Determining Your Effective Rights in NetWare 3.x
Articles and Tips: tip
01 Jun 1998
With the recent release of NetWare 3.2, we thought it might be helpful to review the basics of NetWare's file system rights. At the file and directory level, NetWare 3.x uses eight basic security rights: Read, Write, Create, Erase, Modify, File Scan, Access Control, and Supervisory. Supervisors assign these rights to determine what users can see and do in network directories and subdirectories. They can be added to the directories that users and groups access, giving users and groups their potential rights for accessing the files and applications stored in these directories.
Potential rights are then passed down to the actual directory where you can set what's called the Inherited Rights Mask (or sometimes the Maximum Rights Mask). The IRM affects everyone who accesses this directory, determining which of the eight rights can be inherited from a higher level in the directory structure.
The Eight Basic Rights
Here's what each of the eight basic rights offers at the file and directory levels:
Supervisory. The Supervisor attribute allows users to give all rights to other users within this directory, its subdirectories, as well as assign all rights to files within the directory. This right overrides all other restrictions placed on subdirectories and files. You cannot mask out this right through the directory or file IRM. On the file level, Supervisory rights gives users all rights to the file and to grant rights to this file to other users, as well as modify the other file rights that may or may not already be set.
When assigning rights, only give such assignments to users who need to manage other users or applications within the directory (some applications insist that the installer have Supervisor install the application, or at least have the installer be Supervisor equivalent).
Read. The Read attribute allows users to open and read in files in a directory. At the file level, this attribute allows users to read information that is contained in a designated file. (Supervisors need to grant users Read and File Scan Attributes for file access.)
Write. The Write right allows users to write to a file within the directory. However, for users to actually write to a file or copy a file into this directory, they will also need Create, File Scan, Erase, and sometimes Modify rights (to modify file attributes when necessary).
File Scan. The File Scan right allows users to search the directory for files and subdirectories underneath it. If the system supervisor doesn't grant users this right at the directory level, they'll see "File not Found" when they type DIR in the directory. NetWare uses File Scan along with the Read attribute in order for users to be able to read and open applications in the directory. (Read and File Scan rights are the default rights granted to users for file access.)
Create. The Create right allows users to create and write to new files as well as create new subdirectories within their current network directory. Users will need the Read attribute set along with Create if they are to reopen any files once they close them. And they will also need the Create right to copy files to a directory.
Erase. The Erase right allows users and applications the users are using to delete existing files and subdirectories. Users often need this attribute in home directories and where they store files, and they will need this file attribute in order to write to existing closed files within a directory.
Modify. The Modify right allows users to change file and directory attributes, or file and directory flags. If you want a user to be able to change flags on files in this directory, add this attribute. Also, certain applications change file attributes (usually the Archive bit) as they create and delete files and need the Modify right to work properly, so you might have to experiment with the applications or utilities that are run in this directory to see if users need this attribute.
Access Control. The Access Control right allows users to grant and revoke trustee assignments to other users and groups in this directory or file. The Access Control right can also modify the directory rights or the directory's rights mask. Assign this right to directories where users need to share directory or file access, or to users who manage other users or application access.
Making Trustee Assignments
When these basic security rights are applied to users or groups, they are known as trustee assignments. Users or groups do not have trustee assignments in a directory until the supervisor assigns those rights through user assignments, or to a number of users through group assignments. Supervisors set up trustee assignments through the DOS-based SYSCON utility or, in the case of NetWare 3.2 servers, through the new Windows-based SYSCON utility.
To grant trustee assignments through the DOS-based SYSCON utility, type "SYSCON" at the network prompt, then select the User Information option. You will see a list of all of the users that exist on this server. Select a user, select the Trustee Directory Assignments option, then press the <Insert> key to bring up the "Directory In Which Trustee Should Be Added" window. Type the directory path if you know it, or press <Insert> to bring up a list of the servers to which you are presently attached. Then simply select the directory path a level at a time until you arrive at the subdirectory in which you want to assign rights.
Once at the desired directory level, you can assign the appropriate rights to that user for "potential" directory access. Directories are initially granted Read and File Scan rights, which are the rights needed for application access. If you need to add write rights, press the Insert key to bring up the "Trustee Rights Not Granted" window (see Figure 1).
Figure 1: Web server performance, before and after caching is applied.
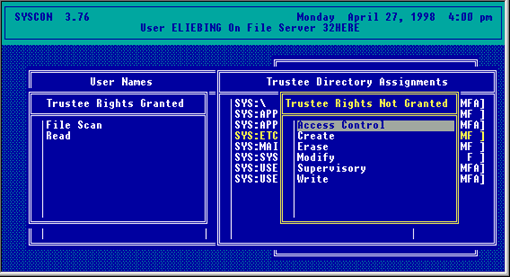
Here you can add the appropriate rights to include writing capabilities to this directory (such as Write, Erase, Create, and sometimes Modify). You can use the <F5> key to highlight a number of selections at once to transfer them over to the "Trustee Rights Granted" window.
Granting Rights at the File Level
You can also grant users and groups rights to access files at the file level. You do this by selecting the Trustee File Assignment entry from either the User Information or the Group Information menu. Then press <Insert> to bring up the "Select the Directory To Select a File From" window. If you know the full directory path to the file upon which you want to set trustee rights, type the path, or press the <Insert> key to bring up server/volume/directory path to the directory holding the file.
Once the directory is selected, press <Enter> to bring up the "Enter a File for Editing Trustees, Or press <Insert> for a "List of Files" window. If you know the file name, type it; otherwise press the <Insert> key and select the file from the list presented. Once the file is selected, press <Enter> to add the file to the Trustee File Assignments window.
When designated through this option, the files are initially granted Read and File Scan rights, which allows file access but not file manipulation. If you need to add Write rights to the file, press <Insert> to bring up the "Trustee Rights Not Granted" windows, where you can add the appropriate rights to include writing capabilities to this file (such as Write, Erase, Create, and sometimes Modify). You can use the <F5> key to highlight a number of selections to move them together into the "Trustee Rights Granted" window.
(For information on how to perform these same functions using the graphical SYSCON utility, see the article entitled "Using the Graphical SYSCON Utility in NetWare 3.2." in the April 1998 issue of Novell AppNotes.)
Security Equivalences
Through security equivalences, supervisors can give users all rights and data access that have been assigned to groups as well as to other users. By making a user a member of a designated group, that user becomes security equivalent to that group, thus granting that user the same rights to directories and files the group has. Users can also be assigned to be the security equivalent to other users, thereby granting potential rights to any directories that users possess.
Inherited Rights Mask
Rights that users receive to a directory through trustee assignments, group assignments, security equivalences, or a combination of these assignments create the potential rights that users can have within a designated directory. These assigned rights flow down in the directory structure until a different trustee rights assignment is made explicitly. They can also be blocked by creating an Inherited Rights Mask or IRM in a directory.
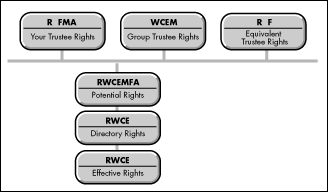
The IRM contains the same eight trustee rights as mentioned earlier. An IRM set directly at the directory and file levels affects everyone who accesses the directory; however, it does not apply to their respective subdirectories. All potential rights are filtered through the IRM in order to determine what a user's effective rights are within a directory, or what file manipulations the user can effectively perform in that directory (see Figure 2).
Figure 2: The Inherited Rights Mask is used to determine effective rights in a directory.
To set the directory's Inherited Rights Mask, you need to have at least Access Control rights in that directory. Then go to the directory and bring up the FILER utility, and select the Current Directory Information option from the "Available Topics" window. The "Directory Information for Directory_name" window appears, showing the directory's owner, creation date and time, directory attributes, your current effective rights, the inherited rights mask settings (defaults to everything set), and the users or groups who have trustee assignments to this directory.
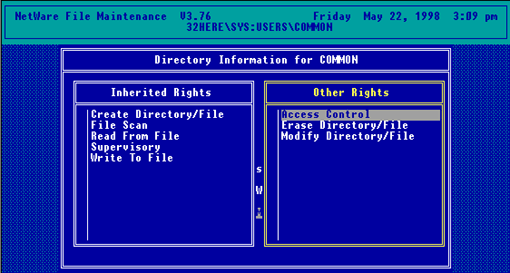
To change the Inherited Rights Mask default, select that option to bring up the "Inherited Rights" window, then grant or revoke the rights you deem . If you take away too many rights, press <Insert> to bring up the "Other Rights" window, as shown in Figure 3. You can then change the rights as you deem necessary.
Figure 3: Adding rights to the Inherited Rights Mask in a directory.
If the directory contains information that doesn't need to be updated or deleted, you can assign Read and File Scan (RF) rights to the mask. However, for you as the Supervisor to be able to add files to the directory, you may wish to also add Create rights to the directory's IRM. If you as the Supervisor need to delete or modify files, the additions would be Erase, Modify, Write, and sometimes Modify security rights. Since the IRM affects all users accessing the directory (including those with Supervisory rights), you have to be careful in setting up an IRM. (The advantage of being the Supervisor or having Access Control rights is that you can go into FILER and modify the IRM if you need to.) Because of this juggling, many Supervisors opt to only use the user/group trustee assignments and don't use the IRM to control directory access.
A file's IRM can be used to help control file access. Supervisors normally invoke a file's IRM and file flags in directories where a lot of users have common access to the files. Users may also use the IRM when sharing access to data in their own personal directories.
Directory and File Attributes
In addition to the eight security rights used for trustee assignments, security equivalences, and the IRM, each directory and file contains a list of attributes as well. For directories, the list of attributes is:
Table 1: Directory Attributes.

For files the list of attributes consists of:
Table 2: File Attributes.
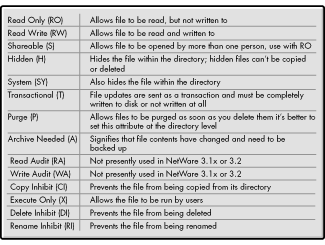
While a number of these attributes are very useful in a DOS/Windows environment, they may behave differently than you expect. For example, Delete Inhibit does prevent you from deleting the file, but it doesn't prevent you from copying the file to another directory. When running WordPerfect 8, it was the Rename Inhibit that prevented file update access rather than Delete Inhibit. It seems that WP8 renames the file I was modifying to a .TMP file name before creating an updated file with the actual file name.
How Users Can See Their Effective Rights
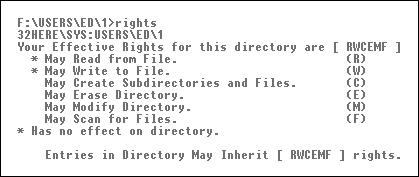
The potential rights assigned to users or groups are filtered through the IRM to determine their effective rights--what they can actually do with files in that directory. Users can see their effective rights in a directory by typing RIGHTS <Enter> at the network prompt from within the directory. The resulting display is shown in Figure 4.
Figure 4: Viewing effective rights in a directory.
To view how files and directories/subdirectories are flagged at a designated directory level, type NDIR /RIGHTS <Enter>at the network prompt. You will see a screen similar to the one shown in Figure 5.
Figure 5: Viewing rights to files and directories.
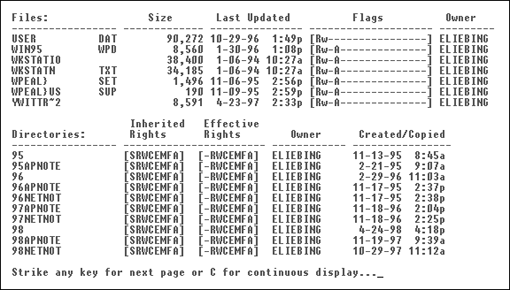
By using the /RIGHTS option, you can view file flags, the file's Inherited Rights through the file level IRM, and the file's Effective Rights. You can also view the subdirectory's Inherited Rights through the directory level IRM, as well as the user's Effective Rights in the subdirectories presented on the screen.
To view just file attributes or flags, users can type FLAG *.* <Enter> at the network prompt to see a list of the files and their file attributes within the directory. If they have Modify rights, they can also change and set file attributes. (You can also use the FILER utility to view and change file attributes.)
To view directory attributes, users can use the FLAGDIR utility by typing FLAGDIR . <Enter> at the network prompt. If they have Modify rights, they can also change or set the directory attributes. (You can also use the FILER utility to view and change directory attributes.)
Summary
Through the eight basic security rights in NetWare 3.x, users gain access to the files and directories they need to in order to perform their work. Once potential rights are assigned and filtered through the IRM, they determine what users can effectively do in a directory or with a file. On top of the basic security rights, system supervisors can apply directory and file attributes, thereby further protecting the directories and files to which users have access.
* Originally published in Novell AppNotes
Disclaimer
The origin of this information may be internal or external to Novell. While Novell makes all reasonable efforts to verify this information, Novell does not make explicit or implied claims to its validity.