Regulation Compliance
Articles and Tips: article
Garth Nielson
01 Aug 2005
Compliance and regulation have become a major shaping force in the world of IT in the last few years. All organizations, regardless of size, industry or location, must factor in how they will deal with a continuing flow of new requirements and pressures.
While all organizations should develop their own internal policies and compliance standards, regulations, such as The Sarbanes-Oxley Act of 2002 and HIPAA for organizations in the United States, represent significant legal mandates. Different regulations exist in different countries and you need to be aware of any in your country so you can be in compliance.
Obviously, organizations where process development and adherence are an accepted part of the culture are in a much better position than their ad-hoc counterparts. Quality management standards, such as ITIL and Six Sigma, lead you to think in terms of higher-level, business-focused IT management.
A common thread in most compliance initiatives is simple: identity. At the highest level, the identity component of compliance, often asks questions such as "Who can do that?" or "Who is ultimately responsible?" At a practical-technology level, identity ensures that the people who are authorized to access information or applications are the only ones that can.
In many regulatory mandates the processes for ensuring compliance is a significant factor. Both compliance data and documentation of the compliance process hold significant weight in audit and reporting situations.
In some compliance scenarios, this may be an extremely complex process crossing both internal political and geographical boundaries. You must reveal your methodology for ensuring compliance to satisfy your auditors. It is not good enough to simply proclaim you have a software license for all of your desktops.
In this article we discuss compliance with internal processes and standards as well as compliance to external regulation, such as software license audits or compliance with government regulations. We'll look at what organizations are doing today from both a process and a technology viewpoint to meet these obligations.
Novell recently completed the acquisition of tally systems, a pioneer of asset management described by a recent news article as "the yardstick by which all other asset management tools are measured."
So Where Do I Start?
Turn to well-established management standards such as ITIL to help establish cross-organizational processes that are often necessary for compliance. These methodologies for management focus on aligning IT goals and processes with business objectives, getting inner-departmental cooperation, and help you sell the value of your efforts up the chain of command.
Also, leverage the urgency and impact of compliance issues to gain funding for new technology, new processes and organizational change that otherwise might lack the backing of a business objective.
Organizations with process frameworks already in place, such as a Change Advisory Board (CAB) or a Configuration Management Database, find themselves well positioned to accommodate new compliance processes and procedures.
For instance, a CAB that shepherds HIPAA compliance must include representation from various organizations. ITIL practices call for someone with a clear understanding of the consumers' business need to be an active member of the CAB. For this purpose, many health organizations designate a practicing physician and a patient advocate, to represent users' needs and to help develop two-way communication between the IT department and the user community.
Be sure that the processes you develop clearly define the end result you are shooting for, including a quantifiable objective and measure by which you will judge success, or compliance. Be sure you can track these measurements over time so you can look at historic trends, develop process improvements and identify inconsistencies.
Analysts commonly give two pieces of advice to those undertaking compliance initiatives.
Start immediately on the high-return items, even if they will need to be fine-tuned as time goes on.
Make sure you have a solid baseline physical inventory.
Common Compliance Requirements
Most compliance or regulatory policies enforced by Novell ZENworks have their roots in security or identity of the user or resource, or in the use of the asset. This is true regardless if the mandate is internal or from an outside agency.
Applying identity management to configuration management has long been a competitive advantage of ZENworks. ZENworks provides a secure management environment to creating and enforcing policies that match up a user's identity with the devices they can use, how that device should be configured, the applications they can access and information they can see.
To audit this environment, ZENworks Asset Management can continually run network discovery and inventory processes to find and inventory devices on your network. While valuable on its own for standard IT processes, this baseline inventory is essential for more regulatory intensive processes such as software license management.
Start with What You Have
A critical early step in compliance processes is understanding the current state of your network. A baseline inventory and discovery tells you what you have and allows you to chart a course that addresses your specific out-of-compliance issues.
The ZENworks Asset Management Network discovery engine collects data about devices on your network, such as PCs, laptops, servers, printers, hubs, routers and switches. This powerful discovery capability allows you to do the following:
locate, identify and report IP-based network devices automatically
specify subnets or IP address ranges you want scanned
collect SNMP and WMI data from enabled devices
reconcile discovered devices based on serial number, MAC address or client ID
offer Web-based analysis and editing of collected data
Discovery
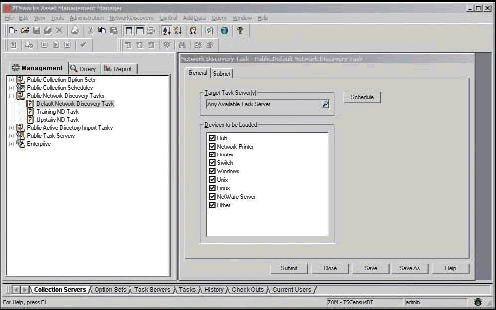
To configure the network discovery process, open the ZENworks Asset Management console. Like any other task in ZENworks Asset Management, you can schedule a network discovery task. If you just want to use one network discovery task throughout the enterprise, use the default network discovery task provided. (See Figure 1.) Otherwise, edit the default task or create multiple tasks if you want to scan different parts of your network at different times.
Figure 1: ZENworks Asset Management will search your network to automatically discover and identify your devices.
From the console's right-side navigation, select the Network Discovery Task option. Right click to add a new discover task or double-click an existing task to view or edit it.
The General Tab allows you to target the appropriate Task Sever and schedule for the discovery task. You can also designate which device types you want to collect inventory for by checking the appropriate checkboxes.
The ZENworks Asset Management Network Discovery Engine identifies all types of network devices, but here you can control which device data is loaded into the database. Device options include: hubs, network printers, routers, switches, and Windows-, Unix-, Linux- and NetWare-based devices.
Select the Subnet tab on the same window to define which subnets to include in the discovery process. You can also specify a range of addresses to include. (See Figure 2.)
Figure 2: Use the ZENworks Asset Management scanning tasks to target some or all of your network for device discovery.
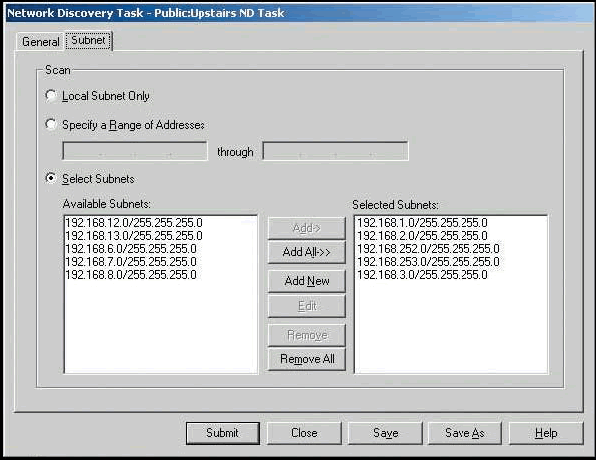
Use the Add and Add All buttons to move subnets from the Available Subnets to the Selected Subnets box; use the Remove and Remove All buttons to remove subnets from the Selected Subnets box.
To specify a new subnet, click on the Add New button and specify an address range and subnet mask in the Add a Subnet dialog. You can add or exclude specific addresses if needed.
Inventory Collection
ZENworks Asset Management utilizes a small client to collect hardware and software data. You can distribute the client by one of several methods, the most likely of which is through standard ZENworks application distribution.
ZENworks Asset Management also includes its own Remote Client Install tool, which is available on the Tools menu. With this console, you can navigate a tree view of the workstations to which you can install the client. The console pulls workstations from several sources including:
Microsoft Windows Network or Network Domains
ZENworks Asset Management discovered workstations
devices with the agent already installed
devices without the agent
previously inventoried devices
Select Install Settings from the Install menu for additional customization options including: designating a collection server, install path, device authentication credentials if needed, and other options to insure a successful installation.
The agent may also be installed using login scripts, Group and System Policies, or it may be manually installed from media or a download site.
Inventory Data Collection
You configure the "how" details of inventory scans by creating Collection Option Sets, Schedules and Tasks from the left navigation of the ZENworks Asset Management console. (See Figure 3.)
Figure 3: Inventory collection configurations, schedules and tasks are defined using Option Sets. Multiple Option Sets allow you to granularly control inventory processes to best fit your network.

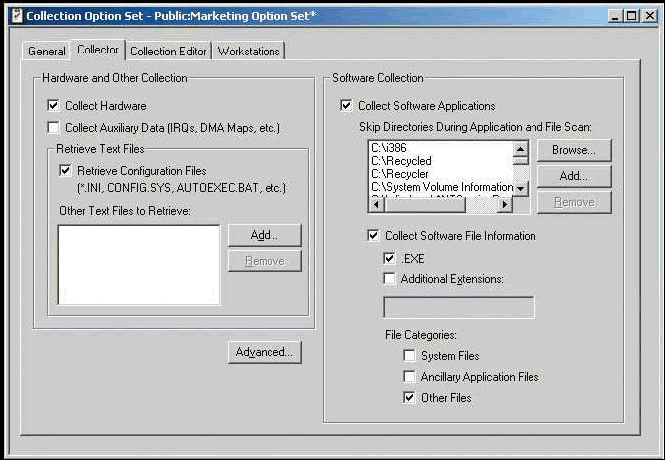
This interface allows you to select hardware scans, software scans, the collection of device configuration files and other miscellaneous files you want to inventory. (See Figure 4.)
Figure 4: The Options Set Collector Tab gives you control over hardware and software collection.
Collecting Other Information
Although inventory data is collected from a workstation automatically, it is often helpful to have a workstation user provide some additional information such as a telephone number or department name that is useful for reporting purposes.
Select the Collection Editor tab to enable additional custom information collection. Then customize the information you want to collect through the User, Workstation or Inventory options.
Scanning NetWare Servers
ZENworks Asset Management can take inventory of NetWare servers as well as Windows Servers. To scan a Novell NetWare server, do the following:
Make sure the machine on which you are running the ZENworks Asset Management console meets the following requirements:
It has the ZENworks Asset Management client applications installed.
It has the Novell NetWare 32-bit client installed. (Without this only software data will be collected.)
You have Supervisor privileges on the NetWare server. Without Supervisor privileges, you will receive limited information about hardware.
In the Manager, click on the Tools menu and click on Scan Novell Server.
Follow the directions in the Scan Novell Server Wizard to scan the Novell server.
Inventory of Disconnected Devices
To accommodate devices that don't frequently connect to the network, use the Portable Collector Wizard to create a collector that will run from local media.
In the ZENworks Asset Management console, select the Portable Collector option from the Tools menu.
The wizard walks you through each step required to create the Collector. First, select a Collection Server (and its scanning configuration) to use as the Portable Collector. Inventory data can then be physically collected or e-mailed back to the asset manager. A second wizard, the Load Portable Collection Wizard, assists you by automatically loading the collected data into the Collection Server you identified. Both processes are straight forward and ensure you have complete and consistent data.
Product Knowledge Base
The foundation of ZENworks Asset Management lies in an extensive knowledge base that automatically identifies, classifies and organizes individual applications, software, software suites and hardware. Without this automation, you would be left to individually identify, at a file level, the software you wanted to inventory, retain usage trends on or manage as part of your license-compliance effort.
Product Recognition Updates are available monthly. You can obtain and apply Knowledge Base updates through an automated process that requires access to the Internet and either an FTP connection or an HTTP proxy server. You can check for updates, be notified of updates, download them manually and install the update. You can also automate as much of the process as you want. (See Figure 5.)
Figure 5: Novell continually updates the ZENworks Asset Management Knowledge Base, which accurately identifies and categorizes any new hardware and software collected during asset scanning and discovery.
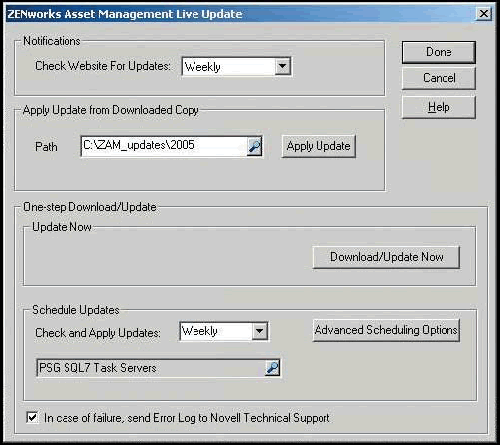
To easily automate the update process, go to the ZENworks Asset Management console, select the Product Live Updates option from the Administration menu. With the Advanced Scheduling Option, define how often the system should check for and apply updates.
Tell Me What I Have
Inventory and configuration reports and queries provide the critical data for many regulatory processes. ZENworks Asset Management includes many pre-defined reports that cover not only inventory, but also software usage and asset management. Users can create or customize existing reports to extract the exact information they require. You can also use the powerful query tool for easy access to data.
With the other reporting and query features, you can also:
run reports on a schedule
get notification of new report data
implement Web-based reporting
control access to reports
analyze reports of trending data
use click-through reports to navigate additional details
Software License Compliance
While valuable on its own for standard IT processes, this baseline inventory is essential for more regulatory-focused processes such as securing devices and software license management.
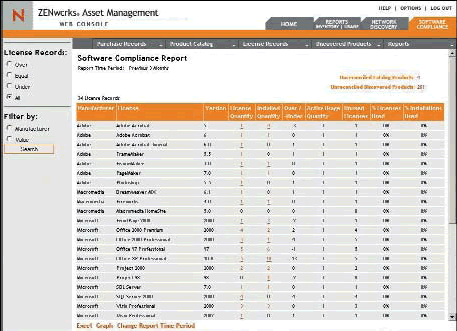
Novell ZENworks Asset Management provides a Web-based view of your compliance status. Inventory data is combined with purchase and license records and presented in a single, comprehensive, integrated license view. (See Figure 6.)
Figure 6: A quick look at the ZENworks Asset Management Compliance Report keeps you up to date on your software license compliance status.
Novell ZENworks Asset Management provides visibility into desktop-application-usage trends and details. Reports indicate who uses what products and types of software. (See Figure 7.)
Figure 7: With the ZENworks Asset Management Application Usage by Product report, you can quickly determine if your software licenses are being fully utilized, and to make better purchasing and deployment decisions.
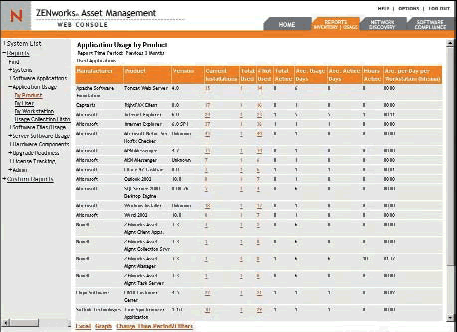
More important, it shows you the desktops that aren't using software so you can recover the license and redeploy it to a user who needs it. You'll maintain compliance while purchasing and supporting only the licenses you really need.
Usage reports also help you set and maintain corporate standards and watch for use of rogue applications, such as hacker tools, peer-to-peer software and more.
Now that you have an accurate accounting of your IT infrastructure, ensured compliance with your licensing contracts, reduced software costs associated with shelfware, and discovered rogue applications, you can now secure these assets.
Load It and Lock It
For years, ZENworks customers have been implementing process controls that successfully secure Windows software and devices by using:
consistent, identity-controlled, policy management across eDirectory trees and Windows domains
tight policy enforcement to lock down workstations and the Novell Application Launcher running as the shell
identity-controlled, policy-enabled software distribution rogue process management
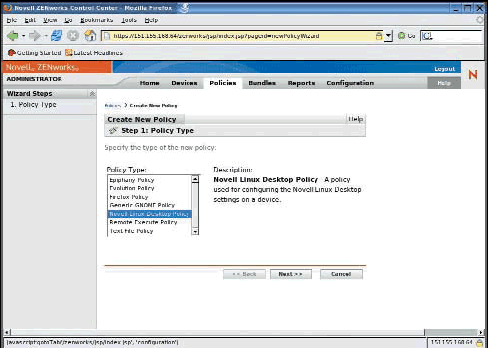
With ZENworks 7, security controls and process management have arrived for the Linux world. The ZENworks Control Center, a new Web-based interface for Linux management, provides simple policy wizards for controlling your Linux environment.
Select the Policies tab, then click the Create New Policy option. Several types of policies are available. Each allows you to control a specific type of configuration or lockdown. Once you establish a policy you can apply it to a single device or groups of devices to ensure compliance. (See Figure 8.)
Figure 8: The "new policy wizard" helps you create many types of policies.
The Policies
The Epiphany Policy provides the ability to set browser controls such as restricting content from unsafe protocols. The powerful Evolution Policy provides control over items such as:
enforced use of SSL
authentication methods used
filters applied to new messages
configuration settings for received e-mail
schedule of when the trash will be emptied
what images can be loaded from the Internet
The Generic GNOME Policy allows the Gconf database to be configured. The Remote Execute Policy provides for identity-based, scheduled executions of scripts, binaries or java files.
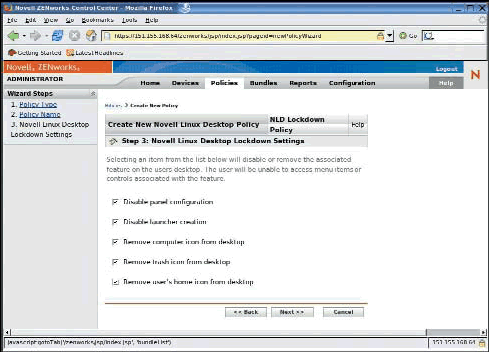
The Novell Linux Desktop Policy allows you to lock down the desktop by removing features such as panel configuration, launcher creation, computer icon, trash icon and the users' home icon. (See Figure 9.)
Figure 9: The Novell Linux Desktop policy wizard provides you with centralized control, allowing you to remove or disable features on the user's desktop.
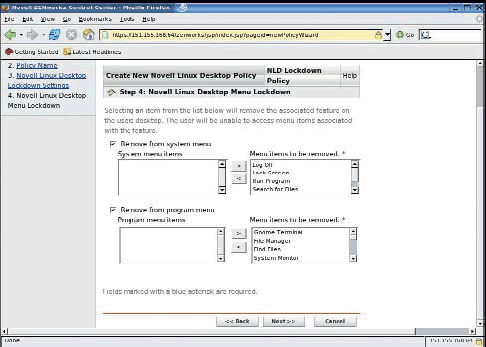
The wizard allows control of the system and program menus. (See Figure 10.) Approximately 20 menu items such as Run program, CD burner, Instant Messenger, File Manager, Music Player and even the Terminal window can be removed from the users' desktops. This customization is critical for isolating the device and the information held on it.
Figure 10: The Novell Linux Desktop policy wizard removes features from the program and system menus to simplify desktop configuration, and helps maintain a device's lockdown status.
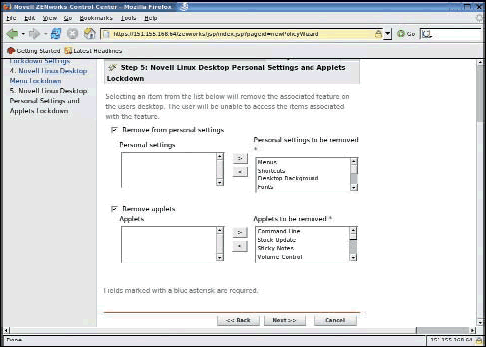
You can further lockdown the personal settings such as screen savers, printers and network proxys by removing them from the desktop. (See Figure 11.) This step also allows for the removal of approximately 12 applets including the clock, address book and dictionary to simplify the user experience and streamline the desktop.
Figure 11: The detailed configuration setting in the Novell Linux Desktop policy wizard removes personal settings and applets from the user's desktop.
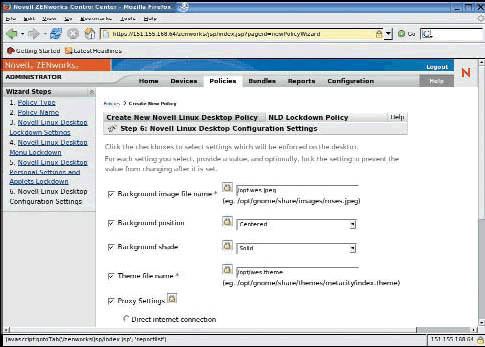
You can enforce specific configuration settings such as proxy settings and background images. Notice the little locks associated with each setting. If the locked icon appears, the settings cannot be changed by the end user. Unlocking the feature gives the device user control to modify the setting. (See Figure 12.)
Figure 12: The Novell Linux Desktop policy wizard defines specific ''look and feel'' settings and allows the administrator to lock the setting so that the end user cannot change them.
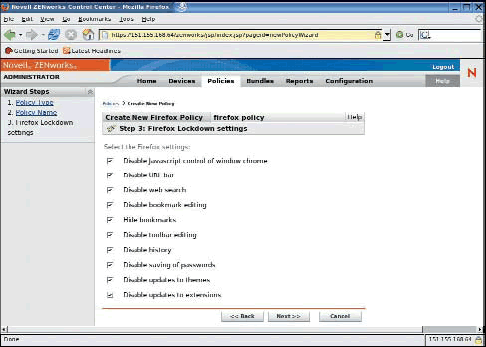
One more very important policy you can use to lock down a device is the Firefox Policy. Using the Firefox Policy you can further ensure compliance to browser security standards.
Begin by locking down (disabling) settings such as:
javascript control of window chrome
saving of passwords
updates to extensions
(See Figure 13.)
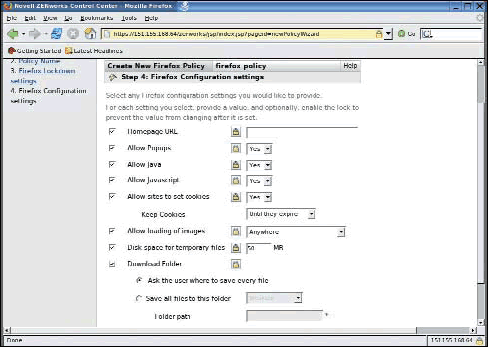
Figure 13: Using the ZENworks Linux Management Firefox Policy, you can enforce settings in the Firefox browser to define users' browsing experience.
Locking configuration settings such as cookies, image loading and popups, and not allowing java scripts, helps you implement the necessary controls to comply with corporate processes as well. (See Figure 14.)
Figure 14: The Firefox Policy enables the administrator to enforce company standards by blocking all device users from changing local configuration settings.
Those Pesky Handhelds
Proper management of handheld devices continues to plague most organizations. Often these devices are overlooked in compliance planning and regulatory issues; however, you must recognize that today's handheld devices can be a significant breach of network security if left unaccounted.
ZENworks Handheld Management can quickly help you get control of devices, and enforce policies that plug some of the holes handhelds create. Enable policy settings, such as "Require a password be set on the handheld," to ensure that devices connecting to your network are protected. (See Figure 15.)
Figure 15: ZENworks Handheld Management ensures that handhelds that access the network are protected by passwords that comply with company policy.
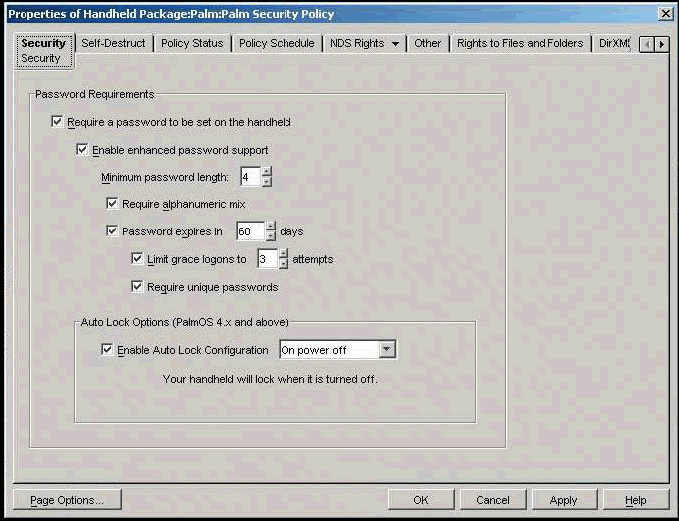
Other options allow you to define password standards for handhelds as well as leverage users' network passwords on their handhelds.
Click on the Self-Destruct tab to automatically program the device to reformat when it is lost. To do this, specify a set number of times the device will tolerate a bad password attempt before it selfdestructs. You can also designate the device to reformat itself after a set number of days from its last connection to your network. Either way, your intellectual property is protected if the handheld is lost.
Conclusion
Ultimately, your compliance plans and processes will be uniquely yours. Regulations, such as HIPAA, may apply to the health industry in general. But your unique network means your approach will be different from everyone else's.
ZENworks provides powerful tools for ensuring your devices and users operate within the regulations you establish. By automating policies through ZENworks, you ensure compliance is enforced and remove many of the variables that can undermine the best laid out plans.
For additional information on Novell solutions that can help you prepare and meet visit the Novell regulatory compliance site.
The Flexible Text File Policy
The flexible text file policy automates the task of implementing a process that secures all the devices on your network. When it comes to security implementation, the best practice is to lock down the device and then make exceptions where necessary.
Management by exception eliminates the eminent tug-of-war associated with taking away privileges. The following are examples of how the text file policy can be used to secure all network devices:
File System Security
Begin by applying the most restrictive file permission settings possible and
then add permissions for specific users or groups as necessary. Linux default file permissions are based on the umask value. The default umask value is 002 making the default file permissions for files 664 and for directories 775. The default umask value is stored in /etc/profile. Use a text file policy to edit the /etc/profile file. For example, you can set umask 777 to remove all file permissions. A more realistic value would be umask 077. This value gives users read/write permissions to files they created and read/write/execute rights to directories they created. If a global setting is not the right solution for your organization, use the text file policy to set umask 077 in the users profile script. By setting the umask value in the profile script, the umask value will become effective when the user logs in.
Service Lockdown
Begin by denying access to all services. Services provide access points into your device. If you don't need FTP, HTTP, SSH, telnet or access via any other service, don't allow connections to be established with them. In Linux, you can lock down any service using the /etc/hosts.deny file. Using the text file policy, we can set the etc/hosts.deny file to ALL:ALL across the network. ALL:ALL denies
all service to all hosts, unless they are permitted access by entries in the /etc/hosts.allow file. Once again, you can use the text file policy to provide the exception list to the /etc/hosts.allow file.
Terminal Lockdown
Begin by reducing the number of terminals available. Reducing the number of terminals available reduces the number of options available for a cracker to attempt to guess root's password. Use a text file policy to edit the /etc/securetty file and remove all terminals except for tty1.
ZENworks Asset Management Best Practices
Keep current with knowledge base and product updates.
Set your Product Recognition Update task to run at the beginning of each month.
Look for the notification icon in the ZENworks Asset Management console, it will appear in the Status Bar. Use Product Live Update to download and apply the updates.
Ensure that the ZENworks Asset Management client is installed on all machines.
Schedule Network Discovery Tasks to run during the workday if your users turn their machines off at night.
Run the Network Discovery Workstation Status report to identify machines that don't have the client installed.
Use the Remote Client Install tool to report on, and then push the client to, those machines.
Verify that all machines are inventoried on a regular basis.
Run the predefined Last Scan History report. Are many machines outside the scheduled inventory frequency?
Create a report to identify machines that are connected but not getting scanned. It's possible the local port is blocked or a firewall is blocking inbound communications; have you recently upgraded to Windows XP SP2?
Integrate IMAC tasks to identify and delete workstations that have been disposed.
Flag workstations that have been disposed so they can be identified and removed from the database.
To identify machines which may no longer be in your environment, create a report based on the time the client last connected and reported.
Manage and report on deleted workstation and component records.
Schedule a Database Purge task to purge outdated records from the database.
Check your Enterprise Options to determine when data will be deleted. The purge task will remove deleted records according to these settings.
When determining how long to keep workstation history data, keep in mind you can report on workstation and component records that have been deleted.
Identify rogue software and create custom product definitions based on software file data.
Create a report to identify the most commonly installed software files.
* Originally published in Novell Connection Magazine
Disclaimer
The origin of this information may be internal or external to Novell. While Novell makes all reasonable efforts to verify this information, Novell does not make explicit or implied claims to its validity.