Relax, It Saves You Time: SUSE LINUX Enterprise Server 9
Articles and Tips: article
30 Sep 2004
Unless you've been living in a cave (or you don't follow the news at Novell, which amounts to the same thing) you already know about the release of SUSE LINUX Enterprise Server 9. It's the first and only Linux distribution that includes kernel 2.6.5. That means it's the only distribution offering:
Support for non-uniform memory access (NUMA) servers, eliminating performance bottlenecks at the memory bus to enable massive scalability in multiprocessing systems.
Support for up to 512 CPUs on a single server, including the 64-bit Intel Itanium* architecture. (How's that for scalability?)
Support for more than 4 billion unique users and groups on a single system. Did I mention scalability?
Support for one billion PIDs before wraparound for a huge performance boost on very busy systems. (Whoooo! Scalability!)
File systems up to 16TB, with improved 64-bit support even on many 32-bit block devices. Now that's scala...you get the idea.
Hyper-threading support that allows a single physical processor to act as two or more processors in multitasking environments and multithreaded applications.
Expanded support for large storage arrays, print farms and other multiple devices. For example, SUSE LINUX Enterprise Server 9 can manage up to 32,000 SCSI disks-among 4095 major device types and more than a million subdevices per type.
Kernel support for Native POSIX Thread Library, significantly boosting performance for heavily threaded systems-like those 32,000 SCSI disks we just mentioned.
In addition to the Linux kernel 2.6.5, SUSE LINUX Enterprise Server 9 contains the latest versions of all these packages:
glibc 2.3.3
GCC 3.3.3
XFree 4.3.99
Samba 3.0.4
Apache 2.0.49
Bind 9.2.3
GNOME 2.4.2
KDE 3.2.1
There's a lot more to like about SUSE LINUX Enterprise Server 9- but you already know that, right? What you really want is to see it in action. Well, unfortunately, we can't purchase a few hundred CPUs for you and show you how to configure them into a grid that can render the next animated blockbuster and make you an instant billionaire. But in the limited space of this article, we can show you how easy it is to install and configure SUSE LINUX Enterprise Server 9 on a typical box using YaST-the open-source, GUI-based management tool that just about does it all.
SUSE LINUX Enterprise Server 9 is the first and only Linux distribution that includes kernel 2.6.5.
Installing SUSE LINUX Enterprise Server 9
Before playing with different configuration options, you first need to install SUSE LINUX Enterprise Server 9 on a test box. This may seem a bit tricky, but here are the complete steps for performing the installation:
Insert CD 1 and follow the instructions on your screen.
Pat yourself on the back for a job well done.
It really is that simple, and it's the same no matter what flavor of SUSE LINUX you're installing-from the smallest desktop to the largest enterprise server. Well, OK, there are a few choices you'll need to make depending on your hardware configuration, whether you want to run Linux in a partition alongside Windows, and so on. If you want more details, check the first sentence of this paragraph again. The installation process really is the same for different varieties of SUSE LINUX-and that includes SUSE LINUX Enterprise Server 8.
YaST is actually the industry's premier tool for installing and configuring Linux, as well as setting up a Linux box as a variety of servers.
That means you can follow Ronald Nutter's excellent instructions for installing SUSE LINUX Enterprise Server 8. The exact same instructions work perfectly for SUSE LINUX Enterprise Server 9, and you'll find them in Tech Talk #1 of Novell Connection Magazine, May/June 2004. Recycled that issue already? No problem-you can find it online at: www.novell.com/connectionmagazine/2004/05/tech_talk_1.html.
For your test setup, follow Nutter's directions for a graphical user interface (GUI) installation. When you're done come back here for some DNS fun.
Introducing YaST 2
Still scratching your head because you thought installing Linux was supposed to be hard? Or maybe you've installed it before and it was hard? How could it have been so easy this time?
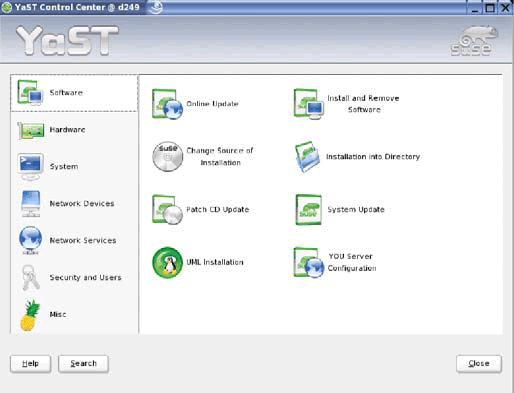
Welcome to YaST 2. Despite its name (Yet another Setup Tool), YaST is actually the industry's premier tool for installing and configuring Linux, as well as setting up a Linux box as a DNS server, FTP server, File/Print server, proxy server, DHCP server, mail server and a whole bunch of other options. And because YaST is included with SUSE LINUX Enterprise Server 9, it's one of the best reasons for choosing Novell for your Linux distribution. (See Figure 1.)
Figure 1: As the industry's premier set up tool, the YaST Control Center gives you point-and-click access to a wealth of setup and configuration options.
What do you get with YaST 2? For starters, you get the advantages of a completely open, enterprise-tested management tool. Earlier this year, Novell began offering YaST under the GNU General Public License (GPL). That means any software vendor can create modules for YaST. For example, IBM took just two weeks to create a module for installing and configuring DB2. Prefer Oracle 9i? There's a YaST module for it too. In fact, says SUSE CTO Juergen Geck, "We have 4,000-plus packages of software open source-enabled to be installed and configured by YaST." (SearchEnterpriseLinux.com, May 4, 2004.)
YaST 2 incorporates many new and improved configuration modules of its own: DNS, DHCP, NIS, LDAP, CA, VPN, Mail, TFTP, Firewall, installation server, you server, boot server, cd creation, User-Mode LINUX (UML) and more.
For that matter, YaST 2 incorporates many new and improved configuration modules of its own: DNS, DHCP, NIS, LDAP, CA, VPN, Mail, TFTP, Firewall, Installation server, YOU server, Boot server, CD creation, User-Mode Linux (UML) and more. And it offers several new and improved installation methods, including NFS, HTTP, FTP, VNC, ssh and SLP.
But enough with the acronyms, already. Let's get our hands dirty with a couple of simple YaST configuration tasks.
Walkthrough: Using YaST to Set up a DNS Server
A Domain Name System (DNS) associates IP addresses with domain names that normal people can read and understand. YaST lets you easily configure a DNS server to perform this task for your local network-which is pretty important if the people in your organization want to get any work done. The DNS module in YaST has two modes:
Wizard Configuration prompts you to make just a few decisions in order to set up a basic, but fully functional, DNS server.
Expert Configuration lets you set up ACLs, logging, TSIG keys and other options.
When you start the DNS module, you begin in Wizard Configuration. There are only three dialogs in this mode. As you step through the dialogs, you have the opportunity to enter Expert Configuration for any advanced options you need to set. What could be easier? To get a feel for how this works, let's step through the Wizard Configuration.
Start the YaST Control Center by choosing System YaST from the SUSE menu. When prompted, enter the root password.
You see the Control Center screen. (See Figure 1.)
From this screen, you can perform just about any Linux setup and configuration task you can imagine. To set up a DNS server:
Click Network Services in the left-hand pane, then double-click DNS Server in the main window.
This brings up the DNS Server Installation Wizard (See Figure 2.)
Figure 2: The DNS Wizard lets you update forwarders automatically via the PPP daemon upon dialout, or set forwarders manually.
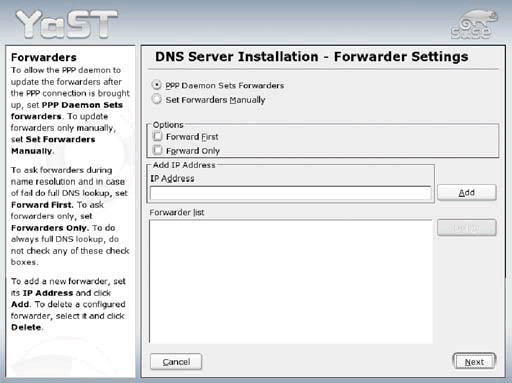
On this dialog, you can choose whether the PPP daemon should provide a list of forwarders upon dialout via DSL or ISDN (PPP Daemon Sets Forwarders), or whether you want to supply your own list. Forwarders are the name servers (mostly of the provider) to which DNS requests should be forwarded if they cannot be resolved directly. For purposes of this demonstration, we'll let the PPP daemon provide the forwarders automatically upon dial-out.
Select PPP Daemon Sets Forwarders.
The next choice is whether to have DNS requests forwarded before an attempt is made to resolve them via the root name servers or, alternatively, to forward all requests and send none to the root name servers. Let's use the latter choice, which makes the most sense for firewall configurations.
Select Forward Only button.
Now shipping with SUSE LINUX Enterprise Server 9, YaST is a powerful tool for a wide variety of management tasks-including software updates on single systems.
The last option on this dialog lets you manually add an IP ddress. Any IP addresses you add, plus any IP addresses that are collected later by the PPP daemon upon dial-out, are displayed in the list at the bottom of the screen. You can run the DNS module anytime to see the list or add to it manually, but for now the list is blank. To move on to the next dialog:
Click Next.
You see the second dialog of the DNS Server Installation Wizard (See Figure 3).
Figure 3: You can add, edit or delete DNS using the DNS Wizard.
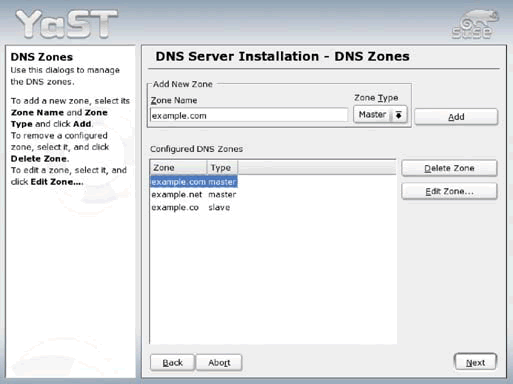
This dialog is about as straight forward as can be. You simply enter the name of a DNS zone, choose a Zone Type-Master or Slave-from the drop-down list, and click Add to add the zone to the list of Configured DNS Zones. You can also select zones to edit or delete as necessary. For purposes of our demonstration:
Create and add zones to match the list shown in the sample screen in Figure 3.
Click Next.
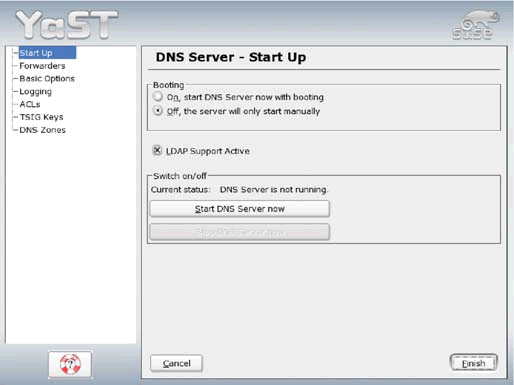
You see the final dialog of the DNS Server Installation Wizard (See Figure 4.)
Figure 4: You can finish a basic DNS server setup with just a few mouse clicks, or go to the Expert Configuration mode for more advanced settings.
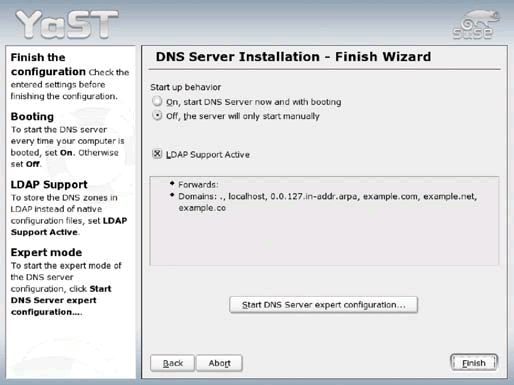
Here, you can choose whether to automatically start up the DNS server automatically every time the machine boots, or to start it manually.
Under Start up behavior, select Off, the server will only start manually.
You can also choose whether to store DNS zones in LDAP.
If it's not already active, select the LDAP Support Active button.
For more information about Novell ZENworks Linux Management www.novell.com/products/zenworks/linuxmanagement/index.html
That's all there is to the basic DNS setup. You can review your Forwards and Domains, and if necessary click the Back button to back up and make any changes. You can also enter the Expert Configuration mode from this screen. Let's take a quick look at those options before finishing up.
Click Start DNS Server expert configuration.
The Expert Configuration options now appear in the left-hand pane of the dialog. (See Figure 5.)
Figure 5: In Expert Configuration mode, the left-hand pane gives you a menu of advanced options.
You can modify any of the options listed in the left-hand pane. We won't do an Expert Configuration now, but to give you a sense of what's possible:
Click on each of the options in the left-hand pane and take a look at the corresponding setup screen.
You've already seen the Start Up and Forwarders screen. As you can see by clicking on each of the other options, Expert Configuration also allows you to:
Set basic options, such as the directory name, dump-file location and more
Define contents, location and logging options for the DNS server's log file
Create Access Control Lists (ACLs) in order to enforce access restrictions
Set TSIGs (Transaction Signatures) to secure communications between DHCP and DNS servers
Define the properties of DNS master and slave zones
As you may have noticed, the Expert Configuration options are listed in the space that used to show Help information for the basic Wizard. No worries, though-if you need help on any Expert Configuration topic, just click the Life Preserver icon at the bottom left corner of the screen.
If you need help on any expert configuration topic, just click the life preserver icon at the bottom left corner of the screen.
When you're finished looking around the various Expert Configuration screens:
Click Cancel to exit Expert Configuration without saving any changes.
Click Abort to exit the DNS Server Installation Wizard without actually setting up a DNS server.
Of course, if you really do want to set up a DNS server, and you've entered all the correct information, you can click Finish to complete the process. Or if you want to set up a DNS server later, you'll know exactly how to do it. Right now, though, we're just taking YaST out for a test drive, and choosing Abort gives you a clean system for the next cool thing we're going to try.
Walkthrough: Using YaST to Set Up an LDAP-based Samba 3 Cross-platform File and Print Server
Samba is an open source implementation of the SMB/CIFS (Server Messaging Block/Common Internet File System) protocols. It allows you to connect shared files, printers and resources across Linux, Windows, Macintosh, UNIX and OS/2 environments using a Linux host. Within your network, a Samba server can act as:
A basic file and print server that makes directories and printers available across Windows and Linux end-user platforms
A Primary Domain Controller (PDC) that manages users and passwords, enabling cross-platform clients to log in to a Windows domain
A Backup Domain Controller (BDC) that enables access to a Windows domain while another Samba-based PDC provides authentication services
Why use Samba? For one thing, it eliminates any need to upgrade from Windows NT 4.0 to an Active Directory-driven domain, since Samba offers NT 4.0-like PDC functionality while keeping your existing domain configuration. For that matter, Samba eliminates the need to use Windows at all for your domain controllers and file/print servers-so you avoid Microsoft licensing fees altogether. Plus, by running Samba you get a more stable, scalable, better-performing CIFS server. You can use Samba to:
Create workgroups that incorporate domain-level application sharing
Give users access to services that look and behave just like Windows, using affordable Linux servers
Establish centralized authentication services using a Linuxbased domain server
Map Windows users' home directories to personal, Linux-based storage space on the network
Set up a login server with scripts that connect users, download the latest virus protection and perform other housekeeping tasks automatically
Use NetBIOS to offer name-based communications between PCs, printers and other machines across different network architectures
Use different authentication backends, such as LDAP, to store Microsoft client and user attributes
Migrate an existing Microsoft NT 4.0 domain to a Samba server while keeping your current client domain configuration
It gets even better. Because there's a YaST module for installing, configuring and managing Samba, you don't need to mess around with editing the samba.conf file manually. Now, the best solution for sharing files and resources is also the easiest to install and use. Need proof? Let's configure an LDAP-based cross-platform file/print server right now, using the YaST Samba Server module.
Samba eliminates any need to upgrade from Windows NT 4.0 to an Active Directory-driven domain, since Samba offers NT 4.0-like PDC functionality while keeping your existing domain configuration.
If it's not already running, start the YaST Control Center by choosing System YaST from the SUSE menu. Enter the root password.
Choose Network Services from the left-hand pane, then double-click the Samba Server module in the main window.
Select or enter your domain name. The list shows all the available domains on your network. (See Figure 6.)
Figure 6: Enter the workgroup or domain name on the first dialog of the Samba module.
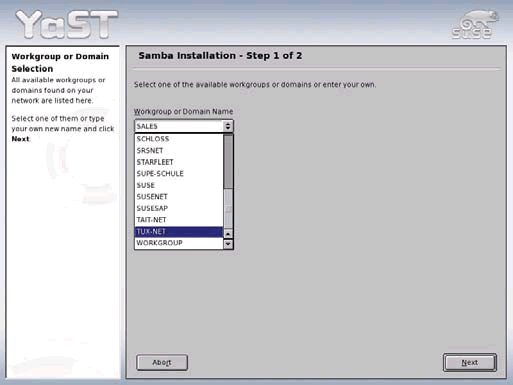
Click Next.
Choose the domain controller setting. (See Figure 7.)
Figure 7: If Windows clients will be logging in via this domain controller, choose PDC. If another server will be providing authentication services, choose BDC.
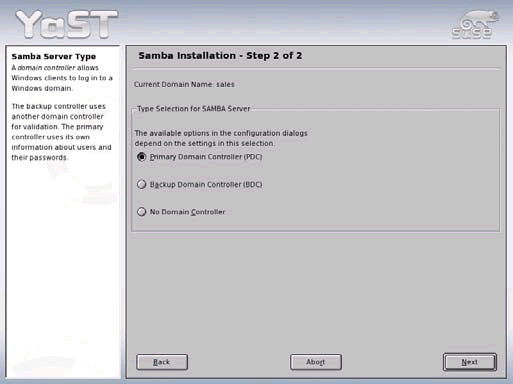
Note: If there is already a PDC or BDC for the selected domain, you can't set up a second one.
That's all there is to installing Samba. To configure it, click Next.
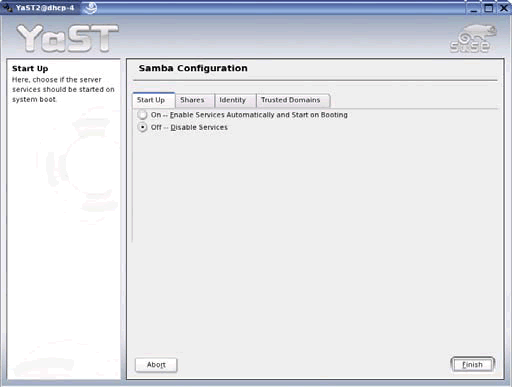
On the Start Up tab, enable the Samba services to be started at system startup. (See Figure 8.)
Figure 8: The Start Up tab lets you enable or disable Samba file/print services anytime, without changing the overall setup.
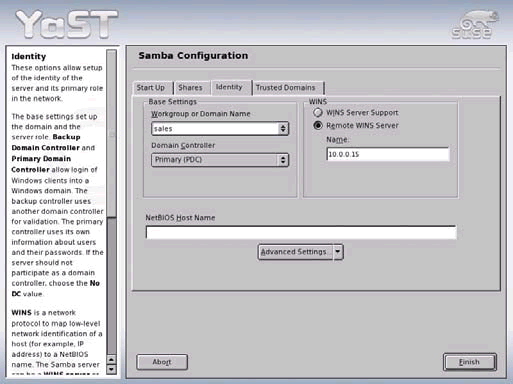
Select the Identity tab and enter a remote WINS server if you have one, or enable WINS server support. (See Figure 9.)
Figure 9: Use the Identity tab to enable WINS server support or specify a remote WINS server. Note the dropdown menu for accessing advanced settings.
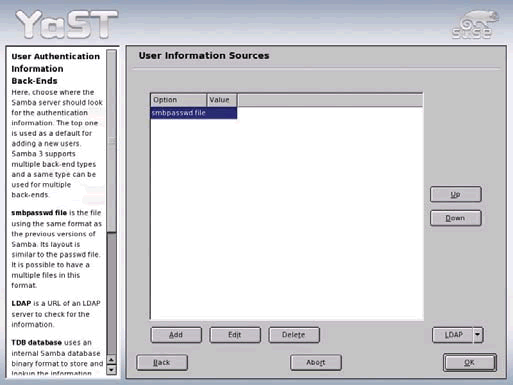
Select User Authentication Sources from the Advanced Settings drop-down menu. You see the User Information Sources screen. (See Figure 10.)
Figure 10: Here, you specify locations where the Samba server should look for user authentication information.
Use the Add and Delete buttons to add LDAP and remove smbpasswd file. (See Figure 11.) Click OK.
Figure 11: Now we've added LDAP as an authentication source, and we're just about to remove the smbpassword file.

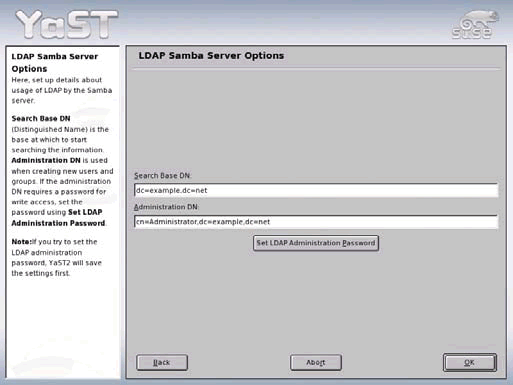
Select LDAP Settings from the Advanced Settings dropdown menu. You see the LDAP Samba Server Options screen (See Figure 12.) Click Set LDAP Administration Password to enter a password for write access to create new users and groups.
Figure 12: Choosing LDAP Settings from the Advanced Settings menu takes you to this screen, where you can specify the base distinguished name, administration distinguished name, and set the LDAP administration password.
If you haven't already got your hands on SUSE LINUX Enterprise Server 9, we apologize for getting you all hot and bothered.
If you leave the YaST Samba Server configuration module now by clicking OK, you'll be asked for the LDAP Administrator password again and for the password of the Samba Administrator. The module creates the needed account in LDAP and your Samba Server is now set up as a PDC for your domain.
You can also share additional directories-for example, a Sales directory to be shared by the sales team. To add, edit, delete, activate or inactivate individual shares:
Choose the Shares tab.
You see a screen like the one in Figure 13.
Figure 13: Here, You can add, edit or delete shares, and toggle shares between enabled and disabled.
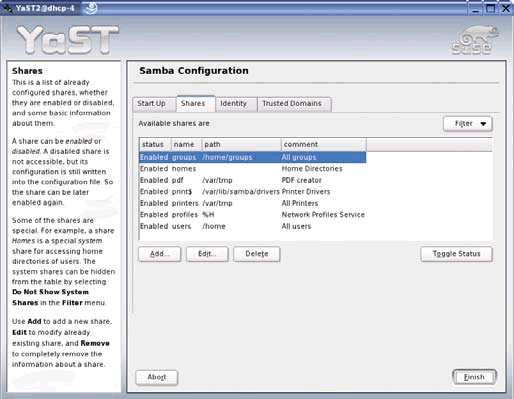
This screen shows all the available shares, including name, path and any comments that have been entered to describe each share. You can select a share to edit or delete, or toggle its status between enabled and disabled. To add a new share:
Click the Add button.
You're prompted to enter the share name (the name that appears to network users), share description, share type (printer or directory) and share path. For example:
Figure 14: Add a new share by specifying the share name, description, type and path.
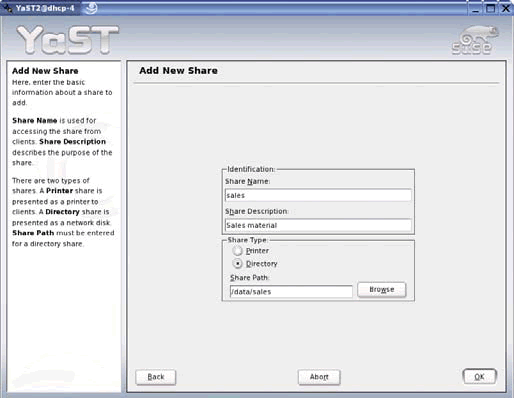
To add a sales share for the sales department, complete the dialog as shown in Figure 14.
Click OK to accept your changes and return to the main Shares dialog.
Feel free to explore the various tabs and options on the Shares dialog. You'll find you can modify file sharing attributes such as Browsable, Case Sensitive, Follow Symlinks, Hide Dot Files, Hide Unreadable and so on. Be sure to choose Advanced Settings on the Identity tab to see options for Expert Global Settings, LDAP Settings, User Authentication Sources and more. In all, you can set more than 100 configurable options with the simple, point-andclick interface provided by YaST. When you're through exploring:
Click Abort on the main Shares dialog to exit the Samba 3 module without saving your changes.
Of course, if you really do want to set up a Samba 3 file/print server, you can now see just how easy it is. Go ahead and enter the real settings you want to use, click OK, and you're all set.
Get Started With SUSE LINUX Enterprise Server 9 Today
If you haven't already got your hands on SUSE LINUX Enterprise Server 9, we apologize for getting you all hot and bothered. With kernel 2.6, YaST management and a whole lot more, this distribution of Linux isn't just a viable alternative. It's a new paradigm: a Linux server operating system that's truly enterpriseready. It's a better way of doing things.
We've only scratched the surface of what's possible. Don't wait to get started trying out the scenarios we've presented here-and exploring the wealth of additional features that can help make your business stronger and your IT people a lot less stressed.
Visit www.novell.com/linux to learn about everything Novell is doing in the Linux world, and check out www.suse.com for more information on SUSE LINUX products including SUSE LINUX Enterprise Server 9. And while you're at either site, follow the links to order a copy of SUSE LINUX Enterprise Server 9. After you've had a chance to see all you can do with it, we're sure you'll be back for more.
Novell ZENworks Linux Management and Network Bandwidth
For more information on taking advantage of Novell ZENworks Linux Management with YaST, see Automatic Software Updates Using Novell ZENworks Linux Management and YaST.
One of the most overlooked requirements in designing a software management system is network bandwidth. Consider that the amount of system information and instructions communicated between a managed system and the ZENworks Linux Management server is relatively small in comparison to the megabytes of data contained in an RPM-based software package that are downloaded and installed. Efficient bandwidth management is essential if you don't want the network to grid to a halt during software updates.
ZENworks Linux Management is designed to help preserve bandwidth. For example, managed systems doing automatic updates will not all try to connect to the server all at once. Instead, they will delay their request by a random length of time, within a configurable total time span. This effectively staggers the request, ensuring that each managed system can access the server.
This feature and others can be very helpful in preserving bandwidth for managed systems that are located together. Dealing with bandwidth issues over a wide area network presents a different set of problems, however. If business centers are distributed across the country or across the world, having all managed systems come back to a central system for their updates can be a costly and slow process.
Fortunately, you have two alternative solutions for taming WAN bandwidth and both solutions are standard features of ZENworks Linux Management:
Caching The ZENworks Linux Management Cache allows for distributed package caching across your network. The cache handles all authentications and requests for packages for a specified group of managed systems. While the initial "fetch" of a software package is done over the wide area network, all other requests for that same package are serviced by the cache. This gives you a central server that all administrators can access and use, offering the most control.
Distributed Servers Another way of distributing packages is to use the ZENworks Linux Management Mirror and have ZENworks Linux Management servers at each location. The mirror can be configured to automatically download software package updates to the local server. In this configuration, a centralized repository of software can be maintained, but local administrators have control of channels, groups and update transactions.
Either way, ZENworks Linux Management gives you powerful options for distributing software reliably, near and far, without compromising the productivity of network-dependent users.
AutoYaST: The What, Why and How of Automatic Linux Configuration
Despite its self-effacing name (Yet Another Setup Tool), YaST is without a doubt the most important tool for navigating the jungle of Linux configuration options. Adding "Auto" may not make the name a whole lot more exciting, but it does make setting up multiple, similarly configured Linux systems about as simple as it could possibly be. And no matter what you call it, that's pretty cool.
What is AutoYaST? -- SUSE LINUX AutoYaST allows you to create a configuration for a single system or a set of systems. The configuration is stored in a control file that automates the installation process-ensuring consistency while tailoring each configuration to account for hardware differences, network settings and other differences.
Why Would You Want to use AutoYaST? -- To save yourself a whole lot of work, obviously. But even if you're the type of IT geek who likes to make unnecessary work for yourself, you might consider:
installing a large number of similar systems. Setting up a high-performance computing cluster, for example, is simply too big of a job for one person, and too error-prone. Even someone with your proclivities doesn't really want to stay up all night doing this kind of work-and all tomorrow night finding and fixing your mistakes.
installation by less-trained operators. Sure, you're a genius-but wouldn't it be nice if your less-than-genius colleagues could help out with the installation? AutoYaST lets you trust just about anyone to install servers to your specifications, without your supervision.
installation over long distances. Got a remote site without trained IT staff? Send over a prepackaged installation CD, have someone at the site run the CD and boot the server, and then (just to let them know who's in charge) go ahead and tweak the configuration manually over the network.
quality assurance. The best way to configure a consistent set of servers-correctly, every time-is to do it automatically. And the control file is the perfect documentation for the configuration of your installed systems.
How Does autoYaST Work? Simple. You configure one server using YaST. When that configuration is exactly the way you want it, you use the AutoYaST module of YaST to write an XML configuration file. You can then specify this configuration file when running AutoYaST on other boxes to reproduce the exact same configuration.
What About Different Hardware Setups or Different Network Settings? AutoYaST automatically detects hardware differences, and the control file can easily be tailored to any environment. That means you can easily install multiple systems that perform similar tasks in parallel-even if the boxes are different. Plus, AutoYaST takes care of network settings and other individual configurations without manual intervention. Configuring multiple Linux systems has never been so uneventful.
And when it comes to server configuration, uneventful is just about as exciting as it gets. Hmm...AutoYaST...maybe it's kind of sexy after all.
What's User-Mode Linux?
SUSE LINUX Enterprise Server 9 includes User-Mode Linux (UML), and YaST offers an easy Wizard for setting it up.
So what's UML, and why would you want to use it? The elevator speech is that UML is a fully-functional Linux kernel that runs as a process in the user space. It runs its own scheduler, independent of the host scheduler, and its own virtual memory system that uses only the physical RAM it needs and can swap to disk if necessary. Each UML kernel can be assigned virtual resources, including a root file system and swap space, and can have its own hardware configuration entirely separate from that of the host. Everything, from network configuration to user accounts is contained within the individual Linux instance, so anything someone does to the UML kernel only affects that instance and does not upset the host at all.
That's the regular elevator speech-now how about the Empire State Building elevator speech?
Relying on the host system only for hardware support, UML provides you with a complete virtual machine, completely configurable through the command line. Users have reported running as many as 50 virtual Linux machines on one hardware box, each running its own processes that the host kernel is unaware of. Because each instance is shielded from interacting with other instances or with the host kernel, UML gives you a safe and secure way of running Linux versions, Linux processes and Linux-based applications without any risk to your primary Linux setup.
That makes UML a great sandbox environment to experiment with removing Linux modules, modifying open-source applications or validating software interoperability-all without the wasted time and hassle of rebooting or possibly even reinstalling a crashed system. And that's just the beginning. The ways you can use UML are limited only by your imagination:
Maximize the return on your hardware investments by giving several users access to the resources of a single machine-with no chance that one user's work will interfere with another's.
Save money on new hardware purchases by maximizing CPU and memory utilization in your existing hardware.
Easily reconfigure resources to meet changing needs-without the time and expense of reconfiguring actual hardware.
Set up a UML kernel on your firewall that allows external users to access your network without any danger of hacking into your hardware.
Create a laboratory environment that allows developers to experiment with new solutions without interfering with normal network operations.
Stress-test software with multiple instances running in parallel.
Configure a virtual network to test your VPN solution, without paying for or installing VMware.
Build a virtual Honeynet to capture and analyze potential security threats- without spending a fortune on building an actual network.
Create a virtual backup e-mail server without spending money for a real one.
Implement Web hosting, FTP, IRC and more without purchasing separate, dedicated servers.
We could go on and on, but we've got to get off at the next floor.
Oh, by the way, keep in mind that the more UML instances you run on a single machine, the more you'll appreciate having ample memory. But then, memory is a whole lot cheaper to buy and easier to install than 20 new servers, right?
Hold the door a minute. One other thing: UML is just one of the standard features you get with SUSE LINUX Enterprise Server 9, and it's easy to set up with YaST. OK? See ya!
Automatic Software Updates Using ZENworks Linux Management and YaST
Getting software updates on your own can be big problem. You could spend hours each week reading errata and searching for new software packages-trying to determine which updates are critical and which can be implemented later. On top of that, you have to worry about whether installing new software will break something in previously deployed systems and applications.
The answer? Just say YaST. Now shipping with SUSE LINUX Enterprise Server 9, YaST is a powerful tool for a wide variety of management tasks- including software updates on single systems. YaST uses the YaST Online Update (YOU) service to obtain software updates produced by SUSE. ZENworks Linux Management-a powerful and secure software management solution for Linux server and workstation systems-can take advantage of the YOU service, enabling you to distribute software updates to all your managed systems automatically.
To acquire the updates, you'll need to use the ZENworks Linux Management Mirror, which is included with ZENworks Linux Management. This is a special software module that works in conjunction with the ZENworks Linux Management server to obtain any new software packages from YOU, other services, and even other ZENworks Linux Management servers. Once configured, the mirror can add software packages and patches to the appropriate software channel for later distribution to your managed systems.
While the entire process is automatic, you always have control over how and when the software is deployed. This is particularly important when you want to test and verify new software updates-a process that ZENworks Linux Management makes easy by exploiting the flexibility of channels and groups. The mirror can be configured to put new software packages into test channels that automatically update test machines using the transaction feature. Once you're satisfied with the new functionality, you can move the software packages to production channels that will then automatically deploy the packages across their infrastructure. Many current users of ZENworks Linux Management are already using this configuration with great success.
ZENworks Linux Management, together with the YaST Online Update service, offers you a fast, powerful, highly manageable solution for reliably rolling out the latest software packages to the machines in your organization that need them most.
* Originally published in Novell Connection Magazine
Disclaimer
The origin of this information may be internal or external to Novell. While Novell makes all reasonable efforts to verify this information, Novell does not make explicit or implied claims to its validity.