ZENworks for Servers: Implementation Tips and Tricks
Articles and Tips: article
01 Aug 2000
Editor's Note: This article provides tips for implementing ZENworks for Servers. You should have a basic understanding of ZENworks for Servers before reading this article and using the information it provides.
Because you are an avid NetWare Connection reader, you probably know that NetWare Connection has already published two articles about ZENworks for Servers this year: The first article explained each of the ZENworks for Servers features, and the second article explained how to install and configure ZENworks for Servers. (See "ZENworks for Servers: Managing Servers Through Policies," Mar. 2000, pp. 38-43 and "Installing and Configuring ZENworks for Servers," Apr. 2000, pp. 26-35.)
This article provides information that will make deploying and using ZENworks for Servers easier. Specifically, this article explains the following information and tools that Novell recently released to help you use ZENworks for Servers:
A revised version of the ZENworks for Servers 1.0 Administration Guide , which includes deployment guidelines to help you determine where to place ZENworks for Servers objects on a network for best performance
A Response File Wizard, which helps you create a response file for deploying ZENworks for Servers
SP5INST.NLM, which enables you to use ZENworks for Servers to deploy support packs to NetWare 5.0 servers
REVISED ADMINISTRATION GUIDE
According to Novell, early implementations of ZENworks for Servers have shown that incorrectly placing the ZENworks for Servers objects can adversely affect the performance of ZENworks for Servers, as well as the overall performance of the network. Tiered Electronic Distribution (TED) objects, in particular, must be placed correctly. Incorrectly placing ZENworks for Servers objects can affect any or all of the following:
Disk space resources
LAN and WAN traffic
CPU utilization
Other I/O activity
To help you avoid performance problems, Novell released a revised version of the ZENworks for Servers 1.0 Administration Guide. In this new 356-page guide, Novell provides a comprehensive explanation of the issues surrounding the deployment of ZENworks for Servers. This guide offers guidelines for placing ZENworks for Servers objects based on common WAN and Novell Directory Services (NDS) tree designs. In addition, Novell provides worksheets to help you plan how you will deploy ZENworks for Servers on your company's network.
Because Novell released this guide after ZENworks for Servers 1.0 shipped, it is not included on the ZENworks for Servers 1.0 CD. You can access or download the ZENworks for Servers 1.0 Administration Guide from Novell's web site at http://www.novell.com/documentation.
General Guidelines
The following list highlights the general deployment guidelines Novell offers in the revised ZENworks for Servers 1.0 Administration Guide :
Use a proxy server anytime you distribute files to multiple subscriber servers across a WAN link. Using a proxy server reduces the load on the distributor server and reduces WAN traffic.
Use a proxy server if the subscriber server and the distributor server do not reside in the same container object. Using a proxy server helps the subscriber server discover the distribution.
Use a proxy server if a distributor server has more than 40 subscriber servers. Using a proxy server reduces the load placed on a distributor server.
Create a Container Search policy in every container object that holds Server objects. By creating this policy, you limit where in the NDS tree ZENworks for Servers searches for policies that apply to each server.
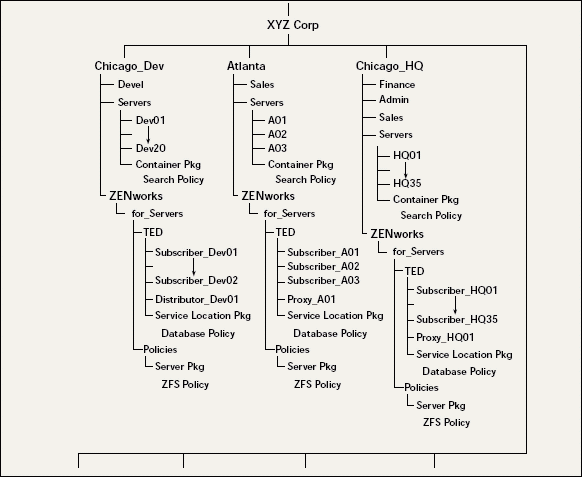
For each geographical location on a network, create a ZENworks container object to hold all ZENworks family product objects. Under each ZENworks container, create a for_Servers container object to hold the ZENworks for Servers objects. (See Figure 1.) If you are using other ZENworks products, you will also want to create container objects such as for_Desktops and for_Networks. You can then easily identify objects for each ZENworks product family without using too many characters of a context's full name.
Figure 1: You should create a container object for the ZENworks product family at each geographical location on your company's network. In this container object, you should then create a container object for each ZENworks product your company is using.

Under the for_Servers container object in each geographical location, create a TED container object to hold the TED objects (such as Distributors, Subscribers, and Proxies) and the ZENworks Database policy.
Under the for_Servers container object in each geographical location, create a Policies container object to hold Server Policy Packages. (See Figure 1.)
Note: Note. To save space, this article provides generalized guidelines. Novell provides detailed guidelines for four common NDS tree designs in the revised ZENworks for Servers 1.0 Administration Guide. Before you begin deploying ZENworks for Servers, Novell strongly recommends that you download and read the deployment section of the revised guide.
RESPONSE FILES
Installing ZENworks for Servers on many servers across a large network can take several hours. Consequently, Novell recommends that you create a response file to automate the installation of Server Policies and TED.
A response file defines how and where you want the various ZENworks for Servers components installed. The ZENworks for Servers installation program reads this configuration information from the response file and installs the ZENworks for Servers accordingly. By using a response file, you do not have to manually enter information during the installation process.
Using a response file has two key benefits:
You can perform unattended, silent installations of ZENworks for Servers to multiple servers across a network. A response file allows these unattended installations to be paused to fix an error condition and then automatically continue.
You can choose where in the NDS tree the ZENworks for Servers components are placed. As mentioned earlier, placing these components is critical to performance and functionality of your company's network.
In addition to specifying where the TED Distributor, Subscriber and Proxy objects are placed in the NDS tree, you can specify default settings for these objects, including logging levels, console prompts, working directories, and the location of log files. You can also set up channels and subscriptions. In addition, the response file allows you to configure the TED objects differently for each server.
If you simply run the ZENworks for Servers installation program without a response file, you do not have this flexibility. In fact, simply installing TED objects through the ZENworks for Servers installation program may adversely affect TED performance. To quote directly from the ZENworks for Servers 1.0 Administration Guide : "If you run the ZFS installation program without a response file, you will not have these benefits. For example, the TED objects will be placed in the same container as the Server object of the target server, which will adversely affect TED performance and management." This fact alone is a good reason to use a response file to install ZENworks for Servers.
Using a response file offers other benefits. For example, after you configure a response file, you can create variations of the file to update existing ZENworks for Servers systems. For example, you can modify the response file to quickly add a new subscriber server.
You can also use the response file to install ZENworks for Servers at a remote site with slow WAN links. Rather than trying to install ZENworks for Servers across the slow link, you can send a response file, along with the files from the \PRODUCTS directory on the ZENworks for Servers 1.0 CD, to the remote site for installation.
RESPONSE FILE WIZARD
Using a response file to deploy ZENworks for Servers across your company's network can save you significant time and effort. However, manually creating a response file is no easy task. For example, you must specify installation options, object creation information, server configurations, and other object configurations.
To make creating response files easier, Novell developed the Response File Wizard. A snap-in module for ConsoleOne, the Response File Wizard walks you step-by-step through the process of creating a response file.
Because Novell developed the Response File Wizard after the release of ZENworks for Servers 1.0, it is not included on the ZENworks for Servers 1.0 CD. You can download the Response File Wizard (RESPONSEWIZARD.JAR) from Novell's Cool Solutions web site at http://www.novell.com/coolsolutions/zenworks/features/a_zfs_response_file_wiz_zw.html.
Installing and Using the Response File Wizard
After you have downloaded the Response File Wizard, you must unzip the file in the directory where you have installed ConsoleOne. Generally, ConsoleOne is stored in the Novell\ConsoleOne\1.2 directory. After you unzip the Response File Wizard in the correct directory, you simply launch ConsoleOne, and the Tool Bar menu at the top of the ConsoleOne screen contains the Response File Wizard option.
Novell recommends that before you run the Response File Wizard, you take the time to complete the Response File Worksheet provided on page 81 of the revised ZENworks for Servers 1.0 Administration Guide. This worksheet will help you gather the necessary information about your company's network and make decisions about where to place ZENworks for Servers components.
When you have completed the worksheet, you can then launch the Response File Wizard from ConsoleOne. The Wizard walks you through the process of creating a new response file or editing an existing one.
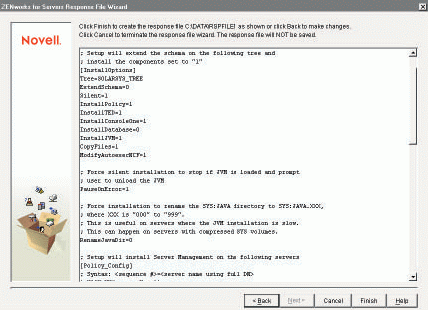
After you finish running the Response File Wizard, it automatically creates a response file with the options you specified. (See Figure 2.) You can then install ZENworks for Servers using the response file by using the following command line syntax:
Figure 2: The Response File Wizard simplifies the process of creating a response file to install the ZENworks for Servers components.

SETUP /U-<path>\<response file>.TXT
SP5INST.NLM
Since the release of ZENworks for Servers 1.0, Novell has also developed another useful NetWare Loadable Module (NLM) called SP5INST.NLM. This NLM allows you to use ZENworks for Servers to deploy the NetWare 5.0 Support Pack 5 to NetWare 5.0 servers across your company's network. Although SP5INST.NLM does not currently support distributing other Novell support packs, Novell has said that future versions of the NLM will. You can download SP5INST.NLM from Novell's Cool Solutions web site at http://www.novell.com/coolsolutions/zenworks/features/a_zfs_nw5sp5_zw.html.
Note: Note. Novell has done limited general testing and no interoperability testing on SP5INST.NLM. Before you use this NLM in a production environment, Novell recommends that you test it on nonproduction servers. Also, at this time, Novell Technical Support does not support SP5INST.NLM.
Distributing NW5SP5
To distribute the NetWare 5.0 Support Pack 5 via ZENworks for Servers and SP5INST.NLM, you complete the following steps:
Download NetWare 5.0 Support Pack 5 from http://www.novell.com/download and SP5INST.NLM from http://www.novell.com/coolsolutions/zenworks/features/a_zfs_nw5sp5_zw.html.
Copy the NetWare 5.0 Support Pack 5 and the SP5INST.NLM to your workstation's hard drive.
Launch ConsoleOne and create a new server software package. To create a new server software package, right-click the server software package name space that appears under My World in ConsoleOne, and then select New Package. This step loads the Server Software Package Wizard. You can then name the server software package and specify the path and file name of the .SPK file.
Create a new software component by right-clicking the server software package you just created, and select New Component. Give the component a descriptive name (such as SP5), and click OK.
Configure the component you just created by right-clicking it and selecting Properties. From the component properties view, select the Requirements Tab. Next, click Add button, and select Operating System. In the Platform field, select NetWare, and in the Version field, select Equal to 5.0.
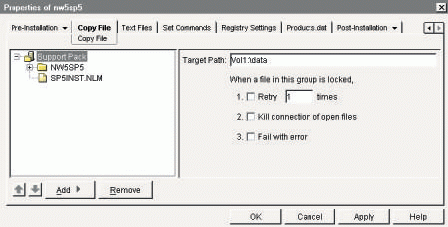
Next, select the Copy Files tab, and select Add. Enter a file group name and a target path. Highlight the file group, and click the Add button. Select File and browse to the directory on your workstation's hard drive where you copied the NetWare 5.0 Support Pack 5. Select the file and check the Recurse Directories box. Select File again, and add SP5INST.NLM to the file group. This file should be at the same level as the support pack is. (See Figure 3.)
Figure 3: Novell has created the SP5INST.NLM to help you install the NetWare 5.0 Support Pack 5 on all the servers on your company's network.

Select the Pre-Installation tab, and click the Add button. Select Unload Process. In the file name field, enter ICMD.NLM. Click the Add button again, select Unload Process, and enter NWCONFIG.NLM. This is a precautionary step because ZENworks for Servers cannot distribute the support pack properly if these NLMs are running.
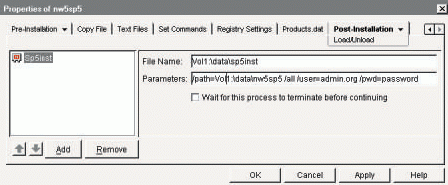
Select the Post-Installation tab, and click the Add button. Select Load NLM. In the file name field, specify the exact location that you placed this NLM in your distribution. (See Figure 4.) In the parameters field, specify the following parameters:
Figure 4: You can configure exactly how you want NetWare 5.0 Support Pack 5 to be installed on the servers on your company's network.

/path= <path to the .ips script in the sp5 build> [For example,
data:\nw5sp5]


 <options of the support pack you want to install> [For example,
 /all, /default, /sp5, /Tivoli, /backup]


/user= <Fully distinguished name of user with rights to extend
the schema>


/pwd= <user Password>
As shown in Figure 4, the following is an example of the parameters field:
/path=Vol1:\data\nw5sp5/all/user=admin.org/pwd=Password
When you have completed steps 1-8, click Apply to save the changes.
Compile the server software package you just created by right-clicking the server software package in ConsoleOne and selecting Compile. The compiled Server Software Package Wizard launches.Click Next, and specify the path and file name of the compiled server software package. Be sure to give this file a .CPK extension, such as NW5SP5.CPK. Click Next, and the compilation begins. When the compilation process is completed, you can use TED to distribute the support pack to NetWare 5.0 servers across your company's network.
CONCLUSION
ZENworks for Servers can save you significant time and money by automating the management and configuration of servers. However, some steps required to deploy and implement the product can be a little complicated. To make the product easier to implement and use, Novell is developing more tools like the ones featured in this article. Keep your eye on the ZENworks section of the Cool Solutions web site for new ZENworks for Servers tools (http://www.novell.com/coolsolutions/zenworks).
Sandy Stevens is a freelance writer based in San Diego, California. Stevens is coauthor of Novell's Guide to Integrating NetWare 5 and NT, Novell's Guide to NetWare Printing, and Novell's Guide to BorderManager.
* Originally published in Novell Connection Magazine
Disclaimer
The origin of this information may be internal or external to Novell. While Novell makes all reasonable efforts to verify this information, Novell does not make explicit or implied claims to its validity.