The NDS Manager Utility
Articles and Tips:
David Chugg
David Cox
01 Apr 1997
IntranetWare and NetWare 4.11 include the new NDS Manager utility, whichallows you to manage Novell Directory Services (NDS). You can run the NDSManager utility as a standalone utility or as a snap-in module to the NetWareAdministrator (NWADMIN) utility. With the NDS Manager utility, you can performthe following tasks:
Manage partitions and replicas
Delete file servers from the NDS tree
Update the version of NDS that is running on your servers
Check the synchronization status of partitions
Diagnose and repair NDS errors
In addition, the NDS Manager utility includes a help file that containsextensive documentation of NDS error codes, their possible causes, and theirpossible solutions. (Novell Technical Support compiled this informationfrom actual support calls.) This article describes the NDS Manager utility'smain features and explains how to install this utility. (See "Installing the NDS Manager Utility" and "Setting Up the NDS Manager Utility.")
A UTILITY WITH TWO VIEWS
With the NDS Manager utility, you can view partitions, replicas, andservers in one of two ways: You can view the entire NDS tree--includingpartitions, replicas, and servers--through a hierarchical browser. (See Figure 1.) You can view a list of partitionsand a list of servers in a split window. (See Figure 2.)
Figure 1: The NDS Manager utility's browser view
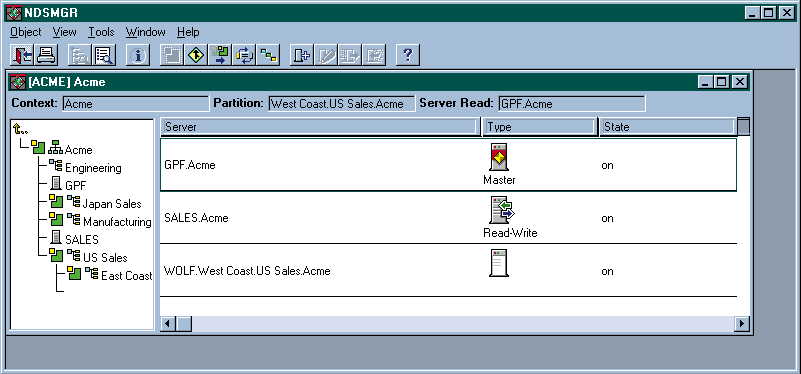
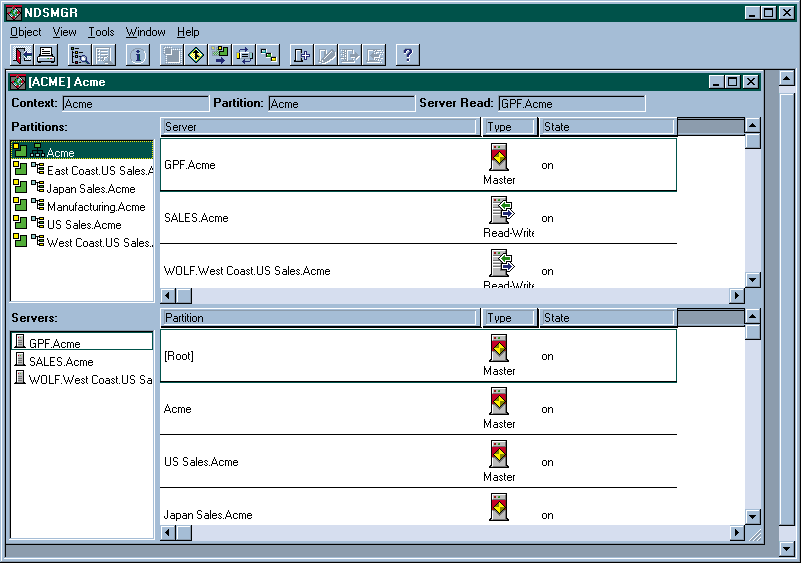
Figure 2: The NDS Manager utility's partitions and servers view
Browser View
When you launch the NDS Manager utility, the browser is displayed. As Figure 1 shows, this browser is divided intotwo sections--the browser pane and the replica pane. The browser displaysonly container and Server objects in the NDS tree, and partitions are identifiedby a partition icon, which is displayed next to the container icon and name.
Double-clicking a container object in the browser expands the objector collapses the object. Double-clicking a Server object displays an informationscreen. You can also access this screen by right-clicking the Server objectand choosing Information or by clicking the Information icon in the NDSManager toolbar.
When you right-click an object, a selection-sensitive pop-up menu appears.For example, if you selected a partition, the pop-up menu would displayonly the valid operations for partitions. Likewise, when you select an objectin the browser, the menu bar and toolbar reflect only valid operations.
You can use the browser to identify parent-child relationships betweenpartitions: The browser displays the child partitions of the current context,which is displayed in the status bar beneath the toolbar.
If you select a partition in the browser, the replica pane displays alist of this partition's replicas and the servers on which these replicasreside. If you select a server in the browser, the replica pane displaysa list of partitions stored on this server.
You can quickly identify the type of replica (master, read-write, read-only,or subordinate reference replica) and the replica state (such as on, off,join, and split). The partition's replicas are sorted by type in the followingorder: master, read-write, read-only, and subordinate reference. You canalso see at a glance which servers are in the process of synchronizing theircopies of the partition.
The Server Read field of the status bar specifies the replica for whichthe replica pane is displaying synchronization information. Because NDSis a loosely consistent database, knowing which replica is supplying theinformation is important, especially since all servers may not have finishedsynchronizing their replica.
Partitions and Servers View
For faster access to specific partitions and servers, you can use thepartitions and servers view. You can perform all partition, replica, andserver operations in this view, except creating a partition. As Figure 2 shows, if you select a partition, a list ofthe partition's replicas appears. If you select a server, a list of thereplicas stored on that server appears.
Each list provides keystroke-sensitive search capabilities. For example,if you click on the partition pane and begin to type the name of a partition,the Go To dialog box appears, helping you locate the partition. The NDSManager utility searches the current context for the partition, and youcan stop the search at any time.
PARTITION OPERATIONS
The NDS Manager utility allows you to perform all partition operations.For example, to create a partition, you use the browser to locate the containerobject that will be the topmost object in the new partition. Then you clickthe Create Partition icon in the toolbar. (The NDS Manager utility givesyou several ways to complete partition operations: In addition to usingthe toolbar, you can use a pull-down menu or right-click an object and selectan option from the menu that appears.)
You can merge partitions by combining a child partition with its parentpartition. You may want to merge partitions if one or both of the partitionsare small or if they are closely related. You may also need to merge partitionsif your company has been reorganized. To merge a child partition with itsparent partition, select the child partition in the browser, and click theMerge Partition icon in the toolbar.
You can also move a partition to another part of the NDS tree. However,the partition you move cannot have any child partitions, and you must followthe hierarchical rules of NDS when moving the partition. For example, youcould not move an Organization Unit (OU) object directly under the [Root]object because only Locality, Country, and Organization objects can residedirectly under the [Root] object.
When you move a partition, you should create an Alias object for thatpartition by selecting the Create Alias option in the Move Partition dialogbox. If you create an Alias object, users who do not know the partition'snew location can find this partition in the NDS tree. If you do not createan Alias object, users may be unable to log in because their context isset to the partition's original location.
You can also delete a replica by removing it from the server on whichit resides. To delete a replica using the browser view, you select the replicain the replica list, choose Delete from the Object menu, and then chooseYes. However, you cannot delete a master or subordinate reference replica.If you want to delete a master replica, you must first change a read-writeor read-only replica to the master replica. Because a partition can haveonly one master replica, NDS automatically changes the old master replicato a read-write replica, which you can then delete. To delete all of a partition'sreplicas, you must merge the partition with its parent partition.
The NDS Manager utility also allows you to abort an operation if NDShas not yet completed the operation and can still back out of it. You maywant to abort a partition operation if NDS is having difficulty completingthe operation. For example, suppose that you were merging two partitions,and a problem occurred. To abort the merge partition operation, you wouldselect the child partition and click the Abort Operation icon in the toolbar.
If you receive an error message stating that the partition is busy, youshould not automatically assume that NDS is having difficulty completinga partition operation. Depending on your network, NDS make take 24 hoursto complete a partition operation. If the operation is not completed within24 hours, use the tips outlined in the "Diagnosing and Repairing Errors" section.
SERVER OPERATIONS
The NDS Manager utility allows you to delete a Server object from theNDS tree. If you want to remove a server from the network and that serverholds replicas, you should first delete these replicas from the server.If you remove a server from the NDS tree without first removing NDS, theServer object remains in the NDS tree.
After you remove the replicas from the server, you must ensure that theser-ver has been shut down; otherwise, you cannot delete the Server object.Next, select the Server object from either the browser view or from thepartitions and servers view. Then select Delete from the Object menu, andchoose Yes.
In addition, the NDS Manager utility allows you to update all of theservers in the NDS tree to the current version of NDS. Previously, you hadto manually update each server--a process that includes copying DS.NLM tothe SYS:SYSTEM directory of the server that needs to be updated and thenrebooting it. With the NDS Manager utility, you can update multiple serversfrom your workstation.
Viewing NDS Versions on Servers
Before you begin updating the version of NDS running on your servers,you should find out what version of NDS is most current for the operatingsystem you use. Specifically, you should find out what the latest versionof DS.NLM is. You can find this information on Novell's World-Wide Web (WWW) site (http://support.novell.com) or on NetWire, Novell's support service on CompuServe.
You must then find out what version of NDS is running on each server.You can view this information from either the browser view or the partitionsand servers view. For example, to view NDS version information from thebrowser view, you would complete the following steps:
Select a container object in the NDS tree.
Select the NDS Version option from the Object menu.
Select View. The View NDS Version dialog box appears, showing the current context, the servers in this context, and the version of NDS on these servers.
By default, all of the servers in the current context and their NDS versionsare listed. You can use the browse button in the View NDS Version dialogbox to change the context. You can also change the default setting so thatall of the servers in this context and in the container objects below aredisplayed. (See the "Changing NDS Version Update Settings" section.)
If you need more information about the servers listed in the View NDSVersion dialog box, double-click a Server object to view the Server Informationscreen. This screen includes information such as the version of NetWareand NDS running on the server, the last time the server was synchronized,and the number of replicas that reside on the server.
Updating NDS Versions on Servers
If you need to update the version of NDS running on your servers, youcan use the NDS Version Update option. Before you begin updating servers,however, you must install the latest version of NDS on one server. Of course,if you just installed a new version of NDS on an IntranetWare or NetWare4 server, the latest version is available on that server.
You can access the NDS Version Update option from the browser view orfrom the partitions and servers view. For example, to access the NDS VersionUpdate option from the browser view, you would complete the following steps:
Select the Server object in the NDS tree that represents the server running the latest version of NDS.
Select the NDS Version option from the Object menu.
Select Update. (If you did not select a Server object, this option is disabled.) The NDS Version Update dialog box appears.
The server you selected is listed in the Source for Version Update field.If this server is not running the latest version of NDS, select anotherserver that is.
By default, all of the servers in the current context (except the serveryou selected) and their NDS versions are listed in the Servers field. Ifno servers are displayed in the Servers field, you can use the browse buttonto change the context. You can also change the default setting so that allof the servers in this context and in the container objects below are displayed.(See the "Changing NDS Version Update Settings" section.)
You can select specific target servers to be updated from the Serversfield in the NDS Version Update dialog box. If a target server's icon isgray, however, you cannot select and, therefore, update the server. A targetserver cannot be updated for the following reasons:
The target server is running a more current version of NDS than the source server is running.
The target server is running NetWare 3.12 or below and does not use NDS.
The target server is running a different version of NetWare than the source server is running. (New NDS versions may require an updated version of NetWare.)
To move servers into the Target Servers to Be Updated list, you pressthe right-arrow button in the NDS Version Update dialog box. Target serversthat appear in this list are then updatedunless the server's iconis gray, or disabled. The target server's icon could be gray if you chosethe target server and then selected a different source server, which isrunning an older version of NDS than the target server is running. In thiscase, the target server will not be updated.
You can also use the Select All Servers With NDS Version Older Than Sourceoption. However, servers with gray icons are not selected even when youuse the Select All Servers option.
The NDS Version Update does not allow you to write over a newer versionof NDS with an older version of NDS. If you need to write over a newer version,you must manually complete this task. (However, writing over a newer versionwith an older version is not recommended because it can cause some seriousproblems.)
After you have selected the source server and the target servers, youcan begin the update process by clicking the OK button. The Update NDS Versiondialog box appears, showing the progress of the update process.
When the update is completed, the NDS Version Update Complete dialogbox appears. This dialog box shows the number of target servers that youselected, the number of target servers that were successfully updated, thenumber of target servers that were not updated, and the number of targetservers that the NDS Manager utility did not attempt to update.
The number of target servers that were not updated includes only thetarget servers that the NDS Manager utility attempted to update but didnot update successfully. This number does not include the target serversthat the NDS Manager utility did not attempt to update. The NDS Managerutility does not attempt to update target servers if you use the UpdateNDS Version progress dialog box to cancel the update process.
If you want more information about this update session, you can clickthe View Log button to view a log file. This log file documents every eventthat occurred during this update session.
Changing NDS Version Update Settings
As mentioned earlier, you can change the default settings for the NDSVersion Update option. You can also change these settings for a particularupdate session, temporarily overriding the default settings. If you customizesettings for an update session, the settings revert to their default valueswhen you exit that update session.
To change the default settings, select Preferences from the Object menu.Then select NDS Update Options. The NDS Update Options screen appears.
To change settings for a particular update session, click the Settingsbutton in the NDS Version Update dialog box. Then choose NDS Update Options.
Whether you are actually changing default settings or whether you arechoosing settings for a particular update session, the same options areavailable to you:
You can disable the default setting of unloading the DS Repair utilitywhen you update target servers. However, if you do not unload the DS Repairutility from a target server, that server cannot be updated to the new versionof NDS. Instead, an error message appears, stating that the DS Repair utilityis loaded on the target server.
You should keep the default setting of unloading the DS Repair utilityunless another network administrator is using this utility to perform arepair operation. In this case, unloading the DS Repair utility will cancelthe repair operation.
You can also enable the no notification setting, which is disabled bydefault. If you enable this setting, you do not receive informational anderror messages during the update session although this information is writtento a log file which you can read later. However, you are not prompted tofix problems that may occur. The update session is completed without interruption,but the NDS Manager utility doesn't update servers that have problems.
In addition, you can change the search context for the NDS Version Updateoptions. You can specify that the NDS Manager utility search the currentcontext only or the current context and all container objects below thecurrent context.
The NDS Update Log settings allow you to change the filename of the logfile or the directory in which this file resides. You can also specify thatthe results of the current update session are appended to the end of theexisting log file or that a new log file is created for this update session.
SYNCHRONIZATION OPERATIONS
The NDS Manager utility allows you to view information about replicas,monitor their synchronization status, initiate the replica synchronizationprocess, and troubleshoot any errors. Although NDS automatically synchronizesa partition's replicas, certain conditions may cause NDS replicas to beout of sync. For example, a WAN link may become unavailable, or a serverthat holds a replica may be down.
You can use both the browser view and the partitions and servers viewto check synchronization status. If you want to check the synchronizationstatus of several partitions simultaneously, you must use the partitionsand servers view.
For example, if you were using the partitions and servers view, you wouldmake sure that the partitions you wanted to check are displayed in the partitionslist. The NDS Manager utility checks all of the partitions in the currentcontext and in the container objects below the current context. To checkall of the partitions in the NDS tree, you must set the current contextto the [Root] object.
Next, select a partition, and then select the Check Synchronization optionfrom the Object menu. The Check Synchronization screen appears. If the NDStree has more than one partition, you select the All Partitions option andchoose OK. The NDS Manager utility then checks to make sure you have sufficientrights to perform this operation. If you have sufficient rights and no errorsare detected, a screen appears, stating that the preconditions for thisoperation have been met. Otherwise, an error message appears. If the preconditionshave been met, choose Yes.
The Partitions Synchronization Check screen displays synchronizationinformation such as the number of partitions checked, the number of partitionswith no synchronization errors, and the number of partitions with synchronizationerrors. The Partitions Synchronization Check screen also lists the partitionsthat were checked. A green icon appears next to the partitions that haveno synchronization errors, and a red icon appears next to the partitionsthat have synchronization errors.
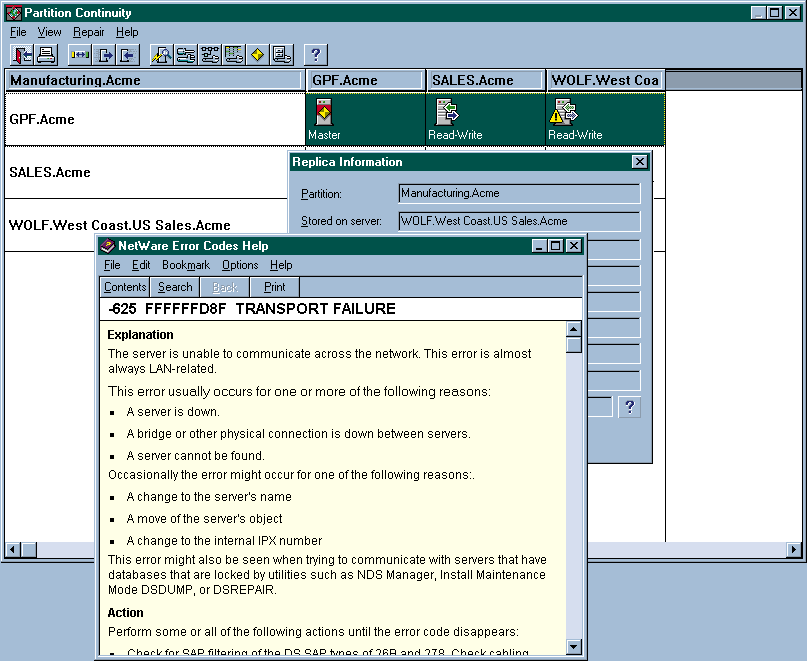
To fix errors or to view the replica list for a partition, select thepartition, and click the Continuity button. The Partition Continuity screenappears, allowing you to gather diagnostics information which is explainedin the next section.
To manually synchronize replicas, you can use the Receive Updates option.If you use this option, NDS sends updated information from the master replicato all other replicas of the partition.
If the master replica does not contain the most current information,you can use the Send Updates option to send updated information from thereplica that has this information. For example, if you updated the NDS databaseon the ADMIN server, you could send updated information from the replicaon the ADMIN server to other servers that held replicas of the partition.
DIAGNOSING AND REPAIRING ERRORS
The NDS Manager utility allows you to perform several diagnostics checkson the NDS tree. For example, you could check the status of each partitionto determine if a synchronization error had occurred. If an error had occurred,you could use the Partition Continuity option to get more information aboutthe error and to find out how to solve the problem.
To access the Partition Continuity screen, select a partition in thepartitions and servers view, and choose the Partition Continuity optionfrom the Object menu. When you choose this option, the NDS Manager utilitychecks each server that holds a replica of the partition you selected andverifies that each server's replica list contains the same information.
If a server that holds a replica of the partition does not have an identicalreplica list or if a replica cannot synchronize with the NDS database, theNDS Manager utility displays an error. This error appears as an exclamationmark on the replica icon. If you want to view the context-sensitive helpfile for an error, double-click the replica icon identified by an exclamationmark. When the Information screen appears, select the help icon (which isidentified by a question mark) next to the number of the synchronizationerror. A help screen appears, explaining the error and the possible causesand solutions. (See Figure 3.)
Figure 3: The context-sensitive help file lists possible causes of NDS errors and gives solutions.
Using the Partition Continuity option, you can also perform repair operationsthat were previously available only in the DS Repair utility, which youmust run from the server console. With the NDS Manager utility, you canperform repair operations from your workstation.
When you perform the following NDS Manager operations, the DS Repairutility is automatically launched on a server to perform the operations:Verify Remote Server IDs, Repair Replica, Repair Network Addresses, RepairLocal Database, Assign New Master, Remove Server, and Repair Volume Objects.After these operations are completed, the NDS Manager utility displays alog file that was created by the DS Repair utility.
Other repair operations such as Synchronize Immediately, Receive Updates,Send Updates, and Abort Operation display a success or failure status. Consequently,the NDS Manager utility does not display a log file when these operationsare completed.
The Partition Continuity view also allows you to get more informationabout a particular partition. You can select Information from the RepairMenu and choose one of the following options: Partition, Server, Replica,and Synchronization Error. For example, if you chose the Partition option,you could view information about the partition you selected, including howmany replicas the partition has and the last successful synchronization.If you chose the Server option, you could view information about the serveryou selected, including the version of NDS running on the server and thenumber of replicas that reside on the server.
To ensure that you are viewing the most current information, you canchoose the Update Synchronization Information option or the Refresh optionfrom the View menu. The Update Synchronization option updates only selectedpartition and server information. The Refresh option updates all informationdisplayed in the Partition Continuity screen.
CONCLUSION
You can use the NDS Manager utility to manage, diagnose, and repair partitionsand replicas. In addition, the help file included with the NDS Manager utilitydocuments NDS error codes and their possible causes and solutions. Thanksto the NDS Manager utility, managing NDS is even easier.
Jody Buchanan, David Chugg, and David Cox work for Novell Inc.
Installing the NDS Manager Utility
The NDS Manager utility is available for Windows 3.1x, Windows 95, and Windows NT Workstation 3.51 and 4.0.
WINDOWS 3.1X AND WINDOWS 95
When you install the NetWare 4.11 component of IntranetWare, the NDS Manager utility for Windows 3.1x and Windows 95 is installed automatically. The executable file for Windows 3.1 is called NDSMGR16.EXE and is located in the SYS:PUBLIC directory on the NetWare 4.11 server. The executable file for Windows 95 is called NDSMGR32.EXE and is located in the SYS:PUBLIC\WIN95 directory on the NetWare 4.11 server.
WINDOWS NT WORKSTATION 3.51 AND 4.0
You must complete the following steps to install the NDS Manager executable file on your Windows NT workstation:
Download the IntranetWare Client for Windows NT, which includes the NDS Manager utility, from http://www.novell.com/intranetware/products/clients/clientwinnt.
Run ADMSETUP.EXE from the I386 directory. The Software License Agreement screen appears. Make sure you understand and comply with the license agreement before continuing.
Choose Yes to continue the installation process. A screen appears, describing what the installation utility will do.
Choose Continue. The Setup Selections screen appears, displaying two options: The first option allows you to install the Novell Application Launcher (NAL), which is used for manag-ing network applications. The second option allows you to install the NDS Manager utility and the NetWare Administrator (NWADMIN) utility for Windows NT Workstation.
From the list of servers in the To Server field, select the server on which you want to install the NDS Manager utility. (If the server is not listed, exit ADMSETUP, log in to the server, restart ADMSETUP, and follow the instructions to this point.) Choose OK to continue the installation process.
The Copying Files screen shows the progress of the installation process. When all of the files are copied, the Installation Complete screen appears, confirming that the NWADMIN utility is installed. The installation program considers the NDS Manager utility part to be of the NWADMIN utility. If you chose the NAL option in step 4, the Installation Complete screen also indicates that Application objects NDSMgrNT and NWAdmnNT were created. These objects are placed in the Novell Directory Services (NDS) tree in which the Server object resides.
The NDS Manager executable file for Windows NT Work-station is called NDSMGRNT.EXE and is located in the SYS:PUBLIC\WINNT directory on the NetWare 4.11 server.
Setting Up the NDS Manager Utility
You can run the NDS Manager utility as a standalone utility or as a snap-in module for the NetWare Administrator (NWADMIN) utility.
RUNNING NDS MANAGER AS A STANDALONE UTILITY
Setting up NDS Manager to run as a standalone utility is a fairly straightforward process: For a Windows 3.1x workstation, you create an icon that points to the NDSMGR16.EXE file in the SYS:PUBLIC directory. For a Windows 95 workstation, you create an icon that points to the NDSMGR32.EXE file in the SYS:PUBLIC\WIN95 directory. For Windows NT Workstation 3.51 and 4.0, you create an icon that points to the NDSMGRNT.EXE file in the SYS:PUBLIC\WINNT directory.
RUNNING NDS MANAGER AS PART OF THE NWADMIN UTILITY
The steps you take to integrate NDS Manager with the NWADMIN utility varies, depending on your workstation environment. After you complete the steps that apply to your workstation environment, NDS Manager will appear as an option under the Tools menu in the NWADMIN utility.
Windows 3.1x. To run NDS Manager as part of the NWADMIN utility on Windows 3.1x, complete the following steps:
If you have never launched the NWADMIN utility for Windows 3.1, open and close this utility.
Add the NDSMGR = NMSNAP16.DLL line to the [Snapin Object DLLs WIN3X] section of the NWADM3X.INI file, which is located in the WINDOWS directory.
If you run the NWADMIN utility with the /N command line parameter, preferences are registered in the User object in the NDS tree. In this case, you should complete the following steps:
If you have never launched the NWADMIN utility for Windows 3.1x, open and close this utility.
Right-click the appropriate User object, and then choose Details.
Choose the NetWare Registry Editor button, and then choose SNAPIN OBJECT DLLS WIN3X from the Key list box. (If the NetWare Registry Editor is empty, you can add the SNAPIN OBJECT DLLS WIN3X key by choosing the Add button under the Key list box.)
Press the Add button under the Values list box, and enter NDSMGR in the Value Name field.
In the Value field, enter NMSNAP16.DLL, select String as the type, and then press the Add button.
Windows 95. To run NDS Manager as part of the NWADMIN utility on Windows 95, complete the following steps:
Launch the NWADMIN utility for Windows 95 without using any command line parameters.
Select Save Settings on Exit from the Options menu, and exit the NWADMIN utility.
Run REGEDIT.EXE, the Windows 95 registry editor, and choose HKEY_CURRENT_USER.
Then choose Software, NetWare, Parameters, and NetWare Administrator.
Highlight Snapin Object DLLs WIN95, and then choose New from the Edit menu.
Select String Value. Type NDSMGR, and press the Enter key.
Highlight NDSMGR, and choose Modify from the Edit menu.
In the Value Name field, type NMSNAP32.DLL, and choose OK.
Exit the Windows 95 registry editor.
If you run the NWADMIN utility with the /N command line parameter, complete the following steps:
Launch the NWADMIN utility for Windows 95, and choose the appropriate User object.
Right-click the User object, and choose Details.
Choose the NetWare Registry Editor button, and select SNAPIN OBJECT DLLS WIN95 from the Key list box. (If the NetWare Registry Editor is empty, you can add the SNAPIN OBJECT DLLS WIN95 key by choosing the Add button under the Key list box.)
Choose the Add button under the Values list box, and enter NDSMGR in the Value Name field.
In the Value field, enter NMSNAP32.DLL, select String as the type, and then press the Add button.
Windows NT. To run NDS Manager as part of the NWADMIN utility on Windows NT, complete the following steps:
Launch the NWADMIN utility for Windows NT without using any command line parameters.
Select Save Settings on Exit from the Options menu, and exit the NWADMIN utility.
Run REGEDIT.EXE, the Windows NT registry editor, and choose HKEY_CURRENT_USER.
Then choose Software, NetWare, Parameters, and NetWare Administrator.
Highlight Snapin Object DLLs WINNT, and then choose Add Value from the Edit menu.
In the Value Name field, type NMSNAPNT.DLL.
Select REG_MULTI_SZ from the pull-down menu in the Data Type field, and choose OK.
Type NMSNAPNT.DLL in the Data field, and choose OK.
Exit the Windows NT registry editor.
If you run the NWADMIN utility with the /N command line parameter, complete the following steps:
Launch the NWADMIN utility for Windows NT, and choose the appropriate User object.
Right-click the User object, and choose Details.
Choose the NetWare Registry Editor button, and select SNAPIN OBJECT DLLS WINNT from the Key list box. (If the NetWare Registry Editor is empty, you can add the SNAPIN OBJECT DLLS WINNT key by choosing the Add button under the Key list box.)
Choose the Add button under the Values list box, and enter NDSMGR in the Value Name field.
In the Value field, enter NMSNAPNT.DLL, select String as the type, and then press the Add button.
Choose OK, and exit the Windows NT registry editor.
* Originally published in Novell Connection Magazine
Disclaimer
The origin of this information may be internal or external to Novell. While Novell makes all reasonable efforts to verify this information, Novell does not make explicit or implied claims to its validity.