Getting Started with Oracle on NetWare
Articles and Tips: article
Ariadne Consulting Ltd.
01 May 2000
Running Oracle on NetWare provides many advantages. Aside from sheer speed, reliability and cost-effectiveness, one of the most compelling reasons to run Oracle on NetWare is its integration with Novell Directory Services (NDS). As an Oracle developer with customers who already possess an established NDS infrastructure, you can cut development time considerably by offering to integrate your solution with NDS, negating the need for an additional authentication system. The larger the NDS tree at your customer site, the more you can save them in cost and time.
This Developer Note is divided into two parts:
Installing and Configuring the Database describes how to install and configure a basic Oracle database on NetWare 5.1, load the starter database and get NDS authentication working.
Using NDS to Authenticate to Oracle presents a simple Visual Basic application demonstrating how Oracle developers can use NDS to easily authenticate to an Oracle database.
Note that this Developer Note does not touch on topics such as Oracle database design, replication or configuration. It also assumes that the reader is familiar with some of the basic Oracle terminology. If you'd like to know more about the very basics of Oracle then a good place to start is Oracle 8i: A Beginner's guide by Michael Abbey et al.
Special thanks must go to Gillian Anderson and Peter Cullen of Oracle UK Tech Support for their help in explaining some of the trickier intricacies of Oracle.
Installing and Configuring a Basic Oracle Database
This Developer Note talks about installing the bundled 5-user Oracle 8i that ships with NetWare 5.1. This article could equally apply to Oracle 8.0.4, which shipped with NetWare 5.0. However, note that certain NLM names may differ. For example, SVRMGR31.NLM in Oracle 8i is SVRMGR30.NLM in Oracle 8.0.4. Also, note that the Oracle directory structure and placement of configuration files differs slightly between the two versions.
If you haven't installed Oracle yet then simply mount the Oracle CD as a NetWare volume, load NWCONFIG and point to O8INW:\INSTALL\NETWARE. The NetWare GUI console automatically launches, and you will see the Oracle Universal Installer. This installer is an easy to use and intuitive installation dialogue. In this Developer Note, we have accepted the default parameters, and I recommend you do the same. This will ensure that you have the starter database, with System ID `ORCL' pre-installed. Note that the password you enter in the Universal Installer will be the password for the starter database.
When you install Oracle 8i, it's a good idea to create a dedicated ORACLE: volume and ensure that this volume has neither compression nor sub-allocation enabled. This way you can set the parameter NW_FSTYPE=DFS in the %ORACLE_HOME%\NLM\CONFIG.ORA file. This forces Oracle to bypass NetWare CLIB file system calls and go directly to its data. According to Oracle documentation, this can result in a 5% performance enhancement. You'll need about 500Mb for the Oracle files alone, plus whatever space you'll need for your data.
If you're not sure what version of Oracle you should be installing, then note that multiple versions of Oracle can co-exist quite happily on a single NetWare server. Naturally, only one version may be running at any one time; but, we have Oracle 8.0.4 and Oracle 8i both installed in our lab. Switching between the two versions is a simple case of altering the server's search drives, changing the ORACLE_HOME parameter, and then restarting Oracle. The ORACLE_HOME parameter is also defined in the CONFIG.ORA.
Once Oracle is installed, run ORALOAD and then ORASTART from the NetWare console. The first NCF file loads the Oracle core modules, while the second starts the Oracle starter database I mentioned earlier. Two other NCF files that we'll be using are ORAUNLD and ORASTOP, which unload Oracle modules and the starter database respectively.
Once the `ORCL' instance has started type `DISPLAY ORACLE STATUS'. You should see output similar to this:
Figure 1: Output from Display Oracle Status.
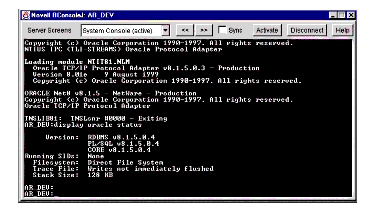
Note that there is a single running SID of `ORCL'. A SID, by the way, is System Identifier and is the ID of an instance of an Oracle database. Oracle does support multiple simultaneous SIDs on NetWare, but for this Developer Note we will be operating in a single SID environment.
Integrate the Starter Database into NDS
After installing the database, the first task is to get the ORCL database into NDS. But first, a word about patches. We have the following patches installed:
Oracle patch kit NR81504A.EXE
Oracle snap-in fix SNAPIN815.ZIP
NR81504A.EXE is a comprehensive set of patches for Oracle's core modules while SNAPIN815.ZIP is a client-side patch that fixes a problem with NetWare's NWADMN32.EXE reporting that means it cannot locate the Oracle snap-in or that the snap-in is corrupt. At the moment, both patches are separate and available from Oracle technical support. The snap-in fix is important because you must use NWAdmin when configuring Oracle on NetWare. Note also that NWAdmin will also report an error when loading if you don't have the Oracle client installed.
If you have not yet done so, install the Oracle 8i client from the second Oracle 8i CD in the NetWare 5.1 box. Be sure to have the IP address of your Oracle host server at hand. In this Developer Note we'll be using IP as the underlying protocol for accessing Oracle.
To integrate the Oracle database into NDS we must do the following:
Decide where in your NDS tree you will be storing your Oracle database objects. We have created O=DB_ADMIN for this purpose.
Create an Oracle Instance object called STARTER.DB_ADMIN with a SID of ORCL. The NDS name can be anything you wish, but the SID must match the SID chosen during database creation. If you don't see `Oracle Instance' in the list of objects to create, then it is possible something went wrong during the installation of Oracle and the NDS schema may not have been properly extended.
Figure 2: The Create Oracle Instance Dialogue screen.
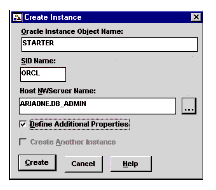
Check Define Additional Properties because once created, we must check Enable NDS Naming on the Connect Address tab. Close NWAdmin.
At the server console, do an ORASTOP, ORAUNLD and then reload Oracle with ORALOAD
Now look at the Connect Address tab for STARTER.DB_ADMIN in NWAdmin. You will see that the NDS Naming Adapter Connection Information for our SID has been populated by Oracle.
At the server console do an ORASTART to start up our database instance.
Back in NWAdmin, select STARTER.DB_ADMIN, and then select the Identification tab. Click the Status button and you will see Oracle report `Available, Running'.
Select the User Mappings tab, and then click the Connect button at the bottom right. You will then see the Oracle connection screen:
Figure 3: The Oracle Connection screen in NWAdmin.
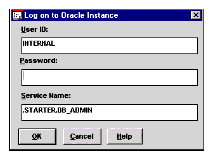
Leave the username as INTERNAL. This is a built-in Oracle username. Type in the password you entered during the installation of Oracle 8i. If you receive no error messages then you have successfully connected!
Authenticating to Oracle
Note that at this point we have not authenticated to Oracle using NDS. Significantly though, we have connected using the NDS name of the Oracle instance. This is 50% of the way there. Experienced Oracle developers will have picked up on one very important point: Where is the client's TNSNAMES.ORA? The client's TNSNAMES.ORA is no longer needed. Because NDS stores the connection information for this, we need only specify the name of the NDS instance object to ensure that we connect. The Oracle client does the rest by making calls to NDS to extract the NET8 connection information. Not having to administer a TNSNAMES.ORA for every single Oracle client is another big benefit of using Oracle on NetWare.
The next step is to connect using our NDS ID. To do this, we have to do some more configuration. If you've exited from the Oracle Instance object, go back in and reconnect using INTERNAL, as we did above. Before we can create Oracle-to-NDS mappings, we must be connected.
To create Oracle-to-NDS mappings:
From the User Mappings select New...
Select the NDS user whom you want to become a user of this database. I have used Admin. In the lower field titled Oracle User, type in ADMIN.
Before confirming this mapping, select the Storage button. Set the Temporary Tablespace to be TEMPORARY_DATA and the Default Tablespace to be USER_DATA. This is standard Oracle practice.
Click on the Privileges button and you will see that Admin has the CREATE SESSION privilege. Grant Admin all the remaining Oracle privileges.
What has happened is that the mapping has been created dynamically behind the scenes by the Oracle snap-in for NetWare Administrator. To aid your understanding, go to the server console and load up Oracle's Server Manager: SVRMGR31.NLM. You will see the `SVRMGR>' prompt. Connect to the STARTER.DB_ADMIN instance as follows (you type in the commands that are highlighted in bold):
Figure 4: Connecting to the instance at the server console.
|
Oracle Server Manager Release 3.1.5.0.3 - Production(c) Copyright 1997, Oracle Corporation. All Rights Reserved.Oracle8i Release 8.1.5.0.4 - Production (5 user, NetWare Bundle)PL/SQL Release 8.1.5.0.4 - ProductionSVRMGR> disconnectDisconnected.SVRMGR> set instance .starter.db_adminOracle8i Release 8.1.5.0.4 - Production (5 user, NetWare Bundle)PL/SQL Release 8.1.5.0.4 - ProductionInstance .starter.db_adminSVRMGR> connect internalPassword:Connected.SVRMGR> |
We will now view the mapping we created in NWAdmin. But first, we must set up an output file to capture the contents of our query.
SVRMGR> spool oracle:\users.txt
Now execute an SQL query which will list all users:
SVRMGR> select * from dba_users;
Output will spool off the screen and also into our output file, close the file with a spool off:
SVRMGR> spool off
If you then edit this file using any editor, you will see several users listed. At the bottom of the listing, however, you will see the following text which you may need to format for legibility:
ADMIN 31 EXTERNAL OPEN USER_DATA TEMPORARY_DATA 19-MAR-00 DEFAULT DEFAULT_CONSUMER_GROUP
From the headings at the top of the listing, you can make out what these relatively straightforward values mean. The important one is the value in the third column: Password. User ADMIN has a password of EXTERNAL which is to say that a third-party authentication system, not Oracle, will be responsible for authenticating users. You guessed it: Enter NDS!
We must now create an SQLNET.ORA file on the client. This file governs how NET8 (Oracle's core protocol) functions. This file will be the same for all clients connecting to Oracle on NetWare. Fortunately, when you installed the Oracle 8i client, and if you kept the default directory names, a sample SQLNET.ORA file was copied to c:\oracle\ora81\admin\sample. Copy this file up one level to c:\oracle\ora81\admin and open it up in notepad.exe. We need to make an important change.
Locate the line: #sqlnet.authentication_services=(beq, oss) and uncomment it. Now change it to read: sqlnet.authentication_services=(nds)
While making these changes, take time to read the useful comments within the sample SQLNET.ORA. Also you may want to view the server's SQLNET.ORA, you will see that it already contains the correct authentication parameter for NDS. This file is located in %ORACLE_HOME%\NETWORK\ADMIN.
Before our database will accept authentication from 3rd-party mechanisms, we need to alter its behavior by editing the INIT file for our SID. All Oracle instances have an INIT{SID}.ORA file in the %ORACLE_HOME%\DATABASE directory, where {SID} represents the 4-character SID, in this case `ORCL'. If you open the INITORCL.ORA file for our starter database, you will see the following line pointing to the location of the parameter file:
IFILE=ORACLE:\OraHome1\admin\oracle\pfile\init.ora.
We must now edit init.ora, and add the line:
remote_os_authent=true.
It's a good idea at this point to restart not just our instance but also the Oracle system. As before, type ORASTOP and then ORAUNLD at the server console. Then restart the system with ORALOAD, and start up our instance with ORASTART.
Now for the real test. Make sure you are logged into the tree as Admin, and then launch NWAdmin. Select STARTER.DB_ADMIN and click on the User Mappings tab. Then click on the Connect button. This time, instead of typing INTERNAL in the username field simply type a `/'. Don't bother with the password field.
Figure 5: Connecting using NDS authentication.
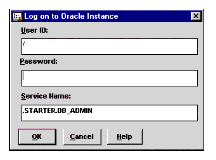
If you are successful, you will immediately be returned to the User Mappings tab and the Connect button will be greyed out. Congratulations, you have authenticated using your NDS ID!
At this point you may be thinking that having to create a mapping for every NDS user is just as labour-intensive as creating native Oracle users from scratch and defeats the purpose of NDS integration. This is correct, but fortunately Oracle allows you to map an NDS group to a single Oracle user. From then on it becomes a simple case of administering the NDS group's membership in order to control access to the Oracle database. In our lab we have two groups in NDS: ORA_ADMIN and ORA_USERS with ORA_ADMIN mapped to an Oracle user who has all Oracle privileges granted. ORA_USERS is mapped to an Oracle user who has the bare minimum needed to connect and execute a query against our database. I would also like to point out that Oracle tracks connections using the NDS user and not the mapped Oracle user.
Unfortunately though, the Oracle snap-in for NWAdmin has some limitations. You will encounter these if you start setting up some more user mappings at this point. Oracle appears to connect only if you have mapped your NDS user to an Oracle user with an identical name, as we did above with the mapping Admin <-< ADMIN. This is a limitation of the snap-in and not of Oracle or NetWare. To really see the power of NDS authentication you must create your own Oracle application, which is the next part of this Developer Note.
Using NDS to Authenticate to Oracle
Now that we've got our basic database configured and running we want to connect to it using NDS credentials. To demonstrate this, we'll create a very simple application in Visual Basic 6.0 (VB6) utilizing a Microsoft ADO (Active Data Object) database connection. The application was coded, tested and run on an NT 4.0 workstation with service pack 4 installed.
Because there a large number of ways to access databases in VB6, this article won't discuss using VB6 to access your database. Choose the method you're most comfortable with. For a thorough discussion on the various database connection architectures available, see "Oracle Programming with Visual Basic" by Nick Snowdon.
The source code shown here is downloadable from http://www.ariadne.net/oracle/singlesignon.htm. At this location you will also find a more fully functional version of the application presented in this Developer Note.
Using the GUI shown below, we'll connect to the starter database we created in the first part of this article, "Installing and Configuring a Basic Oracle Database."
Figure 6: A simple connection interface created in MS Visual Basic 6.0.
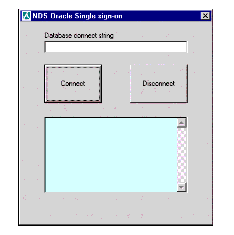
If we type in the full distinguished name of our Oracle instance object in the Database connect string field then click on Connect, we'll see the following results:
Figure 7: A successful connection.
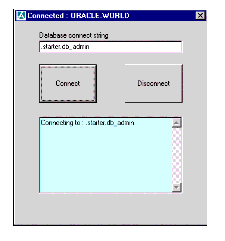
Note how the caption of our window has changed to reflect the fact that we have actually connected. ORACLE.WORLD is actually the result of the SQL query SELECT * FROM GLOBAL_NAME. Instead of just relying on a good return code from ADO this really proves we connected.
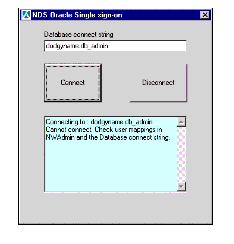
If we mistype the database name, or if we have not mapped our NDS account correctly, or if the database is down, then we'll see the following:
Figure 8: An unsuccessful connection.
Sample Application Using Single Sign-on
The source code for our application is self-explanatory and is shown below. However, before you try to run this code, note the following requirements to make this code work:
When using ADO with Microsoft Visual Basic you'll need to establish a reference to the ADO type library. In Visual Studio select Project | References and check the box for "Microsoft ActiveX Data Objects 2.1 Library," and then click "OK."
If you plan to deploy this app to a Windows 9x PC then the PC will need a DCOM update from Microsoft.
Make sure you have the Oracle Client installed and configured as shown in the first part of this article, "Installing and Configuring a Basic Oracle Database."
Make sure you have granted your NDS account or Oracle group the necessary mappings in the Oracle instance object as shown in the first part of this article, "Installing and Configuring a Basic Oracle Database."
Most importantly, make sure you have the NetWare Client installed and that you have authenticated to NDS before executing the application.
Figure 9: NDS/Oracle Single Sign-on sample code.
'===============================================================

'

' NDS/Oracle Single Sign-on demo

'

'===============================================================

Option Explicit


Dim strDBName As String

Public strLargeString As String

Dim WithEvents OConnection As ADODB.Connection

Dim recset As ADODB.Recordset

Private WeAreConnected As Boolean


Private Sub DisplayResults(str)

Results.Text = Results.Text & str & vbCrLf

End Sub


Private Sub Clear_Click()

Results.Text = ("")

End Sub


Private Sub Connect_Click()

Dim tempstr As String

Dim Usr As String

Dim i As Integer


On Error GoTo errorhandler


'Get the name of the NDS database we want to connect to . . .

strDBName = DBName.Text


'Let them know what's happening . . .
tempstr = "Connecting to : " & strDBName

DisplayResults (tempstr)


Set OConnection = New ADODB.Connection


'Do the connection using native OLE-DB provider for Oracle.

'This bypasses ODBC and communicates directly with OCI

With OConnection

.Provider = "MSDAORA"

.ConnectionString = "Data Source=" & strDBName & ";User Id=/" & strDBName & ";Password=" & strDBName & ";"& strDBName & ";
.CursorLocation = adUseClient

.Open

End With


WeAreConnected = True


'Now do a simple query to show that the connection is ok . . .

Set recset = New ADODB.Recordset

recset.Open"SELECT * FROM GLOBAL_NAME", OConnection

Oracle.Caption = "Connected : " & recset(0)

Set recset = Nothing


Exit Sub


errorhandler:


OracleError:

WeAreConnected = False

DisplayResults ("Cannot connect. Check user mappings in NWAdmin and the Database connect string.")

End Sub


Private Sub DBName_Change()

strDBName = DBName.Text

End Sub


Private Sub Disconnect_Click()

If WeAreConnected Then

DisplayResults ("Disconnecting from : " & strDBName)

OConnection.Close

Set OConnection = Nothing

WeAreConnected = False

Oracle.Caption = "NDS Oracle Single sign-on"

Else

DisplayResults (vbCrLf & "Disconnect failed. Not connected to anything")

End If


End Sub
One very interesting point to note about this code is that nowhere have we used any NDS calls. The username of `/' passed to OCI (Oracle Call Interface) tells Oracle that the application is using an external naming method, specified in SQLNET.ORA. The Oracle client completely handles the subsequent interaction between Oracle and NDS. Naturally, you may want to extract the user's login name from NDS in order to present it in an informational or error message, for example, Connecting to STARTER as .pcoletti.staff.ariadne , please wait . . .
Adding this functionality is easy. You'll need to make use of certain NDS API's including: NWCallsInit, NWDSCreateContextHandle, NWDSSetContext, and NWDSWhoAmI. See http://developer.novell.com/support/sample/areas/vbs.htmfor more information on using these API's from within VisualBasic.
Using this application, you can now fully test NDS authentication to Oracle. I suggest you create a group called ORA_CONNECT.DBADMIN and create a mapping from this group to an Oracle user as described in the first part of this article, "Installing and Configuring a Basic Oracle Database." Add NDS users to ORA_CONNECT.DB_ADMIN, and then connect them using the application. Remove the same users from the group, and then verify that the connection to Oracle now fails. As always, ensure that you have your client's SQLNET.ORA file correctly configured and that IP communications between the client and server are in good shape.
As I've mentioned, one of the most compelling reasons to run Oracle on NetWare is its integration with Novell Directory Services (NDS). If your customers already possess an established NDS infrastructure, you can cut development time considerably by offering to integrate your solution with NDS, negating the need for an additional authentication system. As this article shows, using NDS authentication with Oracle is simple and results in great cost and time savings to your customer.
* Originally published in Novell AppNotes
Disclaimer
The origin of this information may be internal or external to Novell. While Novell makes all reasonable efforts to verify this information, Novell does not make explicit or implied claims to its validity.