Extending the NDS Schema with VB6 and Novell's ActiveX Controls
Articles and Tips: article
Senior Technical Writer
Developer Information
01 Jan 2000
Describes a sample application that uses Microsoft's Visual Basic 6 and Novell's ActiveX controls to extend the NDS schema. The NWDir and NWSess controls can help you rapidly and simply develop powerful NDS applications.
- Introduction
- Overview of the Application
- Global Variables
- The Public Functions
- The ExtendSchema Form
- The ConnectedTrees Form
- The Login Form
- The CreateField Form
- The AssociateField Form
- The CreateLayout Form
- Conclusion
Introduction
This Developer Note describes a sample application that uses Microsoft's Visual Basic 6 and Novell's ActiveX controls to extend the NDS schema.
NDS is a Directory Service that allows you to easily manage your network resources. Simply put, the NDS Directory is a globally accessible, distributed database of objects that represents network resources, such as network users, servers, printers, print queues, and applications. This database is extensible, which means that you can customize the NDS base schema so that the resulting database suits the particular needs of your company or your applications. Novell's ActiveX controls, NWDir and NWSess, make it easy to write applications that extend the schema.
This article discusses a sample application I wrote with VB6 and NWDir to extend the schema. If you'd like more information about Novell's NDS ActiveX controls, follow the series of articles Morgan Adair is writing about the NDS controls. His series started in June, 1999, with an article titled, "Programming with the Novell Controls for ActiveX and Visual Basic: Getting Started." These articles are intended to help a person with basic Visual Basic experience start developing to Novell's NDS. In fact, I used his sample code in my application to connect and login to an NDS tree. You can download Morgan's articles from http://www.developer.novell.com.
Overview of the Application
I wrote the sample application as if I were writing an application that would make an administrator's ability to extend the schema easy. This way, I could write sample code that would help you understand how to enable your own application to extend the schema.
The application performs five tasks:
Connect to an NDS tree.
Login to an NDS tree.
Create a new field in the NDS schema.
Assign this new field to a pre-existing layout in the NDS schema.
Create a new layout for the schema and assign fields to it (including any you've created).
I designed the user interface around a toolbar I created and five forms. I used the forms for Login and Connect that are discussed in the "Programming with the Novell Controls for ActiveX and Visual Basic" Developer Notes series. You can also use this series to take the corresponding DeveloperNet University courses athttp://www.developer.novell.com.
Every form contains the toolbar so that the user can easily navigate from each form. In addition, the ExtendSchema, CreateField, AssociateField, and CreateLayout forms have a place on the top to display which tree the user has connected to. This label lets users always know which tree they are working with. If a user is not connected, this box is blank.
In addition to the forms, I created two modules: Globals.bas and PubFuncs.bas. Globals.bas contains the global variables and PubFuncs.bas contains the public functions. Most of the time I called a function from two or more forms, I made it a public function and put in the PubFuncs.bas module.
The ActiveX Controls Used in the Application
Almost every form in the Extend Schema application uses the same controls:
Toolbar.
ImageList.
NWSess (Novell).
NWDir (Novell).
In order to get a toolbar that would let me customize its size, I used the Microsoft Windows Common Controls 5 (SP2). The ImageList controls the images on the toolbar.
The NWSess and the NWDir controls allow the application to interact with NDS. These controls enable the user to login or connect to an NDS tree and establish a session. The NWDir control also helps the user manage the NDS schema. For more information about the NWSess and the NWDir controls, see Morgan Adair's series about Visual Basic and the ActiveX controls.
Let's look the modules and forms and the code behind them.
Global Variables
Because I needed a toolbar, NDS connections, and NDS fields on every form, I used some global variables. The code shown below defines these variables.
Option Explicit

Public defaultTree As String            'Holds the name of the tree we're using as default.

Public Button As MSComctlLib.Button

Public associateField As New NWFieldType 'Holds the name of the newly created field

to be associated

                                        'with a layout

Public flgNewFieldCreated As Boolean    'A signal that a new field has been created

Public flgConnected As Boolean          'A signal that the user has connected to a tree
defaultTree is first assigned a value for the tree name when the user connects to a tree in either the ConnectedTrees or the Login form. Every other form then uses this value to display the name of the tree the user is using as the default connection.
Button is assigned a value each time the user presses a button on the tool bar.
associateField is first assigned the newly created field name in the CreateField form after the user creates the new field. It's used in the AssociateField form so that the user can associate the new field with a pre-defined layout.
flgNewFieldCreated is first assigned a value in the CreateField form after the user has created the field. The toolbar function checks this flag to verify that users have created a field before they try to associate the new field with a layout.
flgConnected is assigned a value in the Connection and Login forms after the user has connected to a tree. The toolbar function checks this flag to make certain that users have connected to a tree before they try to create a field or layout.
The Public Functions
The following public functions are located in the PubFuncs.bas module:
GetConnectedTrees (used in the AssociateField and CreateLayout forms)
SetContext (used in the CreateField, AssociateField and CreateLayout forms)
Toolbar (used in all forms)
GetConnectedTrees Sample Code
The ConnectedTrees and Login forms both rely heavily on the GetConnectedTrees public function. GetConnectedTrees is shown in the sample code below.
Public Function GetConnectedTrees(lstConnectedTrees As ListBox, NWSess1 As NWSess)

As Integer

     Dim connectedTree As NWNetworkName


     'Display the trees the client's connected to

     For Each connectedTree In NWSess1.ConnectedTrees

          lstConnectedTrees.AddItem connectedTree

     Next connectedTree


      'Select the top tree as default

     If lstConnectedTrees.ListCount > 0 Then

          lstConnectedTrees.Selected(0) = True

          GetConnectedTrees = 0


     End If


End Function
As this code shows, GetConnectedTrees relies on the NWSess control. The NWSess control helps you establish and manage network sessions. This control contains several properties. This function relies on the properties defined in the list below.
|
Connected Trees |
Returns all connected NDS trees as a collection. |
|
DefaultFullName |
Sets and returns the user's default NDS tree and context. |
When GetConnectedTrees and the Login forms load, they call the public function GetConnectedTrees with these parameters:
lstConnected Trees The list box on the ConnectedTrees form that lists all the trees the user is connected to.
GetConnectedTrees returns an integer that both forms check to see if the user has successfully connected to any NDS trees.
The GetConnectedTrees function uses a For loop to go through NWSess1's ConnectedTrees collection and lists each connected tree in the list box. It then selects the tree listed first in the list box as the user's default tree. Both forms let users select another tree to be the default, if they want to.
SetContext Sample Code
The CreateField, AssociateField and CreateLayout forms call the SetContext function to set the user's default context for the form. Each form must have the default context set. SetContext is shown in the sample code below.
Public Function SetContext(NWSess1 As NWSess, NWDir1 As NWDir)


    'Set context to root of the tree the user has selected

     NWSess1.DefaultFullName = "NDS:\\" + defaultTree + "\[Root]"

     NWDir1.FullName = NWSess1.DefaultFullName

End Function
When the forms load, they call SetContext with the NWSess1 and NWDir1 parameters. NWSess1 and NWDir 1 are instances of the NWSess and the NWDir controls.
SetContext sets NWSess's DefaultFullName property to the user's context in the default tree. NWSess1's DefaultFullName property uses the defaultTree global string that contains the name of the tree the user selected. SetContext then sets the NWDir's FullName property to the name returned by NWSess's DefaultFullName property.
The code has now set the default context so the user can extend the schema in the proper tree.
ToolBar Sample Code
Every form calls the ToolBar function. Including the toolbar on every form enables the user to easily navigate the application. The ToolBar function is shown in the following sample code.
Public Function ToolBar(ByVal Button As ComctlLib.Button)

        Select Case Button.Key

          Case "Connect"

              Call unloadForms(ByVal Button)

              frmConnectedTrees.Show

          Case "Login"

              Call unloadForms(ByVal Button)

              frmLogin.Show

          Case "Field"

              If flgConnected = False Then

                    MsgBox "You must first log in."

                    Call unloadForms(ByVal Button)

                    frmLogin.Show

              Else

                    frmExtendSchema.MousePointer = vbHourglass

                    Call unloadForms(ByVal Button)

                    frmCreateField.Show

              End If

          Case "Layout"

              If flgConnected = False Then

                    MsgBox "You must first log in."

                    Call unloadForms(ByVal Button)

                    frmLogin.Show

              Else

                    Call unloadForms(ByVal Button)

                    frmCreateLayout.Show

              End If

          Case "Associate"


              If flgConnected = False Then

                    MsgBox "You must first log in."

                    Call unloadForms(ByVal Button)

                    frmLogin.Show

               Else

                    If flgNewFieldCreated = False Then

                         MsgBox "You must first create a new field"

                         frmCreateField.Show


                    Else

                         frmExtendSchema.MousePointer = vbHourglass

                         Call unloadForms(ByVal Button)

                         frmAssociateField.Show

                    End If

              End If

          Case "Cancel"

              Call unloadForms(ByVal Button)

              frmExtendSchema.Show

          Case "Exit"

              Call unloadForms(ByVal Button)

          End Select


End Function


Private Sub unloadForms(ByVal Button)

          Unload frmConnectedTrees

          Unload frmLogin

          Unload frmCreateField

          Unload frmCreateLayout

          Unload frmAssociateField


     If Button.Key <> "Cancel" Then<
          Unload frmExtendSchema

     End If


End Sub
The toolbar public function is fairly standard Visual Basic code. The code does some error-checking to ensure that users have connected to a tree, and that they have created a new field before they try to associate it with a layout.
The Exit and Cancel Functions
The Exit and Cancel functions on the toolbar are very basic. The Cancel function unloads any loaded forms and returns the user to the ExtendSchema form. The Exit function unloads the form and exits the application.
The ExtendSchema Form
The ExtendSchema form is the first form the user sees. It is also the form loaded when the user clicks on the cancel button.
Figure 1 shows the ExtendSchema form with the controls and attributes labeled.
Figure 1: The ExtendSchema form controls and attributes.
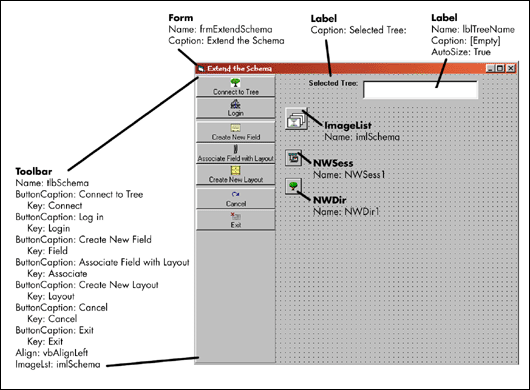
The ExtendSchema Form Sample Code
The ExtendSchema form uses the Novell ActiveX controls when it loads to check if the user has connected to a tree. If the user has connected to a tree, the code calls the public function SetContext with the NWSess1 and NWDir 1 parameters. The SetContext function is described in the "SetContext Sample Code" section.
The ExtendSchema form's code displays the default tree name at the top of the form. When the user clicks a button on the toolbar, the code calls the toolbar's public functions. The toolbar's code is explained in the "ToolBar's Sample Code" section.
Option Explicit


Private Sub Form_Load()

     'Check to see if you're connected to a tree.

     'If so, set the default context

        If flgConnected Then

         Call SetContext(NWSess1, NWDir1)

          'Display the tree name

         lblTreeName = defaultTree

    End If


    frmExtendSchema.MousePointer = vbDefault

End Sub


Private Sub tlbSchema_ButtonClick(ByVal Button As ComctlLib.Button)

    frmExtendSchema.MousePointer = vbHourglass 'The forms sometimes take a while to load

    Call ToolBar(ByVal Button)

End SubThe ConnectedTrees Form
The ConnectedTrees Form
Users select the tree whose schema they want to extend in this form. If users have already logged into the trees they're connected to, they can use this form to select a default tree. If they haven't already logged into the tree, they must use the login form, which the code automatically loads. Figure 2 shows the ConnectedTrees form with its controls and attributes labeled.
Figure 2: The ConnectedTrees form controls and attributes.
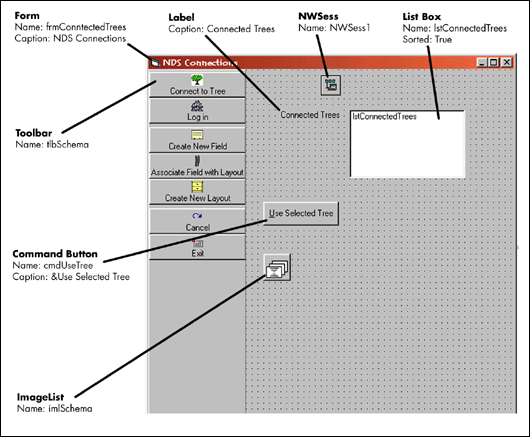
This form has a list box that contains all of the trees the user is connected to. In the list box, the users select the tree they want to extend the schema on. That tree then becomes their default connection for this application. The code behind this form is shown below.
The ConnectedTrees Form Sample Code
Option Explicit


Private Sub Form_Load()

Dim intConnected As Integer


    'List the connected trees in the list box

    intConnected = GetConnectedTrees(lstConnectedTrees, NWSess1)


    'If there are no connected trees, go to login

    If intConnected <> 0 Then<
          frmLogin.Show

          Unload frmConnectedTrees

    Else

          flgConnected = True

    End If


End Sub


Private Sub cmdUseTree_Click()


    'Set the tree to use to the selected tree in the list

    defaultTree = lstConnectedTrees.Text


    'It could take awhile, so change to hourglass

    frmConnectedTrees.MousePointer = vbHourglass


    'Go to the Extend the schema form

    frmExtendSchema.Show


    Unload frmConnectedTrees

End Sub


Private Sub lstConnectedTrees_DblClick()

    cmdUseTree_Click

End Sub


Private Sub tlbSchema_ButtonClick(ByVal Button As ComctlLib.Button)

    frmConnectedTrees.MousePointer = vbHourglass 'The forms sometimes take a

while to load

    Call ToolBar(ByVal Button)

End Sub
The ConnectedTrees relies on the public function GetConnectedTrees in the PubFuncs module. This function is described earlier in this article in the "GetConnectedTrees Sample Code."
Establishing a connection with an NDS tree is merely a matter of selecting the appropriate tree. The user must already be logged into the tree. The selected tree name is then assigned to a global variable that is used to build the user's context for each form.
When the user presses the Use Selected Tree command button, or double-clicks a tree in the list box, the code assigns the user's selected tree to the global variable defaultTree. This tree then becomes the default tree for the application until the user selects, or logs into, a different tree. The code then sets a global flag, flgConnected, to True.
The code checks flgConnected whenever the user pushes a button on the toolbar. If flgConnected is False, the user is not connected to a tree, and a msgBox pops up with the message, "You must first log in." When the user presses the OK button, the code loads the login form.
The Login Form
On this form, users login to an NDS tree whose schema they want to extend. Users use this form, if they haven't logged into, the NDS tree they want to use yet. Figure 3 shows the Login form with its controls and attributes labeled.
Figure 3: The Login form controls and attributes.
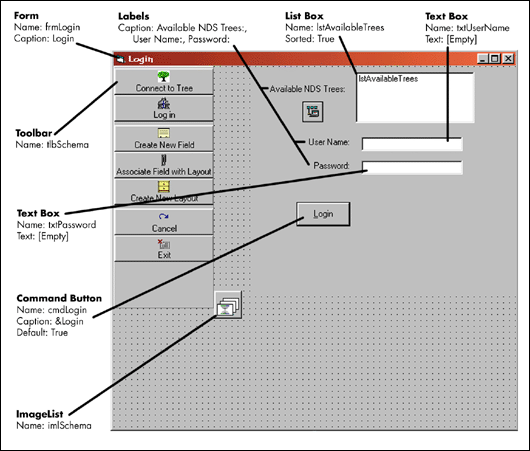
This form has a list box that contains all of the trees the user can log into. In the list box, the user selects the tree to extend the schema on. The user enters the user name and password in the appropriate text boxes on the form and press Login. If the users successfully logs in, that tree becomes the default connection for this application. The code behind this form is shown below.
The Login Form Sample Code
Private Sub Form_Load()

Dim intConnected As Integer


     'List the connected trees in the list box

     intConnected = GetConnectedTrees(lstAvailableTrees, NWSess1)


     'If there are no connected trees, go to login

     If intConnected <> 0 Then<
          frmLogin.Show

          Unload frmConnectedTrees

     End If

End Sub


Private Sub cmdLogin_Click()

     Dim intLoggedIn As Integer


     'Set the tree to use to the selected tree in the list box

     defaultTree = lstAvailableTrees.Text


     'Log in

     intLoggedIn = NWSess1.Login(NWSess1.DefaultFullNameFromTreeName(defaultTree),

          txtUserName.Text, txtPassword.Text, False)

     If intLoggedIn Then

          flgConnected = True

          frmExtendSchema.Show

          Unload frmLogin

     Else

          MsgBox "Unable to log in to server " + defaultTree

     End If


End Sub


Private Sub tlbSchema_ButtonClick(ByVal Button As ComctlLib.Button)

     frmLogin.MousePointer = vbHourglass 'The forms sometimes take a while to load

     Call ToolBar(ByVal Button)

End Sub
Like the ConnectedTrees form, this form calls the public function GetConnectedTrees when it loads. GetConnectedTrees then lists all the available trees in the form's list box.
The Login form relies on the NWSess control to establish the network session. It uses the NWSess control's Login method and passes it the following parameters:
DefaultFullNameFromTreeName(defaultTree) This is a method that returns the full name of the user's default context in the tree it's passed. The defaultTree variable is a global string and is assigned the name of the tree the user has highlighted.
txtUserName.Text The user's login name entered in UserName text box.
txtPassword.Text The user's password entered in the Password text box.
False This is a Boolean value for ShowUI. It determines whether the login user interface is shown. False means that the login will be silent. In other words, the login dialog won't pop-up, and the user will log in using the name and password entered in the form.
The following line accomplishes the Login:
intLoggedIn = NWSess1.Login(NWSess1.DefaultFullNameFromTreeName(defaultTree),

         txtUserName.Text, txtPassword.Text, False)
If the user successfully logs in, the code assigns the user's selected tree to the global variable defaultTree. This tree then becomes the default tree for the application until the user selects, or logs into, a different tree. The code also sets a global flag, flgConnected, to True. As discussed in the ConnectedTrees form, the flgConnected flag determines whether the user is connected to a tree, or whether the user must first log in.
After users either connect to or login to a default tree, they can choose to create a new NDS schema field or NDS schema layout. They can also choose to associate a newly-created field to a pre-existing layout.
The CreateField Form
Users create new fields for the NDS schema on this form. When they press the Create New Field button on the toolbar, the application checks whether they're connected to a default tree. If they're not, it pops up a message box telling them they must log into a tree, then loads the Login form.
Figure 4 shows the CreateField form with its controls and attributes labeled.
Figure 4: The CreateField form controls and attributes.
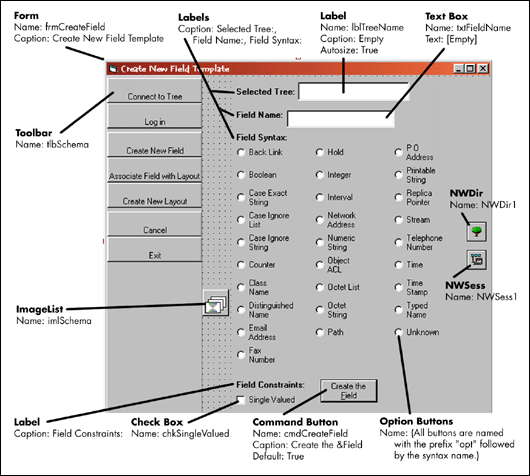
On this form, the user enters the new field's name in the text box, selects the appropriate syntax and chooses whether the field is single-valued or not. Then, all the user has to do is press the Create the Field button. The code then creates the new field. The sample code behind this form is shown below.
The CreateField Form Sample Code
Option Explicit


Dim newField As New NWFieldType

Dim added As Boolean

Private Sub Form_Load()


         'Set the NDS Context so we can use the right tree

         Call SetContext(NWSess1, NWDir1)


          'Display the tree name

         lblTreeName = defaultTree


         'Select default syntax

         optOctetString = True


End Sub


Private Sub cmdCreateField_Click()

     'Assign the field name

     newField.Name = txtFieldName.Text


     'Assign the field syntax

     Call GetSyntax


     'Assign the field constraints.

     'Right now, you can only determine

     'whether the field is single-valued.

     Call GetConstraints


     'Add the field name to the schema

     added = (NWDir1.FieldTypes.Add(newField))

     If added Then

          MsgBox "Added field:" + newField.Name

          flgNewFieldCreated = True

     Else: GoTo ErrorHandler

     End If

     associateField.Name = newField.Name

Exit Sub

ErrorHandler:

     If Err.Number = 615 Then

          MsgBox newField.Name + "has already been added to the schema." + vbCrLf

     ElseIf Err.Number = 672 Then

          MsgBox "You have insufficient rights to the directory. + vbCrLf"

     Else

          MsgBox "Unable to add field:" + txtFieldName.Text

     End If

End Sub


Private Sub GetSyntax()

     'Determine which syntax has been chosen

     'and assign it to the field

     Select Case True

          Case optBackLink.Value

              newField.Syntax = SYN_BACK_LINK

          Case optBoolean.Value

              newField.Syntax = SYN_BOOLEAN

          Case optCEString.Value

              newField.Syntax = SYN_CE_STRING

          Case optCIList.Value

              newField.Syntax = SYN_CI_LIST

          Case optCIString.Value

              newField.Syntax = SYN_CI_STRING

          Case optClassName.Value

              newField.Syntax = SYN_CLASS_NAME

          Case optCounter.Value

              newField.Syntax = SYN_COUNTER

          Case optDistinguishedName.Value

              newField.Syntax = SYN_DIST_NAME

          Case optEmailAddress.Value

              newField.Syntax = SYN_EMAIL_ADDRESS

          Case optFaxNumber.Value

              newField.Syntax = SYN_FAX_NUMBER

          Case optHold.Value

              newField.Syntax = SYN_HOLD

          Case optInteger.Value

              newField.Syntax = SYN_INTEGER

          Case optInterval.Value

              newField.Syntax = SYN_INTERVAL

          Case optNetAddress.Value

              newField.Syntax = SYN_NET_ADDRESS

          Case optNumericString.Value

              newField.Syntax = SYN_NU_STRING

          Case optObjectACL.Value

              newField.Syntax = SYN_OBJECT_ACL

          Case optOctetList.Value

              newField.Syntax = SYN_OCTET_LIST

          Case optOctetString.Value

              newField.Syntax = SYN_OCTET_STRING

          Case optPath.Value

              newField.Syntax = SYN_PATH

          Case optPOAddress.Value

              newField.Syntax = SYN_PO_ADDRESS

          Case optPrString.Value

              newField.Syntax = SYN_PR_STRING

          Case optReplicaPointer.Value

              newField.Syntax = SYN_REPLICA_POINTER

          Case optStream.Value

              newField.Syntax = SYN_STREAM

          Case optTelNumber.Value

              newField.Syntax = SYN_TEL_NUMBER

          Case optTime.Value

              newField.Syntax = SYN_TIME

          Case optTimeStamp.Value

              newField.Syntax = SYN_TIMESTAMP

          Case optTypedName.Value

              newField.Syntax = SYN_TYPED_NAME

          Case optUnknown.Value

              newField.Syntax = SYN_UNKNOWN

          Case Else

              MsgBox "Please choose a syntax."

     End Select

End Sub


Private Sub GetConstraints()

     'Determine if the field is to be single-valued

     'and assign that value to the field.

     'If and when the control supports the other

     'constraints, add them as check boxes and handle them here.

     If chkSingleValued Then newField.SingleValued = True

End Sub


Private Sub tlbSchema_ButtonClick(ByVal Button As ComctlLib.Button)

     frmCreateField.MousePointer = vbHourglass 'The forms sometimes take a

while to load

     Call ToolBar(ByVal Button)

End Sub


Private Sub txtFieldName_KeyPress(KeyAscii As Integer)

     'Check to see if user has pressed Enter. If so, shift the focus to the syntaxes

     If KeyAscii = 13 Then

          Call optOctetString.SetFocus

     End If

End Sub
As the code shows, the CreateField form depends upon Novell's NWDir ActiveX control. NWDir contains a number of collections, objects and properties to help you manage NDS entries and the schema. This form depends upon the NWFieldTypes collection of NWFieldType objects. It also uses the NWFieldTypes Add method.
As with most of the forms, when it loads, it calls the public function SetContext to set the default context for the form. It also displays the default tree name at the top of the form. The form does one other thing on loading, it selects the Octet String Syntax as the default syntax in case the user doesn't select a syntax. The octet string syntax is generic enough to handle most data types.
When you create a new NDS field type, you create an NWFieldType object. In order to create this object, you must assign values to these properties:
|
Name |
The name of the new field type. |
|
Removable |
Determines whether the field type can be removed. (Read only.) |
|
SingleValued |
Determines whether a field of this type can have multiple values. |
|
Syntax |
The NDS Syntax identifier for this field type. |
|
SyntaxName |
The NDS Syntax name represented in string format. |
|
TypeName |
The data type used to determine how to decode field data. (Read only.) |
The CreateField form lets the user define this information by filling out the form. The user need only enter the new field's name, select a syntax from the syntax option buttons, and determine whether the new field type is single-valued or not.
The NWDir control supports all of the NDS syntaxes and lets you select anyone of them for your new field. However, currently it only supports a few of the NDS field constraints, and only one of the constraints it supports is writable.
To briefly review, you can use the NDS field constraints to appropriately restrict the information the field can store and to constrain NDS and NDS client operations on that data The constraints are:
Hidden
Public Read
Server Read
Nonremovable
Operational
Read Only
Write Managed
Sync Per Replica
Schedule Sync Never
Sync Immediate
Single Valued
Sized
String
Of these constraints, NWDir supports only the Removable and Single Valued constraints. The Removable constraint is read-only, so the user can't set it. Removable is automatically set to TRUE for any field that a user creates, meaning that the field type can be removed. The only constraint the user can set is Single Valued. Selecting Single Valued on the form sets the Single Valued property to TRUE, meaning that the field type can have only one value, not multiple values.
When the user clicks the Create the Field command button, the code assigns the name entered in the txtFieldName text box to the new field's Name property. It then uses a Switch statement to determine which syntax option box is selected and assigns that syntax to the new field's Syntax property. The code also checks to see whether the user has checked the Single Valued check box and assigns the appropriate value to the new field's Single Valued property. Because the Removable and Type Name properties are read-only, the code doesn't assign any values to them.
The code then adds the new field to the NWFieldTypes collection with the following line:
added = (NWDir1.FieldTypes.Add(newField))
The code does some simple error-checking in order to tell the user whether the field type has been successfully added to the schema or not.
The last things the code does is to set a global flag that the user has created a new field and to set the global variable associateField to the newly created field. associateField holds the new field in case the user wants to associate the new field with a layout already contained in the schema. The user can use the AssociateField form to do this.
The AssociateField Form
On this form, users associate a field they just created with pre-defined layouts. When they press the Associate Field with Layout button on the toolbar, the application checks whether they're connected to a default tree. If they're not, it pops up a message box telling them they must log into a tree, then loads the Login form.
The toolbar function then checks the global flag flgNewFieldCreated to see if the user has created a new field before selecting to associate the field with a layout. If the user hasn't created a new field yet, a message box pops up stating that a new field must be created. The code then loads the CreateField form automatically.
Figure 5 shows the AssociateField form with its controls and attributes labeled.
Figure 5: The AssociateField form controls and attributes.
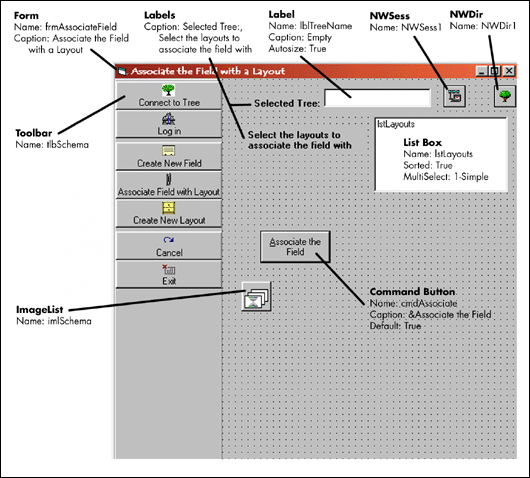
This form has a list box that contains a list of the predefined layouts in a list box. In the listbox, Users select the layout that they want to associate the new field with and presses the Associate the Field command button. Their new field is then associated with the layout they've selected. The sample code behind this form is shown below.
The AssociateField Form Sample Code
Option Explicit


Private Sub Form_Load()


          'Set the NDS Context so we can use the right tree

          Call SetContext(NWSess1, NWDir1)


          'Display the tree name

          lblTreeName = defaultTree


          'Fill the Layout list box with the schema layouts

          Call GetLayouts


 End Sub

Private Sub GetLayouts()

     Dim intIndex As Integer

     Dim Layout As NWLayoutDescription


     'Display the Layouts in the schema

     For Each Layout In NWDir1.Layouts

         lstLayouts.AddItem Layout.Name

         'For convenience, select Top as the default layout

          If Layout.Name = "Top" Then

                lstLayouts.Selected(intIndex) = True

          End If

          intIndex = intIndex + 1

     Next Layout

End Sub


Private Sub cmdAssociate_Click()

     Dim intIndex As Integer

     Dim Layout As NWLayoutDescription

     Dim flgFieldAdded As Boolean

     Dim flgNoError As Boolean


     flgNoError = True


     'Associate the appropriate fields to the new layout

      Do While intIndex <> lstLayouts.ListCount <
          If lstLayouts.Selected(intIndex) Then

              For Each Layout In NWDir1.Layouts   'Go through the Layouts collection

to find the matching

                                                    'layout

                    If lstLayouts.List(intIndex) = Layout.Name Then

                         flgFieldAdded =

NWDir1.Layouts(Layout.Name).Fields.Add(associateField) 'Add the new

                                                                               'field

                         If flgFieldAdded = False Then

                                 flgNoError = False  'This flag saves the error

                         End If

                         Exit For

                    End If

               Next Layout

          End If

          intIndex = intIndex + 1

     Loop

     If flgNoError Then  'If there was no error, all the fields were added.

          MsgBox "Field added to the layout."

     Else

          MsgBox "A field couldn't be added to the layout."

     End If


End Sub


Private Sub tlbSchema_ButtonClick(ByVal Button As ComctlLib.Button)

     Call ToolBar(ByVal Button)

End Sub
As the code shows, the AssociateField form depends upon Novell's NWDir ActiveX control. This form depends upon the NWLayoutDescriptions collection of NWLayoutDescription objects, and the NWFieldDescriptions collection ofNWFieldDescription objects. It also uses the NWFieldDescriptions Add method.
When the form loads, the public function SetContext sets the default context for the form. The form displays the default tree name at the top. The form then calls GetLayouts to fill the list box.
The GetLayouts function uses a for loop to fill the list box with the layouts contained in NWDir's NWLayoutDescriptions collection. While it steps through the collection, it also checks for the Layout named "Top". When the code finds "Top," it highlights Top as the layout chosen by default. In this form, I chose Top as the default layout only as a matter of convenience.
When the user clicks the Associate the Field command button, the code executes a Do While loop to go through the list in the lstLayouts list box, looking for the layout the user selected. When the code locates a selected layout, it then uses a nested For loop to look through NWDir's NWLayoutDescriptions collection, for the matching layout. When it finds the proper layout, it adds the field, held by the global associateField, to the layout collection. The line to add the field is shown below:
flgFieldAdded = NWDir1.Layouts(Layout.Name).Fields.Add(associateField)
The new field was assigned to the associateField global at the end of CreateField.
If the field can't be added to the layout for some reason, flgNoError saves the fact that an error occurred and causes a message box to pop up saying that a field couldn't be added to the layout.
Please remember that my application contains only rudimentary error-checking. A better solution would be to tell the user which layout caused the error.
The CreateLayout Form
Users create a new layout on this form. They can associate fields with the new layout, even fields they've created on the CreateField form. When they press the Create New Layout button on the toolbar, the application checks whether they're connected to a default tree. If they're not, it pops up a message box telling them they must log into a tree, then loads the Login form.
Figure 6 shows the CreateLayout form with its controls and attributes labeled.
Figure 6: The CreateLayout form controls and attributes.

On this form, the user enters the new layout's name in the Layout Name text box, selects the layout the new layout will be based on (or inherit from), and chooses any additional fields they want to add to the new layout. They also select whether other objects can be created from the layout (the layout's effective) and whether those objects will be containers. Then, all they have to do is press the Create New Layout Description Button. The code then creates the new layout. The sample code behind this form is shown below.
The CreateLayout Form Sample Code
The code for this form is longer and more complex than any of the previous forms. So, it is probably easier to look at it in sections. The code to load this form is much more complex than the code to load the previous forms; so, we'll look at it as a separate section. The code that handles a selected layout is the second code section, and the code that actually creates the layout is the final code section.
Option Explicit

Dim NewLayout As New NWLayoutDescription

Dim layoutAdded As Boolean, fieldsAdded As Boolean


Private Sub Form_Load()


          'Display the tree name

          lblTreeName = defaultTree


          'Set the NDS Context so we can use the right tree

          Call SetContext(NWSess1, NWDir1)


          'Fill the Layout list box with the schema layouts

          frmCreateLayout.MousePointer = vbHourglass

          Call GetLayouts


          'Fill the Fields list box with the fields

          Call GetFields


          frmCreateLayout.MousePointer = vbDefault


End Sub


Private Sub GetLayouts()

     Dim intIndex As Integer

     Dim Layout As NWLayoutDescription


     'Display the Layouts in the schema

     For Each Layout In NWDir1.Layouts

          lstBasedOn.AddItem Layout.Name

          'Because Everything inherits at least from Top, we'll select Top

          If Layout.Name = "Top" Then

            lstBasedOn.Selected(intIndex) = True

          End If

          intIndex = intIndex + 1

     Next Layout

End Sub


Private Sub GetFields()

     Dim Field As NWFieldType


    'List the fields into the Field list box

     For Each Field In NWDir1.FieldTypes

          lstFields.AddItem Field.Name

     Next Field


     'Because all objects inherit from Top, remove Top's select

     'From the list of possible Fields to select

     Call RemoveTopFields


End Sub


Private Sub RemoveTopFields()

     Dim intIndex As Integer

     Dim Field As NWFieldDescription


     Do While intIndex <> lstFields.ListCount + 1<
         For Each Field In NWDir1.Layouts("Top").Fields

              If lstFields.List(intIndex) = Field.Name Then

                  lstFields.RemoveItem (intIndex)

              End If

          Next Field

     intIndex = intIndex + 1

     Loop

End Sub
As the above code shows, the CreateLayout form depends upon Novell's NWDir ActiveX control. NWDir contains a number of collections, objects and properties to help you manage NDS entries and the schema. This form depends upon the NWLayoutDescriptions collection of NWLayoutDescription objects. It also uses the NWLayoutDescriptions Add method.
As with most of the forms, when it loads, it calls the public function SetContext to set the default context for the form. It also displays the default tree name at the top of the form. The form does a few other things on loading, it:
Lists all of the layouts in the schema in the Layout Based On list box.
Lists all of the fields in the schema in the Additional Fields to associate with this layout list box.
Removes from the list box all of the fields that the new layout will inherit from the layout it's based on.
After the code sets the context, it calls the GetLayouts function to fill in the Layout Based On list box. This function uses a For loop to step through the NWLayoutDescriptions collection and add them to the list box. Because every layout must inherit at least from the "Top" layout, the code selects the "Top" layout as the default selection.
The Form_Load code then calls the GetFields function. The GetFields function also uses a For loop to set through the NWfieldTypes collection and add them to the list box. When it has added all the fields to the list box, it calls the RemoveTopFields function.
The code must remove all fields associated with Top so that the user can't select them to add to their new layout. NDS could generate an error if the user tries to add fields the layout's already inherited. Removing any fields associated with Top prevents this error. Because all objects must inherit from at least Top, the code always removes the fields associated with Top. Later, the code also removes any fields associated with any layout the user has selected to base the new layout on.
The RemoveTopFields function uses a Do While loop to step through the list box. A nested For loop compares each field in Tops Fields property with the field name in the list box. To access Top's Fields property, you use the NWLayoutDescriptions collection, passing it the layout's name instead of the index. The code looks like this:
For Each Field in NWDir1.Layouts("Top").Fields...
When the code finds a field name that matches one of the field names in Top's Fields properties, it deletes it from the list box.
The form is now loaded and waiting for user input. By filling out this form, the user fills out a template to create a new layout. A new layout requires values for the following properties:
|
Name |
The layout's name. |
|
BasedOn |
The name of the layout that the layout is based on (inherits from). |
|
Fields |
The fields attached to this layout. |
|
Container |
Specifies whether the layout is a container. |
|
Createable |
Specifies if an entry of this layout can be created. |
|
ImageIndex |
The index key used to locate a layout bitmap image. (Read only.) |
|
Removable |
Specifies whether the current layout can be removed. (Read only.) |
Both the ImageIndex and Removable properties are read-only. The user can't set them. Users can remove layouts they create.
To review, NDS objects have class flags associated with them. These class flags define the operations NDS allows on the object class. Usually, you can set these flags:
Container Flag.
Effective Flag.
Auxiliary Flag.
Non-removable Flag.
Currently, Novell's ActiveX controls allow you to only determine whether your layout is effective (you can create objects from it) and whether objects created from the layout will contain other objects.
The CreateLayout form lets users create new layouts by:
Entering the layout's name in the Layout Name text box.
Selecting a layout to base the new layout on in the Layout Based On list box.
Selecting fields to associate with the new layout in the Additional fields to associate with this layout list box.
Clicking the check boxes to determine whether objects can be created from the layout and whether those objects will contain other objects.
When the user selects a layout to base their new layout on, the code immediately removes any fields the new layout would inherit from the layout the user has selected. This includes all of the fields the selected layout has inherited from other layouts. In other words, the code walks the inheritance chain and removes all possible inherited fields. This prevents the user from selecting any fields the layout already has and generating a possible NDS error.
Private Sub lstBasedOn_Click()


     'It could take awhile, so change to hourglass

     frmCreateLayout.MousePointer = vbHourglass


     'Remove the fields our layout inherits from the layout its based so

     'the user can't select fields the layout already has.

     'This avoids an NDS error


     Call RemoveInheritedFields


     'Change the cursor back

     frmCreateLayout.MousePointer = vbDefault


End Sub

Private Sub RemoveInheritedFields()

     Dim intIndex As Integer

     Dim inheritedLayout As New NWLayoutDescription

     Dim Field As NWFieldDescription


     'Compare the fields associated with the layout our layout is inheriting from

     '(based on) to the fields in the field box. If the fields match, our layout is

     'inheriting that field already. If we allow the user to select that field, NDS

     'will generate an error. So remove all fields our layout inherits. Top's

     'fields are already gone.


     If lstBasedOn.Text <> "Top" Then<
          inheritedLayout.Name = lstBasedOn.Text

          Do Until inheritedLayout.Name = "Top"

              Do While intIndex <> lstFields.ListCount + 1<
                   For Each Field In NWDir1.Layouts(inheritedLayout.Name).Fields

                         If lstFields.List(intIndex) = Field.Name Then

                              lstFields.RemoveItem (intIndex)

                         End If

                    Next Field

                    intIndex = intIndex + 1

              Loop

              inheritedLayout.Name = NWDir1.Layouts(inheritedLayout.Name).BasedOn

          Loop

     End If


End Sub
The RemoveInheritedFields code walks the inheritance chain to determine which fields the new layout will inherit. To do this, it uses a Do Until loop with a nested Do While loop that has a nested For loop.
The looping starts by setting inheritedLayout.Name to the highlighted layout name in the lstBasedOn list box. The inheritedLayoutName always holds the name of the layout we are looking at in the inheritance chain. The code starts with the highlighted layout in the lstBasedOn list box and compares the fields in the lstFields list box with the fields associated with the layout in inheritedLayoutName. When it is through comparing all the fields in the lstFields list box, the code sets inheritedLayout's Name property to the name of the layout in the BasedOn property and searches through the lstField list box for all the fields associated with that layout. The code continues setting inheritedLayout's Name property to the name in its BasedOn property until the Top layout is reached. The code then quits looping.
The actual loops work like this:
The Do Until loop loops until inheritedLayout.Name matches "Top." At this point, the code stops searching the NWLayoutDescriptions collection because Top's fields are already removed from the list box.
The nested Do While loop walks through the lstFields list box.
The nested For loop searches through inheritedLayout.Name's Fields property for field names that match the names in the lstFields box and removes any matching field names.
When all the fields in inheritedLayout.Name's Fields properties have been compared, inheritedLayout.Name is set equal to its BasedOn property and the looping begins again.
When the looping is done, all the fields the new layout will inherit have been removed from the lstFields list box so that the user can't select them. The form is again waiting for user input.
The next code actually creates the layout.
Private Sub cmdCreateLayout_Click()


     'Assign the Layout Name

     NewLayout.Name = txtLayoutDescName.Text


     'Assign the inheritance

     NewLayout.BasedOn = lstBasedOn.Text

     Call SetLayoutFlags


     'Add the layout to the schema

     layoutAdded = (NWDir1.Layouts.Add(NewLayout))


     'Check if the layout was successfully added to schema and tell user

     If layoutAdded Then

          MsgBox "Added Layout:" + NewLayout.Name

          Call AssociateFields

     Else

        MsgBox "New Layout" + NewLayout.Name + "wasn't added."

     End If


End Sub


Private Sub SetLayoutFlags()


     ' If the objects can be created from the layout, set the creatable property

     ' to True. The default is False

     If chkCreatable <> True Then<
          NewLayout.Createable = False

     End If


     ' If objects created from the layout are containers, set the container property

     ' to True. The default is False

     If chkContainer = True Then

          NewLayout.Container = True

     End If


End Sub

Private Sub AssociateFields()

     Dim intIndex As Integer

     Dim Field As NWFieldType

     Dim FieldDescription As New NWFieldDescription


 'Associate the appropriate fields to the new layout

     Do While intIndex <> lstFields.ListCount<
          If lstFields.Selected(intIndex) Then

               For Each Field In NWDir1.FieldTypes

                    If lstFields.List(intIndex) = Field.Name Then

                         FieldDescription.Name = lstFields.List(intIndex)

                         fieldsAdded =

NWDir1.Layouts(NewLayout.Name).Fields.Add(FieldDescription)

                         Exit For

                    End If

               Next Field

          End If

          intIndex = intIndex + 1

     Loop

     If fieldsAdded Then

          MsgBox "Added fields to " + NewLayout.Name

     End If


End Sub


Private Sub txtLayoutName_KeyPress(KeyAscii As Integer)

     'Check to see if user has pressed Enter. If so, shift the focus to the

Based On box

     If KeyAscii = 13 Then

          Call lstBasedOn.SetFocus

     End If

End Sub


Private Sub lstBasedOn_DblClick()

     lstBasedOn_Click

End Sub


Private Sub tlbSchema_ButtonClick(ByVal Button As ComctlLib.Button)

        Call ToolBar(ByVal Button)

End Sub
When the user clicks the Create the New Layout Description command button, the code assigns the name entered in the txtLayoutDescName text box to the new layout's Name property. It then assigns the layout name highlighted in the lstBasedOn list box to the new layout's BasedOn property. The code then calls the SetLayoutFlags function.
SetLayoutFlags determines whether the chkCreatable and chkContainer check boxes are checked and sets the new layouts Createable and Container fields appropriately.
The code then adds the new layout to the NWLayoutDescriptions collection with the following line:
layoutAdded = (NWDir1.Layouts.Add(NewLayout))
The code does some basic error checking to ensure that the layout has been added to the schema.
The new layout description isn't quite finished, however. The code must still associate any additional fields to the new layout. So, the code calls the AssociateFields function.
The Associate Fields function uses a Do While loop to walk through the listFields list box, looking for selected fields. The user can select multiple fields, so the Do While loops through the entire list box. When the code finds a selected field name, it uses an embedded For loop to look through the NWFieldTypes collection for a matching field name. When it finds the correct field, it adds that field to the new layout with the following line:
fieldsAdded = NWDir1.Layouts(NewLayout.Name).Fields.Add(FieldDescription)
When the code has found all of the selected fields in the lstFields list box, it exits the loops. If it appears that the fields have been successfully added, a message box pops up and informs the user that the fields have been added to the new layout.
Again, remember that I did extremely basic error checking. A better method would be to ensure that every field is added successfully and inform the user of any fields that were not added.
The NDS schema now contains the new layout description.
Conclusion
I created the Extend Schema application primarily to show how your applications could extend the NDS schema using Visual Basic and Novell's ActiveX controls. The NWDir and NWSess controls are extremely powerful and help you rapidly and simply develop powerful NDS applications.
If you want more information about Novell's ActiveX controls, see the series of articles Morgan Adair is writing about the NDS controls, starting in June, 1999. You can download these articles from Developer Notes at http://www.developer.novell.com. You can also take the course that corresponds to these articles at Novell's DeveloperNet University on the same website.
You can download the source code for my Extend Schema application at:
http://developer.novell.com/education/library.html
* Originally published in Novell AppNotes
Disclaimer
The origin of this information may be internal or external to Novell. While Novell makes all reasonable efforts to verify this information, Novell does not make explicit or implied claims to its validity.