iManager 1.5, Part 2: Assigning Roles and Tasks
Articles and Tips: article
Research Engineer
Novell AppNotes
jfischer@novell.com
01 May 2003
In last month's article, we installed iManager 1.5 on a NetWare 6 server, a Windows 2000 server, and a Linux server. We also talked about the new role-based administration paradigm that iManager follows, and defined roles and tasks. In this month's article, we'll continue our discussion of iManager 1.5 by talking about how to access iManager 1.5, how to create roles and assign tasks and users to the roles, and define Role Based Services (RBS) objects.
Accessing iManager
Once you have successfully installed iManager, you can begin administering your tree with the utility. In order to access iManager, you need to have a browser (Internet Explorer 5.5 or later, or Netscape 6.2 or later). To access iManager 1.5 on a NetWare server, open your browser and type the following address in the address bar:
https://ip_address:2200/eMFrame/iManager.html
To access iManager on a Windows 2000 Server, type in the following address in the browser address bar:
http://ip_address/eMFrame/iManager.html
To access iManager running on a Linux server, type in the following address in the browser address bar:
http://ip_address:2200/eMFrame/iManager.html
When you access iManager, you will see the home page, which should look similar to the one shown in Figure 1.
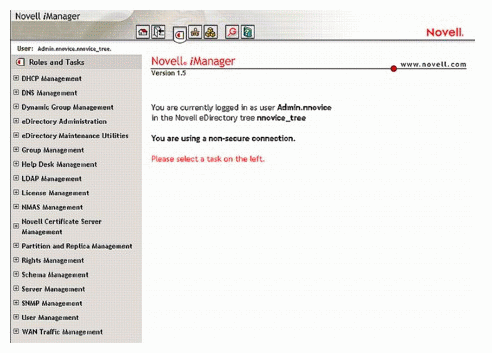
iMonitor's Home Page
Navigating In iManager
The navigation of iManager 1.5 is considerably different from previous NetWare administration tools. First of all, it is completely browser-based instead of a client application like NWAdmin32 and ConsoleOne. You navigate in iManager by using the navigation bar at the top and by using the content pane on the left- hand side of the window. The content you want to see is displayed to the right of the content pane. The display is done using HTML, so you can follow the links provided in the browser interface.
One important point that must be mentioned is that you should only use the navigation links provided to you by iManager. You should not use the back and forward navigation buttons on your browser. The content on iManager is generated dynamically using scripts and programs that query the Directory and display the data inside the browser. If you use the browser's navigation buttons, you may not see accurate information and you will mostly experience errors from the inaccurate content as you update and change information in the Directory.
Secondly, iManager uses pop-up windows in many locations so you may need to disable any ad or pop-up filtering software you are using. Or, if the software supports it, you can add the domain name to your list of addresses to not filter pop-up windows.
Navigation Bar
Figure 2 shows the navigation bar of iManager.
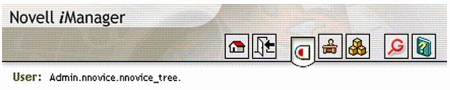
As shown in Figure 2, you navigate through the functions of iManager by using the navigation bar. At the left edge of the navigation bar, you will see the username and context of the user that is currently logged in to iManager.
You will need to know to where each of the buttons on the navigation bar is linked. The following table shows the names of the buttons and gives an explanation of what each one does.
|
Button Name
|
Explanation
|
|
Home |
Returns to the home screen of the currently selected button |
|
Exit |
Exits from iManager |
|
Roles and Tasks |
Displays the roles associated with the logged in user |
|
Configure |
Option to manage RBS such as create/edit roles, and tasks |
|
Developer |
Allows you to create custom tasks |
|
eGuide |
Launches eGuide Administration |
|
Help |
Launches the help window that links to the Novell Document web site. |
Content Pane
The content pane displays the available operations that you can perform within an area on the navigation bar. The pane also displays the roles that are defined for that area. For example, if you choose the Roles and Tasks button, you will see several predefined roles in iManager. You can then navigate through these roles and perform the network administration tasks you need to perform.
Figure 3 shows the content pane for the Roles and Tasks button.
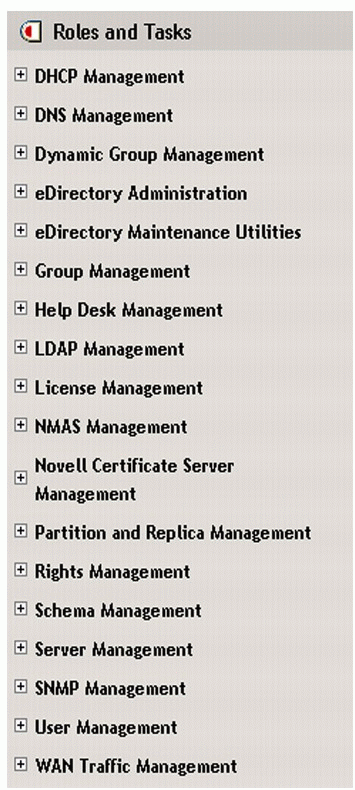
The content page for the Roles and Tasks button
Set Up Roles and Tasks
One of the main benefits of iManager over other administration tools is the Role Based Services (RBS) administration paradigm that is used. This allows you to easily, quickly, and effectively distribute the administration of your network to other users. It also allows the administrative users to more easily perform their assigned tasks without being confused by other network functions.
The network- assigned administrative user will only see the administrative functions they have access to and won't even have to browse through the entire tree to find their location, as is the case with both ConsoleOne and NetWare Administrator. A user can be assigned as many roles as necessary in the tree. It's always a good idea to have a tree-wide administrative user that has access to all roles and functions within the tree.
Installing iManager 1.5 extends the schema of the tree and adds the following RBS objects to the tree.
|
Object
|
Description
|
|
rbsCollection |
Container object that holds all RBS role and module objects |
|
rbsRole |
Specifies the tasks that users are authorized to perform |
|
rbsTask |
Represents a specific function, such as resetting login passwords |
|
rbsScope |
Represents the context in the tree where a role will be performed. This object is associated with the rbsRole objects |
|
rbsModule |
Holds the rbsTask objects |
These objects are created once you install iManager and log in to it for the first time. They organize Role Based Services in the eDirectory tree. The collection object is the top-level container for all other RBS objects and holds rbsModule and rbsRole objects.
An rbsModule object holds a specific task, while an rbsRole holds an rbsScope object. It is the rbsModule that actually defines the administrative tasks that can be performed in the tree. Once a role is created, it uses the capabilities that are defined by a module.
The iManager installation includes several rbsModules for your use to define roles, even though several roles have already been defined for you. As each new product or service is added to the tree, the service can add a new module with predefined administrative tasks. For example, when you install ZENworks, it will add new rbsModules into the tree. Roles can then be created from these new administrative tasks that are available.
A scope object is used to limit the scope of where a user can perform the tasks granted to them in their role. For example, if you only want a user to be able to create other users in the context edu.prv.nnovice, then you would specify a scope object when you associate a user with the role.
rbsTasks are the actual administrative functions that can be performed in the tree, such as creating user objects in the tree. A role will give an administrative user access to perform the specified tasks.
iManager Roles
iManager 1.5 creates over a dozen new roles in the tree for you. These are general roles, but they can be used to help distribute the administrative functions within the network.
For example, one role is called DHCP Management. Granting a user as a member of this role would give the user the right to perform tasks such as IP address management, subnet management, DHCP server management and others. A member of this role would be able to administer all aspects of DHCP for your network. Members of roles can be users, groups, or even containers. Next month we will begin a discussion of each predefined role that comes in iManager.
Creating a New Role
Even with all the predefined roles in iManager, it may be necessary to define your own roles with tasks to fit the needs of your network. This is easy with iManager. When you create a new role, you will see a new rbsRole object appear in the tree underneath the rbsCollection object. This role will also be added to the content pane for the members of this role.
To create a new role, perform the following steps:
Log in as the owner of the rbsCollection where you will create the role object.
Click the Configure button.
Click Role Configuration > Create iManager Role.
Enter a name for the role in the Role Name field.
Specify an rbsCollection to hold the object in the Collection field. You can enter a description for the role in the Description field if you choose to.
Click Next .
Select the tasks you want assigned to this role. Click Next .
Select the name and context of the members you want associated with this role.
Define the scope where you want the member of this role to perform these tasks. Each member can have their own scope or they can all have the same scope.
Check the Inheritable check box if you want the members to be able to perform these tasks inside this container and in other containers underneath it. Uncheck the box if they should only be able to perform the scope inside the selected container.
Click Add .
Repeat steps nine and 10 for each object you added as a member of this role.
Click Next .
Click Finish .
Conclusion
You have now learned how to access the iManager utility and how navigate from within it as well. We also discussed how Role Based Services is set up and detailed the steps to create a new role.
In next month's article, we'll begin a discussion about the predefined roles in iManager and how to create new tasks, modules, collections, and property books. We'll also discuss User Self Management.
* Originally published in Novell AppNotes
Disclaimer
The origin of this information may be internal or external to Novell. While Novell makes all reasonable efforts to verify this information, Novell does not make explicit or implied claims to its validity.