NetWare 6 Trustee Rights: How They Work and What to Do When It All Goes Wrong
Articles and Tips: article
GSC OS Mentor Software Engineer
Novell, Inc. Novell, Inc.
mculver@novell.com rstokes@novell.com
Thanks to Mike Hasleton and Paul Hardwick for their invaluable assistance with this AppNote.
01 Feb 2003
This AppNote aims to counter the considerable misunderstanding regarding how NetWare 6 deals with trustees. It explains how NetWare 6 identifies rights to access files, often referred to as the trustee process. In addition to providing general technical information about the components involved in the process, it looks at common problems Novell has seen with trustees; then it provides you with solutions to those problems.
- Introduction
- Important Concepts and Terminology
- Checking and Repairing the Visibility List
- Troubleshooting Duplicate and Missing GUIDs
- Troubleshooting Trustee Corruption
- Background Trustee Checks
- Conclusion
|
Topics |
NetWare security, trustees, Inherited Rights Mask, troubleshooting |
|
Products |
NetWare 6, Novell Storage Services (NSS) |
|
Audience |
network administrators, support technicians |
|
Level |
advanced |
|
Prerequisite Skills |
familiarity with NetWare trustee rights |
|
Operating System |
NetWare 6 |
|
Tools |
none |
|
Sample Code |
no |
Introduction
Since the release of NetWare 6, much speculation and misunderstanding has arisen about how this operating system handles trustee rights, especially regarding the new version of the Novell Storage System (NSS) file system.
This AppNote helps clear up these misunderstandings and provides useful troubleshooting information. It first defines some important concepts and terms; then it provides a technical description of how NetWare 6 identifies users' rights to access files, referred to as the trustee process. It then looks at common problems Novell has seen regarding trustees, and provides solutions to those problems.
As the title suggests, the AppNote doesn't cover previous versions of NetWare. However, many of the principles can be used for older NetWare versions.
If you aren't familiar with NSS, read "Novell Storage Services (NSS) Performance Monitoring and Tuning" in the July 2002 issue of Novell AppNotes, available at http://support.novell.com/techcenter/articles/ana20020701.html.
Important Concepts and Terminology
Before learning about the problems and solutions, you need to understand the following concepts and terminology.
ID Types
ZID (or Z ID): A numeric ID within the NSS file system, used to reference an object with the object store (also known as the "beast tree"). ZIDs are 64 bits and are unique for each volume.
EID (Entry ID): An entry number in a database. In this AppNote an EID refers to an eDirectory entry within the FLAIM database (the underlying database for Directory Services 8.35 and later, including all eDirectory versions). EIDs are 32 bits and are unique for each server.
EIDs are used within eDirectory to reference objects on a specific server. They are unique for each object for each server, meaning that object CN=Admin.O=EMA_CORP will potentially have a different EID on server FS1 than on server FS2.
This can be demonstrated with DSBROWSE.NLM, a tool you can use to examine the local eDirectory database on the NetWare server. If you examine an object on one server and compare it with the same object on another server, the EID between the two instances of the object are probably dissimilar.
GUID (Global Unique ID): A globally unique identifier within eDirectory. GUIDs were introduced in NetWare 5 but seldom used by applications. Although the GUID was allowed for in the schema, most objects did not have this attribute. As the acronym states, a GUID is globally unique. The scope of this uniqueness is within one tree, although no actual checking is done to ensure this.
Note: DNS Federated Trees rely on the 128-bit GUID number being unique. Therefore, it's probable that GUIDs found in one tree will not exist in another.
Unlike EIDs, if you find two different objects in the same tree with the same GUID, you have an error known as Duplicate GUIDs. (We will discuss this problem later in this AppNote.)
GUIDs are 128 bits and are unique for each object. From NetWare 6 onwards most, if not all, objects have a GUID attribute. GUIDs allow an object to be referenced no matter which server you are accessing.
Figure 1 shows an example of a GUID, which is stored as an attribute of an object in eDirectory.
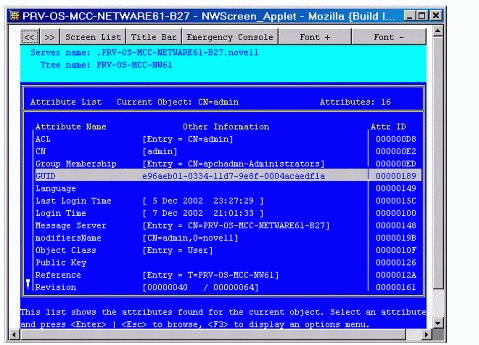
Figure 1: Viewing the GUID for an eDirectory object.
The Client
The NetWare Client establishes an authenticated connection to the server through Directory Services (DS.NLM). It does not perform periodic authentication checks, nor does it track rights. NetWare ensures that the connection table is up-to-date, and that the entries in the connection table are used to give correct access to the file system. The client does not control the rights process. To do so would introduce a security flaw into the client/server relationship in NetWare.
The Connection Manager
When a file is requested from either the traditional or the NSS file system, the NLS Connection Manager (CONNMGR.NLM) is asked for the pre-built list of anything that could have trustees concerned with the object, including:
The requesting object itself (explicitly assigned trustees)
Group memberships
Security equivalences for the object
The contents of this table are determined at connection time. Once the connection is established, the information is relatively static unless the connected user is added to a new group or is given an explicit trustee assignment or security equivalence. In those situations CONNMGR.NLM updates the table and sends out an event that the table has changed. NSS uses this event to update its own connection table.
The NSS connection table entry for a user is established at the same time as the regular connection table entry. It is not established at file system access time. It can be thought of as part of the connection table with NSS-specific information, including the eDirectory object's GUID.
CONNMGR.NLM gathers this information from DS.NLM in the form of a connection table comprised of the eDirectory EIDs for the object, for group memberships, and for security equivalences.
After DS.NLM has given this list of EIDs to CONNMGR.NLM, what happens next depends on whether you are using the traditional file system or NSS. If it is the traditional file system that is asking, the list of EIDs is all that's needed). The list is compared against the Directory Entry Table (DET) for valid trustees by looking at the assigned trustees in the directory structure above (for trustee inheritance) and at the target file system object (for explicit trustee assignments). Inherited Rights Masks (IRMs) are also taken into consideration.
Because the purpose of this AppNote is to look at the NetWare 6 implementation of trustees and the primary file system for NetWare 6 is NSS, the remainder of this discussion will focus on how the trustee process is implemented in NSS.
The NSS Connection Table
NSS uses GUIDs as the key for trustees. It keeps its own connection table with these GUIDs and compares it with the beast object entry to look for valid trustees. It finds valid trustees by looking at assigned trustees in the directory structure above (for trustee inheritance) and at the target file system object (for explicit trustee assignments), also taking IRMs into consideration.
If this fails to provide a method of access, NSS then checks the visibility list (described in detail below) to see if it is a parent directory that requires visibility due to a rights assignment for a child directory.
Using GUIDs instead of EIDs allows the luxury of not caring which server you are on, provided it's in the same tree-which is why Novell Cluster Services uses NSS.
NSS doesn't directly access the connection table. However, it does make calls to read certain information from it to form its own connection table. The NSS connection table consists of a superset of this information.
Trustee Storage
In NSS, trustee rights assignments are stored as a GUID and a rights mask on the beast object. The mask has a bit for each assigned right (the same basic bits as for the traditional file system, but with a few new ones not listed here).
The rights bits are set in the following order:
|
Bit
|
Type
|
|
0 |
R - Read (file reads are allowed) |
|
1 |
W - Write (file writes are allowed) |
|
2 |
Reserved |
|
3 |
C - Create (files can be created) |
|
4 |
E - Erase (files can be deleted) |
|
5 |
A - Access Control (trustee rights can be assigned) |
|
6 |
F - File Scan (files can be viewed in a directory scan) |
|
7 |
M - Modify (files can be modified) |
|
8 |
S - Supervisor (all rights are granted) |
So a trustee assignment of "RF" rights, for example, set bits 0 and 6 high, with the resulting trustee mask value being "001000001". An assignment of "RWCFM" rights set bits 0, 1, 3, 6 and 7 high, with the resulting value being "011001011".
Using these values, a trustee assignment stored in a beast object would look something like this:
GUID Trustee Mask
479f9c81-e1d3-11d6-a310-0004acae89f7 011001011
1a9fb983-e1d4-11d6-a310-0004acae89f7 010000000
2b502f81-e1d4-11d6-a310-0004acae89f7 010000010
2b502f80-e1d4-11d6-a310-0004acae89f7 011001000
Up to four trustees can be assigned to a single beast object. If more than four are needed, an ACL overflow beast object is created and linked to the main beast. The extra trustees are put in the overflow beast. The overflow trustee beast can hold around 20 entries before needing to overflow to the next ACL overflow beast.
The first ACL overflow beast is pointed to by a ZID in the authorization structure on the beast object for the file or folder. If more ACL overflow beasts are required (for example, if you need to store 35 trustees), the next ACL overflow beast is linked from the last ACL overflow beast, creating a linked list.
Inherited Rights Masks (IRMs)
In NetWare, trustee rights assignments made at a given directory level "flow down" to lower levels until they are either changed or masked out. This is referred to as inheritance. The mechanism provided for preventing inheritance is called the Inherited Rights Mask or IRM.
IRMs are taken into account when NSS builds what is referred to as the effective Access Control List (ACL) for a file or directory. The effective ACL is a list of all users who have rights to the directory and includes the rights they have. It is calculated by starting at the root of the volume and working down to the file.
At each level, the IRM is applied to all rights inherited from the parent directory. Only those rights allowed by the mask are inherited by the child object. Rights for the various trustees explicitly assigned to the child are then collected. When a trustee inherits rights from above, the new rights replace the old ones (except the Supervisor right, which cannot be masked or removed by a new assignment to the same trustee).
By the time NSS reaches the target file/directory, it has a list of all trustees and the rights assigned and inherited for this file/directory. This list is then compared against the entries in the connection table structure. Every time there is a match in the connection table with an entry in the effective ACL, the rights are added to those that the owner of the connection has to this file/directory. This is the heart and soul of how inherited rights work.
Figure 2 shows an example of how inheritance and IRMs work. In the example, Bob is a member of a group named "Group".
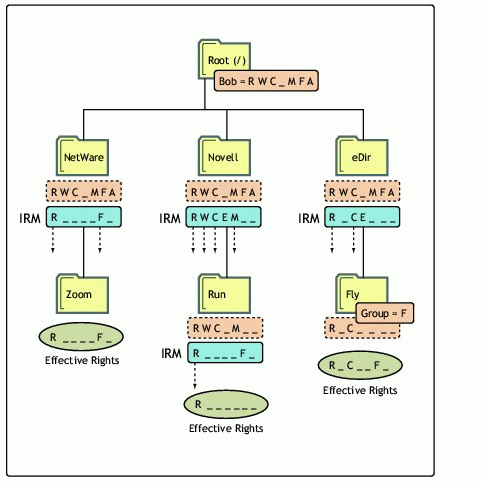
Figure 2: Example of how inheritance and IRMs work.
Suppose the top of this path is the root of drive C. Let's go through and examine Bob's effective rights at the lower layers of the directory structure.
C:\
At the root level, some kindly administrator has granted Bob RWCMFA rights. (Since Bob always gets things right the first time and never needs to delete anything, he doesn't need the Erase right.) Because we are at the root, there is nothing to inherit and therefore no IRM. Thus his effective rights at this level are RWCMFA.
C:\NetWare\zoom
Bob encounters an IRM of RF at the NetWare level, restricting the rights he can inherit to RF. Because Bob has no other rights assignments or restrictions to consider, his effective rights in the zoom directory are RF.
C:\Novell\Run
Bob encounters an IRM of RWCEM at the Novell level, restricting his inheritance to RWCM at that level. He hits another IRM of RF at the \Novell\Run level, giving him an effective inherited right of R. Bob doesn't get the F right because it was masked out at the Novell level.
C:\eDir\fly
Bob encounters an IRM of RCE at the eDir level, restricting his effective rights to RC. However, because he is a member of Group, he is granted the F right at the \eDir\fly level, meaning his final effective rights there are RFC.
In reality the rights aren't calculated at every directory level. The actual algorithm NSS uses to calculate the rights for a particular file or directory is somewhat complicated because it ties in closely with the way the rights cache is implemented. It almost never needs to start at the root and work down, as we did in the above example.
In effect, when the effective rights of a user to an object is finally resolved, you have a list of all users who have rights to the file/directory (the effective ACL) and a list of all users in the connection table. These lists are seldom very large.
The one exception to this is a connection that has Admin-equivalent rights (not to be confused with having the Supervisor right from a trustee assignment). Admin- equivalent users have all rights to files and they cannot be masked out by an IRM or explicit trustee assignment. The only way to keep an Admin-equivalent user from accessing files is to make a special trustee assignment that bars access to all but system connections. This assignment is normally only made in the SYS:\_NETWARE directory and cannot be set through normal tools.
All rights other than Supervisor can be stripped away with an IRM at any level for nearly any user, except a user that has S rights to the Server object itself (such as Admin and equivalents, which usually have rights resulting from an eDirectory rights inheritance). In this situation the Admin user can see all files and folders regardless of IRMs because the access is not granted in the file system. Instead, a bit is set in the connection table to indicate that the user is an admin and as such has full access to the server and all volumes thereon.
The Visibility List
The visibility list is only used for making parent directories visible for navigation purposes. If a user has rights to a file, NetWare makes all directories above the file visible to the user. This saves the administrator the odious task of assigning explicit rights to each directory above where the actual rights are assigned.
Visibility entries are stored in a manner similar to explicitly-assigned trustees: the first four entries are in the actual beast object; the rest are stored in overflow beast objects linked from the directory beast object.
Visibility lists only appear on directories. There is one entry for every trustee assigned anywhere in the subtree below the directory. Therefore, the further toward the root you go, the more GUIDs you see against that directory. At the root, the list has GUIDs for every trustee on the volume.
Each visibility entry has an eDirectory GUID and a count of the number of references to that GUID in the entries for the directory (not the subtree) where the visibility list is assigned. This includes trustees that are explicitly assigned, as well as trustees in visibility lists.
A visibility list entry can be created in one of two ways:
An immediate subordinate directory or file has a trustee that the parent does not.
A visibility entry for a subordinate subdirectory is present.
Visibility counts do not consider trustees from directories or contents of directories that are not immediately subordinate to the considered directory.
Figure 3 shows an example of how the visibility list works. In this figure, Doug, Bob, and Fred are User objects, Group is a group object, and everything else is part of the directory structure.

Figure 3: Example of how a visibility list works.
Here is the visibility list by beast object (in the real list, usernames are not included, only the GUIDs):
Directory COUNT GUID
\ 1 67a60e01-c86b-11d6-ac9c-0090274352eb (Doug)
\ 1 fca90701-c86b-11d6-ac9c-0090274352eb (Bob)
\ 2 d3749d80-c975-11d6-ac9d-0090274352eb (Fred)
\ 1 aa68e580-c86d-11d6-ac9c-0090274352eb (Group)
Temp 1 67a60e01-c86b-11d6-ac9c-0090274352eb (Doug)
Keep 1 fca90701-c86b-11d6-ac9c-0090274352eb (Bob)
1 d3749d80-c975-11d6-ac9d-0090274352eb (Fred)
Images 0
M$ -
Novell -
ZFD -
The visibility list is not affected by adding, deleting, or modifying IRMs. These operate in a transverse flow to the visibility list. In other words, IRMs flow down the directory structure, while the visibility list works up the structure. Therefore Doug can see \Temp because he might need to do so to navigate to \Temp\M$.
Fred has a count of 2 because in the root directory there is a trustee assignment on a direct subordinate (Images) and a visibility entry in Keep from Novell.
For each request we compare GUID entries in the connection table for the connection requesting against all GUIDs on the directory in question, if we find one that matches we display or make visible the directory to the user, hence the term visibility list.
Checking and Repairing the Visibility List
Problems can arise with trustee rights because of a corrupted visibility list. Before you rebuild the visibility list, however, you must determine whether it is actually corrupt or whether it is simply incorrect.
Because the list is built from trustee information, it can be incorrect but valid (not corrupt but still wrong) if the information provided is incorrect, correct and valid or both incorrect and invalid- it all depends on the information that has been used to build it at the time. It is also possible for the reverse to occur: the list could be incorrect and corrupt even if the information given to it is valid.
Patch NW6NSS2C.EXE (or later) contains a fix for a visibility list that is causing corruption. Once you apply this patch, in most cases you can fix an issue with your visibility list by performing a visibility list rebuild. You can download NetWare patches from http://support.novell.com.
If the visibility list is still corrupt after a rebuild, contact Novell Technical Services.
Checking for Errors in the Visibility List
In NetWare 6.0 SP3, Novell includes two modules to help you check for errors in the visibility list: CHECKVIS.NLM and DMPTRUST.NLM.
CHECKVIS.NLM requires a volume name parameter and sends results to the logger screen and to a file named CHECKVIS.OUT. There are three basic messages you might see.
This error means that an entry should be in the visibility list for a directory but is not there:
Missing user in visibility list.
GUID: 41D42500-E386-11D1-BD-2A-0060B01BC3BC
directory: \docroot
This error means that the count in the list should be 1 but the actual count is 2:
Computed count not equal to stored count.
computed=1 stored=2
GUID: 44CF1590-E386-11D1-BD-2A-0060B01BC3BC
directory: \
This error means that a visibility entry was found in the list, but when the list was created there were no actual references:
Extra visibility entry found.
computed=0 stored=1
user ID: 44CF1592-E386-11D1-BD-2A-0060B01BC3BC
directory: \
If you see an error on a volume, you can use DMPTRUST.NLM to find out what the actual trustee assignments are for that volume. DMPTRUST.NLM also generates an .OUT file. Here is an example of the output from DMPTRUST.NLM:
Name: \LOGIN
(1-0) Rights: 0x41 GUID=00000002-0000-0000-00-00-000000000000 ID=FF000001
Name=.[Public].

Name: \MAIL
(1-0) Rights: 0x8 GUID=67A60E00-C86B-11D6-AC-9C-0090274352EB ID=806C
Name=.O=novell.T=PRV-OS-MCC-NW6SP2.

Name: \PUBLIC
(1-0) Rights: 0x41 GUID=67A60E00-C86B-11D6-AC-9C-0090274352EB ID=806C
Name=.O=novell.T=PRV-OS-MCC-NW6SP2.
By matching up the DMPTRUST output to the CHECKVIS output, you can determine how the trustees you lose in a visibility rebuild affect you. Now that you know how the visibility list works, you can also check DS and ensure that the necessary trustee rights exist for a user so that the user is placed in the visibility list during a rebuild.
Rebuilding the Visibility List
After you confirm that the errors reported in the visibility check are caused by corruption (the information doesn't warrant the results from the visibility list), you must repair the visibility list.
Warning: This operation can be destructive; users who could see directories before might not be able to any more after the operation. For this reason, run this operation only as required. Do not use visibility list rebuilds as a regular maintenance tool.
Keep in mind that the purpose of a visibility rebuild is to address problems where the computed value does not equal the stored value for the visibility lists.
When you perform a visibility rebuild, the system first deletes all current entries in the visibility list. Then, in a second pass, the system attempts to rebuild the visibility list for assigned trustees. The numbers you see at the conclusion of the rebuild give the following information:
Objects examined. This indicates the total number of file system objects looked at (a total of files and directories, plus special file system beasts).
Objects cleaned. This indicates the number of directories where visibility information was removed during the first pass.
Overflow objects removed. This indicates the number of visibility overflow objects removed during the first pass.
Trustees re-added. This indicates the number of trustees found on the volume and re-added to visibility lists. Although this number is non-zero, it doesn't mean problems were fixed or resolved. Instead, the number indicates the number of trustees found and included in the visibility list (whether they were there before the rebuild started or not).
After you run a visibility rebuild, make sure you run the visibility check again. If there are still errors, you must examine your trustees for problems (as discussed next) before running a visibility rebuild again.
Troubleshooting Duplicate and Missing GUIDs
On occasion Novell has seen issues with GUID corruption, which can take different forms:
There can be duplication of GUIDs, where the same GUID is found on more than one object within the tree.
The same object can have different GUIDs, depending on which server is queried.
The object can be missing its GUID on some or all replicas.
The symptoms of GUID corruption include incorrect visibility lists and intermittent trustee issues where sometimes you can gain access (if you query the server with the correct data) and sometimes you can't (if you query the server with the incorrect data).
If objects are missing GUIDs, the DSTrace may show -603 errors during the backlinker process for said objects. In this situation, the visibility list might be inaccurate but not necessarily corrupt, because the data being used varies depending on which replica is queried.
Checking trustees consists of using tools to compare GUIDs cached in NSS structures to eDirectory, it is therefore vital that you ensure that there are no synchronization issues within your tree before you begin - if you don't you have already lost the battle before you begin as we will be checking something that maybe corrupt against something that maybe inconsistent.
You also need to consider that in NSS we pull and store DS GUID information and cache some of this information (such as GUID to EID conversion information) - this information is refreshed every 25 hours by default and is adjustable by the NSS parameter IDResetCacheInterval'. You will therefore need to run the NSS commandline of NSS /ResetIDCache' - doing this when we know DS is in sync will ensure that we don't get any unpleasant surprises the next time NSS refreshes its cache (e.g. what you thought you had fixed is once again broken).
Most of these synchronization issues arise in networks with old code or mixed rings. To minimize problems, make sure you use the latest code for the version of DS.NLM you are running, and avoid mixing NetWare 4.x servers in the same replica ring as NetWare 5.x and 6.x servers.
A Word About Mixed Rings
The term "mixed ring" refers to a situation where both DS 6/7 and DS 8+ servers hold a real replica in the same ring where a NetWare 6 server exists. Read/Write, Read Only, and Master replica types are considered real because they contain complete object data. By contrast, Subordinate Reference replicas only contain partial object data.
Mixed rings are somewhat of a paradox. Although NetWare 6 allows the use of mixed rings, it is not recommended except under very limited situations. Several issues are exacerbated by the introduction of NetWare 6 into a different type of ring. For example, problems arise when you have a pure NetWare 4.x replica ring and you upgrade to or introduce a NetWare 6 server that does not hold a real replica. NetWare 4.x will not place a GUID on objects; NetWare 5.x and 6.x will only do so for real objects because the creation of this attribute on external references are not supported in versions of DS before 7.60. In this situation, it is possible for objects to be created that do not have a GUID.
The safest approach is to ensure that the server holds real replicas of any object that has a trustee to the filesystem, however this is not always possible.
Fixing GUID-Related Issues
Duplicate GUIDs. If you have duplicate GUIDs, the easiest solution is to delete one of the objects that has the duplicate. This is usually due to old code, so make sure you upgrade your DS.NLM version; otherwise, the problem could occur again.
Disparate GUIDs. If you see different GUIDs for the same object on different replicas, use iMonitor or DSBrowse with the -a option to resend the object from the good replica (see Figure 4).

Figure 4: You can resend information about a selected object using DSBrowse loaded with the -a option.
Missing GUIDs. If you are missing the GUID on an object in every replica, first ensure that the replica ring is not comprised only of NetWare 4.x servers and external reference NetWare 6.x servers. Then recreate the object.
If you find that you can't delete an object when trying to fix a GUID issue, contact Novell Technical Services for assistance in manually synchronizing the GUIDs. For additional information on GUID issues see TID # 1007892 at: http://support.novell.com/cgi-bin/search/searchtid.cgi?/1007892.htm.
Troubleshooting Trustee Corruption
You might have an issue with explicit trustee assignments if any of the following apply to you:
You've rebuilt the visibility list and you still think it's incorrect (although no longer corrupt).
You are seeing inconsistent or missing trustees.
You've looked at your trustee list using a tool like TRUSTBAR.NLM and the list is not what you believe it should be.
You just can't seem to get your trustee assignments working properly.
Starting with NetWare 6.0, Novell has included a tool named TRUSTBAR.NLM. (This tool also works with NetWare 5.x and with traditional volumes if you have the long name space loaded.) TRUSTBAR.NLM allows you to back up, delete, and restore your trustee assignments.
Loading TRUSTBAR.NLM without any options will display the online help information shown in Figure 5.

Figure 5: The online help information for TRUSTBAR.NLM.
To take care of trustee corruption issues, you can use TRUSTBAR.NLM in the following manner. Use the -B option to back up your trustees for a specific volume; then use the -D option to delete trustees for that volume; then restore them back to the volume with the -R option. Always use the -V (verbose) option so you know when TRUSTBAR.NLM has finished its work.
If you need to go back and run a final visibility list rebuild, you can do so now that you've run TRUSTBAR.NLM. Keep in mind that TRUSTBAR.NLM does not address visibility list corruption and might not correct an inconsistent visibility list.
License issues can sometimes look like trustee issues, so don't be fooled. Run the PM DISPLAY console command to make sure you can have more than three licensed connections and that there are no grace connections.
As an example, Figure 6 shows the output of the PM DISPLAY command for a server with a license problem.

Figure 6: Grace Licenses can make you think you have trustee issues.
At the bottom of the PM DISPLAY are totals for Licensed (Grace) and Unlicensed (NLM) connections. In this case, the total indicates that 2 grace licenses are in use. Showing grace connections is a sign that the server is not licensed correctly, in this situation correct the problem with licensing before you look at possible trustee issues.
Background Trustee Checks
Background checking primarily verifies that GUIDs stored in various structures are current. Background checking normally runs five days after the server comes up and every two weeks thereafter. The algorithm minimizes impact on the system because as other activity on the system increases, the checker increases its delay time between operations.
The checker makes sure all entries in the object ID store are current and verifies that the IDs in the files (trustees, creator, modifier, archiver, and so on) still exist. It also verifies that other internal structures unrelated to IDs are consistent.
For an ID to be removed, it must be found to be missing four times in a row over a 90-day period.
Turning the background checking process off will not have immediate negative effect, but over time old trustees will build up on files and in the object ID store.
Conclusion
In this AppNote, you have learned about the key parts of the infrastructure that make up the trustee process in NetWare 6. You have also learned about situations that can cause problems and what to do about those situations.
Novell has seen many cases where people have performed unnecessary operations on their servers, with lost trustees resulting from attempting to fix issues that might not have even existed. In most cases the information in this AppNote will help you resolve your own issues. However, if you have remaining questions, concerns or issues contact Novell Technical Services.
* Originally published in Novell AppNotes
Disclaimer
The origin of this information may be internal or external to Novell. While Novell makes all reasonable efforts to verify this information, Novell does not make explicit or implied claims to its validity.