How to Use the Alarm Management System of ZENworks for Servers 3
Articles and Tips: article
Senior Software Engineer
Novell, Inc.
gmanish@novell.com
01 Sep 2002
This AppNote explains the basics of using the Alarm Management System (AMS) of ZENworks for Servers (ZfS) 3 to proactively monitor network alarms and receive updates on events occurring on your network.
- Introduction
- Startup Options
- Configuring the Agents
- Configuring the Alarm Dispositions
- Adding New Alarm Types
- Managing the Alarm Database
- Alarm Reporting
- Conclusion
|
Topics |
network management, ZENworks for Servers, SNMP traps and alarms, product configuration |
|
Products |
ZENworks for Servers 3 |
|
Audience |
network administrators, support technicians |
|
Level |
beginning |
|
Prerequisite Skills |
familiarity with basic network management concepts |
|
Operating System |
NetWare, Windows NT/2000 |
|
Tools |
none |
|
Sample Code |
no |
Introduction
The Alarm Management System (AMS) in Novell's ZENworks for Servers (ZfS) 3 alerts you to important network conditions and events such as SNMP traps, threshold alarms, and connectivity testing faults. This lets you proactively monitor and resolve network problems and receive updates on events occurring on your network.
The AMS component of ZfS 3 provides a centralized location for viewing and processing the events and alarms generated by devices throughout your network. From within ConsoleOne, you can view tabular lists of statistical data for active and historical alarms received by AMS. This makes it easy to handle alarms and track network events and recurring alarm conditions. In addition, you can receive real-time notification when alarms occur through the following mechanisms:
Severity level, as displayed by the changing color of the alarm indicators
Audible notification
Status bar ticker-tape messages
You can also assign an action, such as automatically launching a program when an alarm is received, or sending an e-mail message to notify remote users of events.
This AppNote explains the basics of configuring and using AMS to proactively monitor network alarms and receive updates on events occurring on your network.
Startup Options
You can choose to start up the AMS in one of the following three modes:
View Alarm Summary
Monitor colors on nodes in the Atlas View
View real-time alarms on a particular node or segment
View Alarm Summary
The Alarm Summary view is a graphical representation of all the alarms received on your network. You can launch this view from within the ZfS console. To do this, select a ZfS site object, then select Views | AlarmSummaryView. A sample Alarms Summary screen is shown in Figure 1.
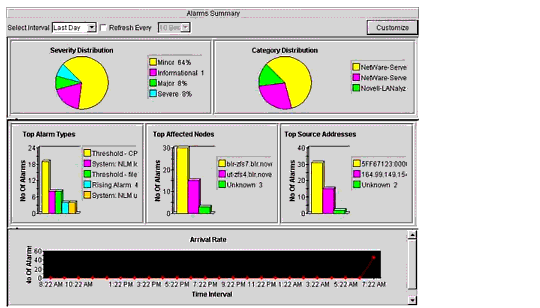
Example of an Alarms Summary screen.
The view displays your network alarms distribution based on severity, category, owner, and state. It also displays which of your machines is generating the most alarms, the type of alarm generated for a maximum number of times, and the rate of arrival of the alarms.
You can find the node that is generating the maximum number of alarms by using the Active Alarm View. To see this view, select the node and then select View | Active Alarm View. The list of alarms for the node is displayed. You can then take corrective measures to resolve the alarms.
Monitor Colors in the Atlas View
To monitor the node or a segment in the management console, launch the Atlas View by selecting Atlas from the left side pane of ConsoleOne and then selecting View | Atlas View. This view displays icons for all Atlas Page objects. If there is an alarm, the icon for the affected object changes color. The color indicates the severity of the alarms on the segments and nodes on the Atlas page.
To view the segment or nodes, double-click on the page icon. An Atlas page will be displayed, as shown in Figure 2.
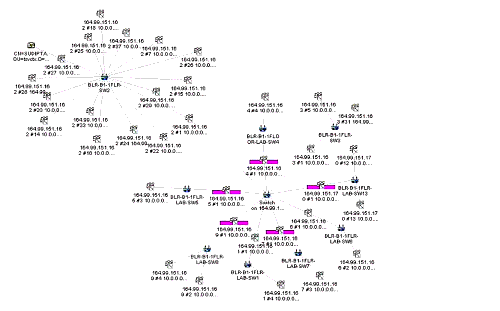
Example of an Atlas page with colored bars to indicate severity of alarms.
The following table lists the alarm colors and their corresponding severity.
|
Alarm Color
|
Severity
|
|
Red |
Severe |
|
Magenta |
Major |
|
Yellow |
Minor |
|
Blue |
Informational |
View Real-Time Alarms on a Particular Node or Segment
If you want to view real-time alarm information for a particular node, segment, or the entire ZfS site, launch the Active Alarm View on the desired object. The real-time alarm data will be displayed. When a new alarm is received, it will be displayed as a ticker tape message in the status bar, and a new row will be added to the tabular view of the Active Alarms.
The Active Alarm table has the following seven columns:
|
Column Name
|
Description
|
|
Severity |
Severity icons corresponding to information, minor, major, severe, or unknown |
|
AffectedObjectName |
Name or network address of the device that sent the alarm to the AMS (for segment alarms, this will be the name of the segment) |
|
Summary |
Summary of the event, often including the name or the network address of the object affected by the alarm |
|
Owner |
Person or group responsible for handling the alarm (SYSTEM is the default owner) |
|
Received Time |
Date and time when AMS received the alarm |
|
Type |
Generic description of the alarm (for example, System:NLM Load) |
|
Category |
Category identified in the MIB associated with the trap type object |
Note: For alarms detected by Traffic Analysis Agent (such as the duplicate IP address alarm), AffectedObjectName will be the name or network address of the machine which is running the Traffic Analysis Agent.
Configuring the Agents
Configuring agents is an important aspect of the AMS configuration. If you do not configure the agents, you may receive so many alarms that resolving them might become difficult. To reduce the number of alarms you see, you can configure the agents to selectively disable SNMP traps you are not interested in, or to not send the same type of alarm before a specified interval of time has elapsed.
ZENworks for Servers 3 comes with two SNMP trap agent implementations on NetWare:
NWTRAP.NLM implements the NetWare Server Trap MIB, a Novell proprietary MIB that handles all NetWare core OS alerts. It supports 375 alerts. The default configuration file for this agent is NWTRAP.CFG, located in the NMA subdirectory of the ZfS Agent install directory.
NDSTRAP.NLM implements the NDSTRAP.MIB to capture eDirectory events. The default configuration file for this agent is NDSTRAP.CFG, located in the NMA subdirectory of the ZFS Agent install directory.
You can use the NetWare console commands listed in the following table to configure these agents. For NDSTRAP, all the commands are same. The commands would start from NDSTRAP instead of NWTRAP.
|
Command
|
Explanation
|
|
NWTRAP COMMUNITY |
Displays the SNMP community string |
|
NWTRAP COMMUNITY = <CommunityStr> |
Sets the SNMP community name |
|
NWTRAP CFG_FILE = <filename> |
Sets the path to the configuration file. The configuration file is processed automatically when NWTrap first loads. You can also manually process the configuration file using the NWTRAP READ_CFG command. |
|
NWTRAP CFG_FILE |
View the current path of the configuration file |
|
NWTRAP Default Interval |
Displays the default interval |
|
NWTRAP Default Interval = <period> |
Sets the default interval in seconds, which means to delay for <period> seconds before sending duplicate traps. The value can range from 0 to 86400 seconds (24 hours). |
|
NWTRAP DISABLE <TrapList> |
Disables traps from generating. <TrapList> may consist of one or more trap numbers separated by commas or spaces, the keyword "ALL", or a logical expression such as ID ! = 224,229,300 or SEVERITY > MINOR. The order of severity levels is INFORM=0, WARN=1, MINOR=2, MAJOR=3, and CRITICAL=4. Examples:NWTRAP DISABLE 10,11,100,243NWTRAP DISABLE SEVERITY <= WARN NWTRAP DISABLE ID != 224,229,300 |
|
NWTRAP ENABLE <TrapList> |
Enables generation of traps. <TrapList> may consist of one or more trap numbers separated by commas or spaces, the keyword "ALL", or a logical expression such as ID != 224,229,300 or SEVERITY > MINOR.The order of severity levels is INFORM=0, WARN=1, MINOR=2, MAJOR=3, and CRITICAL=4.Examples:NWTRAP ENABLE 10,11,100,243NWTRAP ENABLE SEVERITY <= WARN NWTRAP ENABLE ID != 224,229,300 |
|
NWTRAP <TrapList> INTERVAL = <period> |
Sets the interval for one or more specific traps. <period> is the number of seconds in the range 0 to 86400 (24 hours) or the keyword "DEFAULT". To cause a trap to use the default interval, set the interval with <period> equal to the keyword "DEFAULT". |
|
NWTRAP LIST ACTIVE |
Lists all the active traps |
|
NWTRAP LIST ENABLED |
Lists all the enabled traps |
|
NWTRAP LIST DISABLED |
Lists all the disabled traps |
|
NWTRAP LIST SEVERITY = <sev> |
Lists all the traps with severity = <sev> |
|
NWTRAP LIST ID != 12,224,300 |
Lists all but the traps with the following IDs: 12, 224, 3000 |
By default, both trap agents are loaded as a part of the NMA5.NCF file invoked by the AUTOEXEC.NCF file. As a result of objects being created and deleted in eDirectory, NDSTRAP generates a higher number of alarms. This might clutter your alarm database. If you do not want to use the NDS (eDirectory) traps, you can unload NDSTRAP.NLM.
Configuring the Alarm Dispositions
Alarm dispositions govern the handling characteristics for each type of SNMP trap. AMS allows you to configure the automatic handling of an alarm by defining it in the alarm disposition. AMS supports the following disposition settings: archive alarm, send SMTP notifications/SMS/pager message, launch application, and forward trap to other ZfS servers or other network management systems. You can also set options for alarms, such as audible beeps and ticker bar display.
After you set the disposition for an alarm, you should test it against an alarm that can be generated easily (for example, a System:NLM load). If the results are positive for this alarm, the results will be positive for the other alarm types.
Archive Alarm
By default, all alarm types are archived in the database. You can disable the archive setting for the set of alarm types you are not interested in. This will allow you to prevent the database from becoming filled with alarms you don't want to see.
Send SMTP Notification/SMS/Pager Message
When sending an SMTP e-mail notification, a default information pattern for each alarm is always sent as the body of the e-mail message. You can choose to add more information to the body and the subject of the e-mail. For example, you can use variables in the settings, as shown in Figure 3.
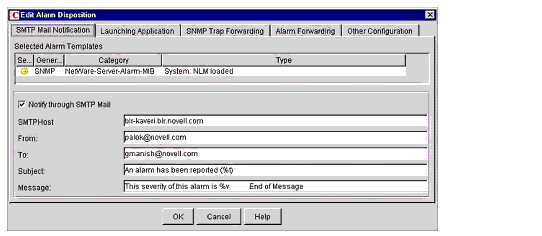
Setting the SMTP Mail Notification options in the Edit Alarm Disposition window.
Note: Note the use of the "%t" variable in the Subject field and the "%v" variable in the Message field. The values for these and other variables are listed in the following table.
|
%t |
Alarm Type |
|
%v |
Alarm Severity |
|
%a |
Alarm ID |
|
%s |
Alarm Summary |
|
%o |
Affected Object ID (a long number acting as an ID in the database for the node that generated the alarm) |
|
%n |
Affected Object Name |
Corresponding to the above SMTP Mail Notification settings, the specified user would receive the e-mail message shown in Figure 4.
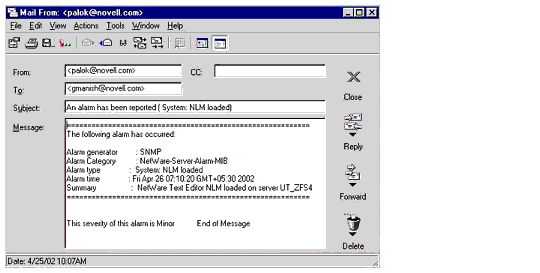
E-mail notification message generated by AMS.
You can also send SMS or pager messages using the SMTP mail disposition. When setting the disposition for these notification methods, you need to specify the mail address of the pager or the mobile phone number in the "To" field of the SMTPMailNotification disposition setting dialog.
Launch Application
You can configure AMS to launch an application on the ZfS site server when an alarm is received. The application name and argument list need to be specified in the disposition. AMS supports the variables listed in the table above as application arguments. "%s" refers to the Alarm Summary string, which is a collection of words. However, the application will interpret each word as a separate argument, which is not the intended behavior. To avoid this, enclose variables containing more than one word in double quotes, like "%s".
Forward Trap
You can forward SNMP traps received by the AMS to other ZfS servers or to third-party management systems. This is an easy method to integrate ZfS with other enterprise management products such as HP OpenView. When setting the Forward Trap disposition, you only need to specify the IP address of the server on which some other management product is installed and running.
Displaying a ticker-tape message in the status bar of ConsoleOne
This message provides a summary of the most recent alarm or network event. This option is enabled by default. You may want to edit your alarm dispositions so that only important alarms that you want to monitor display a ticker-tape message.
To disable or enable a ticker-tape message:
Right-click the ZENworks for Servers site object in the left frame of ConsoleOne > click Properties.
Click the Alarm Disposition tab.
Select the alarm that you want to edit from the Alarm Templates list > click Edit. The Edit Alarm Disposition dialog box is displayed.
Click the Other Configuration tab. To disable the ticker-tape message, uncheck the Show on Ticker Bar check box. To enable the ticker-tape message, check the Show on Ticker Bar check box.
Click OK.
Making an Audible Beep at Console
The sound alerts the user of an occurrence of an alarm. Useful applications of this function include:
Server abend
System: Server downed by user
File system full
This option is disabled by default. You should enable this option for important alarms that you want to monitor.
To enable or disable an audible beep:
-
Right-click the ZENworks for Servers site object in the left frame of ConsoleOne > click Properties.
-
Click the Alarm Disposition tab.
-
Select the alarm that you want to edit from the Alarm Templates list > click Edit.The Edit Alarm Disposition dialog box is displayed.
-
Click the Other Configuration tab.
-
To enable the audible beep function, check the Beep on Console check box. To disable the audible beep function, uncheck the Beep on Console check box.
-
Click OK.
Adding New Alarm Types
AMS comes with a default set of trap types. Any trap that does not belong to this set is considered as Unknown and is either logged as an "unknown" alarm or ignored, depending on the configuration settings. To ignore unknown traps, set the "IgnoreUnknownTraps" command equal to "yes" in the AlarmManager.Properties file in the SYS:\ZENWORKS\MMS\MWSERVER\PROPERTIES directory before starting the ZfS server.
You can add new alarm types for third-party alarms in AMS by adding the new MIB file into the MIB pool and compiling it.
Managing the Alarm Database
The AMS purge utility configuration file, AMPurge.Properties, defines the criteria for selecting the alarms to be purged, as well as the time of day the process should run. This file is located in the Properties directory on the server and volume where you installed the Alarm Manager database. You can configure the purge criteria by setting the values in the file as shown in following table.
|
SeverityInformationalPurgeWait |
The number of days after which Informational alarms will be deleted |
|
SeverityMinorPurgeWait |
The number of days after which Minor alarms will be deleted |
|
SeverityMajorPurgeWait |
The number of days after which Major alarms will be deleted |
|
SeverityCriticalPurgeWait |
The number of days after which Severe alarms will be deleted |
|
SeverityUnknownPurgeWait |
The number of days after which Unknown alarms will be deleted |
Note: By default, alarms of all severity levels are deleted after every seven days.
Alarm Reporting
You can generate two kinds of alarm reports using AMS:
Alarm Summary report
Alarm Detail report
The Alarm Summary report displays a brief summary of the alarms at the site. It provides a graphical representation of the distribution of alarms, for the selected number of days. The report provides the following information about each connected computer system:
Alarm Severity
Alarm Category
Alarm Owner
Alarm State
Top alarm types
Top affected objects
Top source address
The Alarm Detail report lists complete information about the alarms at the site. You can customize the settings for generating the report. The report provides the following information about each connected computer system:
Alarm Severity
Affected Object Name
Source Address
Alarm State
Alarm Category
Alarm Generator
Alarm Time
Alarm Owner
Alarm Type
Alarm Summary
Conclusion
This AppNote has given an overview of how to use the Alarm Management System in ZENworks for Servers 3. It has presented a brief look at the various ways to configure this feature to enable you to proactively monitor and resolve network problems.
For more detailed explanations of these features, refer to the online ZfS 3 Administration Guide at http://www.novell.com/documentation/lg/zfsi.
* Originally published in Novell AppNotes
Disclaimer
The origin of this information may be internal or external to Novell. While Novell makes all reasonable efforts to verify this information, Novell does not make explicit or implied claims to its validity.