Troubleshooting Novell iChain 2.1 Authentication Issues
Articles and Tips: article
iChain WWS Engineer
Novell, Inc.
ncashell@novell.com
Shane Johns
iChain WWS Engineer
Novell, Inc.
sjohns@novell.com
01 Sep 2002
This AppNote gives a detailed insight into the interfaces and flow control of Novell iChain 2.1's authentication components. It provides a list of available tools and discusses the most common support issues, giving numerous tips to help address issues discovered when working with these iChain components.
- Introduction
- iChain Components and Related Files
- General iChain Troubleshooting Tools
- Tools for Troubleshooting Proxy Authentication Issues
- Authentication Troubleshooting Concepts
- Proxy Authentication Troubleshooting Steps
- Conclusion
|
Topics |
iChain, troubleshooting, LDAP, security, Web application developments |
|
Products |
Novell iChain 2.1 |
|
Audience |
network administrators, integrators, developers |
|
Level |
intermediate |
|
Prerequisite Skills |
familiarity with Web applications and security |
|
Operating System |
n/a |
|
Tools |
none |
|
Sample Code |
no |
Introduction
Troubleshooting a system with many interacting components, such as Novell's iChain 2.1, can be challenging without the proper know-how and tools. This AppNote gives a detailed insight into the interfaces and flow control of Novell iChain's authentication components. It provides a list of available trouble- shooting tools and discusses how to resolve the most common support issues.
iChain Components and Related Files
When troubleshooting iChain issues, you need to be aware of all devices that play a role in the iChain solution: the iChain Proxy server itself, the eDirectory LDAP server containing all the iChain-specific NDS entries, the Radius/LDAP servers being pointed to by the authentication profiles, and the network layout describing where each server is located.
iChain Proxy Server
The following configuration files pertain to the iChain Proxy server.
CURRENT.NAS stores all the information that has been inserted into the iChain GUI configuration utility. This information includes profile (authentication and access control), interface, accelerator information, as well as global tuning parameters for the iChain Proxy server.
TCPIP.CFG stores protocol and binding information for all LAN interface cards with IP bound on the iChain server.
OAC.PROPERTIES stores some advanced settings required for Object Level Access Control (OLAC). Whereas iChain 1.5 required that the LDAP server information be configured here, iChain 2.0 and 2.1 take this LDAP information from the Access Control (ACLCHECK) profile instead.
TracerMedia.Properties allows administrators to enable OLAC debug information. The default setting (DEBUG0) is for minimal debug information, but it can be set to display more detailed information by changing the debug level higher, up to DEBUG5.
TRACE.TXT logs the OLAC information if the TracerMedia.Properties file has logging to file enabled. This file is located at the root of the SYS volume.
Custom Login/Logout Pages must be stored in the sys:\etc\proxy\<login page> path. Any modifications to the default login and logout pages provided by iChain must adhere to a set of guidelines defined in the iChain configuration documents.
CONSOLE.LOG. Whenever an event (error or informational message) is displayed on the server console, it is automatically written to the CONSOLE.LOG file stored in the sys:\etc directory.
Proxy and ACLCHECK Log Files. The logging of incoming HTTP requests into the Proxy, as well as the access control logs, are stored in the LOG volume on the iChain Proxy server. This volume can be accessed via the iChain GUI, and you can opt to save the log files locally as well. An option also exists to periodically send these log files via FTP to a remote FTP server.
APPSTART.NCF. All iChain-specific files are loaded from this NCF startup file. If you need to change the load order or add switches to the modules, you will need to make those changes via this file.
TUNE.NCF. Any system parameters (usually defined in the NetWare registry) may be set or overwritten at startup by adding statements to the TUNE.NCF file. An example of this in iChain would be to enable NCP on an interface by adding the "SET NCP Include IP Address " parameter in this file.
iChain eDirectory LDAP Server
The eDirectory LDAP server stores all NDS objects required by iChain. To get information on the objects and attributes required by iChain, use the ICE.EXE tool shipped on the Authentication Server CD to generate an output file. A graphical version of this tool exists in ConsoleOne under the Wizard > NDS Import/Export tab.
Alternatively, you could use a third-party LDAP browser to export the object and attribute information to an LDIF file to analyze and verify that the correct iChain information exists. (An example of an LDAP browser is referenced in the "iChain Troubleshooting Tools" section below.)
The key iChain objects and attributes found in the eDirectory include:
The iChain Service Object (ISO)
The iChain Rule objects (ROs)
The User FormFillCrib attribute
The BrdsrvsRuleObject attribute (container, group, or user)
iChain LDAP or Radius Servers
A number of troubleshooting files are available from the iChain LDAP or Radius servers pointed to by the authentication profile, depending on whether they are Novell or third-party servers.
The files for Novell servers are:
sys:\etc\CONSOLE.LOG file with the "Radius debug on" command enabled (when Radius authentication is enabled)
sys:\system\DSTRACE.LOG file with the "+LDAP" and "+TIME" options enabled (when LDAP authentication enabled)
For third-party LDAP or Radius servers, consult the documentation provided by the vendor.
Network Layout
It's important to be aware of any devices (such as packet-level firewalls, L4 or L7 switches, and so on) that lie between the iChain proxy server and its eDirectory LDAP server, origin Web server, or authentication server. Since each device can impact communication, it is very useful to have a diagram depicting the location of these devices, as well as an export of their configuration.
General iChain Troubleshooting Tools
This section describes some of the general-purpose iChain troubleshooting tools that are available.
ConsoleOne
This is the main tool required to add the iChain objects and attributes into eDirectory. You can also use this tool to confirm that the following entries exist and are set up correctly:
LDAP Group Object. You need to make sure that (1) the "Allow clear text Passwords" option under the General tab is enabled, and (2) that the LDAP attribute mapping with NDS exists for all LDAP attributes you are trying to extract from eDirectory.
LDAP Server Object. You can enable debug LDAP options under Screen Options so that the DSTRACE screen reports more detailed LDAP information.
ISO Attributes. Make sure the correct Protected Resource (PR) mode is configured, and that the correct OLAC parameters are defined for that PR.
Password Management Setup. If advanced password checking is enabled during authentication, make sure that the Password Management servlet location is pointing to a valid Web server servlet location.
Rule Object Attributes (Rules Tab). Verify that the Rule objects defined for the secured PRs have the correct information in the "Apply to" list.
Rules Applying to Users (User Tab). Select the iChain tab under the User object's properties and confirm that the Rule objects configured to apply to that user, or to the user's groups or containers, actually do so.
Schema Extensions. Using the NDS Import/Export option under the Wizards tab, you can export the schema extensions that were made on that server. This is useful for verifying that all User objects and attributes have been created correctly.
ICE Utility
This is a simple tool that can export the eDirectory schema setup to an LDIF formatted file. The easiest way to run the ICE utility is through ConsoleOne. Using the "NDS Import/Export" option under the Wizards tab (see Figure 1), you can export the schema extensions that have been made on that server to a file. This is useful for verifying that all User objects and attributes have been created correctly. Alternatively, you can run the utility in standalone mode on the client (ICE.EXE) or server (ICE.NLM) to generate the same information.
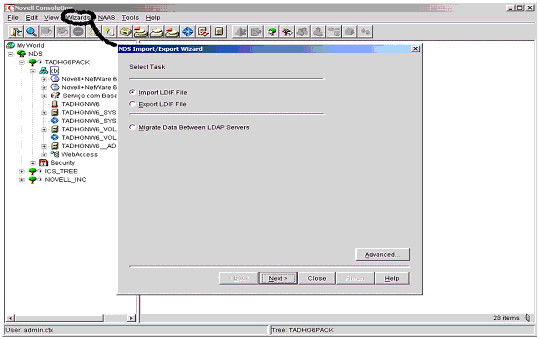
The NDS Import/Export Wizard option in ConsoleOne.
LDAP Browser
A very user-friendly LDAP browser is available from http://www.iit.edu/~gawojar/ldap. It allows administrators to view the contents of their directory and easily export the configuration from the directory to an LDIF format file. Again, you can use this to confirm that the iChain-related objects and attributes are written correctly to the directory. Figure 2 shows a sample ISO object named ISO with all attributes configured.
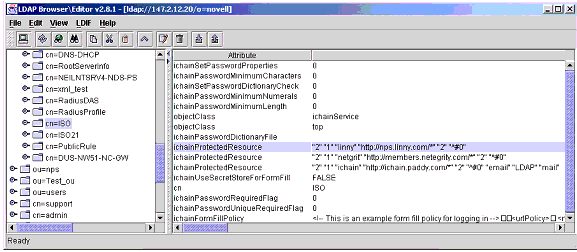
Sample ISO object with all attributes configured.
LSEARCH.NLM
This tool is an LDAP client that can be run from the iChain server console. It can be used to simulate any type of LDAP request that iChain components can use. Therefore, its main goal is to identify whether problems encountered are related to the LDAP server (if the iChain component LDAP requests and LSEARCH report the same response) or to the LDAP client (if the iChain component LDAP requests and LSEARCH do not report the same response). You can download this utility from Novell's developer site at http://developer.novell.com/ndk/cldap.htm.
Below is an example of the output of an LSEARCH command to bind and limit the LDAP search in the tree to one entry:
lsearch -h147.2.12.20 -Dcn=admin,o=novell -wnovell -z1
where:
-h gives the hostname
-D gives the bind username
-w gives the bind username's password
-z retricts the number of entries to search
Figure 3 shows the screen output of this command.
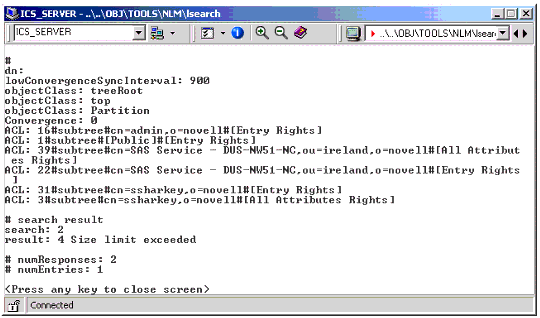
Screen output of the LSEARCH command.
iChain Proxy Server GUI
The Web-based iChain Proxy Server GUI utility provides several options to view status and performance information.
The Home > Health Status tab reports the status of the system and services running. Should any system check or service fail to start, this screen will report the failure and give possible reasons why it occurred. You should check this page to make sure there are no red warning lights (which indicate serious errors to the service that have caused it to fail) or yellow warning lights (which indicate informational/warning messages for a particular service) at the top of this screen.
The Monitoring > Services, Summary and Performance tab shows statistics relating to services (accelerator IP addresses and TCP ports in use) and performance-related information (cache hit ratio, disk space utilization, browser and proxy server throughput, and TCP request handling). This information can help you identify resource limitations or trends useful in troubleshooting problems.
The Monitoring > Cache Logs screen (see Figure 4) allows you to access the ACLCHECK access control and Proxy logs that are stored in the LOGS volume of the proxy server.
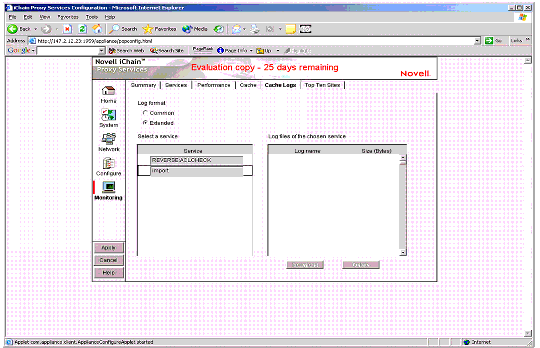
The Monitoring > Cache Logs screen in the iChain Proxy Server GUI.
iChain Command Line Interface
This tool can be used to quickly verify that the Proxy authentication profile (LDAP, Radius, or Mutual authentication) and the ACLCHECK profiles exist and are accessing the correct authentication servers with valid credentials. Figure 5 shows an example of using this interface.
The iChain command line interface.
PROXYCFG Console Screen
This screen is useful for checking possible registration errors with any of the defined authentication or ACLCHECK profiles configured. These errors tend to be written to the end of the PROXYCFG screen and are therefore often missed! Figure 6 is an example of the PROXYCFG screen.
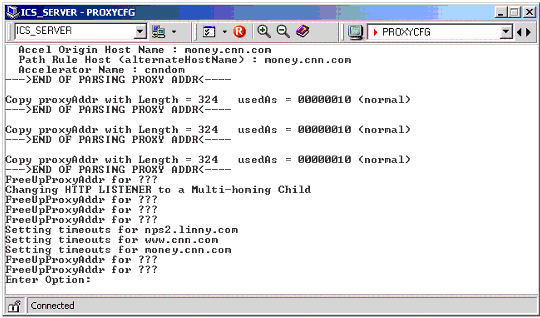
The ICS Server PROXYCFG console screen.
TCPCON Utility
Since the Proxy applications are for the most part written to the TCP interface, you can use the TCPCON utility to verify the state of these applications, as well as to check for possible network-related issues at the IP layer. The following are the key screens to monitor:
Statistics > TCP can help you get an idea of the retransmission rate on the network.
Statistics > ICMP can help you get an idea whether or not there are performance problems on the network, or routing loops by checking the various ICMP counters.
Protocol Information > TCP > TCP Connections displays a list of applications listening on various ports on the iChain Proxy server. It also shows the list of connections being made in to and out of the Proxy server, along with their corresponding state.
Figure 7 shows an example TCPCON screen.

The TCPIP Console screen.
Authentication Server Log Files
When the iChain components make client requests to the authentication (LDAP or Radius) servers, they simply wait for a response. If the response is invalid or unexpected, you need to look at why such responses were returned. One easy way of doing this is to analyze the log files from the authentication servers that are handling the iChain requests.
Below is a description of how you would enable the advanced logging on the Novell LDAP and Radius servers. For third-party servers, consult the vendor's documentation to locate equivalent commands.
Load DSTRACE.NLM and enable the "+LDAP" and "+TIME" commands. (For more information on how to do this, see TID #10025618, available at http://support.novell.com/cgi-bin/search/searchtid.cgi?/10025618.htm.) This will generate an output file (sys:\system\DSTRACE.LOG) where you can view LDAP requests and responses in and out of the LDAP server. An example of an LDAP search request for the ISO's protected resources is shown below:
[2002/06/11 16:26:52] (0xd6b6cba0:0x0059:0x63) DoSearch on connection 0xd6b6cba0 [2002/06/11 16:26:52] get_filter: begin get_filter [2002/06/11 16:26:52] get_filter: OR [2002/06/11 16:26:52] get_filter: begin get_filter_list [2002/06/11 16:26:52] get_filter: begin get_filter [2002/06/11 16:26:52] get_filter: PRESENT [2002/06/11 16:26:52] get_filter: begin get_filter [2002/06/11 16:26:52] get_filter: EQUALITY [2002/06/11 16:26:52] (0xd6b6cba0:0x0059:0x63) SRCH base "cn=iso,ou=ireland,o=novell" scope 0 deref 0 sizelimit 1000 timelimit 0 attrsonly 0 filter: (|(objectclass=*)(objectclass=ldapsubentry)) attrs: [2002/06/11 16:26:52] (0xd6b6cba0:0x0059:0x63) ichainProtectedResource [2002/06/11 16:26:52] (0xd6b6cba0:0x0059:0x63) nds_back_search: getOperationalAttrs is TRUE [2002/06/11 16:26:52] (0xd6b6cba0:0x0059:0x63) => send_search_entry (cn=ISO,ou=ireland,o=novell) [2002/06/11 16:26:52] (0xd6b6cba0:0x0059:0x63) send_ldap_result 0:"":"" to connection 0xd6b6cba0 [2002/06/11 16:26:52] (0xd6b6cba0:0x0059:0x63) Outgoing Decode 0000 30 81 ED 02 01 59 64 81 E7 04 1A 63 6E 3D 49 53 0....Yd....cn=IS 0010 4F 2C 6F 75 3D 69 72 65 6C 61 6E 64 2C 6F 3D 6E O,ou=ireland,o=n 0020 6F 76 65 6C 6C 30 81 C8 30 81 C5 04 17 69 63 68 ovell0..0....ich 0030 61 69 6E 50 72 6F 74 65 63 74 65 64 52 65 73 6F ainProtectedReso 0040 75 72 63 65 31 81 A9 04 32 22 32 22 20 22 31 22 urce1...2"2"."1" 0050 20 22 6C 69 6E 6E 79 22 20 22 68 74 74 70 3A 2F ."linny"."http:/ 0060 2F 6E 70 73 2E 6C 69 6E 6E 79 2E 63 6F 6D 2F 2A /nps.linny.com/* 0070 22 20 22 32 22 20 22 5E 23 30 22 04 3C 22 32 22 "."2"."^#0".<"2" 0080 20 22 31 22 20 22 6E 65 74 67 72 69 74 22 20 22 ."1"."netgrit"." 0090 68 74 74 70 3A 2F 2F 6D 65 6D 62 65 72 73 2E 6E http://members.n 00A0 65 74 65 67 72 69 74 79 2E 63 6F 6D 2F 2A 22 20 etegrity.com/*". 00B0 22 32 22 20 22 5E 23 30 22 04 35 22 32 22 20 22 "2"."^#0".5"2"." 00C0 31 22 20 22 70 61 64 64 79 22 20 22 68 74 74 70 1"."paddy"."http 00D0 3A 2F 2F 69 63 68 61 69 6E 2E 70 61 64 64 79 2E ://ichain.paddy. 00E0 63 6F 6D 2F 2A 22 20 22 31 22 20 22 5E 23 30 22 com/*"."1"."^#0" 00F0 30 0C 02 01 59 65 07 0A 01 00 04 00 04 00 0...Ye........
The "Radius Debug ON" trace from Novell's NMAS Radius Server console can be used to write debug information about requests and responses in and out of the Radius server.
Network Layout Information
Firewalls, L4 switches, and other third-party devices may create connectivity problems when not integrated correctly into an iChain environment. Before troubleshooting any problem, make sure you have a clear picture of how the network you are dealing with is laid out so that you know exactly what devices could be impacting iChain behavior.
LAN Analysis Tools
Using a LAN analysis tool (such as Sniffer) to take traces is a useful way to verify whether the correct requests were sent out, and whether correspondingly good responses arrived back. Here is the key trace information you would need to capture in an iChain environment:
Traffic between proxy and authorization server
Traffic between browser and proxy server
Traffic between proxy and origin server
Tools for Troubleshooting Proxy Authentication Issues
In addition to the general-purpose tools listed in the section above, there are a number of other tools that apply only to the authentication component of iChain. Here is a list of those tools, along with a brief description of each one.
Proxy IAgent Console
The Proxy Console > IAgent Console screen shows all the users that are authenticated to the iChain Proxy server. For each authenticated user, you can simply type the number that corresponds to that user (displayed in the left-most column) and see more detailed information about that user, as shown in Figure 8.
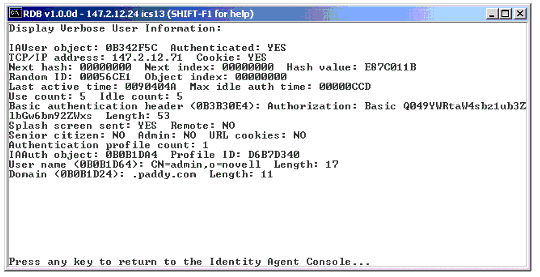
The IAgent Console screen.
Internet Browser
Browsers are useful as an iChain authentication troubleshooting tool for a number of reasons:
They can import third-party certificates. Once a certificate is imported, you can view each field in the certificate and verify that the subject names, alternative names, timestamps, and so on are all okay.
Some certificates can be configured with no encryption so that you can verify the user credentials that are POSTed over HTTPS in a LAN trace during the authentication stage.
Netscape browsers can be set up with NULL encryption by selecting the Security tab > Navigator > Configure SSL v3 tab, and disabling everything except for "No encryption with an MD5 MAC".
Internet Explorer 5.x can be enabled with a debug WININET.DLL so that a log file is created that decodes all HTTPS traffic. This DLL is available in the Microsoft SDK, or you can download it from http://curl.haxx.se/dev/. A text file in this folder outlines the instructions on how to enable the DLL.
Figure 9 shows the decoded credentials passed in at the browser login page over HTTPS during the login process. Note that it includes not just the context, username, and password, but also the hidden fields described above.
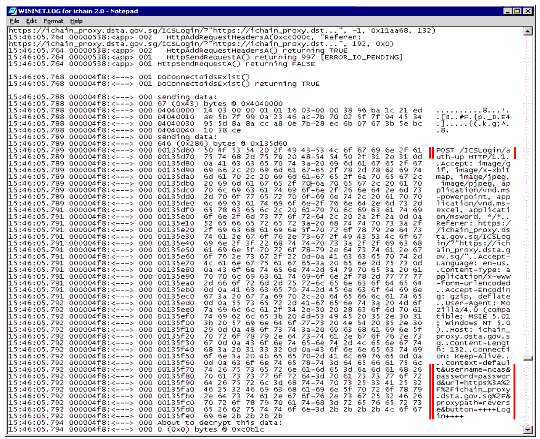
Decode of the credentials passed over HTTPS during the login process.
Authentication Troubleshooting Concepts
Authentication tends to cause more headaches than any other iChain component. In order to successfully troubleshoot authentication-related issues, you need to know what system modules Proxy authentication is dependent on. You should also be familiar with the communication flow that takes place.
Dependent Modules
Here is a description of the system modules Proxy authentication is dependent on.
TCPIP.NLM. TCPIP handles all the incoming IP packets, as well as the multiplexing of the application data to the relevant service based on the TCP port number. Assuming that the Proxy server loads successfully, with accelerators configured and authentication enabled over HTTPS, then both TCP port 80 and 443 will be enabled on that box. When the browser transmits a HTTP request to the proxy server's IP address, the TCPIP module will redirect the corresponding TCP segments to TCP port 80 and 443, where Proxy will then process them.
PROXY.NLM. This NLM checks all incoming requests to see if a valid iChain cookie exists in these incoming HTTP headers. If one exists, then processing of the request will continue and it will eventually be sent on to the origin Web server. If no cookie exists and authentication is enabled, the authentication method defined by the authentication profile is called. What happens next depends on the authentication type:
LDAP - The proxy will make the client LDAP calls via the LDAPSDK.NLM.
Radius - The proxy will make the client Radius calls through RADCHK.NLM.
Mutual - The proxy SSL handshake will request that the browser send its client certificate for validation.
PROXYCFG.NLM. The PROXYCFG module stores the authentication profiles. When the proxy tries to authenticate the user, it must interact with PROXYCFG to determine the type of authentication required and the specifics regarding the authentication server (LDAP, Radius). PROXYCFG also provides some useful error information. If any error is discovered during the processing of the authentication information, or even when contacting the authentication server, PROXYCFG often displays information about that error on the PROXYCFG console screen.
NILE/PKI. Due to the fact that users authenticate over an HTTPS channel, the Proxy server must send its certificate down to the browser for validation. This certificate, assigned to the accelerator, contains the server's public key, the subject's digital signature, and other information required for the browser to verify that site's authenticity. For the certificate interface, the Proxy needs to register SSL services with NILE.NLM, which interfaces with the encryption libraries.
Proxy Flow Control
When the Proxy module processes an incoming request on Port 80 (default), the following checks are performed:
Check if authentication is required by verifying the "Enable Authentication" flag from the accelerator setup.
If not enabled, forward the request to the origin Web server.
Check whether an iChain cookie exists.
If cookie exists, process the cookie.
If cookie does not exist, identify the user. To do this, first verify that the protected resource being accessed is not defined as Public (no authentication required). If this is the case, the proxy enters into a series of redirects.
Redirect to http://www.novell.com:80/ICSIBroker/?"http://www.novell.com" -X <------------------------------------------------------------------------------------------------------
The browser sends the request to the redirected page.
GET http://www.novell.com:80/ICSIBroker/?"http://www.novell.com" -X ------------------------------------------------------------------------------------------------------->
The Proxy takes this incoming request and verifies that it's for the ICSIBroker URL and that the -X flag is enabled. The "-X" at the end of the URL shows that the Proxy attempted to get the browser to return a cookie, but that the browser did not return one. The Proxy rejects this request by redirecting it Login Broker.
Redirect to http://www.novell.com:443/ICSLogin/?"http://www.novell.com" <-----------------------------------------------------------------------------------------------------
By default, authentication over SSL is enabled and the request shown above would be sent. If the "AuthenticationOverHTTP" option was enabled for the accelerator, the format would be as follows:
Redirect to http://www.novell.com:80/ICSLogin/?"http://www.novell.com" <-----------------------------------------------------------------------------------------------------
The browser responds with a request to the redirected page.
GET http://www.novell.com:443/ICSLogin/?"http://www.novell.com" ------------------------------------------------------------------------------------------------>
After doing a successful SSL handshake (required because the redirect is to TCP Port 443) to the redirected IP address and port combination from the previous step, the proxy then determines the type of authentication configured for that accelerator (for exampe, LDAP using CN, Email, or a Field Name) and sends the appropriate login page. Note that each different type of authentication has its own unique HTML file.
The browser sends the first GET request to retrieve graphics from the previous login page.
GET http://www.novell.com:443/ICSLogin/nbmside.jpg --------------------------------------------------------------------------------->
The browser sends the second GET request to retrieve graphics from the previous login page.
GET http://www.novell.com:443/ICSLogin/nbm1top.jpg ----------------------------------------------------------------------------------------->
The Proxy server sends the requested graphics back to the browser.
200 OK <-------------------------------
The browser then does an HTTP POST to the Login Broker with the login information.
POST http://www.novell.com:443/ICSLogin/auth-up ------------------------------------------------------------------------------------------>
The Proxy processes the browser's credentials and extracts the username, password, context, proxypath, and accelerator mode. The POST credentials would look something like this:
context=default&username=ncashell&password=novell& URL=http://www.novell.com/&proxypath=reverse&button=Login
These credentials are sent to the authentication server (Radius or LDAP) to verify whether they are correct. Once confirmed, the authentication (known as IAgent) database is populated with following information about the newly-authenticated user:
Fully distinguished name of user
Domain name
IP address of client browser workstation
User authenticated flag
Authorization header
Next, the Proxy server redirects the user back to the Identity Broker, this time with a "-T" option indicating that a cookie was set. The newly-defined cookie for that session is sent as part of this redirect too, along with the domain authenticated to and its path.
Note: iChain Proxy server cookies always start with the string "IPCZQX0100000000".
With these two flags (-X and -T) set, the Proxy server is now capable of telling whether the browser does not accept cookies but needs to in order to authenticate to the proxy.
Redirect http://www.novell.com/ICSIBroker/?"http://www.novell.com" -T <-------------------------------------------------------------------------------------------------------- Set-Cookie: IPCZQX0100000000=000000002e1f010000000000; path=/;domain=.novell.com
The browser responds with a request to the redirected page.
GET http://www.novell.com/ICSIBroker/?"http://www.novell.com" -T -----------------------------------------------------------------------------------------------------> Cookie: IPCZQX0100000000=000000002e1f010000000000
The Proxy server checks to see if the "-T" flag is set and a cookie exists. Assuming the user is already authenticated via the cookie, it redirects the user to the original URL by building the location header and HTML text, and then sending the redirect.
Redirect http://www.novell.com <-------------------------------------------------------------------
The browser does a GET request with a valid IAgent cookie to the original destination.
GET http://www.novell.com --------------------------------------------------------------------------------------> Cookie: IPCZQX0100000000=000000002e1f010000000000
The Proxy server processes the incoming HTTP GET request, extracts the cookie from the headers, and validates it. The validation process is a simple one:
A checksum is performed on the incoming cookie to see if it has been tampered with.
The source IP address of the client that sent the cookie is verified to see if it corresponds to the source IP address of the user that initially authenticated.
The request is forwarded to the origin server.
Figure 10 shows this flow control graphically. Note that since the authentication takes place over HTTP in this example, the data exchanged is shown in clear text.
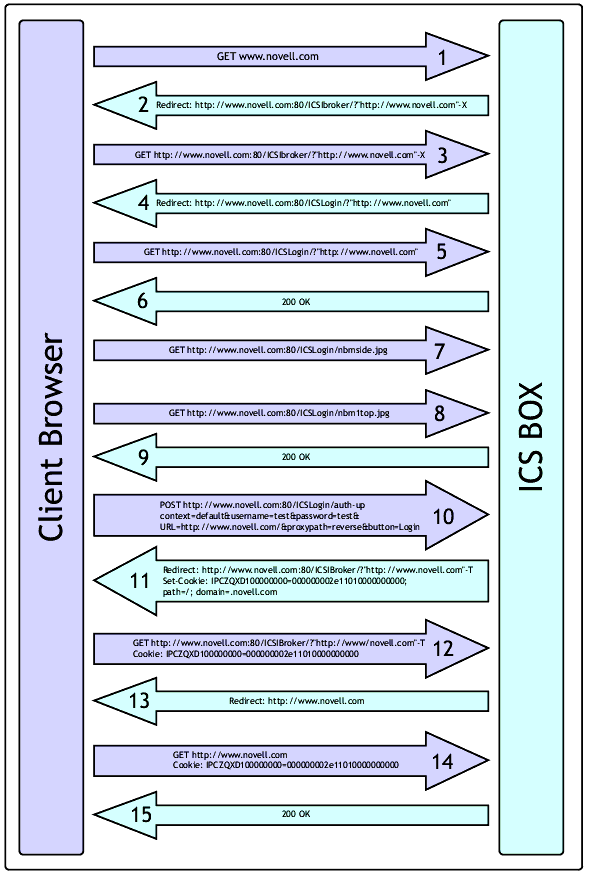
Chronological diagram of iChain flow control.
Proxy Authentication Troubleshooting Steps
When troubleshooting Proxy authentication problems, there are a number of key stages that must be looked at. This section describes these key stages and the errors that can occur in each. It also describes some processes to follow in order to identify and address the authentication problem.
Basic Configuration Check
Before doing any advanced checking, there are a few very basic checks that need to be performed so that you can rule out some simple errors.
Make sure the ISO PR mode is not set to Public. If it is, any authentication checks for the PR will be bypassed. To check the setting, go to ConsoleOne, select the ISO object, and verify that the Protected Resource tab shows the resource access value as either Secured or Restricted.
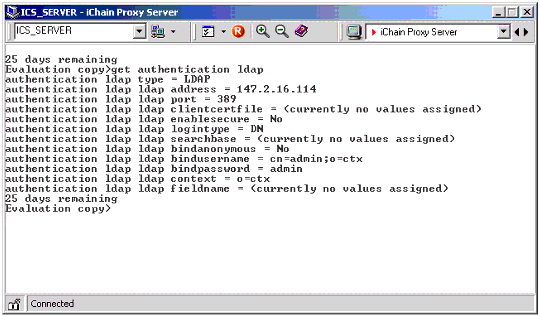
Make sure the Proxy authentication profile (LDAP, Radius, or Mutual) is configured and has the correct information. Executing the "get authentication <authentication_profile_name>" command from the iChain command line interface will give you this information. A sample output for an LDAP authentication profile configured is shown in Figure 11.
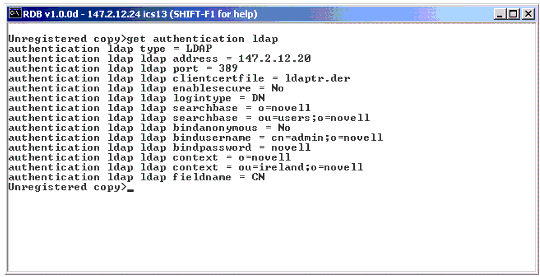
Sample output for LDAP authentication profile.
Make sure the LDAP server allows clear text passwords. If this is not done, the LDAP Bind request will fail and no LDAP search or modify requests will be answered.
Make sure the IP address/Port combination for authentication server is alive via PING. The iChain command line interface offers a PING application that can verify if a host or TCP-based application is alive. Figure 12 shows a successful PING for an LDAP application server (TCP port 389).

A successful PING for an LDAP application server on TCP port 389.
Make sure an SSL Certificate is assigned to the Proxy server. You can confirm this by looking at the Web Server Accelerator and verifying that the "Certificate" field under SSL Listening Port has an entry next to it. By default, the "Auto" certificate created during the installation of iChain should be there.
Make sure no errors exist in the Home > Health Status or Monitoring > Services screens of the iChain Proxy GUI.
Proxy Initialization Problems
The majority of Proxy initialization problems impacting authentication will result in the following two messages being reported on the PROXYCFG console screen: "Proxy Failed to Get ISO Object From Proxy Server" or "Invalid authentication information". If either of these two errors is reported on this screen, it would normally indicate an connectivity issue with the authentication server you're trying to communicate with. Proceed as follows:
Verify that the authentication profile configured on the iChain Proxy server is valid. In the case of an LDAP authentication profile, for example, make sure the IP address and TCP port are pointing to the correct LDAP server. Also make sure the username/password combination you are using for the LDAP Bind request is valid and that you have Read and Browse rights to the eDirectory tree.
Verify that the iChain command line interface PING command works for the authentication servers.
Verify the LDAP request/responses (DSTRACE) for any errors reported. If no incoming information is seen, it's likely that the client LDAP request is not being sent by the iChain Proxy server, or an intermediate device (such as a firewall) is blocking the request.
Verify that LDAP TCP connections exist in the established state in TCPCON > Protocols Information > TCP Connections. This is a static screen that shows all TCP connections in and out of the server. Locate any LDAP session (TCP port 389) and check the state of the connection. If it's in the SYN_SENT state, you have tried to establish a TCP connection to the remote LDAP server but the LDAP server has failed to respond to the TCP handshake message.
Check interpacket delay times between LDAP request/responses via a LAN trace. It could be that the LDAP Server is slow to respond to queries because it is overloaded. If this is the case, the LDAP client requests may be timing out. One possible solution is to increase the number of threads initialized by the LDAP server.
If the LDAP server is running on NetWare, use the LDAP DISPLAY CONFIG console command to view details of the LDAP server setup. You can increase the number of threads using the LDAP MAXIMUM THREADS= console command.
If the LDAP server is running on a UNIX platform, check the man pages for the equivalent command.
Check whether secure LDAP is configured as LDAP over SSL on TCP port 636. If this is the case, try using the standard LDAP on TCP port 389 to see if this works. If it does, it's likely to be an issue with the certificates imported for the secured LDAP session. Verify the certificate details, and that the trusted root has been correctly imported.
Access Granted to Users That Should Not Have Access
This is likely to be the case where the ISO's defined Protected Resources have an access mode of Public. When this condition holds, no authentication check will be done on incoming requests destined for that Protected Resource. Check the ISO's Protected Resource setup, and change the access mode to Secured or Restricted.
Login Page Is Not Displayed
Failure to display the iChain login page is a likely indicator of SSL/PKI certificate issues. From the authentication flow described earlier, you know that the login page form and graphics are sent over the secured SSL session. If the SSL session has failed to be established, then subsequent login page information will not be sent. If this happens:
Verify that the issue is related to the SSL handshake and certificates by enabling the option to authenticate over HTTP. This is done by selecting the accelerator in the iChain GUI, selecting the Authentication Options menu, and enabling the "Prompt for username/password over HTTP" setting. Authenticating over HTTP means that the user's credentials will be passed over TCP port 80, rather than the secure TCP port 443. This is recommended for troubleshooting purposes only, to confirm that the login page and user credentials are valid. Once you have confirmed this, you can further troubleshoot the SSL certificate issue as described below.
Look for errors on the Novell SSL Server Handshake screen (see Figure 13), which describes the client and server handshake protocol when the session is started for the first time. When the handshake stage has finished, the counter associated with that handshake stage will be incremented (for example, when the server sends back its certificate, the Server Certificate counter will be incremented). If an issue arises where the SSL handshake fails, it's important to use these counters to detect which handshake stage it failed at.

An example of the SSL Server Handshake screen.
The most common cause of handshake failure is the verifying of the server certificate. One possible certificate problem could be the "Valid from" or "Valid to" fields in the certificate being invalid due to timing problems on the server. It is possible to import all the certificates into the browser, or even confirm timestamps through a LAN trace.
Figure 14 shows an example trace of an invalid trusted root certificate that caused an SSL session to be reset. This chained certificate included the server certificate and its root certificate.
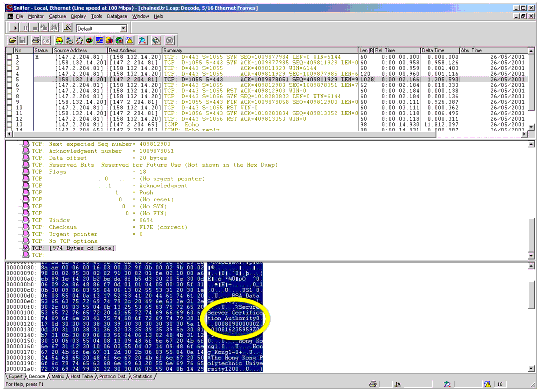
Trace of an invalid trusted root certificate.
The "Valid to" fields for both the server and root certificates are circled. You can see that the root certificate, shown in the list, expired on 010819235959. (The trace also shows that the root certificate was valid from 000809000000 to 010819235959). This corresponds to 9 August, 2000. Since this trace was done after that date, an SSL alert message was sent back to the server indicating that the root certificate was invalid and the TCP connection was reset.
Another possible problem source could be a connectivity issue between the proxy server and the CRL server (if the CDP attribute for CRLs enabled). To troubleshoot these issues, trace the traffic between the Proxy and CRL servers and verify that the CRL is successfully downloaded.
If possible, try using another browser type to see if the problem is unique to one type of browser. It could be that the SSL client code in one browser is unable to process the Server handshake requests correctly, while other browsers can.
Try to generate another certificate on the iChain Proxy server with a small key size and see if the SSL handshake succeeds. This is to check for the unlikely event of having a corrupted certificate. This can be done using the iChain Proxy GUI and selecting Home > Certificate Maintenance > Create.
There may be occasions where the SSL handshake has successfully completed and the login page still doesn't get displayed. One check to perform in this condition is to see if the login page has been customized (for example, using Java scripts or other scripts that the browser may have problems processing). If this is the case, revert to the original login pages that ship with iChain and retest the login.
Login Page Displayed But Authentication Fails
In the case where the login page is displayed, yet the authentication of the users credentials fails, here are a few checks that need to be performed.
Verify that the authentication profile settings are correct using the iChain command line interface "get authentication <authentication_profile_name>" command. This will confirm that the requests are being sent to the correct server, using valid credentials.
Verify that the authentication server is alive via the iChain command line PING request. If the LDAP or Radius authentication server is down, you'll never get a response to your requests!
Verify that the login page hasn't been customized. The login page submits the user's credentials via a HTTP POST request. The default fields from the login page (context, username, and password) are sent, but certain hidden fields are also sent. The Proxy specifically parses the incoming POST request for these hidden fields (URL, proxypath, and button) and will abort the authentication process if they are missing. If the login page is customized in any way, make sure that all the fields are passed within the newly-customized login page.
Another fairly rare issue occurs when the HTML POST data information is correct but out of order. The back-end proxy should not care about this, but try to make sure the input parameters being passed by the login page are in the following order: context, username, password, url, proxypath, and button.
Verify that no intermediate device is stripping cookies. Some third-party proxy servers are capable of stripping cookies from HTTP headers. If the iChain cookie required for authentication is continuously stripped, iChain will keep asking users to reauthenticate.
Verify that the browser is sending the correct credentials when POSTing information to the iChain Proxy server (that is, valid username, password, and context information). The easiest way of verifying this is described in the browser section of the "Proxy Authentication Troubleshooting Tools" section above, which explains how to disable encryption on the browser. This shows how to configure Netscape or Internet Explorer to get access to the unencrypted HTTP data over the secure HTTP session.
Verify that the cookie is being set correctly on the browser by the iChain proxy server. Browsers can be configured in such a manner that users are prompted before accepting cookies. When this occurs, users can view the cookie details and confirm that the domain and path for that cookie are valid. To configure the browsers to enable this option, do the following:
In Netscape browsers, select Edit > Preferences > Advanced and set the "Warn me before accepting cookies" option.
In Internet Explorer, select Tools > Internet Options > Security > Custom Level and set "Allow cookies that are stored on your computer".
Verify that the accelerator name, cookie domain, and URL being accessed are all using the same case-sensitivity. Internet Explorer 5.x has an issue where, before sending out a cookie for a specific domain, it checks the destination URL's domain with all the domains a cookie has been set for. If a match is found, the cookie is sent out. If the cookie defined for the iChain accelerator (Web Server Accelerator > Authentication Options > Cookie Domain in the iChain GUI) uses uppercase and the URL in the browser is defined in lowercase (or vice versa), the cookie will not be sent out and the user will be prompted to reauthenticate.
In cases where users are continuously prompted to reauthenticate, verify that the cookie being sent in the HTTP header adheres to RFC 2965. Older versions of certain browsers (such as Opera 0.91) failed to do this and users would be continuously prompted to authenticate. A LAN trace of the cookie being sent is enough to verify that the syntax is correct.
Verify whether it is possible to log in to eDirectory using the user's credentials. This will verify that the username, context, and password combination is correct, and that you are not prompted for grace logins because of login restrictions set up for that user. To enforce the login restrictions for users, iChain administrators should enable the Password Management servlet. Be aware that it is case-sensitive; if you don't adhere to the case-sensitivity, the servlet will not be called.
Verify whether user authentication information is available in the Proxy Console's IAgent screen (referenced in the "Proxy Authentication Troubleshooting Tools" section above). Also make sure that the senior citizen flag is not set to Yes, indicating that the entry is no longer active.
Check whether the browser displays an HTTP 403 error message indicating that the browser does not support cookies. If this is the case, the Proxy did authenticate that user and set the cookie, but there is something invalid about the subsequent request coming from the authenticated browser. Invariably, this problem will occur if:
The browser requests are going to an L4 switch that is load balancing between multiple iChain Proxy servers. If this is the case, the browser has probably had its cookie set by one iChain Proxy server but had a subsequent request, sent with the valid cookie, sent to another iChain proxy server by the L4 switch. This problem can be avoided by enabling IP address hashing on the L4 switch so that the browser gets redirected to the same iChain Proxy by the L4 switch after the initial packet is sent.
The browser goes through an ISP with multiple transparent proxies in parallel. In this scenario, the IP address of the incoming requests into the Proxy will be that of one of the transparent proxies. If subsequent browser requests go through another transparent proxy in parallel, the incoming IP address will be that of the second transparent proxy. Since the cookie checking involves checking the source IP address of the authenticated user, a mismatch will be detected and the above error sent. To get around this, modify the APPSTART.NCF file to load the Proxy.nlm with the "-ri" (remove IP address check) option.
If the cookie is never set on the browser (confirm by setting the "Prompt when accepting cookie" option on the browser), the likelihood is that the users credentials were never successfully validated by the back-end authentication server. At this point, you need to confirm that:
The iChain proxy LDAP or Radius client has issued a request to the back-end authentication (LDAP or radius) server.
The back-end authentication server has responded with a valid answer.
To confirm that the iChain Proxy is generating the client request for the authentication server, take a trace and check the LDAP or Radius requests being sent out. If the request is going out, check the trace for responses, as well as the interpacket delay time (delta time) between the request and response. If this delta time is large, internal timeouts could be occurring at the iChain Proxy server. The internal timeouts are quite large on the Proxy server side, so you would need to figure out why the authentication server was slow to respond (covered in the next section).
Slow Authentication Reponse Times
This section describes how to troubleshoot slow response times from the authentication server. The steps to take depend on which type of authentication is enabled: LDAP or Radius.
If LDAP authentication is enabled:
Verify that the LDAP authentication profile configured in the iChain GUI has a valid BIND username/password with Read and Browse rights to eDirectory.
Verify that the log files on the LDAP Authentication server show the incoming BIND request and the search request for the user's credentials. Confirm that these log files show valid responses being sent back. Don't just look at the LDAP return code; look closely at the response to see if LDAP attributes are being sent back also.
If the LDAP server is running on NetWare, load DSTRACE with the "+LDAP" and "+TIME" options, and capture the log information to the sys:\system\DSTRACE.LOG file using the FILE=ON command.
If the LDAP server is running on UNIX, check the man pages for information on how to enable logging.
Check the iChain system console for LDAP handle errors. For performance reasons, iChain allocates a number of handles during startup. These handles are continuously reused throughout the time the iChain server remains up. If for some reason the handles are all used up, iChain must wait until a handle becomes free before forwarding the next LDAP request. To confirm if this is the case, verify that the user data POSTed by the browser is valid and that no LDAP request is sent to the LDAP server. Alternatively, disable the accelerator via the iChain GUI and re-enable it to see whether all works well again. This operation reinitializes the handle allocations.
Check for intermediate devices (such as L4 switches balancing between multiple LDAP servers) between the iChain proxy server and LDAP server. If there is any way to bypass these intermediate devices for a test, do so. Note that it is more efficient to define multiple LDAP servers in the LDAP authentication profile than to define the virtual IP address of an L4 switch that load balances between different LDAP servers.
Check if the LDAP Server is slow to respond to requests. It could be that the LDAP server is heavily loaded. If this is the case, there is an option to allocate more threads to the LDAP server; or you could add another LDAP server into the setup and load balance between the servers.
To allocate more threads to the LDAP server:
On NetWare, the LDAP DISPLAY CONFIG system console command shows the LDAP settings. Use the LDAP MAXIMUM THREADS= command to increase the thread count.
On UNIX, check the man pages for the LDAP daemon for the equivalent command.
To load balance between LDAP servers, simply add the IP address of the new LDAP server to the LDAP Server field in the LDAP authentication profile.
If Radius authentication is enabled:
For Radius authentication troubleshooting, LAN traces can prove very useful. As with the LDAP authentication, you must verify that the iChain Proxy server is sending out a valid Radius request, and that the Radius server is responding within a reasonably short period of time.
Note: RADIUS Token Authentication will work if the token is retrieved from the card using a PIN number. However, if token authentication is set up to have the token retrieved from the card using a challenge sent from the Radius server, the user sees a login failed message rather than being presented with the challenge.
Use the RADPING (Radius Request Simulator) tool to verify that the Radius server is capable of processing the Radius request that is being generated. You can download a free Windows-based version of this tool from http://www.mastersoft-group.com/download/final.asp.
Using LAN traces, verify that the iChain server sends a valid Radius request, and that the Radius server responds within a reasonably short time period.
Verify that the iChain Radius authentication profile has same radius secret as that specified in the Radius Dial Access System (DAS) object.
Verify that the iChain Radius authentication profile Radius server UDP port (1812/1645) corresponds with the one running on the Radius authentication server.
Verify that the Radius authentication server has a valid DAS profile setup, and that the Radius client has a valid iChain Proxy server address.
Verify that the DAS object has been added as a trustee with Read rights to the top container of the tree where the Radius users are located. This is required when using Radius token authentication with an NMAS Radius server. Failure to do so will result in the user CN, rather thatn the FDN, being sent to the iChain Proxy Server. When this happens, users will see the error "Status : 403 Forbidden. Description: User Name Mismatch" when trying to authenticate.
Verify that the Radius debug commands show no errors. If the running Radius server is from Novell's NMAS or BMAS product line, enable debugging by typing "Radius debug ON" at the Radius server's system console. The debug information will be written to the system console, and therefore can be captured in the CONSOLE.LOG file. Check this CONSOLE.LOG file for any Radius errors.
If Radius authentication is enabled on Radius servers that do not return a fully qualified NDS name (non-Novell NMAS Radius servers), the following two parameters required in the ACLCHECK authentication profile are set at the iChain command line:
set authentication aclcheck ldap bindanonymous=no
add authentication aclcheck ldap searchbase= o=novell (or appropriate container on your tree)
If the bindanonymous features are not set correctly, you will receive the following error:
Information Alert Status: 500 Internal Server Error Description: Insufficient resources to complete the request. Please try your request again.
Conclusion
Understanding the internal workings of any product will help you isolate and identify problems faster. This AppNote has taken a look at authentication, one of the two main support problem areas of iChain, and has detailed its inner flow control and dependencies. It also described the most common authentication- related support issues and provided a list of available support tools and trouble- shooting tips to help any administrator address issues discovered while working with these iChain components.
A follow-up AppNote will cover the troubleshooting of iChain authorization- related issues.
* Originally published in Novell AppNotes
Disclaimer
The origin of this information may be internal or external to Novell. While Novell makes all reasonable efforts to verify this information, Novell does not make explicit or implied claims to its validity.