Centralis Contex: The ConsoleOne Extensions for Thin Client-Server Solutions
Articles and Tips: article
Centralis Contex Product Manager
ewen_anderson@centralis.co.uk
01 Jun 2001
This AppNote introduces the Centralis snap-ins Novell's ConsoleOne administration utility Management console. These snap-ins extend the functionality of ConsoleOne to thin client-server environments, while allowing the administrator to remain working in the familiar Novell management interface.
Since this AppNote was written in the U.K., it retains the British spelling used by the author.
Introduction
Centralis Contex is a set of snap-ins for ConsoleOne, Novell's administration software. It enables administrators to edit Windows NT Terminal Server/ MetaFrame user environment settings from within the familiar Novell environment.
Many organisations have standardised on Novell's technologies for management solutions to take advantage of their directory-enabled technology. However, thin client server solutions such as Citrix MetaFrame and Windows 2000 Terminal Services add an additional dimension, allowing delivery of this directory- managed solution to thin client devices, and over slow communications links.
While it is possible to use the native administration consoles to manage the user settings for MetaFrame and Windows 2000 Terminal Services, there are three significant benefits to making these available within the Novell suite:
It simplifies the management of users, providing a consistent tool and interface from which to carry out administration tasks.
It standardises the process of managing users, automating many of the manual editing tasks, and allowing multiple users to be selected and changed at the same time, and template users to be created.
It centralises change, using Novell's synchronising technology to store the users settings in the NDS.
Feedback from some of the thousands of customers who use Centralis previous snap-in (TCS Snap-in for NWAdmin) has also led to the inclusion of a number of additional features which enhance the functionality of this product.
Centralis Contex is available as part of the Integration Toolset (bundled with Centralis AXE and Lyncx), as Centralis Contex (versions for Novell Account Management and ADSync), or as individual platform releases. A limited functionality release of the Account Management snap-in is available as a free evaluation. See the Centralis software Web site (http://www.centralsoft.net) for further details.
Overview of Contex
Contex has been developed by Centralis as a snap-in for Novell's ConsoleOne utility Management console. It provides support for both Windows NT 4 and Windows 2000, in Domain- and Active Directory-based environments.
Contex exposes Windows Terminal Server and Citrix MetaFrame user configuration settings via tabs in Novell's ConsoleOne editor. There are currently two versions of the software:
Contex for Account Management NT. Supports editing of user settings stored in the NT domain via Novell's NDS for NT, NDS Corporate Edition, and Novell Account Management.
Contex for ADSync Active Directory. Supports editing of user settings stored in the Windows 2000 Active Directory via Novell's ADSync.
Both versions of the snap-in offer feature enhancements to previous version of the NWAdmin snap-in. These enhancements include:
Multi-User Edit. Support for single- and multi-user editing, with selection of fields to be affected by multi-user editing.
Append. Option to automatically append username to profile path during creation from a template or multi-user editing.
Templates. Option to create Template users for all exposed settings, and to associate an alias container with a template object.
User Alias. Option for automatic creation of a user Alias in specified container during creation from a template or multi-user editing.
Interface. Pages designed to have a "look and feel" similar to Manager for Domains.
Key Product Features
This section outlines some of the key product features in the Contex snap-in, grouped according to the screen page in which they appear:
Profile Page
Configuration Page
It also covers an additional page that is displayed when multiple users are selected for editing.
Profile Page
The property page (shown in Figure 1) lets you assign properties related to the user's Terminal Server environment, such as Profile Path and Terminal Server Home Directory settings. It also provides the option to Map Root the Home directory drive if required. (This option is only applicable when mapping to a NetWare volume and requires the Novell Client for NT/2000 v4.80 or later.)
Profile Page in the Centralis Contex plug-in for ConsoleOne.
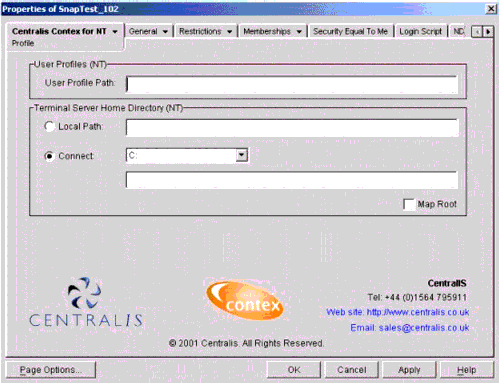
User Profile Path. The user profile path is used to enter a network path used for Terminal Server logons only when enabling a roaming or mandatory user profile for a selected user. The path you enter follows this form:
\\server_name \ profiles_folder_name \ user_name
For example:
\\puma\profiles\jeffho
If you specify both a user profile path and a Terminal Server profile path, the user profile path is used for Windows NT logons and the Terminal Server profile path is used for Terminal Server logons. If you specify only a user profile path, that path is used for both Windows NT and Terminal Server logons.
If a Novell User Template is used to create a user which has a Terminal Server Home Directory and/or Profile Path specified, the Username is automatically appended during creation. If the directory specified in the user profile path does not exist, it is automatically created the first time the user logs on.
The Terminal Server profile path is used for Terminal Server logons only.
Terminal Server Home Directory. An assigned home directory becomes a user's default directory for the File Open and Save As dialog boxes, for the command prompt, and for all applications that do not have a defined working directory. Home directories make it easier for an administrator to back up user files and delete user accounts by collecting many or all of the files in one location.
Each user on Terminal Server should have a unique home directory on a server. This ensures that application information is stored separately for each user in the multi-user environment. The home directory can be a local directory on a user's computer or a shared network directory, and can be assigned to a single user or many users.
If the home directory specified is not NetWare-based, you must manually create it and assign the correct rights.
Map Root. Selecting the Map Root option map roots the selected drive to the user's home directory on the designated NetWare server. Once the drive is mapped, users cannot navigate above this directory. For example, selecting the Map Root option when connecting drive V to \\PUMA\DATA\HOME\JEFFHO map roots the V drive to the JEFFHO directory. The user cannot then navigate up the directory hierarchy from JEFFHO back to a previous level (the HOME or DATA directories). This feature requires the Novell Client for NT/2000 v4.80 or later.
Additional Notes. If you specify only the home directory for Windows NT, that home directory is used for both Windows NT and Terminal Server logons.
If you specify only the Terminal Server home directory, the default home directory is used for Windows NT logons, and the specified home directory is used for Terminal Server logons.
Configuration Page
The second Contex page is the Configuration page (shown in Figure 2). It allows the editing of the individual user configuration settings. After changes have been made, they can be applied to the selected users by clicking either OK or Apply.
The Configuration Page in the Contex plug-in for ConsoleOne.
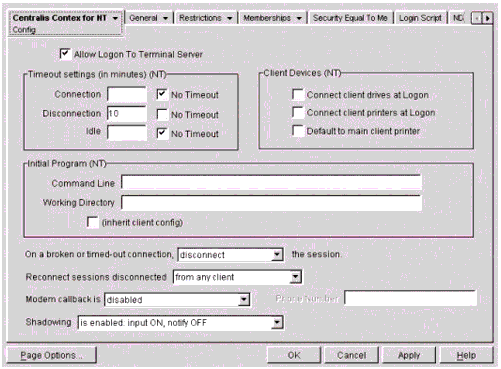
The full range of settings available from this page is described below.
Allow Logon to Terminal Server. To permit or deny the user to log on at the Terminal Server, click to select or clear the Allow Logon to Terminal Server check box. In this way, a user's ability to log on can be disabled temporarily without deleting the user's account.
Timeout Settings. These settings (specified in minutes) specify timeout intervals for a Terminal Server connection. The timeout settings are listed in Table 1.
|
Timeout Setting
|
Description
|
Notes
|
|
Max Connection Time |
This setting specifies how long the user is allowed to be logged onto the server at one time. One minute before the connection timeout interval expires, the user is notified of the pending disconnection. The user's session is disconnected or terminated, depending on the broken or timed-out connection action specified in the User Configuration dialog box. |
This timer is not cumulative; every time the user logs on, the timer is reset. If a connection duration is specified, the session is disconnected or terminated when the specified duration elapses. If No Timeout is selected, the connection timer is disabled. |
|
Max Disconnection Time |
This setting specifies the maximum amount of time a disconnected session is retained in the disconnected state before the logon is terminated. |
If a disconnect duration is specified, sessions in the disconnected state are terminated when the specified duration elapses. If No Timeout is selected, the disconnection timer is disabled. |
|
Max Idle Time |
This setting specifies how long the session can remain idle (no keyboard or mouse activity) before the user's session is disconnected or terminated, depending on the broken or timed out connection action specified in the User Configuration dialog box. |
This timer is reset whenever there is keyboard or mouse activity on the user's client computer. If an idle duration is specified, the session is disconnected or terminated when the specified interval elapses without any activity at the client. If No Timeout is specified, the idle timer is disabled. Make sure the relevant (inherit user config) options are selected in the Citrix Connection Configuration Advanced Connection Settings window before setting the user's Timeout options. |
Table 1: Timeout settings for a Terminal Server connection.
Client Devices. The settings shown in Table 2 specify whether or not Terminal Server automatically re-establishes client device mappings at logon.
|
Client Device Setting
|
Description
|
Notes
|
|
Connect client drives at Logon |
If selected, automatically reconnects to any mapped client drives. |
Note: Make sure the relevant connection (inherit user config) box is selected in the Citrix Connection Configuration Client Settings window before setting the user's Connection option. These options are supported for Citrix ICA-based clients only. For Microsoft Terminal Server Clients, use logon scripts to map drives and printers. |
|
Connect client printers at Logon |
If selected, automatically reconnects to mapped client printers. |
|
|
Default to Main Client Printer |
If selected, forces the default client printer to be the Terminal Server default printer. |
Table 2: Client Device settings for a Terminal Server connection.
Initial Program. The settings shown in Table 3 specify the program to be executed automatically when a user logs on to Terminal Server.
|
Initial Program Setting
|
Description
|
Notes
|
|
Command Line |
Program information for the application to be auto-started |
Enter text as you would type it at a command prompt. |
|
Working Directory |
Working directory for the application to be auto-started |
|
|
Inherit Client Config |
Causes the logon process to use any initial program specified by the client |
The check box is selected by default, and must be On before setting any Initial Program options. |
Table 3: Initial Program settings for a Terminal Server connection.
Other Settings. A number of additional settings are available from Centralis Contex. These are listed in Table 4.
|
Timeout Setting
|
Description
|
Notes
|
|
Broken or timed-out connection |
This selects the action taken when the user's session is disconnected due to a disconnect request, connection error, modem carrier drop, idle timeout, or connection timeout. Options: Disconnected places the session in the disconnected state Reset terminates the session |
You can place the user session in a disconnected state or reset (terminate) the user session. If the user session is placed in a disconnected state, it will remain in that state until the session is reconnected or the disconnected session timer times out. |
|
Reconnect sessions |
This selects which clients can reconnect to a disconnected session. Options: Disconnected places the session in the disconnected state Reset terminates the session |
Note that sessions started at clients other than the system console cannot be connected to the system console, and sessions started at the system console cannot be disconnected. This option is supported only for Citrix ICA-based clients that provide a serial number when connecting. |
|
Modem Callback |
The client can be configured so that when a remote user dials in to a modem port, the application server dials the remote client back. Options: Disabled prevents callback Fixed Telephone Number dials a specified number Roving Telephone Number allows the user to specify a number |
These options are supported for Citrix ICA-based clients using ICA-Dialin only. Use Microsoft Remote Access Service (RAS) to configure callback options for Microsoft Terminal Server Clients. |
|
Shadowing |
Shadowing allows a user to remotely monitor the on-screen operations of another user. Select Disabled to disable shadowing. Select Enabled to enable shadowing. Options: Input On allows the shadower to send mouse and keyboard data to the shadowed session Notify On requires the shadowed user to agree to be shadowed whenever another user attempts to shadow this user |
Note that sessions at the system console cannot be shadowed from other clients, and that the system console cannot be used to shadow other clients. Shadowing is supported for Citrix ICA-based clients only. |
Table 4: Other settings for Terminal Server connections.
Multiple User Editing
If multiple users are selected and edited, Centralis Contex will display three pages, rather than the two used for single user editing. The additional page for multi-user editing provides an "Options" page. The Options page displays a tree containing all of the user settings which can be edited in the Profile and Config pages. Selecting attributes from this screen allows the administrator to select which attributes will be affected by the multi-user edit.
Figure 3 shows the options page where the Map Root setting on the Profile page and the Disconnection Timeout settings on the Configuration page are selected. The administrator can change these settings and apply them to the selected users.
The Options Page displayed for multi-user operations.
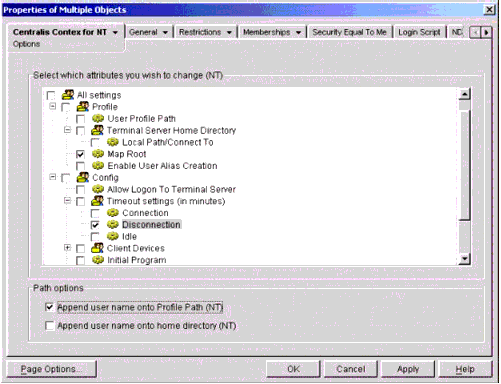
As an example, suppose an administrator only wants to change the Map Root setting, but wants to change it for all users. All users within a container can be selected within ConsoleOne, and the Contex tab selected. Contex will detect the multi-user edit operation and offer the options screen. By selecting just the Map Root attribute and editing this on the Profile page, the administrator can synchronise the single attribute across all the selected users, without changing any of their other personal settings.
Note: When the Centralis Contex is first displayed, the Config and Profile page settings will all be disabled. The user must explicitly select on the options page which settings they want to change.
The two options at the bottom of the page determine whether to append the user name to the Profile Path and to the home directory path (these two paths are the ones shown on the Profile page). This allows the base profile or home directory for the selected users to be specified and then, during processing of the changes, each user's Username will be appended to the base path as they are processed, allowing them to remain personalised.
On the profile screen, an alias container can also be specified. In this container, an alias of all of the selected users will be created (see "Adding Thin Client Server Settings to User Templates" for more information on alias container creation).
Adding Thin Client-Server Settings to User Templates
Centralis Contex also enables administrators to set up and edit a single template object. Templates allow standard settings to be created, stored, and then applied automatically to all users created using the template.
All the standard settings are exposed via the standard two pages; however, the Profile page has an additional setting. This setting will allow the user to associate an Alias container with the template, meaning that any users created using this template will have an alias automatically created in the specified alias container. Figure 4 shows the template snap-in profile page with the additional alias container selection option.
Profile Page with the Alias Container selection option.
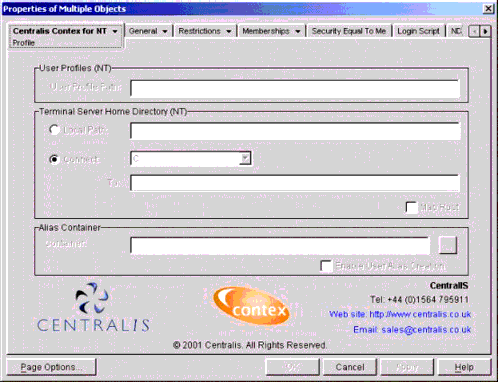
If a container is not specified then no alias will be created. For more information on the User Alias, see the next section.
The User Alias in Thin Client-Server Environments
One feature of Contex is the ability to automatically create a user Alias in a specified context whenever a user account is created. The Alias is used by administrators to deliver contextless login to Windows Terminal Server/ MetaFrame environments, where users exist in multiple containers. Using the single sign-on feature of the Citrix Feature Release 1/XP client allows the Novell username and password to be passed into the session, but does not allow resolution across multiple contexts.
An additional utility, Centralis Lyncx, has been created to create alias accounts for existing users.
About Centralis Lyncx. Centralis Lyncx (Locate Your Novell Context) is a companion utility which simplifies and accelerates the process of creating Aliases for multiple users. It allows administrators to select items and drag and drop them into a container, automatically creating Aliases for them.
Although Centralis Contex provides the facility to create an alias automatically for each user from the template, Lyncx can be particularly useful where large numbers of existing users need to be set up with an alias user. Its main benefits are:
Automated Alias Creation. Centralis Lyncx significantly reduces the time required to create multiple Alias accounts.
Flexible User Selection. Centralis Lyncx supports selection of users by name, group or container.
Note: Centralis Lyncx was created by Centralis as an in-house administration tool. While it has been used and tested by Centralis, we have made it available as a free download, and it therefore has not been subject to the full quality control associated with our commercial software releases. Users are advised to test the software against a test tree before using it to manage their live environment.
Figure 5 illustrates how Centralis Lyncx works.
Profile Page with the Alias Container selection option.
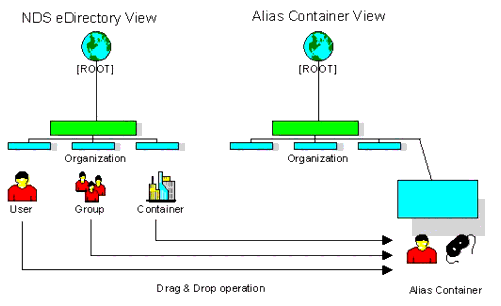
Following are the steps for creating alias accounts for multiple users with Centralis Lyncx.
-
Load Centralis Lyncx.
-
Select the users, tree, container, or group.
-
Drag it into the Alias container. Aliases are automatically created for all users within the specified selection.
-
Repeat the above drag-and-drop process for each additional selection required.
Delivering Contextless Login
The following procedure can be used to deliver contextless login in a Terminal Server/MetaFrame environment:
-
Set up TSClientAutoAdminLogon.
-
Set up Alias users for all required users.
-
Limit the search for the normal contextless login.
These steps are explained in more detail below.
TSClientAutoAdminLogon. The Novell Client supports login by a Terminal Server user passing their Username and Password into the session (for example, using the single sign-on feature of the Feature Release 1 Citrix client).
To set this up, the following entries should added to the registry:
HKLM\Software\Novell\Login REG_SZ TSClientAutoAdminLogon = 1 REG_SZ DefaultLocationProfile = LocationProfile
where LocationProfile is the name of the Location Profile to be used (for example, Default).
Some changes also need to be made to the Location Profile which is to be used. To make these changes, go to the Novell Client Properties and complete the following steps:
-
Select the Location Profiles tab.
-
Select Default (or other profile name as specified above).
-
Select Properties, and then select Properties again.
-
Deselect "Save profile after successful login". (This prevents the context from being changed in the profile when a user logs in.)
-
Select the NDS tab.
-
Enter the Tree and Context required.
Using this method, the Username and Password can be passed into the session and login will be successful. However, this only works for a user in the context specified in the Location Profile. The feature is therefore useful, but effectively limited to a single specified context.
Using Aliases. To overcome this limitation, it is possible to use a single container to store pointers to each user as an Alias object. To achieve this, complete the following steps:
-
Create a new Organizational Unit (OU).
-
Use Lyncx to create an Alias object for all users, anywhere in the tree, who will be given access to log in to the Terminal Server.
-
Set the context specified in the Location Profile above to this new OU.
Now when a username and password are passed into the session, the Novell Client will look for that name in the Alias list. If found, that user will be logged in successfully.
Limiting the Search for Contextless Login. Aliases for users are picked up by the normal NWGINA contextless login feature to prevent users from picking up their Alias on normal login. It may therefore be necessary to prevent the searching of the OU that was created for the Aliases.
There are two methods to achieve this: (1) by removing Browse rights for the Public object, or (2) by limiting the containers searched.
It is possible to limit the contexts in which the contextless login feature will search by adding values to the registry. If no limits are specified, the search starts from the root of the tree, Hence both the User object and the Alias will be detected and the user will be offered them as a choice (although both will work).
The following are the entries that can be added to limit a search:
HKEY_LOCAL_MACHINE
\SOFTWARE
\Novell
\Graphical Login
\NWLGE
\LgnCL
\CxPruning
In this key, create another key that is named exactly the same as the tree:
\Tree
Within this key, create a DWORD type value named exactly the same as the context to be searched. Set the contents of this value to specify the depth of the search:
0 = Search this context only, no sub-contexts
0xFFFFFFFF = Search this context and all descendent contexts
Any other value specifies how many levels of sub-contexts should be searched. If no values are defined within this key, no search will be performed for that tree.
Conclusion
This AppNote has briefly described the main features and benefits of the Centralis Contex snap-ins for Novell's ConsoleOne utility. For more information about this product, visit the company's Web site at http://www.centralis.co.uk.
* Originally published in Novell AppNotes
Disclaimer
The origin of this information may be internal or external to Novell. While Novell makes all reasonable efforts to verify this information, Novell does not make explicit or implied claims to its validity.