How to Access NDS from HTML or ASP, Part 2
Articles and Tips: article
Software Engineer
Developer Support
rletos@novell.com
01 Apr 2001
This is Part 2 of our series on how to access NDS from HTML or ASP. This article discusses how to browse the DS tree from an HTML page and how to get DS object values from the DS tree. For Part 1 of this article see http://support.novell.com/techcenter/articles/ana20010306.html.
Browsing the DS Tree from HTML Page
We finished Part 1 in this series with the "Who Am I?" HTML sample code. Our next task is to create an HTML application, that will allow us to browse objects in any given DS tree we are connected to. To make this task a little more complicated we also want to display our DS tree in the tree hierarchy. Using this object should give us the capability of expanding or collapsing DS tree nodes with just the click of a mouse. Can we achieve this task? Yes, we can! Fortunately we have VBScript which allows us to locally require processing- and with TreeView implemented as a COM object it can be embedded into an HTML document along with NWDir control.
How Should the HTML Application Look?
Here is how we want the HTML application to look:
One combo box from which it is possible to choose an available DS tree (in case we are working in a multiple DS tree environment).
A clickable TreeView window with DS tree objects.
Objects in TreeView window displayed (including their typical icons) so that the type of the object can be easily recognized by the user.
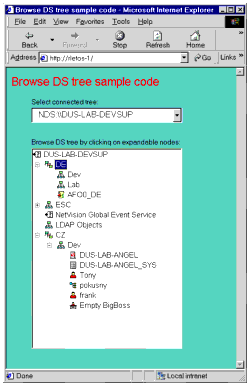
How the the HTML application looks.
Embedded COM Components Using <OBJECT<
The first embedded object in our code is NWSess ActiveX control. This is a control from the family of Novell ActiveX controls. We use it to get a list of available or connected DS trees.
<OBJECT CLASSID="CLSID:EC747AE4-8EF6-11D0-B375-0000E20315E2"
   ID="NWSess1" WIDTH=32 HEIGHT=32 >
</OBJECT>
Next is the NWDir ActiveX control.
<OBJECT CLASSID="CLSID:4F021AE3-9E98-11D0-A808-00C04FDCD94A"
   ID="NWDir1" WIDTH=32 HEIGHT=32 >
</OBJECT>
We want to use combobox COM object in this sample code to list available DS trees. Here is how this object is embedded:
<OBJECT CLASSID="CLSID:8BD21D30-EC42-11CE-9E0D-00AA006002F3"
   ID="Combo1   "
   STYLE="HEIGHT: 30px; LEFT: 50px; POSITION: absolute; TOP: 80px; WIDTH: 300px">
</OBJECT>
We also want to have all DS objects nicely ordered by its hierarchy in a TreeView object. The TreeView should also have capability to handle not only object names but also object icons. To achieve this, we need to add not only the TreeView object to the HTML document, but also the ImageList object.
<OBJECT CLASSID="CLSID:58DA8D8F-9D6A-101B-AFC0-4210102A8DA7"
   ID="ImageList1" WIDTH=38 HEIGHT=38 >
</OBJECT>
<OBJECT CLASSID="CLSID:0713E8A2-850A-101B-AFC0-4210102A8DA7"
   ID="TreeView1"
   STYLE="HEIGHT: 400px; LEFT: 50px; POSITION: absolute; TOP: 160px;
      WIDTH: 300px">
   <PARAM NAME="LineStyle" VALUE="0">
   <PARAM NAME="Style" VALUE="7">
   <PARAM NAME="Appearance" VALUE="1">
   <PARAM NAME="BorderStyle" VALUE="1">
   <PARAM NAME="ImageList" VALUE="ImageList1">
   <PARAM NAME="Indentation" VALUE="250">
</OBJECT>
Notice that we have created important relation here between our ImageList1 object and our TreeView1 object, by specifying the <PARAM< tag for embedded TreeView object. The full syntax is:
<PARAM NAME="ImageList"VALUE="ImageList1">
Be aware that there are some problems when adding DS icons to the TreeView. As you can see we can easily embed COM object ImageList into the HTML document using <OBJECT< tag, but the real problem begins with the data (icon pictures) to which this ImageList object points. We have namely two choises:
-
We can use the list of icons, which comes with NWDir ActiveX control. However this icon list is far from complete, which means that there are no icons available for some quite frequently used objects, for example the [Root] object (globe icon).
-
We can add our own icons into embedded ImageList using DATA attribute of the <OBJECT< tag for embedded ImageList. However it is a nightmare to add data for several tenths 16x16 coloured images in MIME64 encoded data format!
Under these circumstances we have decided to use icons which come with NWDir control; because it is a much less complicated approach and will be easier to document our intent. The whole code for adding icons is easy and straight forwarded.
This last part of the <OBJECT< section in our sample code adds two Label objects with some description strings. Normally we can use default HTML text, but using these controls allows us to place the description text in the exact position as specified by the positioning parameters in the <OBJECT< tag.
<OBJECT CLASSID="CLSID:978C9E23-D4B0-11CE-BF2D-00AA003F40D0"
   ID="Label1"
   STYLE="HEIGHT: 15px; LEFT: 50px; POSITION: absolute; TOP: 60px; WIDTH: 160px">
   <PARAM NAME="Caption" VALUE="Select connected tree:">
   <PARAM NAME="ForeColor" VALUE="0">
   <PARAM NAME="BackColor" VALUE="11193702">
</OBJECT>

<OBJECT CLASSID="CLSID:978C9E23-D4B0-11CE-BF2D-00AA003F40D0"
   ID="Label2"
   STYLE="HEIGHT: 15px; LEFT: 50px; POSITION: absolute; TOP: 140px; WIDTH: 300px">
   <PARAM NAME="Caption" VALUE="Browse DS tree by clicking on expandable
   nodes:">
   <PARAM NAME="ForeColor" VALUE="0">
   <PARAM NAME="BackColor" VALUE="11193702">
</OBJECT>
The HTML header and body of this HTML browser sample code are trivial, but here they are:
<HTML>
<HEAD>
<TITLE> Browse DS tree sample code </TITLE>
</HEAD>

<BODY BGCOLOR=#66CDAA>
<FONT face="Arial" size="+1" color="red">
Browse DS tree sample code
</FONT>
</BODY>
</HTML>
Browsing the DS Tree
Browsing the DS tree is the most important part of this sample. It starts with the <SCRIPT< tag and contains four scripting procedures: Window_OnLoad(), ListContainer(), Combo1_Click(), and TreeView1_DblClick().
When the HTML application starts the Window_OnLoad() procedure is invoked. We use this procedure to do the following required initializations:
-
ImageList1 properties are set and a list of the images is built from the NWDir1.Pictures property.
-
NWSess1.ConnectedTrees property is read, names of connected DS trees are retrieved and added to our combo1 list. In our sample code we use the NWSess1.ConnectedTrees property, which in fact means "all DS trees to which we are currently logged". You can modify this code later and replace this property with NWSess1.TreeNames. There should not be problems with this modification; by default each DS user (even the one not authenticated yet) has browse rights to all objects in the DS tree.
-
The last task in Window_OnLoad() procedure is to initialize our TreeView1 object properly. The important parameter here is TreeView1.PathSeparator. It must be set to "\" (backslash character). In fact this is a tricky setting that will help later, when coding object retrieval from DS tree. The idea behind this setting is that NWDir component uses UNC coding, i.e. fully distinguished name (FDN) is presented as "NDS:\\TREE_NAME\CONTAINER\\OBJECT_NAME". In case we use the backslash character as a path separator in our TreeView1 object, most of the job when constructing FDN of the object, in case we need it, is done by TreeView1 itself. This setting simply saves us from writing a lot of code.
<SCRIPT LANGUAGE="VBScript">

Const CREATE_NEW_TREE = 1
Const BROWSE_CURRENT_TREE = 2

Sub Window_OnLoad()
Dim nwpicture, imgX
   ImageList1.ImageHeight = 16
   ImageList1.ImageWidth = 16
   ImageList1.ListImages.Clear
   For Each nwpicture In NWDir1.Pictures
      set imgX=ImageList1.ListImages.Add(, nwpicture.ImageIndex,
         nwpicture.Picture)
   Next
   Combo1.clear
   Combo1.Font.Name = "Arial"
   Combo1.Font.Size = 9
   For each entry in NWSess1.ConnectedTrees
      Combo1.addItem entry.FullName
   Next
   Combo1.Text = Combo1.List(0)
   TreeView1.Sorted = True
   TreeView1.PathSeparator = "\"
   TreeView1.Font.Name = "Arial"
   TreeView1.Font.Size =9
End Sub
When the user clicks in the IE window on the combo1 button, we expect he has chosen a new DS tree name. So we have to take appropriate action. This is done by combo1_Click() scripting procedure:
Sub combo1_Click()
   if combo1.Text <> "" Then
       ListContainer(CREATE_NEW_TREE)
   End If
End Sub
Similarly, the appropriate action must be taken when the user double clicks in an existing tree view on a container object in order to expand the tree and browse subordinate objects.
Private Sub treeView1_DblClick()
   ListContainer (BROWSE_CURRENT_TREE)
End Sub
The procedure ListContainer() does in fact all the job with DS tree browsing. This procedure takes one parameter, which says if a new tree should be read (CREATE_NEW_TREE) or if we continue browsing our current tree (BROWSE_CURRENT_TREE).
Sub ListContainer(operation)
Dim xnode, xchild
Dim shortName, context
Dim object, index
   TreeView1.MousePointer=11  'vbHourGlass
   If operation = CREATE_NEW_TREE Then
      TreeView1.Nodes.Clear
      shortName = Mid(Combo1.Text, 7)   ' Strip off NDS:\\
      Set xnode = TreeView1.Nodes.Add(, , , shortName)
      xnode.Image = 1     ' We don't have any globe in NWDir !!!
      index = xnode.index
   Else
      Set xnode = TreeView1.SelectedItem
   End If
   If xnode.Children = 0 Then
      context = "NDS:\\" + xnode.FullPath
      NWDir1.FullName = context
      If NWDir1.Entry.Layout.Container = True Then
         For Each object In NWDir1.Entries
            Set xchild = TreeView1.Nodes.Add(xnode.index, 4, ,object.shortName)
            xchild.Image = object.ImageIndex
         Next
         xnode.Expanded = True
      End If
   End If
   TreeView1.MousePointer=0  'vbDefault
End Sub
</SCRIPT>
Notice that when the ListContainer() procedure is called with parameter CREATE_NEW_TREE, we start building our TreeView from scratch. Instead of reading the [Root] object of the given DS tree we simply add first node to the TreeView, and this node holds the name of the given DS tree. Because there is no icon available for the [Root] object in NWDir control, we set:
xnode.image = 1
which means we are hard coding to use the [Root] object icon, which belongs to an unknown object.
Getting DS object values from DS tree
This last HTML sample is in fact the modification of the previous HTML browser sample code. Now our intent is to add capability to the HTML browser not only to browse DS objects; but also to read existing object attributes, and for any given attribute to read all its existing values. This small HTML application is capable of getting various values from NDS by simply clicking with a mouse on the object of interest.
How Should the User Interface Look?
With our current HTML browser uses can double click on the TreeView node to expand or collapse appropriate parts of the DS tree. What seems to remain unused is a single click on the TreeView node. OK, we can use this event for notification that there is a request to read all existing attributes of the selected object. Then we can list these attributes in a ListBox.
After getting attributes into ListBox we can choose an attribute of our interest and retrieve all its values just by clicking on it with the mouse. These values are then put into a TextBox.
See Figure 2 for how the HTML browser should look after all additional modifications.
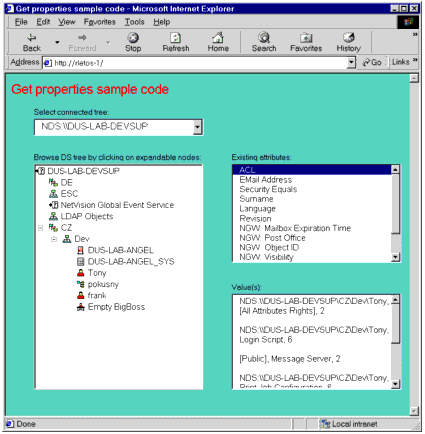
The HTML browser after all additional modifications.
The full code of this HTML sample can be downloaded from http://developer.novell.com.
Changes from Previous HTML Browser Code
The procedure Window_OnLoad() has been modified and contains code which initiates newly added objects List1 and Text1. Don't forget to set Text1.MultiLine property=1. This allows Text1 textbox to accept multiple lines when attribute values are displayed.
Sub Window_OnLoad()
Dim nwpicture, imgX
   ImageList1.ImageHeight = 16
   ImageList1.ImageWidth = 16
   ImageList1.ListImages.Clear
   For Each nwpicture In NWDir1.Pictures
      set imgX=ImageList1.ListImages.Add(,
            nwpicture.ImageIndex,nwpicture.Picture)
   Next
   Combo1.clear
   Combo1.Font.Name = "Arial"
   Combo1.Font.Size = 9
   For each entry in NWSess1.ConnectedTrees
      Combo1.addItem entry.FullName
   Next
   Combo1.Text = Combo1.List(0)
   TreeView1.Sorted = True
   TreeView1.PathSeparator = "\"
   TreeView1.Font.Name = "Arial"
   TreeView1.Font.Size =9
   List1.Font.Name = "Arial"
   List1.Font.Size = 9
   Text1.Font.Name = "Arial"
   Text1.Font.Size = 9
   Text1.ScrollBars=3
   Text1.MultiLine=1
End Sub
Here is the code addendum, which embeds listbox List1 and textbox Text1 into our HTML document:
<OBJECT CLASSID="CLSID:8BD21D20-EC42-11CE-9E0D-00AA006002F3"
   ID="List1"
   STYLE="HEIGHT: 190px; LEFT: 400px; POSITION: absolute; TOP: 160px;
   WIDTH:300px">
</OBJECT>

<OBJECT CLASSID="CLSID:8BD21D10-EC42-11CE-9E0D-00AA006002F3"
   ID="Text1"
   STYLE="HEIGHT: 170px; LEFT: 400px; POSITION: absolute; TOP: 390px;
   WIDTH: 300px">
</OBJECT>
One click on the given node in our TreeView (i.e. one click on a given DS object) starts the process which reads all existing attributes from that DS object and fills them with listbox List1. Here is the code:
Sub TreeView1_Click()
Dim xnode, entry, context
   TreeView1.MousePointer=11  'vbHourGlass
   Set xnode = TreeView1.SelectedItem
   Text1.Text=      ""
   context = "NDS:\\" + xnode.FullPath
   NWDir1.FullName = context
   set entry=NWDir1.entry
   value = entry.GetFieldValue("", Empty, True)
   call DataToListBox(value,List1)
   TreeView1.MousePointer=0  'vbDefault
End Sub
We simply set NWDir1.FullName property with the full DS path of the given object and then set focus on the current NWDir1.entry. The first parameter passed to the entry.GetFieldValue() method, which is empty string (""), causes that all existing attributes for a given object will be retrieved. The last parameter TRUE, passed to this function, forces the result to be always an array, even in case we have only one value. Why are we doing this? This is a good practice when working with NWEntry.GetFieldValue() method. Attribute values in DS may be single valued or multiple valued. Forcing the result from GetFieldValue() method to be always an array, even in case there is only one single value, helps us significantly in consecutive data retrieval, about which DataToListBox() procedure takes care.
We know we have forced the result to be always an array, and this fact helps in the logic of the procedure DataToListBox(). Here we first test if upper dimension of our array is bigger than 0. If it is, we need to read existing values from this array using FOR-NEXT loop. If it is not, we check whether our value(0) is empty or not. If it is not empty, we can add the value to the listBox, otherwise we add the warning, that there is "<No value<".
The important point in DataToListBox() procedure is -which function to use when checking value(0)? Value(0) is a type of Variant, so in general it can hold String, it can hold number, or it can for example hold Boolean value. We know in our particular case -when retrieving all object's attributes -it will return Strings only but we want this procedure as universal as possible. To check and read values here correctly we have to use IsEmpty() function:
Sub DataToListBox(value, listBox)
Dim i
   listBox.Clear
   If UBound(value) Then
      For i = 0 To UBound(value)
         listBox.AddItem value(i)
      Next
   Else
      If Not IsEmpty(value(0)) Then
          listBox.AddItem value(0)
      Else
         listBox.AddItem "<No value>"
      End If
   End If
End Sub
After we get attribute names into our List1 listbox we can choose one of the listed items and click on it in order to read and see given attribute values. Here is the code for List1_Click() procedure, which handles this:
Sub List1_Click()
Dim entry, attrName
   List1.MousePointer=11  'vbHourGlass
   if List1.ListIndex<>-1 then
      attrName=List1.List(List1.ListIndex)
      set entry=NWDir1.entry

      err.clear
On Error Resume Next
      value = entry.GetFieldValue(attrName, Empty, True)
      If err.number <>0 then
         msgbox "Error when getting value for: " & attrName, vbCritical
      Else
         call DataToTextBox(value,Text1)
      End If
   End If
   List1.MousePointer=0  'vbDefault
End Sub
In this procedure, DataToTextBox() is used to fill textbox with retrieved data. It works in the same way as DataToListBox(), only the output is TextBox here:
Sub DataToTextBox(value, textBox)
Dim i
   textBox.Text=""
   If UBound(value) Then
      For i = 0 To UBound(value)
          textBox.Text=textBox.Text+value(i)+chr(10)+chr(13)
      Next
   Else
      If Not IsEmpty(value(0)) Then
         textBox.Text = value(0)
      Else
         textBox.text = "<No value>"
      End If
   End If
End Sub
The interesting thing with List1_Click() code is that there is some kind of error handling implemented. The reason is that not all attributes can be read without any problem with NWEntry.GetFieldValue() method. This method for example cannot be used for reading attributes with SYN_STREAM syntax, i.e. attributes, which are implemented in DS separately as files. Similarly it can happen that we ask NWDir to read an attribute we have no rights to. In this case NWENtry.GetFieldValue() fails. There can be some inconsistencies in DS object attributes, which can cause that an attempt to read values from there to fail.
In case NWEntry.GetFieldValue() fails and returns an error, we capture this error with the following code line
If err.number <>0 then
and then raise a warning window, which looks like this one:
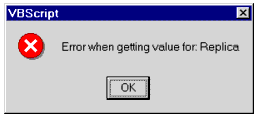
VSBScript warning window.
Conclusion
So far we have used scripting on the client side only. Our Web server is in fact used only as an HTML document storage, which provides documents each time a client sends the request. In Part 3 we will discuss using AX NWDir in ASP.
* Originally published in Novell AppNotes
Disclaimer
The origin of this information may be internal or external to Novell. While Novell makes all reasonable efforts to verify this information, Novell does not make explicit or implied claims to its validity.