How to Supercharge LDAP Searches with NDS eDirectory Indexes
Articles and Tips: article
Manager for LDAP
Novell NDS Administration
glanderson@novell.com
01 Jul 2000
Thanks to Paul Kelley, Qiang Tian, Brian Jensen, Andy Hodgkinson, Tom Doman, Duane Buss, Steve McLain, and Xiaohua Yu, who contributed information and took the time to ensure that this information was accurate.
This AppNote shows how to improve eDirectory search performance by efficiently managing indexes.
- Introduction
- Indexes in eDirectory
- Index Management in eDirectory Version 8.5
- Indexes in ConsoleOne
- Programmatic Index Management with LDAP
- Monitor and Indexes
- Which Indexes Should You Create?
- How Are Indexes Really Used?
- Which Index Is Your Query Really Using?
- Summary
Introduction
Novell's NDS eDirectory (the 8.x release of NDS) boldly proclaimed the ability to hold huge numbers of objects in a distributed, replicated directory structure. In fact, a searchable directory holding one billion objects was displayed at Novell's Brainshare conference in 1999.
Fast access to that large number of objects was provided by the use of indexes in the directory's data store. The set of indexes shipped with the directory were enough to provide basic query functionality. However, as applications added new schema, the need for a tool to define appropriate indexes became quickly apparent.
Versions of Novell Directory Services (NDS) prior to the eDirectory release relied on a flat file data store with no real indexing. Performance analysis of these earlier versions of the directory indicated some practical guidelines for tree configuration. For example, the stated guideline for objects in a container was 5,000. Performance on a single server was also constrained by the data store size and the available memory on the server. If the entire directory could be held in RAM, performance was good. If portions of the directory had to be stored on disk, performance dropped significantly.
The new eDirectory redefined some of the rules for tree implementation. The new data store allowed significantly more information to be held on a single server. The need to limit the number of objects in a container was also removed. Tests on data sets ranging from 10,000 to over 10 million objects indicated a pretty constant search performance, regardless of the size of the directory. Several competing directories showed excellent performance as long as enough RAM was available on the server to hold the entire data store in memory. However, performance dropped dramatically as soon as the data store was larger than available RAM.
Indexes in eDirectory
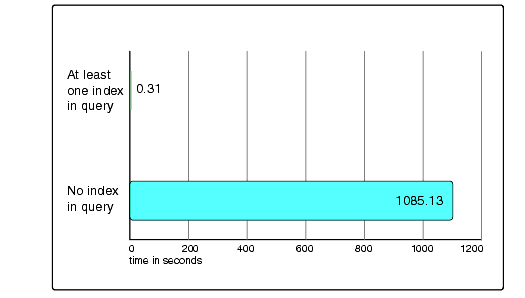
Testing of eDirectory indicated that search performance on large data sets can be significantly improved by using indexes on the data, and that search performance remained pretty constant regardless of the number of objects stored when an index was involved in the search. One such series of tests focused on the effects of indexes on complex queries in a large data set. The data set contained two million user objects distributed in twenty containers. A set of five common attributes was selected. Indexes existed on two of the five attributes. A series of one hundred queries were then generated by selecting random combinations of these five attributes.
Figure 1 shows the significant impact of the correct index being involved in a search query. Results went from over eighteen minutes on average, to an average of 0.31 seconds.
Figure 1: Effects of using indexes in queries.
Cost of Indexes
While appropriate indexes can significantly improve performance, there is also a cost associated with each index added to the directory. Each addition, deletion, or modification of an entry in the directory causes all indexes affected by the change to be updated. Substring indexes are the most costly to create and update, and presence indexes are the least costly. Obviously the more indexes that exist on a server, the longer the time it takes to do add, delete, or modify operations. Thus, Novell recommends that indexes be used judiciously.
A secondary side effect of indexes is that each index obviously requires some storage to hold it. Thus, each index adds to the size of the data store.
Default Indexes
The following indexes are created by default when NDS is installed:
|
Name
|
Type
|
Rule
|
Attribute
|
|
CN |
Auto Added |
Value |
cn |
|
CN_SS |
Auto Added |
Substring |
cn |
|
dc |
Auto Added |
Value |
dc |
|
Given Name |
Auto Added |
Value |
Given Name |
|
Surname |
Auto Added |
Value |
Surname |
|
uniqueID |
Auto Added |
Value |
uniqueID |
|
uniqueID_SS |
Auto Added |
Substring |
uniqueID |
|
Aliased Object |
Operational |
Value |
Aliased Object Name |
|
Obituary |
Operational |
Presence |
Obituary |
|
Member |
Operational |
Value |
Member |
|
Reference |
Operational |
Value |
Reference |
|
Equivalent to Me |
Operational |
Value |
Equivalent to Me |
Index Management
The shipping versions of eDirectory hold all index definitions inside the data store. Index definitions are not available using standard directory queries. Indexes are defined per server, and each index covers the data on the server where it is defined. Index definitions are not replicated to other servers.
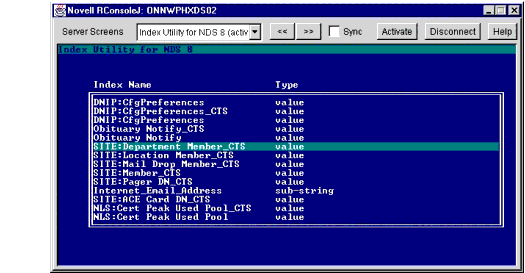
Defining a new index in a directory on NT or NetWare requires a special tool (DSIXEDIT.NLM or DSIXEDIT.EXE). This unsupported tool is available from Novell support. The DSIXEDIT tool requires that the directory service process be shut down on the server where the index is to be defined. The tool opens the database and allows the administrator to view the indexes already on the server. A view of the console screen for DSIXEDIT is shown in Figure 2.
Figure 2: This is the DSIXEDIT console screen.
The DSIXEDIT tool is available on both NetWare and NT. The tool has three commands:
A - Add an Index
D - Delete Highlighted Index
U - Upgrade All Indexes
Adding an Index. A pop-up window for entering the Index Name appears when the A key is pressed. This is the user-defined name for the index. Type in the desired name and press the Enter key. Another window showing the list of currently defined attributes is displayed. Attributes are listed in the order they were defined in the directory, not in alphabetic order. You can scroll to find the desired attribute, or while holding the <Alt< key press the <F3< key to provide a search window. The administrator can enter a portion or the entire name of the attribute in order to locate it. Once the desired attribute is highlighted, press the <Enter< key. The next window allows you to select the index rule. Presence and Value Match rules are available for all attributes. A Substring rule is available for text attributes. The first two matching rules always appear in this window. The Substring rule appears only if a text attribute has been selected. Highlight the desired rule and press the <Enter< key.
The index progress window appears now. It shows the count of entries being indexed. Since indexing time is proportional to the size of the data set, it can take a long time if you have a really large data set. When the index is fully built, a success or failure window appears. If index creation was successful, the new index always appears at the bottom of the DSIXEDIT index list.
Deleting an Index. An index can be deleted by simply highlighting the desired index and pressing the D key. This action prompts for a confirmation that you really want to delete the index. Answering in the affirmative removes the index from the database.
Upgrading Indexes. The U key provides a means of checking the database's index definitions against the index definitions shipping with the DSIXEDIT tool. If a definition mismatch occurs, the DSIXEDIT tool updates the definition in the database. (This command provides the same functionality as the Check Operational Indexes specification in DSREPAIR.)
The DSIXEDIT tool works with versions of NDS eDirectory in the range of 8.0 to 8.4x. A version of this tool does not exist for the eDirectory 8.5 release. The major disadvantage of using this tool is that the directory must be off-line during index creation. The length of time required to create an index varies based on the number of objects already in the data store, so your directory could be off-line for quite a while.
Index Management in eDirectory Version 8.5
Novell realized the need to handle indexes differently, so the soon-to-be- released eDirectory 8.5 includes added capability for defining and managing indexes in the directory. While indexes are still defined on a server-by-server basis, the definitions are now held as values of the indexDefinition attribute on the NDS server object. Each index on a server applies to the data stored on that server. Index definitions are still not replicated to other servers, but simple management tools now allow an index definition to be copied to a new server.
When a new index is defined or the state of an existing index is changed, the operation does not happen immediately. A background process that usually runs about every thirty minutes checks the index definition values against the current index status and starts any necessary processes. Indexes are built in the background while the directory is still working. Once the index is completed, its status changes to on-line automatically. Users of the directory should notice the immediate performance improvement.
The indexDefinition Attribute
The indexDefinition attribute on the server object is defined using syntax CI_LIST. It is a multi-valued attribute. Each value of the attribute holds the following strings:
Index Version Information
User-defined Index Name
Index State
Index Rule
Index Type
Index Value State
Attribute Name
Index Version Information. The index version information is a field added to the index and reserved for future use. In the shipping eDirectory 8.5 product, this field will always be 0.
User-defined Index Name. The user-defined index name field is a readable description identifying the index on the index management page of ConsoleOne. Family Name Substring and Zip Code Value are examples of the types of strings that should be used in this field. The administrator can define any name that makes sense to him. Novell does suggest, however, that the index name should not contain the '$' character. This character is the delimiter between the 7 strings in the attribute value. If you use the '$' character in one of the strings, you must escape it when trying to work with the indexes via LDAP.
Index State. The index state field contains the following values:
0 = suspended 1 = bringing online 2 = online 3 = pending creation
When an index is in the suspended state, it is not used in queries and is not updated. The bringing online state indicates an index is in the process of being created. Online means that the index is up and working. Pending creation means that the index has been defined and is waiting for the background process to begin its operation.
When defining an index using LDAP, this field should be set to 2. The background process automatically changes the state once index building has begun.
Index Rule. Values for the Index Rule field include:
0 = Value Matching 1 = Presence Matching 2 = Substring Matching
A value matching index helps with queries where the criteria involves the entire value or the first part of the value. For example, this index helps on both a query to find all entries with a "LastName" attribute that is equal to "Jensen", or a query to find all entries with a "LastName" attribute that begins with "Jen".
The presence matching index optimizes queries with criteria that only involves the presence of an attribute. An example of this type of query is to find all entries with a "Login Script" attribute.
A substring matching index can be used to optimize queries with criteria that is a subset of a string value. For example, a query to find all entries with a "LastName" attribute that contains "der" would benefit from this index. The query in this example would return matches for (among others) "Derington", "Anderson", and "Lauder".
Index Type. The Index Type field has the following definitions:
0 = User Defined 1 = Added on Attribute Creation 2 = Required for Operation 3 = System Index
User-defined indexes can be suspended or deleted. When you define an index using one of the methods outlined in this paper, this value should always be set to 0.
Index Value State. Index value state is used by the database to identify the source of the index. Defined values include:
0 = Uninitialized 1 = Added from server 2 = Added from local DIB 3 = Deleted from local DIB 4 = Modified from local DIB
Indexes that are predefined, or that were added or modified using the DSIXEDIT tool, are identified with the 2, 3, or 4 values. An index created using LDAP should have this string set to 1.
Attribute Name. The attribute name string contains the NDS attribute name. In many cases, attributes have both an NDS name with an LDAP name mapped to it. Be sure to use the NDS name for the attribute. When you create an index using ConsoleOne, this is not an issue because you select from the list of known NDS attribute names. When you create an index using LDAP, make sure you use the appropriate NDS attribute name, not the LDAP mapped attribute name. Be careful to escape any characters that require escaping.
Creating an Index
So now that the format of an indexDefinition attribute value has been identified, how do you really go about creating one?
Indexes can be defined using one of two methods. ConsoleOne provides a snap-in to manage this attribute. Users of the directory can also define new indexes and manage existing indexes using LDAP. The NDS iMonitor product allows indexes to be viewed. Examples of each of these methods are provided below.
Indexes in ConsoleOne
To define an index using ConsoleOne, first select the Server object for the server where you want the index to be defined. Right click on the server's icon and select Properties from the list that appears (see Figure 3).
Figure 3: Properties of all the indexes defined on this server.
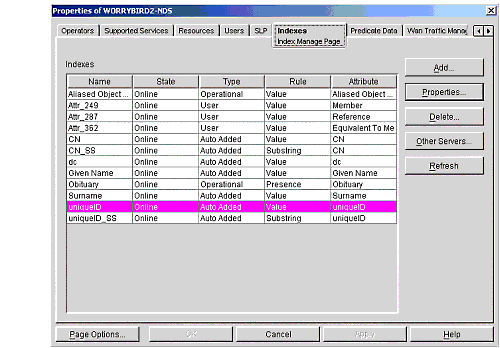
This screen shows you the properties of all the indexes defined on this server. You can choose to add an index, change the properties of the selected index, delete an index, or copy an index to another server.
The Refresh button causes ConsoleOne to re-read all of the values in the indexDefinition attribute, so the displayed list of indexes and properties is refreshed.
We will now explore some of these functions.
Adding an Index
Click the Add button to display the screen shown in Figure 4.
Figure 4: Create Index window.
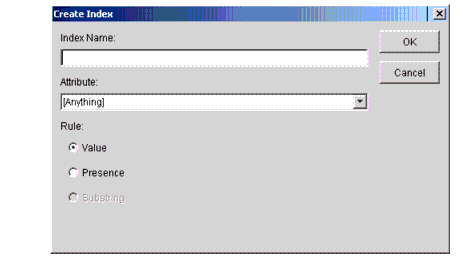
Enter the user-identifiable name for this index in the Index Name field. Then, using the drop-down list of the Attribute field, select the attribute that the index is to be attached to. Notice that the Rule field shows choices for Value and Presence, but Substring is grayed out when this screen is first displayed. If the attribute you select for the index is of a type that allows a substring index, then the selection for substring becomes available.
Changing the Properties of an Index
The Properties button calls up the Index Information window, as shown in Figure 5.
Figure 5: Index Information window.
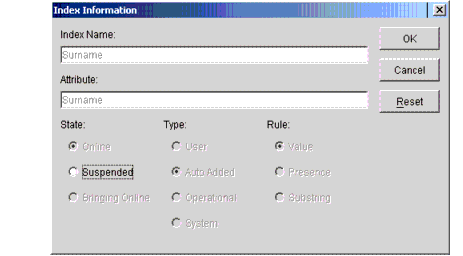
Note: If you have multiple indexes selected and you click the Properties button, the properties window only shows the first selected index.
The only selection you have in this window is to change the state of the index. If the index is in the Online state or the Bringing Online state, the only choice you have is to select Suspended. If the index is Suspended, the only choice you have is to select Bringing Online.
Since each object addition or modification requires touching the defined indexes, having all of the indexes active may slow down bulk-loading of data in the directory. To achieve additional bulk-load speed, a system administrator may want to suspend all of the user-defined indexes. After the bulk-load is completed, the indexes can then be brought online. They build in the background and become effective when building is completed.
Copying an Index to Another Server
To copy an index definition to other servers in the tree, simply select the desired index from the list and click on the Other Servers button on the Index page of the properties window (see Figure 3). The Other Servers window appears, as shown in Figure 6.
Figure 6: Other Servers window.
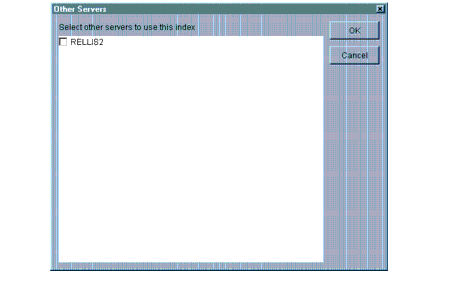
All of the boxes next to the listed server names will be blank. To add the selected index to a server, simply check the box next to the server's name. When you click the OK button, the index definitions are copied to the selected servers. If an index with the same attribute and type is found on one of the destination servers, the background process changes the name and state of the existing index to the name and state of the index being copied. No error message is given in this case.
Programmatic Index Management with LDAP
Last, but certainly not least, indexes can be defined and managed using LDAP. The advantage to allowing index creation through LDAP is that an application can now define indexes during its install process. Index definitions can be part of the same LDIF file that applies the required schema for the application. Using the command shown below with the ldapmodify utility available from Netscape creates a substring index on the fullName attribute.
ldapmodify -h 10.10.10.15 -b -D "cn=admin, o=novell""
-w "ldap" dn: cn=testServer-NDS, o=Novell"
changetype: modify

add: indexDefinition

indexDefinition: 0$fullNameSubstring$2$2$0$1$fullName
Notice that the '$' character is used to separate the various fields in the value. If you use an index name or an attribute name that contains a '$' character, you must escape the '$'. In LDAP, inserting the character sequence \24 does this. The backslash is the escape character, and it must be followed by two octets specifying the nibbles of the escaped character. Since the $ character has a hex value of 24, the octet representation of the escaped sequence is \24 (or, if you prefer, 5C3234). If you choose to put UTF8 extended characters (not recommended) in one of the two text fields, they must also be escaped.
The following command using the Netscape ldapsearch process provides all of the values of the indexDefinition attribute:
ldapsearch -h 10.10.10.15 -L -D "cn=admin, o=novell" "
-w "ldap"  -b "cn=testServer-NDS, o=Novell""
(indexDefinition = *) indexDefinition
LDAP can also be used to programmatically change the state of a defined index. Normally you would want to query the indexDefinition attribute to determine the current Index State, then modify the Index State field to either 0 to suspend it or 2 to start bringing it online. You should never change the state to either Bringing Online or Pending Creation. This is done automatically by a background process.
The following command to ldapmodify changes the state of the fullNameSubstring index from Online to Suspended.
ldapmodify -h 10.10.10.15 -b -D "cn=admin, o=novell""
-w "ldap" dn: cn=testServer-NDS, o=Novell"
changetype: modify

delete: indexDefinition

indexDefinition: 0$fullNameSubstring$2$2$0$1$fullName

add: indexDefinition

indexDefinition: 0$fullNameSubstring$0$2$0$1$fullName
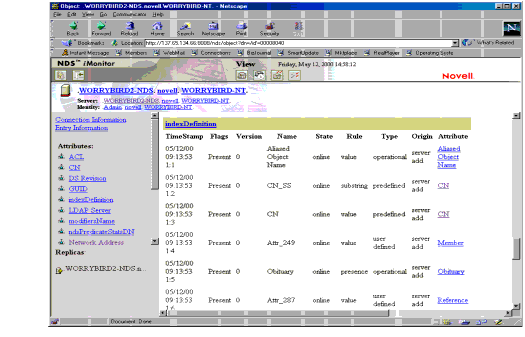
NDS iMonitor and Indexes
NDS iMonitor also provides functionality to view the state of indexes on a server. If you have sufficient rights to see attributes of the server object, you can scroll down on the server view and examine the state of all of the indexes on the server.
Figure 7 shows some of the indexes on this server. Note that all of the attributes are linked. If you select one of these links, the definition of the attribute is displayed. You cannot manage indexes using NDS iMonitor in the current release; only browse functionality is provided.
Figure 7: NDS iMonitor to view the state of indexes on a server.
Which Indexes Should You Create?
Now that the process for creating an index has been explained, the next logical question is, "Which attributes should you index?"
Fortunately, NDS eDirectory version 8.5 also provides the capability to capture search predicate statistics. This functionality was provided as a tool for a server administrator to determine the common things that people searched on. When eDirectory is installed, a special predicate statistics object is created. The name of the object is the server name with a -PS appended.
As system administrator you can create as many objects of this type as you feel necessary, but typically a single object will suffice.
The predicate statistics functionality is not intended to be run all of the time the directory is in operation. Collecting these statistics does affect performance of the server. Lengthy accumulation of statistics can also result in large databases.
To view and manage the predicate statistics functions on a server, first select the server object in Console One and bring up the property page. The Predicate Data tab looks similar to the screen shown in Figure 8.
Figure 8: The Predicate Data tab.
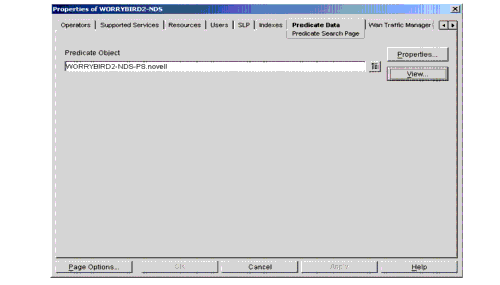
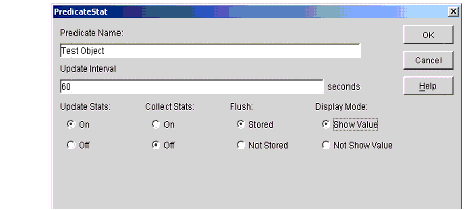
The Predicate Object field allows a search for the particular predicate statistics object you desire to view. The last predicate statistics object selected is displayed in the window. The Browse button allows the administrator to search for other objects of this type. Once a predicate statistics object has been selected, the properties and the search predicates can be viewed. Click the Properties button to display the window shown in Figure 9.
Figure 9: Configure properties window.
A Clear All button has been provided to clear out all of the existing values of the selected predicate statistics object. While using this functionality in an environment where the predicate statistics object is replicated to another server, collecting lots of predicate data should be avoided to minimize replication traffic. Regularly clearing the values held in the predicate statistics table helps the system administrator keep a usable data set.
The Collect Stats setting controls whether or not statistics are being gathered. If statistics are being gathered, the administrator can choose to either hold them in memory or store them as values of the attribute in the directory. The Flush setting is used to make this choice.
The Update Stats setting controls the background process that moves the data from the in-memory collection structure to the predicate statistics attribute. If Update Stats is turned on, then the Update Interval specifies how many seconds to wait between runs of the background process. If Update Stats is turned off, the background process will not run at all, and predicate statistics will only be collected in memory. This functionality can be useful to minimize the impact that collecting statistics has on server operation. The in-memory buffer has no upper limit, so if most predicates are unique it is possible to use up all of your server's available memory. The table below defines the operating combinations of Flush and Update Stats if statistics collection is turned on.
|
Update Stats
|
Flush
|
Action
|
|
Off |
Stored |
Statistics accumulate in memory, no update of attribute |
|
Off |
Not Stored |
Statistics accumulate in memory, no update of attribute |
|
On |
Stored |
Statistics regularly stored to attribute, memory released |
|
On |
Not Stored |
Statistics not stored to attribute, memory released |
If statistics accumulation is turned on and the Update Stats control is Off, be very careful to monitor the activity and available memory of your server so that it does not run out of memory.
The Display Mode setting determines whether the statistics are kept with or without values. For example, if Show Values is selected, then the predicate statistics displays one entry for the search "surname=Smith", and another entry for "surname=Jones". If Not Show Value is selected, the prior two queries will be displayed as two instances of the "surname==" predicate. The Display Mode value can be set either at creation time or from the predicate object properties page.
If the administrator chooses to change the value of the display mode, the recommended procedure is to turn statistics collection off, then clear out all of the old statistics values using the Clear All button. When the old predicates have been cleared out, change the Display Mode setting and turn statistics collection back on.
In order to view the predicate statistics from ConsoleOne, the Flush setting must be set to Stored. While the Flush is in the Not Stored state, statistics are being gathered in a small table held in memory. The statistics in this table are not visible either by reading the statistics object or through ConsoleOne. The values in the table are written to the predicate statistics attribute when the Flush is changed to Stored. Each time the internal table is flushed to values in the selected predicate statistics object, the values in the table are compared to the predicates held by the object. If the predicates are the same, the count is simply updated to reflect the new instances of that predicate. If the internal table holds new predicates, they are added as values to the object.
Once the predicate statistics object is properly configured, clicking the View button displays a window similar to the one shown in Figure 10.
Figure 10: View properties window.
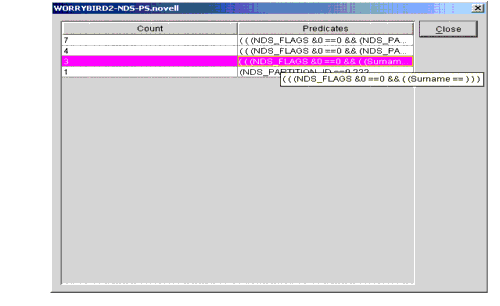
Entries in the list are sorted by the number of times they have been used. The list may be a little difficult to read, as it shows internal search information as well as user query information. Sometimes the full predicate is not available in the display window. To see the full predicate, simply select the predicate of interest and move the mouse horizontally a little. A tool tip displaying the full predicate appears.
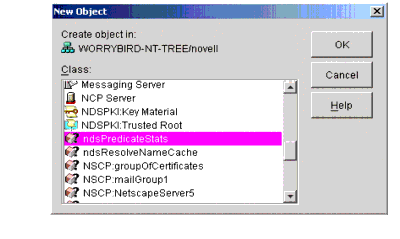
To define a predicateStatistics object, browse to the desired point in the tree, then either right-click on the container, or select File | New from the toolbar. Scroll down the list and select the ndsPredicateStatistics object (see Figure 11).
Figure 11: The New Object dialog box.
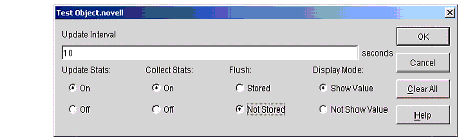
When you select the ndsPredicateStats object class and click OK, a definition screen like the one shown in Figure 12 appears.
Figure 12: Definition screen for ndsPredicate- Stats.
Using this screen you can set whether to store predicates with values, the flush state, the timeouts, and so on. Click OK to create the predicate statistics object. The object will not be active until you select it from the server object's property screen.
Predicate statistics are stored in the directory as multiple attribute values using the SYN_NETWORK_ADDRESS definition. This syntax provides for an integer coupled with a string. The integer portion of each value contains the count of the statistics. The string contains the predicate values. These values are not easily interpreted, and so they won't mean much on casual inspection. The ConsoleOne snap-in provides a much better view of predicate information.
Predicate statistics are intended to provide a short-term snap-shot of directory usage. It is probably not a good idea to leave statistics collection going all the time. Obviously, accumulating these types of statistics adds processing time to each search. In addition, leaving statistics collection on can result in storage of large amounts of data in the directory. The system administrator should only use these statistics to tune the performance of the server. Since predicate statistics objects are replicated, care should be taken so that these objects are not proliferated and that they are cleaned up or deleted after a tuning session.
The current ConsoleOne snap-in for predicate statistics does not provide a way to clear out the statistics values. Thus, values accumulate in the statistics object. The values can be deleted through LDAP by first reading out the values, then deleting the selected values from the object. The other way to clear the values is to delete the predicate statistics object, then re-create it as necessary. Because the objects are replicated, the system administrator may want to define a new partition that only exists on the server being tuned and store predicate statistics objects there.
How Are Indexes Really Used?
Explaining the full rules for how an index is selected would require a large tome. This article attempts to provide some simple guidelines.
When a search is received, the search query is evaluated and broken down into a combination of minterms. Each of these minterms becomes a search predicate. One index is selected as being optimal for each predicate. The indexed attribute is used to create the initial result pool for that predicate, then the other predicate criteria are applied to form the final set. Results sets from the different predicates are then merged to form the final result set.
The following general rules apply to index usage:
The search predicates that show up in the predicate statistics screen do not necessarily represent the database's optimization of the query. These values are only to be used as indicators of the attributes that are most commonly referenced.
While it is possible to create an index on objectClass, the value of the index depends very much on the type of data you are using. For example, if your system has 2 million users defined, and 5 printers defined, an objectClass index makes sense when you are searching for printers, but will not buy you any performance benefit when you are searching for users.
"Not-ed" queries (queries containing !) do not use indexes. The reason for this is that objects where the attribute is not defined are also returned in the result set.
Substring indexes are the most costly type of index to maintain, so the presence of several substring indexes in a directory can severely affect add, delete, and modify performance. Use substring indexes with care.
Value indexes on large string or octet string attributes may not provide the desired performance improvement. NDS truncates indexed string values at 32 bytes and indexed octet string values at 49 bytes. When a query includes a value that is larger than the truncation value, the index can only be used to generate a possible result set. Each object in the possible set must then be read and evaluated to make sure it fits the criteria.
Defining an index for each attribute within a query rarely provides performance benefits. Search filters are broken down to predicates during the filter evaluation, and NDS only uses one index per predicate.
If the number of objects matching a search filter approaches a high percentage of the number of objects in the directory, query performance may be better if no index is used.
If a query includes multiple predicates on the same indexed attribute that are ANDed together, query performance is generally be better if the more specific predicate is given before the lesser specific predicate. NDS uses the index attribute on the first predicate. For example, if you are trying to find everyone that belongs to the "Novell" group and to the "NDS Support" group, a search filter containing groupMembership == "NDS Support" "" groupMembership == "Novell" performs better than the query groupMembership == "Novell" "" groupMembership == "NDS Support".
Queries that contain a >= specification use an index, but queries containing >= will not. As was the case with the ! term, a >= query assumes that all objects that don't contain the attribute match the query.
Which Index Is Your Query Really Using?
NDS eDirectory provides functionality to view many internal processes via the dstrace screen. By setting the record manager option for tracing, the administrator can see which index was picked for a particular query. A sample of a dstrace listing showing this information is provided below. Using this functionality along with the predicate statistics provides the administrator with some good tools for optimizing search performance.
Recm:  [05/17/00 12:57:54.32]: Iter #4568b40 query

((Flags&1)==1) && (32171==32832) &&&
((indexDefinition$446A$.Flags&8 && .apprx=S_CILIST))&
Recm:  [05/17/00 12:57:54.32]: Iter #4568b40 NO INDEX USED

Recm:  [05/17/00 12:57:54.32]: Iter #4568b40 first(

eid=32832)
The above trace lines were for a query against the indexDefinition object. Notice that the second message indicates that no index was used to perform the query.
Recm:  [05/17/00 12:58:16.47]: Iter #4568b40 query

((Flags&1)==1) && ((Surname$304A$.Flags&8 && .==&And*&))&
Recm:  [05/17/00 12:58:16.48]: Iter #4568b40 index =

Surname$IX$305

Recm:  [05/17/00 12:58:16.48]: Iter #4568b40 first( ID_INVALID)
This second set of trace lines were for a query against the Surname attribute. Notice that the second message indicates that the Surname index was used to perform the query.
Summary
Properly selected indexes and properly formulated queries can dramatically improve your directory performance. Novell's eDirectory has now provided several easy methods for managing the indexes defined in your directory. Application installation programs can now be customized to add appropriate indexes to the directory at the same time as they are adding the application's schema. A system administrator can easily determine the state of any of the indexes on a server, and has been provided a great deal of flexibility in controlling the indexes.
* Originally published in Novell AppNotes
Disclaimer
The origin of this information may be internal or external to Novell. While Novell makes all reasonable efforts to verify this information, Novell does not make explicit or implied claims to its validity.