Enabling Roaming Lotus Notes Users with ZENworks for Desktops
Articles and Tips: article
Consultant
Novell, Inc.
jkirkley@novell.com
01 May 2000
The ability to check Lotus Notes e-mail from any computer in an enterprise environment would make any user happy, especially if the user travels from site to site within the company. Fortunately, this is a task for which Novell's ZENworks for Desktops is ideally suited.
ZENworks is a directory-enabled desktop management solution. Its integration with Novell Directory Services (NDS) enables automated software distribution and management for networked PCs from a central location. It enables network administrators to automate the process of distributing applications, policies, and personal desktop configurations. In addition to policy-based workstation management and secure remote control, ZENworks provides the intelligence that enables desktop applications to "self-heal" in the event an end user deletes an essential system file or otherwise corrupts the application.
This AppNote provides step-by-step instructions on how to enable a "roaming Notes" capability for your users with ZENworks. The procedures described herein explain how to take an existing installation of Lotus Notes and adapt it for roaming users. The basic strategy is to eliminate the need for security files to be stored on the local hard drive, placing them instead on a NetWare server where Novell Directory Services (NDS) can protect them.
For additional information on ZENworks for Desktops, visit the product Web site at:
http://www.novell.com/products/zenworks
Another good resource is the ZENworks Cool Solutions site at:
http://www.novell.com/coolsolutions/zenworks
Benefits of "Roaming Notes"
The "roaming Notes" application described in this AppNote has the following benefits:
Once you have performed the described procedures, users can check their Lotus Notes e-mail from any computer in the enterprise, even from a computer on which "roaming Notes" has not been configured.
Novell Directory Services will protect all security files because they are stored on the network instead of on a local hard drive.
"Roaming Notes" is delivered via ZENworks' Application Launcher and therefore takes advantage of the "self-healing" feature of ZENworks-delivered applications.
The application can be fault tolerant and load balanced.
The application can be configured to use the "Launch Closest Application" feature to minimize WAN traffic.
Initial Preparation
It is critically important that you follow the instructions contained within this AppNote exactly as they are given, to ensure that users' e-mail accounts do not become corrupt.
The main steps in the initial setup process are:
Building a "Get-Files" Application object
Building a "Get-INI" Application object
Building a "Delete-Files" Application object
Editing "Get-Files" to call "Get-INI" and "Delete-Files" upon distribution to the user.
Once these preparatory tasks are completed, you can create an Application object to run a ZENworks-delivered version of Lotus Notes. Roaming users can then click on the icon for this application to run "roaming Notes" from any workstation on the network.
This AppNote assumes that you have ZENworks for Desktops already installed on your network. For information on how to install and set up ZENworks, see the documentation that came with the product.
Building the "Get-Files" Application Object
The first step in the process is to build an Application object that will copy the Lotus Notes files from the hard drive to a network drive.
Using the NetWare Administrator utility, create an NDS Application object and name it "Get-Files".
When Get-Files runs, we want it to first copy the Notes data files from the local C:\Notes\Data directory to a corresponding directory on a network drive. Preferably, this should be a standard drive mapping. The users' home directories will work fine if the server has enough disk space. If not, you might consider using a dedicated server. In this AppNote, we will use the P: drive. You set this up from the Application Files page of the Application object (see Figure 1).
Figure 1: Configuring "Get-Files" to copy the local Notes data files to a network drive.
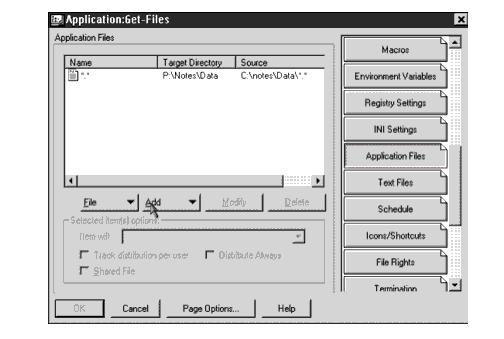
Be sure to select the "Copy if newer" option under "Select item(s) options" so only older files will be overwritten.
Next, we need to search in the C:\Notes\NOTES.INI file for references to the C: drive and replace them with references to the network drive (drive P: in our example). This process can be configured on the Text Files page (see Figure 2).
Figure 2: Replacing references to the local drive in NOTES.INI with references to the network drive.
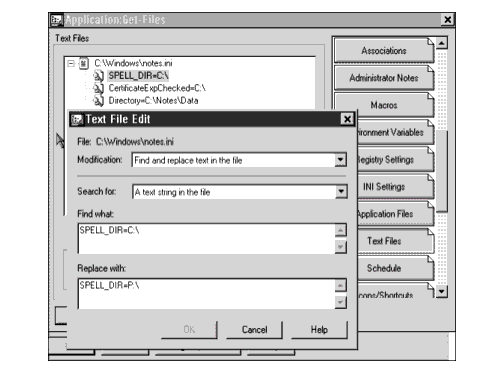
Configure Get-Files to search for "C:\" and replace it with "P:\" in only the three lines listed below, following the example shown in Figure 2:
SPELL_DIR=C:\
CertificateExpChecked=C:\
Directory=C:\Notes\Data
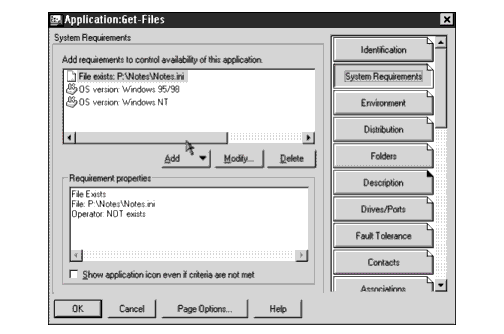
On the System Requirements page (see Figure 3), add the following requirements for controlling the availability of this application:
File exists: P:\Notes\Notes.ini
OS version: Windows95/98
OS version: Windows NT
Be sure to set the operator for "File exists: P:\Notes\Notes.ini" to "NOT exists" so that Get-Files will not run if the P:\Notes\Notes.ini file exists. This is extremely important, as it prevents the application from prompting the user to install the application on every workstation the user logs in at. (You will see how the NOTES.INI file gets copied to the P: drive in a later step.)
Figure 3: Setting the System Requirements for Get-Files.
On the Distribution page, check the options to force run each time the user logs in and to prompt the user before distribution of this application (see Figure 4).
Figure 4: Setting the application to prompt the user before distribution.
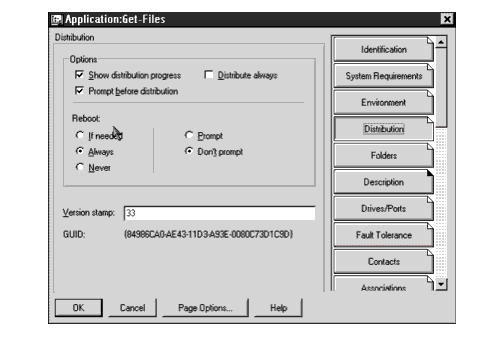
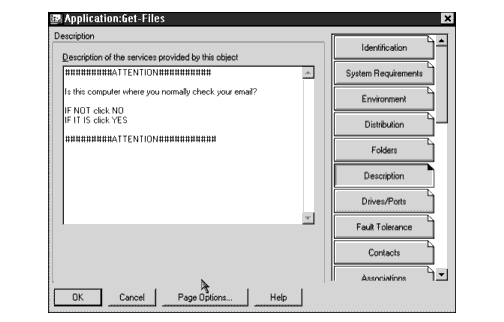
It is very important that the user be prompted before the application is distributed, for we must ask users if this is the workstation from which they normally check their e-mail (see Figure 5).
Figure 5: Entering the text for the user prompt.
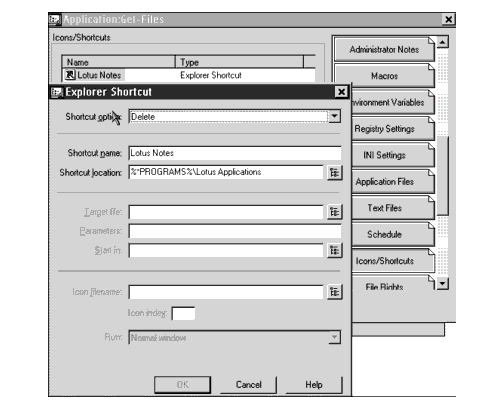
Finally, we want Get-Files to delete the Lotus Notes shortcut from the Start/Programs/Lotus Applications menu. This is configured on the Icons/Shortcuts page, using the settings shown in Figure 6.
Figure 6: Deleting the Lotus Notes entry from the Windows Start menu.
Building the Get-INI Application Object
The second step in the process is to build an Application object that will copy the NOTES.INI file from the local drive to the network drive.
Create a new Application object and give it a name. In this example, we will use the name "Get-INI" since the only thing this application does is copy the C:\Windows\Notes.ini file to P:\Notes\Notes.ini.
This action is configured on the Application Files page (see Figure 7). For Windows 95/98/NT, you can use the macro %*WINDIR%\ instead of hard-coding the source location of NOTES.INI.
Figure 7: Setting up Get-INI to copy the NOTES.INI file to the network.
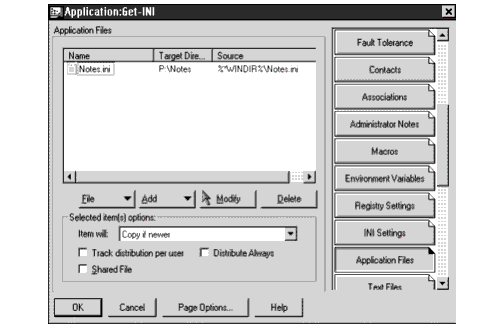
Be sure to select the "Copy if newer" option under "Selected item(s) options".
Don't forget to specify the OS requirements of Windows 95/98/NT on the System Requirements page.
Building the "Delete-Files" Application Object
In this step, we create a third Application object that will delete the Notes files from the local drive.
Create the Application object and name it "Delete-Files".
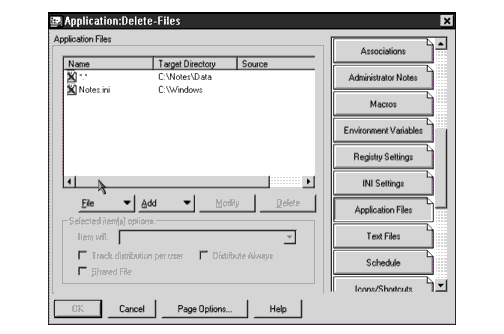
On the Application Files page, configure the application to delete all files from the C:\Notes\Data directory, and also to delete the C:\Windows\ NOTES.INI file (see Figure 8).
Figure 8: Configuring Delete-Files to delete the Notes files from the local drive.
Again, make sure you set the correct OS on the System Requirements page.
At this point, you should have three new NDS objects, as shown in Figure 9.
Figure 9 The three Application objects needed for "roaming Notes."

Editing the Get-Files Application
For this step, you will need the NALRUNW.EXE file found in the ZENworks Application Management Toolkit (for ZEN 1.x). This toolkit is available as a free download from:
http://www.novell.com/coolsolutions/zenworks/assets/apptools.exe
NALRUNW is used in pre- or post-distribution scripts to call other applications that you want to be run in a specific order. We will use it to have Get-INI and Delete-Files run after Get-Files is distributed.
Copy the NALRUNW file into the SYS: PUBLIC directory on a server your users have mapped as a search drive.
On the Distribution Scripts page of the Get-Files Application object, add the lines shown in Figure 10.
Figure 10: Configuring Get-Files to run Get-INI and Delete-Files after it is distributed.

Associate the user(s) that will need the "roaming Notes" capability with the "Get-Files" application. This can be done for individual users, groups, or containers.
Application Sequence
With these preparations in place, the following sequence is followed when as associated user logs in to a workstation.
The ZENworks Application Launcher is started (from the user's login script) and delivers the Get-Files application to the user.
Get-Files checks for the existence of P:\Notes\Notes.ini. If this file is found, the application will abort. If the file is not found, the application continues.
Get-Files displays the prompt asking the user if this is the workstation from which he or she normally checks e-mail. If the user responds "No", the Get-Files application terminates. If the user responds "Yes", the application proceeds while the user continues checking his or her e-mail in the usual way.
Get-Files copies the files from C:\Notes\Data to P:\Notes\Data. It also performs the search and replace operation on the C:\Windows\notes.ini file.
The Get-INI application starts as specified in the Distribution Scripts for Get-Files. This application copies the NOTES.INI file to the P:\Notes directory.
The Delete-Files application runs next, deleting the files under C:\Notes\Data as well as the C:\Windows\Notes.ini file.
At this point the computer is automatically rebooted without any user intervention.
The trick is that the Get-Files application also distributes the Get-INI and Delete-Files applications. The Get-INI actually copies the NOTES.INI file to the P: drive. The Get-Files application is set for a forced reboot so that the next time the ZEnworks Application Launcher is run, the Get-Files application will not be visible to the user.
Everything is now ready for the user to run Lotus Notes via the ZENworks Application Launcher. As a bonus, the data files are now securely stored on the network, where they fall under the protection of NDS.
Delivering Lotus Notes with ZENworks
The final procedure is to set up Lotus Notes to be a ZENworks-delivered application. Here is a brief guide to creating this application.
Run the ZENworks snAppShot utility and perform a basic installation of Lotus Notes, accepting the default configuration.
Create an application template (AOT) and then create an Application object for Lotus Notes in NDS.
Edit the following items for the Lotus Notes Application object:
On the Application Files page, all files that are designated to be copied to C:\Notes\Data should be changed to P:\Noted\Data. (Do not change the delivery location of the other directories under C:\Notes\Data and the files that populate those directories. We are only concerned about the files directly under C:\Notes\Data.)
Highlight all Application Files and select the "Copy if doesn't exist" option.
Under the "INI Setting", change the delivery location of the NOTES.INI file to P:\Notes\notes.ini. Then view the file. Change all lines to "Create if doesn't exist" and then change the "C:\" to "P:\" under the Directory string.
On the System Requirements page, list the desktop operating systems and hard drive space required to load Notes (10 MB).
It is important that you add a check for the existence of the P:\Notes\ Notes.ini file on the System Requirements page. Configure it so the file must exist in order for the application to run. That way, the Lotus-Notes application will not even be visible to the user if the P:\Notes\Notes.ini doesn't exist.
On the Icons/Shortcuts page, totally clear out all delivered icons. (Don't click Delete, just wipe the fields blank.)
On the Environment page, make the working directory P:\Notes (or wherever you copied the Notes.ini file).
Once you have created this application, associate the Get-Files and Lotus-Notes application to your roaming Notes users. The applications will take care of themselves as far as which ones the user can see and use. Since Get-Files is set for a forced reboot, it will not be visible the next time the application launcher is run. However, since the Notes.ini file is now on the P" drive, the Lotus-Notes application is now available. Also note that the Get-Files application deletes the entry for Lotus Notes in the users' Start/Programs menu. Users therefore must select the Lotus Notes icon from the ZENworks Application Launcher window in order to check their e-mail.
When users click on the NAL-delivered Lotus-Notes icon, the program will take only a few seconds to install (because its only verifying files). Users will then be able to check their e-mail from any computer on the network. Even if a roaming user checks e-mail from a computer that is logged in to a NetWare 3.x (Bindery-based) server, the roaming user will not affect the local Lotus Notes account.
Conclusion
This AppNote has demonstrated the powerful capabilities of ZENworks for Desktops to deliver a "roaming Notes" solution for your network. If these procedures are followed exactly, your Notes users will be able to log in and check their e-mail from any workstation on the network.
* Originally published in Novell AppNotes
Disclaimer
The origin of this information may be internal or external to Novell. While Novell makes all reasonable efforts to verify this information, Novell does not make explicit or implied claims to its validity.