Using Novell ZENworks in the Search for Extraterrestrial Intelligence
Articles and Tips: article
Managing Director
Connectotel Ltd., London, UK
01 Nov 1999
Thanks to David Anderson, Director of the SETI project, and the SysOps of the Novell Support Connection Forums for their assistance in reviewing this AppNote.
Do you dream of being the first to discover evidence of life on other planets? find out how ZENworks and software from the SETI (Search for ExtraTerrestrial Intelligence) project can make this science-fiction scenario become a reality!
- Introduction
- What Is SETI?
- What Is ZENworks?
- Distributing SETI@Home with ZENworks
- Distributing the SETI Software
- What Is Installed with SETI@Home?
- Conclusion
Introduction
This AppNote was inspired by questions from a number of customers who, after creating ZENworks Application Object Templates for the standard office applications and their in-house software, wanted to try something a little more adventurous.
The AppNote describes how to use Novell ZENworks to distribute the Berkeley SETI@Home software used as part of the SETI project in the search for evidence of extraterrestrial intelligence.
The following are several resources that may be useful in providing more information about ZENworks and about the SETI project:
ZENworks Product Page: http://www.novell.com/products/nds/zenworks/
ZENworks Cool Solutions: http://www.novell.com/coolsolutions/zenworks/
ZENworks Resources Page: http://www.connectotel.com/zen/
SETI Home Page: http://setiathome.ssl.berkeley.edu/
Since this AppNote was written in the UK, it retains the British spelling used by the author.
What Is SETI?
SETI, the Search for ExtraTerrestrial Intelligence, is the largest and most successful collaborative computing project of all time. The SETI project aims to analyse terabytes of data received at the Arecibo Radio Observatory, using software on multiple Internet connected PCs to perform the data analysis. The project and the SETI@Home software is looking for patterns in the incoming radio data which might indicate the presence of Extraterrestrial Intelligence in the region of the sky being scanned. At the time of writing (August 1999), more than one million users across the world are already taking part in this project.
The SETI@Home software consists of two parts: an "application" and a "screen saver". The application does all the work: it downloads blocks of data from the Internet, performs the number crunching on that data (looking for orderly patterns that might be artificial), returns the results to the SETI server and downloads the next block of data. The application is represented by a green radio telescope icon in the Windows System Tray (normally at the lower right of the screen). The application window can be opened by double-clicking on this icon.
The SETI@Home screen saver runs when the keyboard or mouse have not been used for a while. It displays colour pictures showing the progress of the data analysis process. Normally the application processes data only when the screen saver is running, although the application can process data all the time if configured to run in that mode. Figure 1 is a screenshot of what the screen saver looks like.
Figure 1: The SETI@Home screen saver.
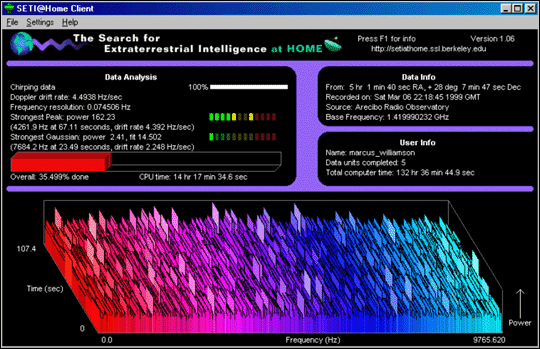
The screen saver display shows information about the current data unit being analysed, as well as information about the user running the software, including the number of data units completed and the total amount of computer time provided to the SETI project by this user. A "data unit" is a unit of information downloaded from the SETI database for analysis by the SETI@Home software. A data unit is typically 300-400 KB in size and consists of digitised radio frequency data captured from the radio telescope at a particular time and date for a certain section of the sky. When the analysis is complete, a results file of around 10 KB is returned to the SETI database.
What Is ZENworks?
Novell's ZENworks (Zero Effort Networks for Users) is an NDS-enabled software application designed to reduce the cost of networked PCs and make users more productive. ZENworks includes policy-enabled application distribution, desktop policy management, and workstation maintenance.
With self-healing application delivery, desktops customized for the users needs and easy problem resolution, ZENworks makes the network effortless for the user. This allows the user to have all the power of the PC without having to be responsible for making it work.
In the examples shown in this AppNote, we shall demonstrate the use of ZENworks application distribution and desktop policy management features.
ZENworks Software
Any of the following ZENworks versions may be used to distribute the SETI@Home software. Whichever version of ZENworks is chosen, the ZENworks software must be already installed and operating correctly on your network before attempting to distribute the SETI@Home software. Additionally, the Novell Client software which includes the Workstation Manager must be running so that ZENworks desktop policies can be enforced.
ZENworks 1.1 Starter Pack. The ZENworks 1.1 Starter Pack is available to all users of NetWare 4.x and NetWare 5.x and consists of just the Software Distribution and Desktop Policy Management components. These are the only components required for the distribution of the SETI@Home software.
The ZENworks 1.1 Starter Pack is available as part of Novell NetWare 5, or as a free download from:
http://www.novell.com/download/#Clients - Network
ZENworks 1.1. The full version of ZENworks 1.1 consists of: Software Distribution, Desktop Policy Management, Remote Control, Hardware Inventory and Software License Metering. This software was previously available from Novell Authorised Resellers until the advent of ZENworks 2.0.
ZENworks 2.0. ZENworks 2.0 consists of: Software Distribution, Desktop Policy Management, Remote Control, Hardware and Software Inventory and Software License Metering. This software is available from Novell Authorised Resellers.
Distributing SETI@Home with ZENworks
The steps involved in the overall process of distributing SETI@Home with ZENworks include:
Obtaining the SETI@Home software
Creating an Application object for the SETI@Home software
Creating a Policy Package
Distributing the SETI software to users
These steps are described in detail in the following sections.
Obtaining SETI@Home for Windows
The SETI@Home for Windows software to be distributed using ZENworks is available for download at:
http://setiathome.ssl.berkeley.edu/windows.html
The downloaded file should be named setiathome_win_1_06.EXE or something similar. As of October 1999, the current version of SETI@Home for Windows is 1.06.
Creating a SETI@Home Application Object
In order to distribute the SETI@Home application, it is first necessary to create a "snapshot" of the installation of the software, which will create a SETI@Home Application Object Template (AOT). It is from this AOT file that the SETI@Home Application Object itself will be created in NDS.
Running a snAppShot consists of the following stages:
Starting the snAppShot process
Installing the software
Configuring and customising the software
Ending the snAppShot process
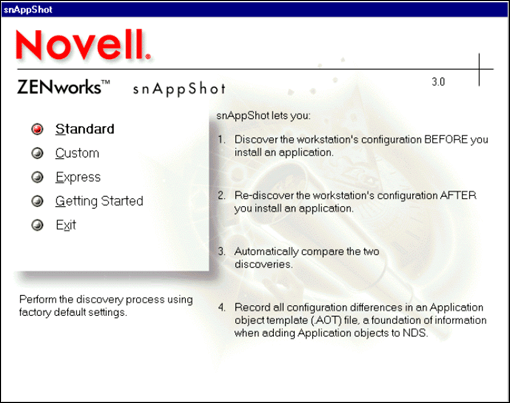
Starting the snAppShot Process. To start the snAppShot process, run the program SNAPSHOT.EXE, normally located in the SYS:PUBLIC\SNAPSHOT directory. Figure 2 shows the opening snAppShot screen.
Figure 2: The ZENworks snAppShot screen.
To create this object, proceed as follows.
Click Standard to create a typical template.
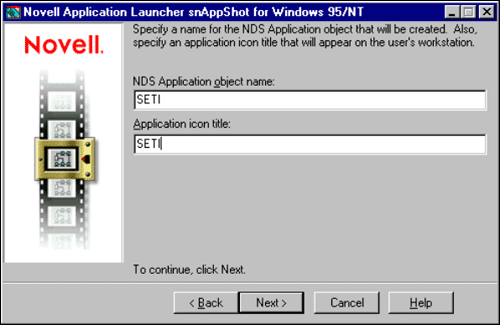
On the next screen (see Figure 3), enter the name of the Application Object which will be created and the icon title (not used in this case), both "SETI". Click Next to continue.
Figure 3: Entering the object name and icon title of the AOT.
Enter the location in which the SETI@Home application files will be placed. Click Next to go to the next screen. (In many environments, a "library" of standard applications will already have been created underneath the SYS:PUBLIC\SNAPSHOT directory, or elsewhere. Choose this directory, with SETI as a subdirectory.)
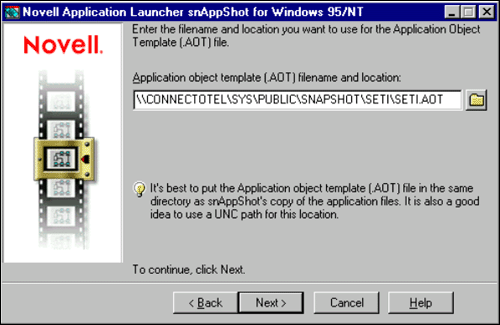
Now choose the name of the AOT file, which will be used for SETI. The default will be "SETI.AOT" (see Figure 4). Click Next to continue.
Figure 4: Entering the AOT file name and location.
Select the C: drive for snAppShot to scan. Click Next to continue.
Review the summary screen, then click Next to continue.
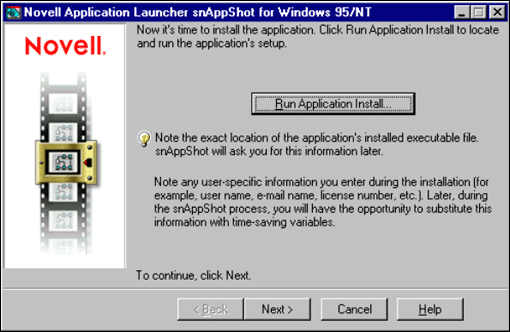
ZENworks now prompts you to run the installation program for the application to be installed (see Figure 5). Click the Run Application Install... button to continue.
Figure 5: Running the SETI install.
Installing the SETI Software. The next step is to install the SETI software. SETI installs like any other application, with license agreements, user- determined file location options, and program folder destination. Simply run the program that you previously downloaded from the SETI Web site to complete the install.
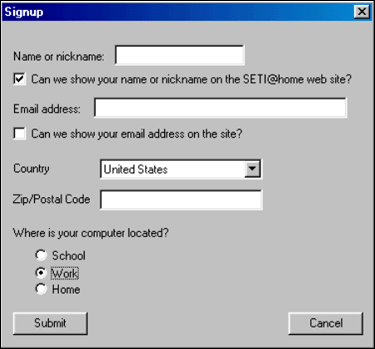
When the installation has completed successfully, a signup screen will be displayed, allowing you to configure the SETI software.
Configuring the SETI Software. At this stage (see Figure 6), you should provide a "nickname," a name by which you may be referred to in the statistics section of the SETI Web site. You should also enter an e-mail address, as well as some generic location information.
Figure 6: Configuring your site's SETI profile.
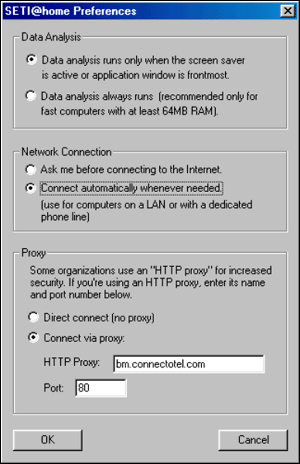
After you submit the configuration signup information, the SETI@Home preferences screen appears (see Figure 7). Here you can decide:
The mode for Data Analysis (only when the screen save is active or to always run).
The mode for Network Connection (ask to connect for dialup or connect automatically for LAN-attached PCs).
If you are using a proxy or firewall (such as Novell BorderManager), the proxy address and port number (usually 8080 or 80) can be entered here.
Figure 7: Configuring your SETI preferences.
After clicking OK, additional customisation may be carried out as described below. Any configuration or customisation performed here will become part of the snAppShot.
Customising the SETI Software. The SETI software includes two bitmap files, HEADER.BMP and SETIHOM8.BMP, both of which may be customised to your environment. The characteristics of each of these files are shown in the following table.
|
Filename
|
Purpose
|
Size
|
|
HEADER.BMP |
Appears in the header of the screen saver |
500x41 |
|
SETIHOM8.BMP |
Appears in "About SETI@Home" |
490x141 |
If you want to replace these files with your own customised bitmaps, they should have already been created using your favourite graphics editor using 256 colour bitmap files at the specified sizes.
At this stage in the snAppShot process, you may copy the files which you have previously prepared into the C:\Program Files\SETI@Home directory.
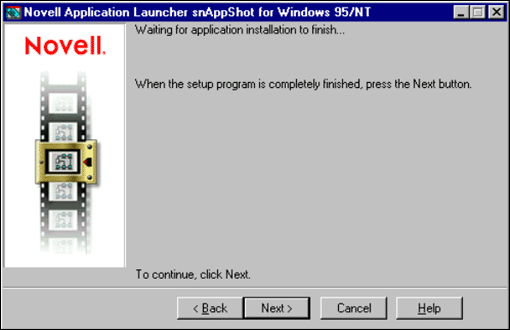
Ending the snAppShot Process. After the SETI@Home software has been successfully installed onto the template PC, you can end the snAppShot process. To do this, return to the snAppShot process and click Next(see Figure 8).
Figure 8: Completing the snAppShot creation process.
Review the snAppShot target distribution location and click Next to continue. The snAppShot process now re-scans the PC to determine the differences between the "after" and "before" states, and then creates the AOT file.
Creating the Application Object. Now that the AOT file exists, you can create the Application object in the NetWare Administrator (NWAdmin) utility. To do this, complete the following steps.
Start NWAdmin, select the container in which the Application object will be created, and then right-click and select Create.
Choose to create a new Application (Object), as shown in Figure 9.
Figure 9: Selecting to create a new Application Object.
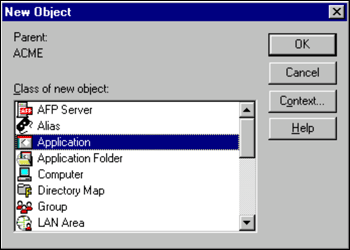
Create an Application Object using an AOT/AXT file by selecting the "Create an Application object with an .aot/.axt file" option. Click Next to continue.
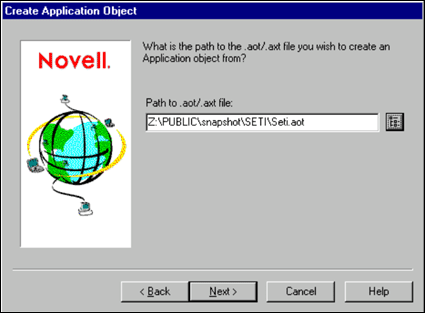
Select the path to the SETI.AOT file which was previously specified during the initial AOT creation (see Figure 10). Click Next to continue.
Figure 10: Completing the snAppShot creation process.
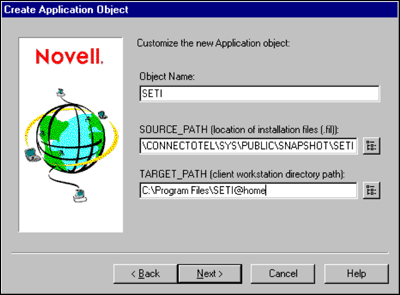
Two confirmation screens will display the details of the Application object already provided earlier in the snAppShot process (see Figure 11). Click Next to continue.
Figure 11: Confirming the source and target paths to the AOT previously created.
Review the summary screen, then click Finish.
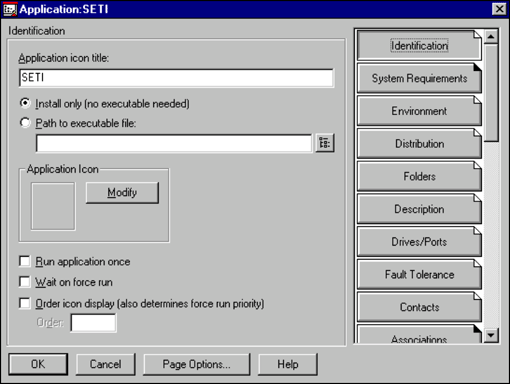
Back in NWAdmin, check the Identification tab for the Application object to ensure that "Install only (no executable needed)" is selected (see Figure 12).
Figure 12: Ensuring the AOT is set to "install only".
Check the System Requirements tab to ensure that Windows 95/98 (and/or Windows NT) are specified in the Operating System requirements.
Check the Associations tab to ensure that all members of your organisation (in this case, the ACME organisation) container will receive the SETI Application object (see Figure 13).
Figure 13: Determining which organizations will recieve SETI.
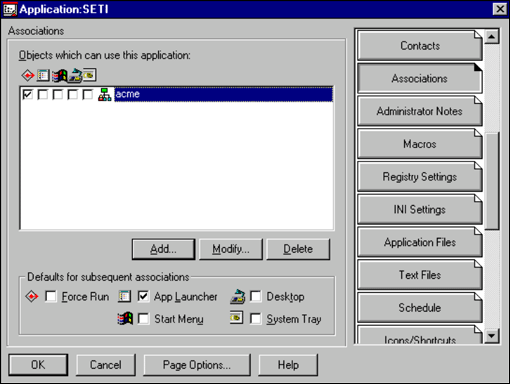
For SETI to be made available to network users, it is necessary to associate the users with the SETI Application object which has been created. In this case, we select "Force Run" so that it is invoked every time the NAL.EXE or NALEXPLD.EXE programs are loaded. Click OK when you have done this.
Creating a Policy Package
In addition to as creating an Application object, it will also be necessary to create a Policy Package which will force the SETI@Home screen saver to be active for the specified users. To create a new Policy Package in NWAdmin, complete the following steps:
Select the container in which the Policy Package should be created, then right-click and select Create.
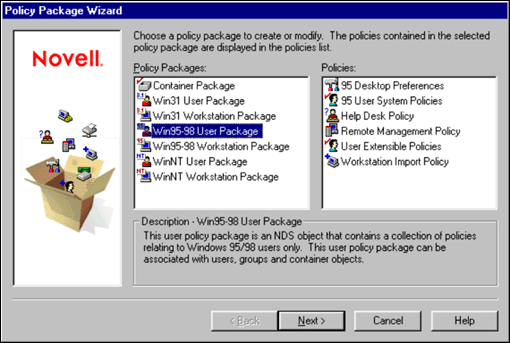
Choose the Win95-98 User Package (see Figure 14). Click Next to continue.
Figure 14: Selecting the appropriate Policy Package.
Use the default name or enter another name for the Policy Package, and then specify its creation location (see Figure 15). Click Next to continue.
Figure 15: Naming the Policy Package and determining its location.
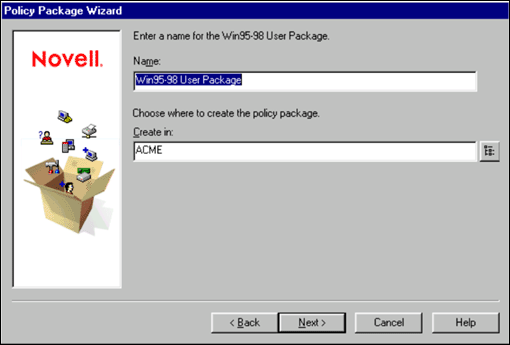
Choose the container which will use this Policy Package. In this case, all users in the ACME organisation container will be using the package. Click Next to continue.
Confirm the selections made by clicking Next.
Review the summary screen, then click Finish.
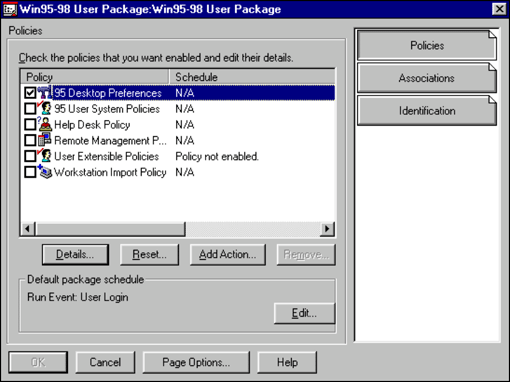
Now, edit the Desktop Preferences policy of this Policy Package (see Figure 16) in the Policies tab.
Figure 16: Enabling the Policy Package that needs editing.
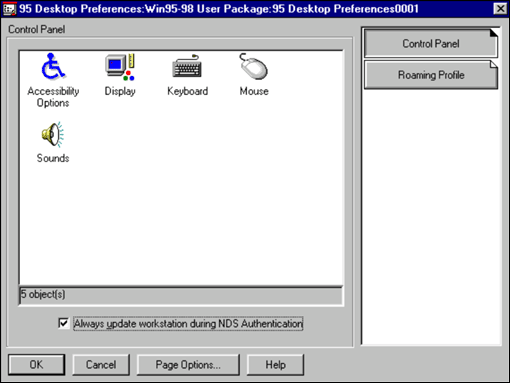
From the Control Panel tab, select the option "Always update workstation during NDS Authentication". Double-click the Display icon.
Figure 17: Editing the Desktop Preferences of the Policy Package.
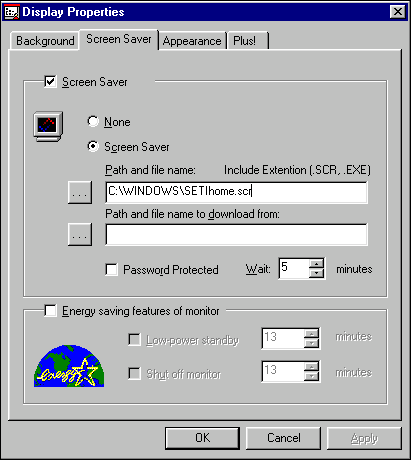
Select the Screen Saver tab, select the "Screen Saver" check box, select the "Screen Saver" radio button, and enter the path and name of the screen saver (see Figure 18). This ensures that the SETI@Home screen saver is selected every time the user logs in. At this stage, the wait time may also be changed to a suitable value for all of your users. Click OK when finished.
Figure 18: Entering the screen saver settings for SETI.
Distributing the SETI Software
That might have seemed like a lot of work, but ZENworks is all about providing Zero Effort Networking for users! Administrators have to do a fair bit of work just the one time, but that work can then be replicated hundreds or thousands of times across your network.
When users log in next, if they are in the NDS container associated with the Application Object and are associated with the Policy Package, they will receive the SETI@Home software and their screen saver will be set to run the SETI@Home screen saver.
If a new version of the SETI@Home software is made available, it is recommended that you download the new version, run the snAppShot process again, and create a new AOT file, as described above. This will ensure that the latest software is always being used.
What Is Installed with SETI@Home?
To run SETI@Home, the following files are installed on the workstation of each network user. This information was obtained by examining the FILEDEF.TXT file in the SYS:PUBLIC\SNAPSHOT\SETI directory after creating the AOT.
|
Filename
|
Purpose
|
|
C:\Program Files\SETI@home\Uninst.isu |
Uninstall script |
|
C:\Program Files\SETI@home\setihom8.bmp |
Bitmap which appears in "About SETI@Home" |
|
C:\Program Files\SETI@home\header.bmp |
Bitmap which appears in the header of the SETI@Home screen saver |
|
C:\Program Files\SETI@home\ico00001.ico |
Icon for the SETI@Home program |
|
C:\Program Files\SETI@home\SETI@home.exe |
Main program |
|
C:\Program Files\SETI@home\windows_help.txt |
Help file (ASCII text) |
|
C:\Program Files\SETI@home\config.bin |
Configuration settings |
|
C:\WINDOWS\IsUninst.exe |
Uninstall program |
|
C:\WINDOWS\SETIhome.scr |
Screen saver program |
The first time SETI runs on a user's PC, you will notice that the SETI@Home software connects to the SETI site to download its first data unit. This will take from a few seconds to minutes, depending on the speed of your Internet connection. Subsequent access to obtain new data units will happen after 10-50 hours of processing per PC, depending on the performance of the PCs being used.
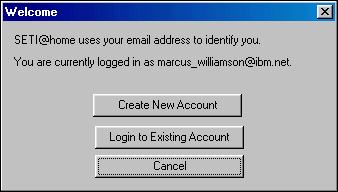
After installation, users may want to change the login name being used for their PC. This can be changed by double-clicking on the green "radiotelescope" icon in the system tray followed by Settings and Change/Create Login. The user is then presented with the dialogue box shown in Figure 19, in which he or she may log in and modify the SETI login details.
Figure 19: Welcome dialogue box allowing users to log in to their SETI account and make changes.
Conclusion
As demonstrated in this AppNote, ZENworks provides an effective method of distributing the SETI@Home software to all networked workstations with no effort required on the part of the network user. It is hoped that the example provided here will assist not only with the implementation of SETI@Home but with other applications which are installed onto the local PC in a similar way.
Have fun with ZENworks and good luck in your hunt for extraterrestrial intelligence!
* Originally published in Novell AppNotes
Disclaimer
The origin of this information may be internal or external to Novell. While Novell makes all reasonable efforts to verify this information, Novell does not make explicit or implied claims to its validity.