Using Seagate's Crystal Reports 6.0 with the ManageWise Inventory Database
Articles and Tips: article
Consultant
Novell Consulting Services
01 May 1999
If you've ever wanted to design your own custom reports from the inventory information gathered by ManageWise, this AppNote will tell you how.
Introduction
ManageWise 2.6 ships with the tools necessary to generate ManageWise Inventory reports (the Query Tool on the ManageWise Console and Kansmen's SyncComplete product). However, many customers want to generate specific reports that are unique to their company's business needs. This AppNote introduces the use of Seagate's Crystal Reports 6.0 product for creating custom ManageWise inventory reports. Much of the information contained in this AppNote can be applied to other reporting software, such as Microsoft Access.
It is assumed that you already have the inventory component of ManageWise 2.x installed and are familiar with its functionality. Also, this is not intended to be a complete tutorial on Crystal Reports, nor does it walk through its installation process.
The latest shipping version of ManageWise is 2.6; however, the procedures outlined in this AppNote will work with any version of ManageWise 2.x. Accordingly, ManageWise will be referred to as ManageWise 2.x throughout this AppNote, unless a feature is specific to a certain version of ManageWise.
The References section at the end of this AppNote lists where to get additional information on ManageWise 2.x. and detailed information on Crystal Reports.
Setting Up the Software
Follow these instructions to obtain the ManageWise inventory database files and to set up Crystal Reports.
Software Needed
You will need the four populated ManageWise 2.x Btrieve Inventory database files, which are:
FILES.DAT
MACHINES.DAT
TYPES.DAT
VALUES.DAT
The default directory for these files is SYS:MW\LDT on your ManageWise inventory server.
In addition, you will need:
The file MWS002.EXE available from http://developer.novell.com/support/sample/tids/mws002/mws002.exe. This file contains the database schema for the ManageWise Inventory database.
Seagate Crystal Reports, running on a Windows workstation with Btrieve installed and properly configured. For this AppNote, it is assumed that Crystal Reports 6.0 is being used. It is also assumed that Crystal Reports is installed on the ManageWise 2.x Console workstation, because the ManageWise Console will already have Btrieve installed and properly configured.
Setup
Complete the following steps to set up Crystal Reports:
Extract MWS002.EXE; then unzip MW21_DDF.ZIP to get the three DDF files (FIELD.DDF, FILE.DDF, and INDEX.DDF). DDFs are Data Definition Files and they contain the internal schema necessary to read and export Btrieve files into Crystal Reports. These three .DDF files include the database and key structures of the four ManageWise inventory database files in Btrieve's format.
Additionally, MW21_DDF.ZIP contains a FORMATS.DOC file that gives an overview of the ManageWise Inventory database file details.
Place FIELD.DDF, FILE.DDF, and INDEX.DDF in the same directory as the four populated ManageWise Inventory database files.
Note: This document assumes that both the .DDF and .DAT files are on your ManageWise Console workstation in the default Crystal Reports directory of C:\CRW.
Creating a Report
After Crystal Reports is installed on your workstation (again, your workstation must be running Btrieve), you can start the program by clicking the Start Menu, Programs, Seagate Crystal Reports 6.0, and then 16-bit Crystal Report Designer. (The 16-bit version of Crystal Reports is required because the ManageWise Console, whose Btrieve is being used here, is 16-bit.)
Complete the following steps to create a report:
Select "New Report" from the Crystal Reports Welcome screen. The following screen will appear.
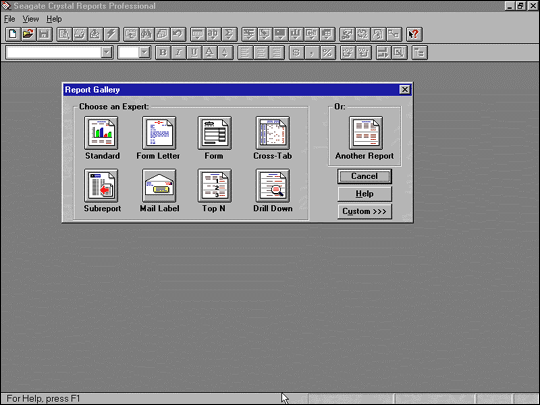
Click on the Custom >>> button in the lower portion of this Report Gallery screen. The Report Gallery window will appear, allowing you to choose the report and/or data type.
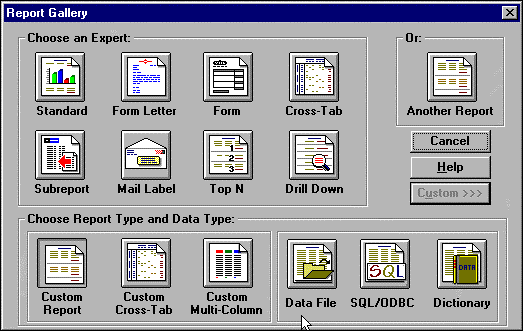
Click on the Data File button in the lower portion of the Report Gallery window. The Choose Database File window will appear, as shown below. This is where you choose a dabase file.
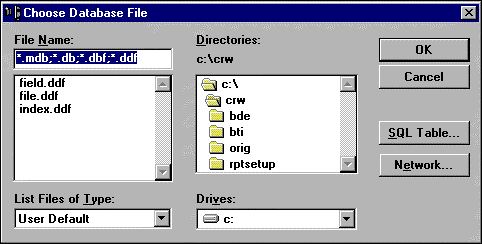
Because the three .DDF files are in the C:\CRW directory, they are displayed here by default. (If you did not place the three .DDF files in this directory, move to the directory where these files are located.)
Select the "index.ddf" file from the File Name box and click OK. The Select Tables dialog appears, allowing you to choose from the ManageWise inventory database files.
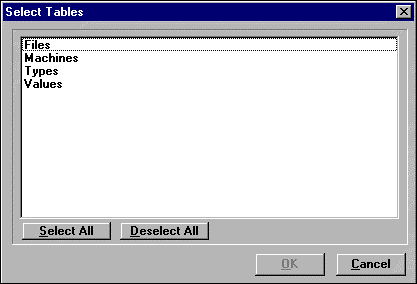
Notice that the files listed are the four ManageWise inventory database files (without the DAT extension). If you do not see these four files, ensure that they are in the same directory as the three .DDF files.
Click on the Select All button and then click OK. Crystal Reports' Visual Linking Expert then shows you how the databases are "linked" together when making a report.
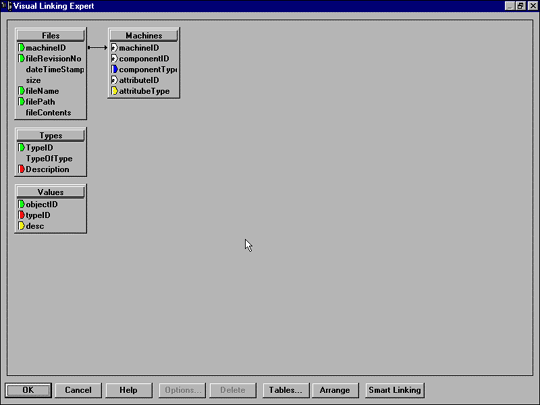
Notice that not all of the links between the four ManageWise Inventory database files are made. Specifically, two manual links need to be made:
The componentType in MACHINES.DAT needs to be linked to TypeID in TYPES.DAT.
The componentID in MACHINES.DAT needs to be linked to objectID in VALUES.DAT.
To perform these two manual links, first select componentType in MACHINES.DAT and drag the mouse to point to TypeID in TYPES.DAT. Notice the lines connecting componentID to objectID in the following screen shot.
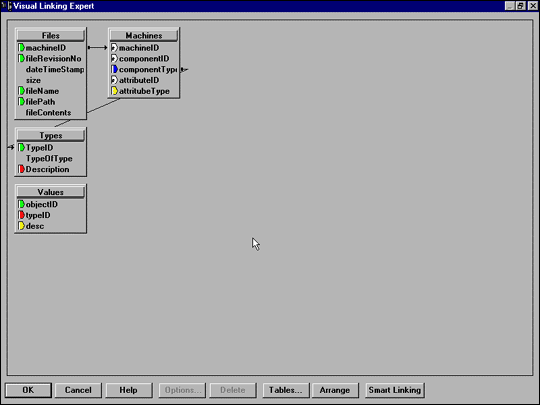
Next, select componentID in MACHINES.DAT and drag the mouse to point to objectID in VALUES.DAT.
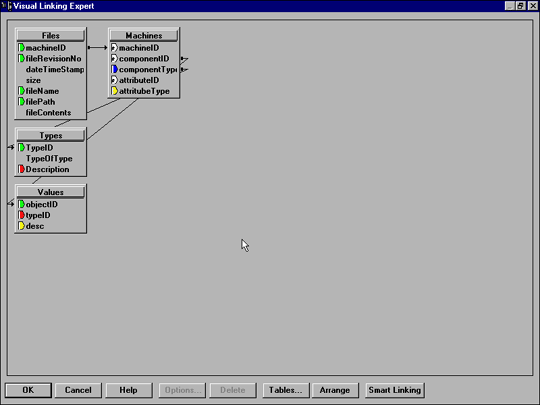
Click on the Arrange button to display the final linking of the four ManageWise Inventory database files. A screen similar to the following will be displayed. This arrangement makes the linking of databases in Crystal Reports easier to visualize.
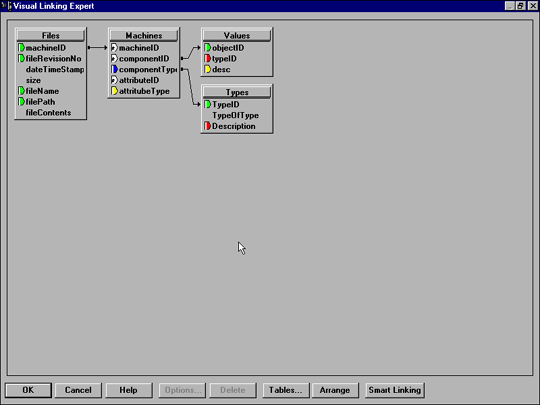
Looking at the above screen, the concepts to understand about the ManageWise Inventory database are:
The machineID represents each inventoried workstation.
The componentID represents the objectID in VALUES.DAT; therefore, the componentID will give you values.
The componentType represents the TypeID in TYPES.DAT; therefore, the componentType will give you types.
Note: The machineID will be unique for each inventoried machine, whereas the componentID and componentType combination will vary for a given inventoried machine.
When your screen looks like the one above, with the proper linking in place, click OK. The following screen will appear, along with the Insert Fields dialog box in which appropriate fields need to be inserted to generate a meaningful report.
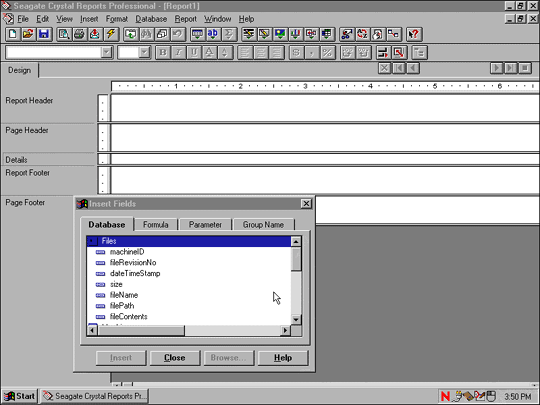
If you scroll through the Database tab in the Insert Fields dialog box, you will notice that the four ManageWise Inventory database files (Files, Machines, Types, and Values) are listed here at the left of the dialog box, with each of their fields indented beneath.
From this Insert Fields dialog box, select machineID beneath Machines (not beneath Files, as shown above) and drag it into the area above labeled "Details". After you do this, your screen will look like the following.
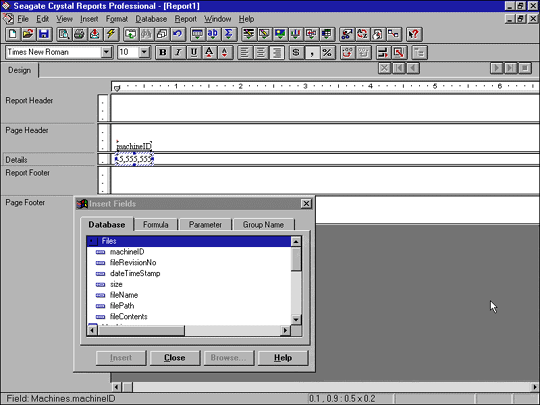
Use the same drag-and-drop procedure as just described to insert these fields:
Description beneath Types
Desc beneath Values
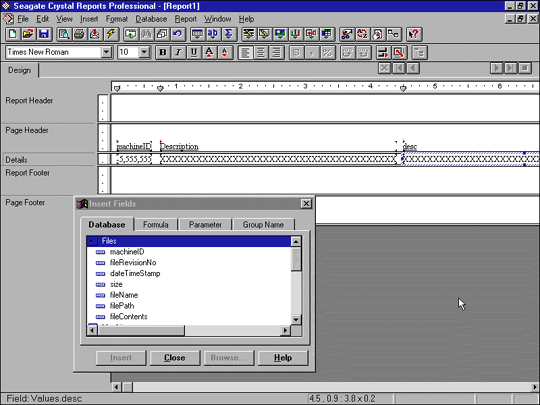
You now have the details needed to generate a report. To understand why these fields were chosen, refer back to the screen shot in Step 8, if necessary, while reading this explanation:
MachineID will give you each inventoried workstation, depicted by a unique number.
Description will give you the types of components found on each inventoried workstation.
Desc will give you the values of the types of components found on each inventoried workstation.
At this point, your screen should look like the following example.
Click Close from the Insert Fields dialog box.
You are now in the "design view" of Crystal Reports (notice the Design tab in the upper-left portion of the previous screen shot). To see the actual data associated with these fields, you need to switch to the Preview mode. To do this, click on the Preview icon, which is the fourth icon from the left on the Crystal Reports toolbar (it is the icon with the magnifying glass over a piece of paper). After you do this, you will get a screen with information similar to the following.
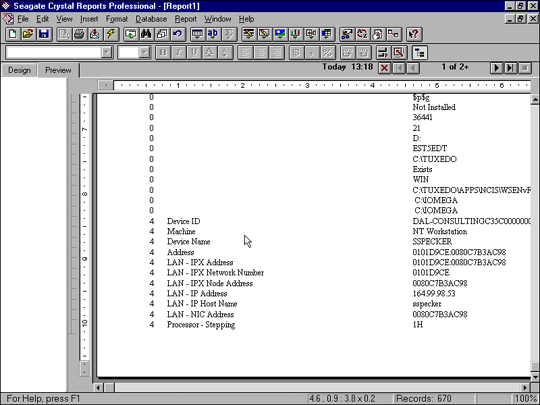
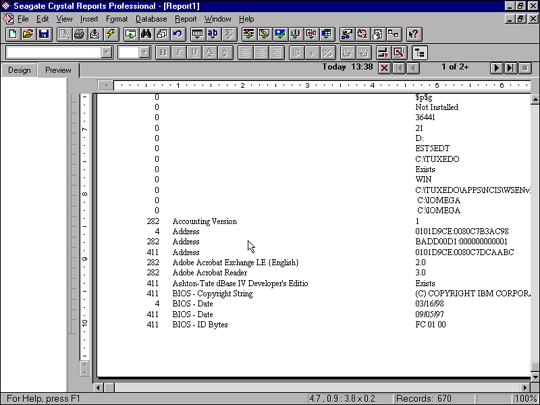
You are now in the Preview mode (notice the Preview tab) where the actual data from the three fields you just inserted is displayed. By default, the information is sorted in ascending order by Machines.machineID (that is, by the machineID field in MACHINES.DAT). This type of format notation (Machines.machineID) will be used throughout the remainder of this document.
Note: You may need to scroll down through this first-page window to start seeing meaningful information. You can scroll page by page through this report by selecting the icons directly to the right of "1 of 2+" in the upper-right portion of the screen. These navigational icons look and act like the buttons on a VCR.
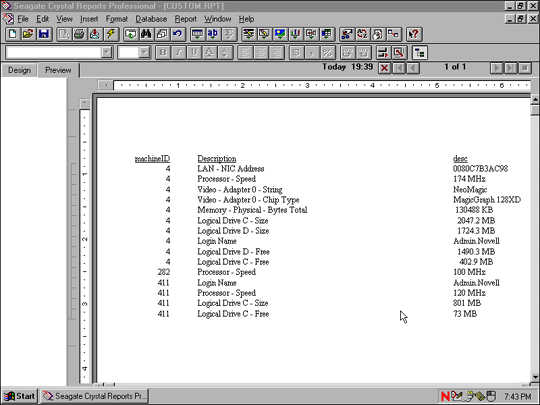
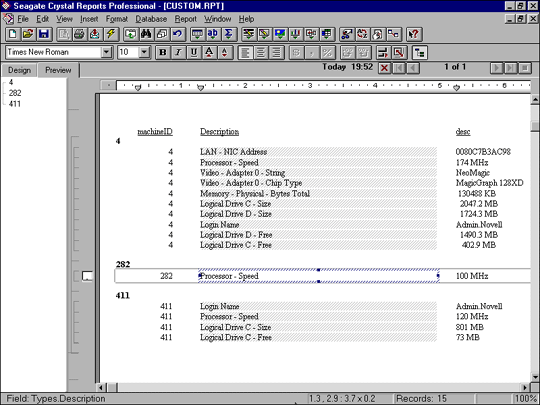
If you scrolled through this report, you would first see all the inventoried information for Machine 4, then 282, then 411. These machineID numbers represent the three inventoried devices on the test network used. You can change the sort order by selecting Report | Sort Records... and then changing the Sort Fields to include only Types.Description. By default, this will sort the information under the Description heading (middle column) in ascending order, and the result will look similar to the following screen shot.
Now, inventoried information is in alphabetical order by Types.Description. The machineID column (left-most column) shows from which of the three unique machines (4, 282, and 411) these types came from. If you experiment with this sort procedure, you will discover that sorting by Values.desc alone does not produce meaningful information; rather, it simply puts the Values (under the far-right heading "desc") in ascending or descending order.
You have now created your ManageWise inventory report in Crystal Reports. Once you become more familiar with Crystal Reports and the structure of the ManageWise inventory database, you can start creating custom reports, as described in the next section.
Creating Customized Reports
To illustrate how to create a customized report with Crystal Reports, we''ll use our sample three-node network consisting of two workstations (MachineIDs 4 and 411) and one NetWare File Server (machineID 282). Both workstations are logged in as Admin.
Consider the custom report shown in the following screen shot.
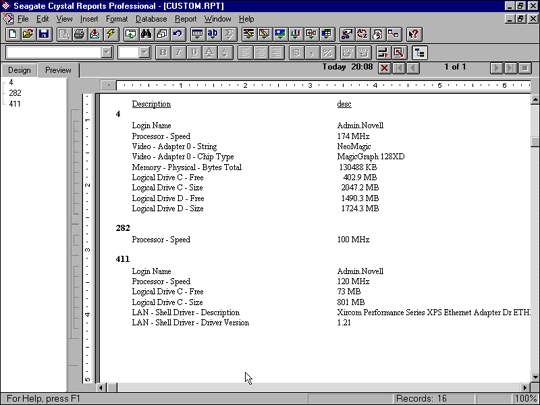
This report is fairly representative of the format and type of information a manager would want, in that:
It shows the login name of the inventoried workstations.
It displays common hardware components found on the company's workstations.
If your organization's login names do not clearly indicate whose workstations are whose, you can use Full Name instead (assuming you are using the Full Name property on your user accounts in NDS).
The steps for creating the custom report shown in the above screen will now be discussed. You will need to create a new (separate) report to show ManageWise inventory's mapping of a component's description to its TypeID number. For many people, it is easier to query by simply typing in a number versus having to correctly spell out a lengthy component name.
To create this custom report, follow Steps 1 through 14 as given in the previous section, but substituting the following fields in Step 10:
TypeID from TYPES.DAT
Description from TYPES.DAT
You will get a report similar to the following:
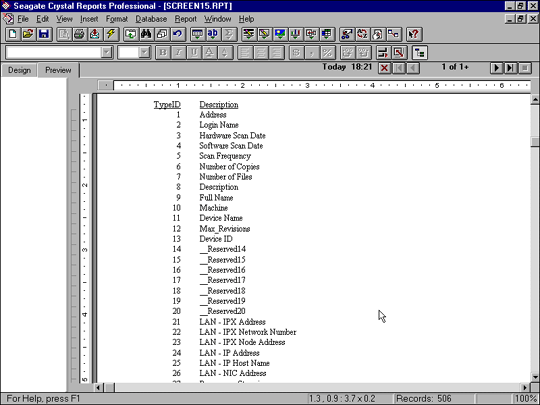
From this report, you can see that you will be able to query Crystal Reports for TypeID 1 to get Address, TypeID 2 to get Login Name, and so on. Armed with this information, you can now select the components you want included in your custom report.
In our example, we want to generate the report by querying for CPU, Video Card, RAM, Hard Drive Storage, and LAN Driver (using the appropriate TypeID for each item). The steps for doing this are detailed below.
Open the report you want to query for these specific components (here we'll use the one created in the previous section).
From the menu, select Report | Select Expert.
If appropriate, remove Types.Description from the tab (this might be here from the sort performed in Step 14 above).
From the menu, select New and choose Types.TypeID. These numbers (One Of 2, 30, 37, 38, 48, 54, 55, 58, 59, 337, 338) are the TypeID numbers associated with the components you want in your report. You will see a screen similar to the following.
If the listing is not sorted by machineID (as it is in this example screen shot), remove the sort order you specified in Step 14 above by selecting Report | Sort Records... and removing Types.Description from the Sort Field.
To group the records by MachineID, select Insert | Group and choose Machines.machineID. You will see a screen similar to the following.
To sort by Login Name, select Report | Sort Records... choose Types.TypeID, and specify Ascending order. (Because Login Name is TypeID 2, it will be listed first.)
While still in the Design View, remove the machineID column. You now have the custom report shown at the beginning of this section. Of course you can change the heading names to something more meaningful than "Description" and "desc." You might also want to consider removing the inventoried file server (MachineID 282 in this report).
For complete information on selecting, grouping, and sorting records in Crystal Reports, refer to Chapters 4 and 5 of the Crystal Reports 6 for Dummies book mentioned in the References section at the end of this document.
Conclusion
This AppNote has shown you how to set up Crystal Reports 6.0 for use with ManageWise 2.x so that you can start manipulating the ManageWise inventory database into customized and meaningful reports for your company. Once you have the data in Crystal Reports (which you should, after following the example given herein), the rest is up to you and Crystal Reports.
Additional References
Here are additional resources for obtaining more information on Crystal Reports and ManageWise.
Crystal Reports
Seagate Crystal Reports User's Guide(Version 6.0)
Wolf, Douglas J., Crystal Reports 6 for Dummies (contact IDG Books at http://www.idgbooks.comfor ordering information)
Training courses on Crystal Reports from Seagate (see the Seagate web site at http://www.seagatesoftware.com/crystalreports/for more information)
ManageWise 2.x
ManageWise home page at http://www.novell.com/managewise
Novell Support Connection at http://support.novell.com(you can search here for Technical Information Documents or TIDs on ManageWise)
Novell AppNotes, available at http://www.novell.com/research/
Subscribe to the monthly electronic ManageWise Newsletter at http://www.novell.com/managewise/newsletter
* Originally published in Novell AppNotes
Disclaimer
The origin of this information may be internal or external to Novell. While Novell makes all reasonable efforts to verify this information, Novell does not make explicit or implied claims to its validity.