Using ZENworks to Check Workstation Hardware for Year 2000 Compatibility
Articles and Tips: article
Senior Analyst
TechVoice, Inc.
DOUG STEWART
Software Engineer
Novell DeveloperNet Labs
01 Jan 1999
Getting behind on your Year 2000 compatibility testing? Find out how quick and painless it can be with Novell's ZENworks and a free hardware testing program from DeveloperNet Labs.
- Introduction
- About the Y2K Test for ZENworks
- Preparing ZENworks for the Y2K Tests
- Installing the Year 2000 Compatibility Testing Software
- Setting Up ZENworks to Distribute the Y2K Test
- Viewing the Results of the Y2K Tests
- Summary
Introduction
With the year 2000 less than a year away, network administrators are being bombarded with anxious calls asking for users' computers to be evaluated for Year 2000 (Y2K) readiness. The daunting prospect of manually testing thousands or even hundreds of workstations may prevent the timely intervention that is necessary to avoid data loss or system failure. Fortunately, Novell's ZENworks, along with a specially-developed Year 2000 Compatibility Test, is ideally suited to automating the repetitious task of Y2K testing.
This AppNote describes the installation and configuration procedures necessary to run the Year 2000 Compatibility Test using ZENworks. It is a follow-up to the NetNote entitled "DeveloperNet Labs Year 2000 Compliance Test Tools" in the November 1998 issue of Novell AppNotes.
The AppNote assumes you are familiar with how ZENworks is set up and how to configure it properly. For more background information, visit the October 98 AppNotes: "Using ZENworks to Distribute and Manage Applications on a Network" and "A ZENworks-Friendly Location Independence Strategy for NetWare Networks" .
The Year 2000 test described in this AppNote is a hardware check only. It is available as a free download from Novell's DeveloperNet Labs. For those who require more comprehensive Y2K testing, Novell has bundled with ZENworks 1.1 a five-user version of Greenwich Mean Time's Check 2000, a diagnostic tool that scans workstation hardware, software, and data for Y2K bugs. Customers can also purchase additional Check 2000 Client Server licenses from Novell. For more information on ZENworks 1.1 with Check 2000, visit Novell's Web site at http://www.novell.com/products/nds/zenworks.
About the Y2K Test for ZENworks
To ease the task of Y2K testing, Novell's DeveloperNet Labs has created a series of tests that can be distributed to users and run automatically using ZENworks. These tests use INT 1A to read the BIOS, and ports 70 and 71 to read the real-time clock from CMOS. The entire test takes about a minute to run on each workstation.
This new tool offers three key benefits:
It provides an automated way to test workstations. ZENworks automates the inventory task by running the Year 2000 Compatibility Test rather than requiring the administrator to physically visit each system. It also removes any burden on the part of users to have to run some new program on their system and forward the results back to MIS.
It runs ten individual tests of hardware compliance. Unlike other, simpler tools available via the Internet, the Year 2000 Compatibility Test for ZENworks is designed to cover a broad range of potentially hazardous dates. These tests cover both the Real Time Clock and the BIOS, as both are susceptible to Y2K errors.
It records this information inside of NDS for ease of reporting. The Year 2000 Compatibility Test stores the results of each workstation's test in Novell Directory Services (NDS) using a new schema extension to the Workstation object. NWAdmin can thus serve as a reporting tool for Y2K compliance. An additional snap-in extension provides exporting capability for reading the data in spreadsheets or other applications.
The Y2K Compatibility Test for ZENworks currently runs only on Windows 95 and 98 workstations. It doesn't run on Windows NT systems because Windows NT masks the Y2K hardware issues that may exist. However, there is a DOS standalone version of the utility which you can run on NT machines after booting them up under DOS. A Windows 3.x version is also available, but it too must be run manually on each workstation. (See the "Component Checklist" section below for availability information.)
What the Compatibility Test Checks
The Year 2000 Compatibility Test checks two sets of dates: critical rollover dates and critical reporting dates. The dates checked are those deemed critical by Novell, and represent the extent of the testing that the Compatibility Test performs.
Critical Rollover Tests. The critical rollover tests check to see if the century bit is being utilized properly; for example, if dates are being reported as 12/31/1999 or as 12/31/99. If the century bit (represented by 19 in 1999) is not being set, the rollover date of 1/1/2000 will be reported as 1/1/1900. The following critical rollover dates are tested:
12/31/1998 - 1/1/1999
12/31/1999 - 1/1/2000 (only the BIOS is tested)
2/28/2000 - 2/29/2000
2/29/2000 - 3/1/2000
12/31/2034 - 1/1/2035
Critical Reporting Tests. The critical reporting tests check to see if the BIOS and real-time clock can be set to dates that are critical to year 2000 compliance. The following critical reporting dates are tested:
9/9/1999 (some BIOSs use this as a date that will never be set)
12/31/1999
1/1/2000
2/29/2000
1/1/2035
Component Checklist
To successfully run the Year 2000 Compliance Test via ZENworks, you will need the following components:
Servers: NetWare 4.1x or NetWare 5.0. You may need to apply Service Pack 6 to NetWare 4.11 servers to properly run ZENworks and the Compatibility Test. This service pack is available from the Novell Support Web site at http://support.novell.com.
Workstations: Windows 95 or 98, with the Novell Client 32 software installed
NetWare Administrator Utility: NWADMN32 version 5.0.1 or higher is required in order to correctly display the results of the tests. However, the tests do run and the results can be correctly exported from other versions of NWAdmin.
ZENworks: You will need the full ZENworks package, not the Starter Pack provided with NetWare 5.0 or available for download from Novell's Web site. Although the Compatibility Test software installs with the Starter Pack, it will not run properly.
Year 2000 Compliance Tests: The Year 2000 test tools are available for download in in the downloads areaof the Novell Research Web site.
Preparing ZENworks for the Y2K Tests
To use the Y2K test with ZENworks, you must first perform some preparatory steps that are necessary for running ZENworks for any program. These tasks include:
Creating a User Policy package
Enabling the Workstation Import Policy
Registering workstations in your tree
Importing the registered workstations
If you have already performed these tasks in your tree, you can jump ahead to the section on "Installing the Year 2000 Compatibility Testing Software" later in this AppNote. These preparatory steps are reviewed briefly below for those who may not have completed all of them.
Creating a User Policy Package
User Policies can cover a wide range of functions. For our purposes, we only have to configure workstation registrations.
Run NWAdmin32.
Right-click on the Organization or Organizational Unit where you want to store ZENworks policy packages. (The choice of container is fairly arbitrary.)
Choose Create from the menu.
Choose Policy Packages, then click OK.
NWAdmin displays the Create Policy Package dialog shown below.
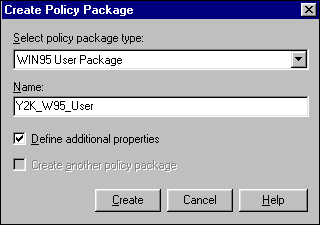
Choose Win95 User Package from the drop-down menu. (Remember, the Y2K Compatibility Test only works on Windows 95 and 98 systems.)
Type in a name for your policy, such as "Y2K_User_Policy" or some other descriptor.
Check the Define Additional Properties box.
Click on Create. NWAdmin displays the User Package Policies dialog.
Enabling the Workstation Import Policy
You can now enable the workstation import policy.
Click on the Workstation Import Policy check box to highlight it.
Click on the Details button below the policies list.
In this next dialog, click on the Workstation Location tab to the right.
NWAdmin displays a new dialog where you can define the container where you want to place the registered Workstation objects. It is recommended that the Workstation objects be kept in the same container as the associated User objects. If this exceeds the guideline of no more than 1500 objects per partition, you can create Workstation objects in a single separate container.
For the "Create workstation objects in:" field, choose "Selected Container".
Click on the tab to the right labeled Workstation Naming to display that page. Here you can choose how you want to name the registered workstations. By default, the computer name/network address is used.
Click OK to return to the Policies dialog.
Click on the Associations tab to display that page. Here you can create a list of containers for ZENworks to use. Within these containers should be all the users whose workstations you want to evaluate. After selecting the desired containers, click OK.
Note: This association does not flow down the tree. You must select the first immediate container object in which the User objects reside in the tree for them to participate in the Y2K tests. User objects in child containers will not be affected.
You can also choose a group or a single user to include in this Associations list, if you want to narrow the tests down to a few workstations.
Registering Workstations
If you have installed the Novell Client 32 software that ships with ZENworks on a workstation, this registration takes place automatically, through a scheduler on each workstation which runs the necessary registration file the first time a user logs in. This scheduler, in turn, registers the user's workstation to the Workstation Registration page (in NWAdmin) of the first parent container object under which the User object resides.
Of course, since workstations are registered when users log in, it may take some time for all of the workstations to become registered. You may not see immediate test results until more workstations have registered and are ready to be Y2K tested.
On occasion, you may experience problems with specific Windows 95/98 workstations correctly registering. In those cases, try the following and then recheck NWAdmin to view the registered workstations.
Run UNREG32.EXE from SYS\PUBLIC.
Run WSREG32.EXE from SYS\PUBLIC.
Note: Don't confuse these registration tools with similarly named tools in the PUBLIC directory. Make sure you have WSREG32.EXE, for example, before running it.
If this does not work for you, here's a further suggestion:
Run UNREG32.EXE from SYS\PUBLIC.
Shut down the workstation and reboot.
Run NWADMN32.EXE and delete the Workstation Object in NDS.
Reboot the workstation.
Importing Registered Workstations
Once you have registered your users' workstations into NDS, you'll need to import them to proceed with Y2K testing.
Start NWAdmin, and click on the parent container for the User objects whose workstations you are evaluating.
Choose Details.
Click on the Workstation Registration tab to view that page.
You can now choose one or more workstations to import. Remember, this list grows over time as more and more users log in and run the policy you created earlier.
Highlight one or more workstations to import.
Click the Import button.
If NWAdmin performs the import successfully, it displays a message listing the number of successful workstation imports. NWAdmin also places an appropriate Workstation object into the container specified earlier.
Installing the Year 2000 Compatibility Testing Software
Once you have established the various policies in NWAdmin, you are ready to extend the NDS schema and install the NWAdmin snap-ins to support the extensions. The Setup program will:
Copy two DLLs (WMY2K.DLL and WMY2K32.DLL) to SYS:\PUBLIC on your selected server.
Copy two NWAdmn32 snap-ins (WMY2KSNP.DLL and WM_Y2KEX.DLL) to your selected server's SYS:\PUBLIC\WIN32\SNAPINS directory.
Copy the NWAdmn32 snap-in resource file (WMY2KEXR.DLL) to the SYS:PUBLIC\WIN32\NLS\ENGLISH directory on your selected server. This file is used by the WM_Y2KEX.DLL.
Copy various files to extend the NDS Schema and set up the Year 2000 Compatibility Test for Win95/98 Application object to the SYS:SYSTEM\Y2KTEST directory on your selected server. These files are:
WNDSSCH.EXE
Y2KTEST.SCH
MFC42.DLL
MSVCRT.DLL
Y2KTEST.AXT
Y2KSETUP.TXT
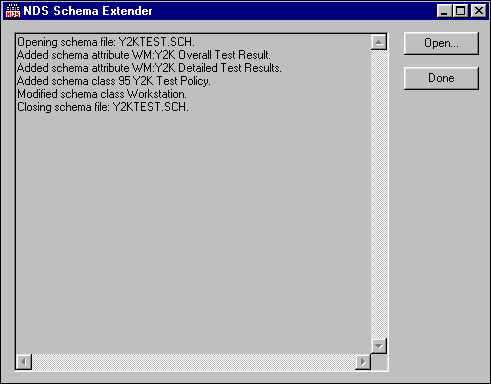
Run the Schema extension program to incorporate the Y2K extensions into NDS.
Note: The Y2K test program itself requires under 1MB of space.
To install these files and run the extension program, insert the Install disk into drive A: and type A:\SETUP in the Windows Run entry box. The program will ask you which server to install to, as shown below:
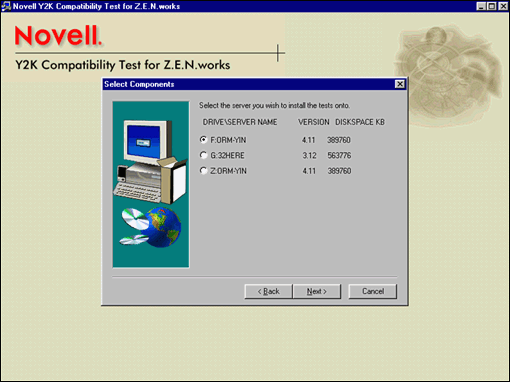
Click on the server you want, then click Next. The program will go through the file copy process and then present you with a screen asking you if you want it to automatically extend the schema. Since extending the schema is essential, answer Yes, and then click Finish. The program will display a progress screen similar to the one below, which will notify you when it successfully completes the extension.
At this point, you are ready to set up ZENworks to distribute the Y2K test to workstations.
Setting Up ZENworks to Distribute the Y2K Test
You now will configure ZENworks to distribute the Y2K Compatibility Test to each workstation at login time. If you have already configured workstations to run Application Explorer, you can skip to the next section.
Note: Since the Y2K test only runs on Windows 95/98 workstations in this iteration, you only have to include login script commands for those workstations and not for Windows NT or Windows 3.x systems.
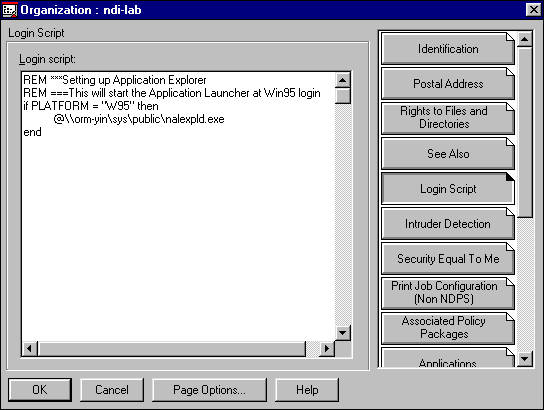
Run NWAdmin, right click on the container within which are the User objects you want to run Y2K testing, and select Details.
Click on the Login Script tab. NWAdmin displays a dialog with the container's current login script. (In some cases, it will be empty.) Of course, you could include the commands in a group or user login script if desired.
Type in these commands:
REM === This will start the Application Explorer at Win95 login if PLATFORM = "W95" then @\\servername\sys\public\nalexpld.exe end
where servername is the name of the server where you installed the Y2K software. An example of this is shown in the figure below:
When the user next logs in to the network, ZENworks will run the Application Explorer on that workstation. We next need to have the Explorer distribute the Year 2000 Test software.
Creating the Year 2000 Test Application Object
First, you need to add an Application object to the NDS tree. You can then reference this object in ZENworks to run it at login time.
From NWAdmin, right-click on the container where you want to install the Application object. (The choice of containers is arbitrary, so if you have a container for applications, it is fine to use it here.)
Select Create, then choose Application.
NWAdmin presents you with the Create Application Object screen similar to the one shown below:
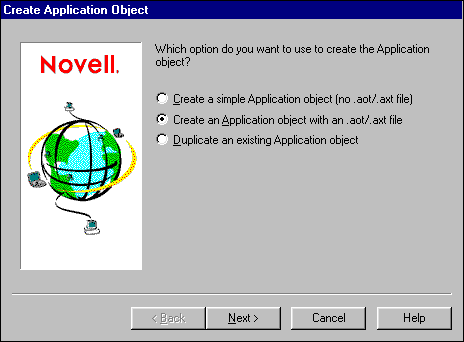
Choose to create an object using an .AOT/.AXT file as shown in the figure.
Select the SYS:\SYSTEM\Y2KTEST directory where the Y2KTEST.AXT file was installed.
Continue through the following screen, at which point NWAdmin shows you the Review dialog seen below:
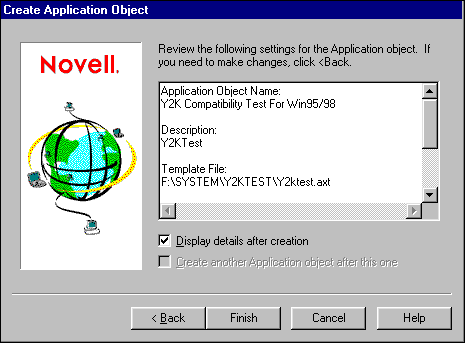
This screen shows you your new Application object's configuration and source path.
At the bottom of the screen, check the box labeled "Display details after creation".
Click Finish.
NWAdmin proceeds to create your new object. Once finished, it displays that object's Details page.
Note: If it fails to do so, locate the Year 2000 Compatibility Test for Win95/98 Application object in your tree. Right-click on it and choose Details to view the Details page.
Click on the System Requirements tab.
Choose Windows 95 as the operating system requirement.
Click on the Associations tab.
You can now select the containers, groups, or users you want to run the Y2K test. Of course, you will want to install that program on each workstation, so you need to configure this parameter in each of the containers, groups, and users you defined here.
Click OK to accept the associations you have defined for this object and close the dialog.
Right-click on each container, group, or user object in your tree you associated the Y2K test with in Step 9.
Select Details from the menu.
Choose the Applications tab from the object's Details dialog. NWAdmin displays a dialog similar to the one shown below:
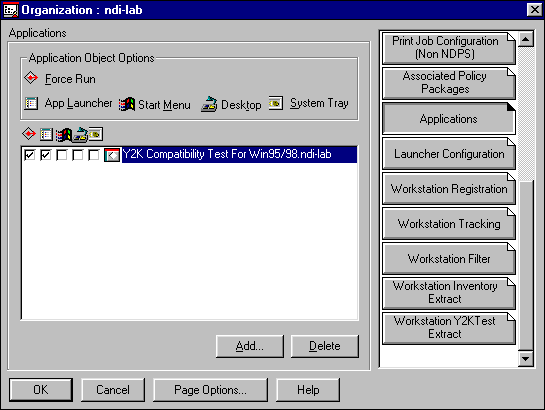
Click in the box on the left, the one below the icon for Force Run, to force the workstation to install the Y2K test during login.
Creating a Workstation Policy to Run the Test
You have now prepared ZENworks to install the Y2K Compatibility Test software on each workstation. You now need a policy to run that test when users log in.
Start NWAdmin if it isn't running already.
Right-click on the Organization or OU where you want to store the policy package.
Choose Create from the menu, then Policy Package. Click OK to continue.
In the Create Policy Package dialog, choose a Win95 Workstation Package.
Type in a name for your policy, such as "Y2K_WS_Policy".
Check the box marked Define Additional Properties, then click Create. NWAdmin will create the object and display its Details page.
Select the Associations tab to display that page.
Choose the containers, groups, or users you want to run the Y2K test, then click OK.
Scheduling the Y2K Workstation Policy to Run
The defaults in NWAdmin are to run the policies according to an hour/day schedule. It is generally best to change this so the test runs during login.
Right-click on the Workstation Policy object you just created.
Choose Details from the menu. NWAdmin displays the object's Details page.
Check the Win 95/98 Y2K Test Policy check box to enable the policy.
To change the scheduling of the test, highlight Win95/98 Y2K Test Policy in the dialog, then choose the Details button at the bottom of the list.
Click on the box marked "Ignore Policy Package default schedule".
Select the Schedule tab, choose Event, then select User Login from the pick box.
Accept this change and NWAdmin returns you to the Details page as shown in the figure below:
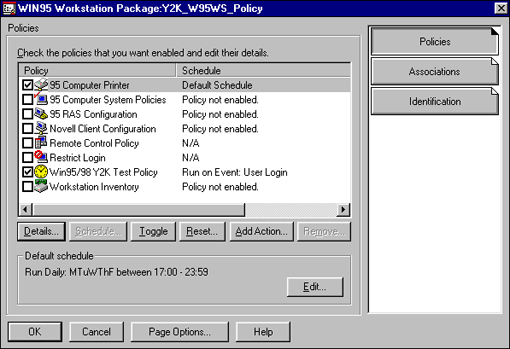
The policy now shows that it will run during user logins.
Note: If you have had to install ZENworks or upgrade to the full version, you will have to reboot for these changes to take effect. (NWAdmin will state this on screen to remind you.) Also, users may have to log in up to three times to complete the tests if they too have to upgrade to the latest Application Explorer, then install the Y2K software, then run the tests.
When the user next logs in from a workstation, the Application Explorer will load and display the Y2K Compatibility Test results screen, with the results appearing in real time as the workstation is tested.
Viewing the Results of the Y2K Tests
Once your users have begun to run the Y2K tests, you can review the results in NWAdmin.
Highlight the registered workstation name in your tree.
Right-click on it and select details.
Choose the Year 2000 Compatibility tab to display that page.
NWAdmin displays a dialog similar to the one shown below:
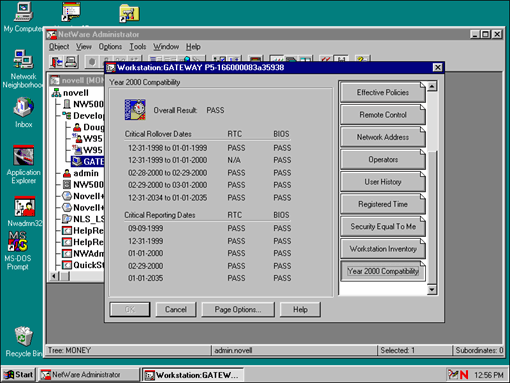
Reading the Results
The test results are in two columns: one for the BIOS and one for the Real Time Clock (RTC). The workstation must pass both tests in order to be Y2K compliant. The tests also have Rollover and Reporting categories. Rollover deals with the ability of the workstation to correctly roll over to the next date at 12:00 am (midnight). Note that it is not just December 31, 1999, that's an issue. There are five dates that workstations may have difficulty with.
The Reporting category checks to see whether the workstation can correctly be set tot the critical dates listed at the beginning of this AppNote.
Exporting the Results
Year 2000 compliance is a critical issue with management. Since clear, concise reports on the current status will be valuable, the Year 2000 NDS data is exportable to a file for inclusion in a spreadsheet or database.
Note: The program will overwrite any existing exported data files it finds in that path. If you want to retain previously extracted test results, you'll need to rename that file prior to the export.
Right-click on the container in your tree that has the registered workstation objects.
Select Details, then click on the Workstation Y2K Test Extract tab.
NWAdmin displays the Extraction dialog as shown below:
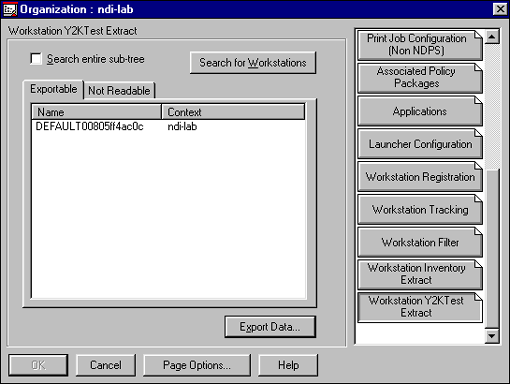
Note: You can also search in sub-containers, if you have selected a parent container for the workstations.
Click on the Search for Workstations button. NWAdmin will display a list of all the workstations it finds with Y2K test results.
Select one or more workstations from the list.
Click on Export Data.
NWAdmin will not ask you for a destination for this file. Select an appropriate path and choose OK. It then exports the data to two files:
WMY2KTL.TAB
WMY2KOVR.TAB
The WMY2KTL.TAB file contains the detailed results for each test on each workstation. The WMY2KOVR.TAB file contains a single Pass/Fail result for each tested workstation.
Summary
The need to perform Year 2000 compatibility testing is critical to avoid data loss or system failures. The important step is to enable such testing to occur faster and easier with Novell's NDS. The automated testing of Windows 95/98 workstations is readily supported on NetWare networks using the Year 2000 Compatibility Test program with ZENworks. Although the process for installing and configuring this test has a few steps, the setup procedures can all be performed from the administrator's workstation, and then distributed to all locations on the network without having to physically visit each site.
Disclaimer
The origin of this information may be internal or external to Novell. While Novell makes all reasonable efforts to verify this information, Novell does not make explicit or implied claims to its validity.