Using DSREPAIR to Maintain the Novell Directory Services Database
Articles and Tips: article
Worldwide Support Escalation Engineer
Novell Technical Services
01 May 1998
The DSREPAIR utility has been shipping with NetWare since the first release of NetWare 4.0, yet few administrators know what it can really do. This AppNote gives you the rundown of each option and provides examples of NDS maintenance tasks.
- Overview
- Introduction
- Unattended Full Repair
- Time Synchronization
- Report Synchronization Status
- View/Edit Repair Log File
- Advanced Repair Options
- Summary
Overview
The DSREPAIR utility is provided with the NetWare 4.x operating system to check for and correct problems in the Novell Directory Services (NDS) database on an individual server basis. DSREPAIR is implemented as a NetWare Loadable Module, and is written with the C-Worthy user interface using the NWSNUT.NLM library module. This library module is automatically loaded when DSREPAIR is loaded on the server. You can load the DSREPAIR utility on any server in the NDS tree.
The shipping version of DSREPAIR was 4.23a (for NetWare 4.10) and 4.40 (for NetWare 4.11); however, these older versions lack some of the functionality contained in newer versions of the utility. This information is based on DSREPAIR version 4.47, which works with all versions of DS.NLM for 4.10 and 4.11 to date (4.63 to 5.81). Stay tuned to http://support.novell.com for information about newer releases of DSREPAIR.
To understand this AppNote you should be familiar with the following NDS concepts:
NDS tree structure
Partition management
Replica management
General NDS synchronization
Introduction
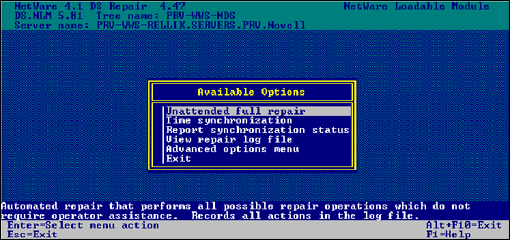
The opening screen of DSREPAIR (see Figure 1) reveals five options available for the system administrator:
Unattended full repair
Time synchronization
Replica synchronization status
View/edit repair log file
Advanced options menu
Figure 1: DSREPAIR main menu.
Unattended Full Repair
The "Unattended Full Repair" option automatically performs all possible repair operations that do not require operator assistance. You control parameters or items to be checked or repaired through first accessing and changing the parameters in the "Repair Local DS Database" option in the "Advanced Repair Options" menu. The log file records all actions during this operation so that you can determine what was done.
During the local database repair portion of the repair procedures, the NDS database is locked, making it inaccessible to the client or any other use until the repair is completed. After completing the "Local NDS Database Repair" operation and saving the repaired database, this operation unlocks the local database files and opens them for access.
The unattended, full repair goes through four major repair procedures:
Local NDS database repair (database is locked)
Repair of all network addresses (database is unlocked)
Remote server ID checks (database is unlocked)
Replica ring repairs (database is unlocked)
Refer to these specific functions in the "Advanced Repair Options" section for the detailed descriptions of the repair operations.
When the repair operations are complete, the log file is opened for viewing so that you can see what repairs were done and what the state of the database is following the automatic, unattended repair.
Time Synchronization
This operation contacts every server known to this server's local database and requests information about Directory Services, time synchronization, and server status. If this server contains a replica of the [Root] partition, the operation lists every server in the NDS tree.
Each server's information is displayed on the screen (see Figure 2) and written to the log file as a table. The information contained in the log files is explained in the table following Figure 2.
Figure 2: Sample time sync report.
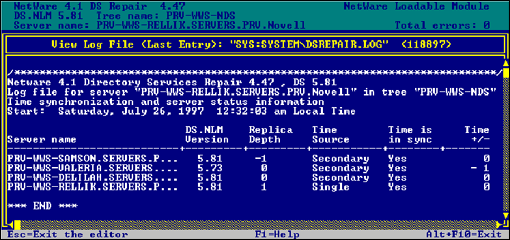
The table below shows the kind of server information gleaned from the Time Synchronization Process.
|
Field Name |
Description |
|
Server Name |
The Distinguished Name of the server responding to the Directory Services request is displayed. |
|
DS.NLM Version |
The NDS version running on the reporting server is returned and displayed. |
|
Replica Depth |
The replica depth is reported as -1 if no replicas are stored on the server, 0 if the server contains a replica of the [Root] partition, or a positive integer that indicates how many objects away from the root the first replica is on the reporting server. |
|
Time Source |
DSREPAIR cannot report the time source for each server, but does reveal the time source server type, which can be used to determine if time synchronization has been configured properly. All servers in the tree must be synchronized to the same time source or NDS cannot resolve synchronization collisions properly. |
|
Time is in Sync |
This field reports the local time synchronization status on the reporting server which should be "Yes". A "No" status means that the server cannot contact its time source. However, this should not cause problems over short periods of time, because the server's internal clock will not drift significantly. |
|
Time Delta |
This field reports time differences relative to this server. All servers should be within 1 second of each other, or they have not been configured properly. This field reports up to 999 minutes and 59 seconds (approximately 16.5 hours) in the form MINUTES:SECONDS. If the time difference is greater than that, the maximum value is displayed as "999:59". |
Report Synchronization Status
This operation checks the synchronization status of all partitions that have a replica stored on the local server. This operation contacts each server in the replica ring and reads the partition status attribute of the partition root object. DSREPAIR displays any errors found (see Figure 3) and writes them to the log file.
Figure 3: Sample synchronization status report.
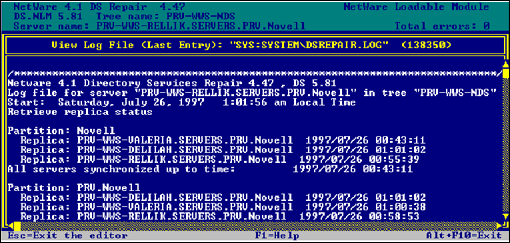
In the log file, the partitions are divided into sections depending on the number of replicas the local server contains. In this example the local server contains more than one replica. You can tell from Figure 3 that this server contains a replica of the partition "Novell" and another replica of the partition "PRV" which is a child of "Novell".
Below the partition name, each replica known to the local server is identified by server name. The key here is that a synchronization status is only available for the servers that hold replicas according to this local database.
To the right of each replica you will see one of two things:
The date and time of the last successful synchronization.
The date and time of the last successful synchronization with an error code (such as 625) and a designation of whether the error was local or remote to the server in question.
Figure 4 shows an example of a replica synchronization report that returned some errors.
Figure 4: Sample synchronization status report with errors.
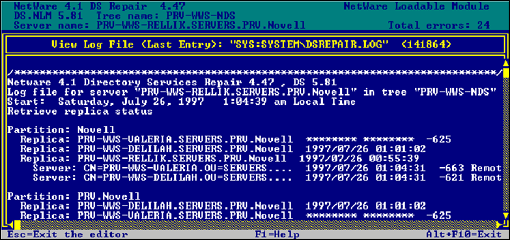
The first error in this example is:
Replica: PRV-WWS-VALERIA.SERVERS.PRV.Novell ******** ******** -625
This error means that the local server cannot obtain a replica synchronization status at this time. The -625 indicates a communication error.
Replica: PRV-WWS-RELLIK.SERVERS.PRV.Novell 1997/07/26 00:55:39 Server: CN=PRV-WWS-VALERIA.OU=SERVERS.... 1997/07/26 01:04:31 -663 Remote Server: CN=PRV-WWS-DELILAH.OU=SERVERS.... 1997/07/26 01:04:31 -621 Remote
The second and third errors mean that server PRV-WWS-RELLIK last successfully synchronized at 00:55:39, and it failed to synchronize at 01:04:31 with the other two replicas.
View/Edit Repair Log File
This option allows you to view and edit the DSREPAIR log file, which contains the results of operations performed by the utility. The log files' default location is:
SYS:SYSTEM\DSREPAIR.LOG
When DSREPAIR is loaded, the log file becomes active, and it appends the results of the operations to it. Thus, the file size grows with each repair operation performed. The log file size is displayed in parentheses at the end of the log file title line.
You can turn the log file off, turn it on again, delete it, or change the name to write to any local DOS or NetWare volume, by using the "Log File and Login Configuration" option in the "Advanced Repair Options" menu.
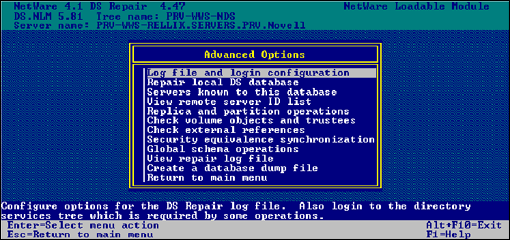
Advanced Repair Options
This option allows you to manually control the individual repair operations and global repair functions in the NDS tree. You can also access diagnostic information about the NDS database to analyze the status of the tree. Several of the advanced repair operations are the same as the main menu options discussed earlier.
The "Advanced Options" menu provides the following additional operations:
Log file and login configuration
Repair local DS database
Servers known to this database
View remote server ID list
Replica and partition operations (check volume objects and trustees as well as external references)
Security equivalence synchronization
Global schema update
View/edit repair log file
Create a database dump file
Figure 5: DSREPAIR Advanced Options menu.
Log File and Login Configuration
This option provides two functions:
Configuration of the DSREPAIR log file
Login to the Directory Services tree
Configuring the DSREPAIR log file allows you to manage that file. You can turn it off, delete it, or change the file name to any local DOS drive or NetWare volume.
When a repair function requires you to log in, a login screen appears for you to enter your user name and password. Once you have logged in, the prompt no longer appears. The system then uses the last user's login name. The "Login" option is useful for all other global functions of DSREPAIR, such as the "Security Equivalence Synchronization" operation. This function allows you to change the logged in user and set rights to a different part of the NDS tree.
The explanation for each of the parameters for the "Log File Configuration" option is given in the following table.
|
Field Name |
Description |
|
Current file size |
<bytes< This parameter is provided for information only. |
|
Reset the log file |
Press <Enter< to delete the log file. This parameter resets the file size to zero. When the file is deleted, you will lose all log information that has been previously sent to the file. |
|
Log output to a file |
"Yes" (the default) saves the output of DSREPAIR operations and error messages to a log file."No" writes the output to a temporary buffer that is displayed in place of the log file. The information is then erased at the end of each operation. |
|
Log file filename |
The default is SYS:SYSTEM\DSREPAIR.LOG. You can replace the default path and filename with a different path and filename, including any local DOS drive or NetWare volume. |
|
If file already exists |
"Append to existing file" (the default) adds to the end of the existing log file, if it exists for the path indicated. "Overwrite existing file" causes new log file information to write over the existing file. |
|
Administrator Name |
Enter the full NDS path (complete name context) for the Administrator. This user needs the Supervisor object right to the [Root] object of the NDS tree. |
|
Password |
Enter the Administrator's password for this NDS tree. |
Repair Local DS Database
This function repairs the NDS database files stored on the server, allowing you to manually control all repair operations. All of the database checks and repairs described here are included in the "Unattended Full Repair" option in the main DSREPAIR menu, using the default parameter settings.
The "Repair Local Database" options are shown in Figure 6.
Figure 6: Repair Local Database options.
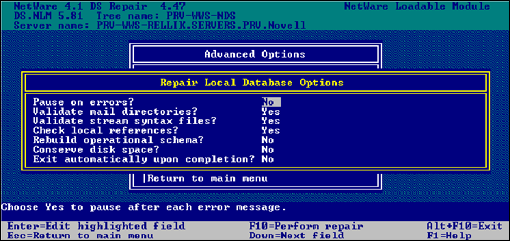
The Directory Services database is temporarily locked during these repair operations to prevent users from logging in. This option requires you to confirm the local database repairs. All repairs are performed on a temporary copy of the files, which are renamed at the end when you commit to save the database on which repairs have been made.
During the local NDS database repair operations, checks are made and repairs done where errors are found. You have the option of saving the changes when DSREPAIR is done, or you can view the log file before selecting to save or exit. Under most circumstances it is a good idea to view the log file before saving whenever there are errors.
When DSREPAIR saves the database it simply copies the previous database files with a .OLD extension and then writes the changes to new files with the .NDS extension. One important thing to note is that the .OLD files are not preserved or copied if a .OLD file set exists that is less than 72 hours old. This is to provide some reference point to go back to if you run into trouble while running multiple DSREPAIRs within 72 hours.
|
Option |
Default |
Description |
|
Pause on errors? |
No |
Leave the default selected if you don't want DSREPAIR to stop on errors. After the repair has completed you can view all actions it performed in the log file. Choose Yes to pause after each error message. |
|
Validate mail directories? |
Yes |
Leave the default selected to check the mail directories on volume SYS for users who no longer exist after repairs have been made. (Directory Services does not require mail directories.) |
|
Validate stream syntax files? |
Yes |
Leave the default selected to check for valid stream syntax files after the repairs have been made. Stream syntax files contain data for a property with the syntax of stream. In this operation a list of stream syntax files that don't have entries in the database is made, and then they are deleted. |
|
Check local references? |
Yes |
Leave the default selected to check the local references in the database for valid IDs and missing references. If any local references are missing, they are added. If any of the references have invalid IDs, they are purged. |
|
Rebuild operational schema? |
No |
Choose "Yes" to rebuild the predefined base schema on the server. The operational schema is the schema required for base operations of Directory Services. If the operational schema becomes damaged, you must rebuild it (this should rarely be the case). |
|
Conserve disk space? |
No |
Choose "Yes" to remove noncritical files before and after repair. These files can help recover a damaged database, but they use disk space. |
|
Exit automatically upon completion? |
No |
Leave the default setting if you want to look at the repair operations before saving the repaired database. Choose "Yes" to immediately exit the DSREPAIR utility upon completion. This will also unlock and open the local NDS database files after completing the repairs. |
This option of DSREPAIR checks the following items. If it finds an error during the check, it repairs the error.
Entry value, block, and partition records. DSREPAIR checks for invalid partitions and partition roots. If the utility finds any errors, it fixes those errors. It also checks for invalid checksum and links in records. DSREPAIR fixes any errors, then checks again for invalid partitions and partition roots. During these operations, it creates a temporary database file set with the extension .TMP. At the end of the repair operations this temporary database file set becomes the permanent database file set, unless you choose not to accept the repairs made.
The Directory tree structure. DSREPAIR checks the directory tree structure to ensure that all records are linked to the root object and that all properties are linked to the respective entry records.
The schema. DSREPAIR checks the schema for valid object class and attribute definitions. DSREPAIR rebuilds any invalid classes and/or attributes found in the operational schema, if the rebuild operational schema option is set to On.
Object level repairs. For each replica root, DSREPAIR checks all objects in the partition (replica ring) for valid containment and for consistency with the schema. It deletes any illegal optional attributes. It changes any object class missing a mandatory attribute to an Unknown class. If it finds any illegal containment, it changes the parent class to Unknown. It checks all attribute syntaxes for consistency.
All mail directories. DSREPAIR checks all mail directories for valid IDs. It deletes any invalid IDs. DSREPAIR only checks for them if the default option Yes is set for this repair operation.
Any illegal stream syntax files. DSREPAIR deletes any invalid stream syntax files. It makes this check only if the default option Yes is set for this repair operation.
Servers Known to This Database
This feature lists all servers known to the local Directory Services database. If this server contains a replica of the [Root] partition, then this list most likely contains all the servers in the tree. However, if the server does not contain a replica of the [Root] partition, the list will be a subset of t he servers in the NDS tree.
This feature lists the Local Status and the Local ID for each server in the list. The Local Status field reports the state of a server as seen from this server. If the server is UP, it is active. If it is DOWN, a communication problem has occurred recently. If the server has recently become active, polling it for status will change its state to UP. After a period of time, the server on which you are running DSREPAIR will try to contact the DOWN server. The contacted server's state will then change to UP. If servers appear that no longer belong to this tree, you must delete their server object using the client utilities PARTMGR or NWADMIN. Eventually, the server object will be purged from all the servers remaining in the tree.
Upon selecting a server displayed in the list, several server options become available.
Time Synchronization and Server Status. This operation contacts every server known to this server's local database and requests information about Directory Services, time synchronization, and server status. If this server contains a replica of the [Root] partition, it polls every server in the Directory Services tree to collect this information.
The information on each server is displayed on the screen and written to the log file in the form of a table. The information fields and explanation of the field contents are exactly the same as the Time Synchronization operation of the DSREPAIR main options menu.
Repair all Network Addresses. This operation searches three places to find all possible server objects known to the local database:
Server object IDs from the remote server ID table
Server object IDs from the replica table
NCP server class objects in the database
This option searches for the server's name in the local SAP table for every server object known to the local database. If it finds an address in the SAP table, it compares this address to the server object's network address attribute and the address in each replica property of every partition root object. If the address it finds in the SAP table differs from these, it updates the other table addresses to match the address found in the SAP table. That is, it assumes that the address from the SAP table is the most correct one. If it cannot find a SAP name-to-network-address mapping, it does not do any other repairs. Thus, this operation repairs the server's network address in replica rings and server objects in the local database.
This operation is also included in the "Unattended Full Repair" option in the DSREPAIR main menu. When this option completes the repairs, it takes you automatically to the log file, if the log file creation option is turned on, or to the operation results screen.
Repair Selected Server's Network Address. This operation is identical to the "Repair all Network Addresses" function, except that it checks and repairs only the selected server. This operation repairs the selected server's network address in replica rings and server objects in the local database. It checks the network address of the selected server in the local database by searching for the server's name in the local SAP table. If it finds an address in the SAP table, it compares this address to the server object's network address attribute and the address in each replica attribute of every partition root object. If the address it finds in the SAP table differs from these, then it uses the network address in the SAP table to update the network address in the other tables. If it cannot find a SAP name-to-network-address mapping, then it does not do any other repairs.
Upon completion of the repairs, it takes you automatically to the log file, if the log file creation option is turned on, or to the operation results screen.
Update Schema on All Servers. This operation verifies the operational schema on all servers known to the local database, and it updates the base schema if needed. This is the same operation as in the "Advanced Menu Option" for "Global Schema Update", except that it checks only servers known to the local server. This includes all servers that hold replicas of partitions that are also held by the local server.
This operation is faster than the "Global Schema Update" option because it does not have to walk the tree.
Update Schema on the Selected Server. This operation verifies the operational schema and updates the base schema, if needed, on the selected server. This is the same as the "Advanced Menu Option" for "Global Schema Update", except it checks only the selected server.
This operation is also faster than the "Global Schema Update" because it does not have to walk the tree, and faster than the "Update Schema on All Servers" option because it operates only on the selected server.
View Entire Server Name. This feature allows you to verify the entire Directory Services Distinguished Name, which can be as long as 256 characters. Use this when the full Distinguished Name is longer than that allowed by the DSREPAIR menu options field.
View Remote Server ID List
This option displays the remote server ID list, allowing the remote IDs to be verified and edited. This option provides a "Local ID to Remote ID List" in table form, as shown in Figure 7.
The list contains the remote server's name, the local ID for remote servers, and the local server's ID on the remote servers. In an NDS tree, an object's ID is unique on each server. The remote server ID list contains a list of the server's object IDs as they are found on the remote server's database. If the remote ID is incorrect, this server returns a -632 error, indicating that it cannot authenticate to the remote server.
Figure 7: Local ID to Remote ID list.
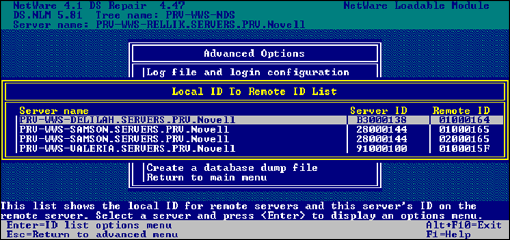
The list gives you tools to repair the remote ID and to authenticate to the remote server so you can verify that the ID is correct. Upon selecting a server from the list, several remote ID repair options are given.
Verify All Remote Server IDs. This operation uses the remote server ID cache table on the selected server to locate servers known to it. It then contacts each server in the list to verify that its ID on that server is correct in the table. This operation checks all remote server IDs in the list and repairs or deletes any that are incorrect. This action could be slow on networks that must contact many remote servers. (This operation is included in the "Unattended Full Repair" option in DSREPAIR's main menu.)
Verify Selected Remote Server ID. This operation is identical to the above "Verify All Remote Server IDs" option, except that the action involves only the selected server in the remote server ID table.
Delete the Selected Remote Server ID. This operation removes the selected server's ID pair from the remote server ID list. Perform this operation only if you are certain that the entry is incorrect and DSREPAIR does not fix it.
Replica and Partition Operations
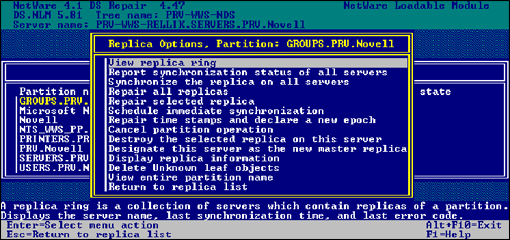
This option displays a list of all partitions that have a replica stored on the local server's Directory Services database. Each partition is shown in table form with the replica type (Master, Secondary, or Read-only) and replica state (On or Off) as it is stored on this server. After selecting a partition to access, this option displays a list of partition and replica operations you can choose from. These replica and partition operations allow you to repair replicas and perform diagnostic synchronization to reveal any problems with servers involved in partition operations. Once you select a partition, the "Replica Options" menu appears, as shown in Figure 8.
Figure 8: Replica and partition operations menu.
View Replica Ring. This option provides a table display of all the severs that contain replicas of the selected partition. This set of servers is called the replica ring. The replica ring list shows the replica type and replica state information for each server in the ring. When you select a server in the replica ring, this option displays a list of six replica ring operations as shown in Figure 9.
Figure 9: Replica ring operations.
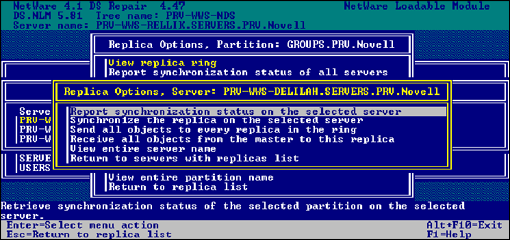
Report Synchronization Status on the Selected Server This operation checks the synchronization status of the selected server. This option performs the same operation as the main menu option "Report Synchronization Status", but only for the selected server in the replica ring. After the operation is completed this option displays the results and stores them in the log file, if the file is turned on.
Synchronize the Replica on the Selected Server This operation determines the synchronization status of the selected partition on the selected server. If the selected server can synchronize properly to every other server that contains a replica of the selected partition, the replica on that server is functioning correctly. This operation contacts the selected server and has it immediately synchronize to every other server in the replica ring. After the operation is completed, this option displays the results and stores them in the log file, if the file is turned on.
Send all Objects to Every Replica in the Ring This operation sends all objects from the selected server in the replica ring to all other servers that contain a replica of its partition. This ensures that a replica synchronizes to all other replicas of the partition. Also, you should be aware that execution of this function can create high network traffic.
Receive All Objects from the Master to This Replica This operation copies all objects from the Master replica to the replica on the selected server, which can be a Secondary (Read/Write) or Read-Only replica. This ensures that the selected partition synchronizes with the Master replica. The replica on the selected server is marked as a new replica. This operation also destroys all objects in this server's replica and sends a new copy of the Master replica to this server. Any modifications that have been made to this server's replica that have not been synchronized to the Master replica will be lost.
View Entire Server Name This feature allows you to view the entire Directory Services Distinguished Name, which can be as long as 256 characters. Use this when the NDS name is longer than that allowed by the DSREPAIR options menu field.
Report Synchronization Status of All Servers. This operation checks the synchronization status of all partitions that have a replica stored on the local server. This operation contacts each server in the replica ring and reads the partition status attribute of the partition root object. DSREPAIR displays any errors found and writes them to the log file. (This is the same as the main menu option discussed previously.)
Synchronize the Replica on All Servers. This operation determines the synchronization status for every replica stored on the local server. If all the replicas on each server synchronize properly, the tree is functioning correctly. This operation contacts each server in the replica ring and has that server immediately synchronize to every other server in the replica ring. Servers do not synchronize to themselves, so the status for a server's own replica is shown as "host".
Repair All Replicas. This operation repairs all replicas displayed in the replica table for the selected partition. Repairing a replica consists of checking the replica ring information on each server that contains a replica, and validating the remote partition root ID, that is, the ID of the partition root on the target server. (This option is identical to the "Unattended Full Repair" operation. Perform the "Repair Local Database" operation before initiating this option, if that operation has not been done within the previous 30 minutes.)
Repair Selected Replica. This operation checks and repairs only the selected replica. Repairing a replica consists of checking the replica ring information on each server that contains a replica and validating the remote partition root ID, that is, the ID of the partition root on the selected remote server. (This option is identical to the previous "Repair All Replicas" option, except that the "Repair Selected Replica" operation acts on only the one selected replica rather than on all of this server's replicas.)
Schedule Immediate Synchronization. This operation immediately synchronizes all replicas. This is useful when you are viewing the DS. NLM trace screen and would like to see the synchronization trace information without waiting for the normally scheduled synchronization process.
Repair Time Stamps and Declare a New Epoch. This operation provides a new point of reference to the Master replica, so that all replicas of the selected partition are updated. This operation is always performed on the Master replica, which does not need to be the local replica on the current server. In this operation all time stamps in the Master replica are examined. If any time stamps are ahead of the current time, they are replaced with the current one that is unique and will not be reissued. After the time stamps have been made consistent in time, a new epoch is declared.
An epoch is an instant in time that is arbitrarily selected as a point of reference. It is used here to mean a new version. Epochs control replica synchronization. When a new epoch is declared, it begins on the Master replica. Other replicas cannot send updates to a replica with a new epoch, but they will receive updates from the Master replica until they become fully synchronized with it. When this process completes, all replicas have the same epoch and bidirectional synchronization is allowed again.
Before using this option, make sure that all servers in the replica ring are communicating properly. To do this, choose the "Synchronize the Replica on all Servers" option from the "Replica Ring Options" menu. Use this option if you notice a discrepancy between objects in a replica or in an object's property.
Keep in mind the following things as you begin this operation:
The Master replica does not have to be on the local server, but you must have rights to the Master replica to make the repairs.
All time stamps are examined and repaired as required.
A new epoch is declared on the Master replica, affecting all objects in the replica.
A replica receives a copy of all the objects from the Master replica or from another replica that has received the new epoch.
As the replicas synchronize, they do not accept updates from replicas with a prior epoch.
The replica becomes the same epoch as the Master.
Any modifications from a previous epoch will be lost.
Cancel Partition Operation. Use this option to cancel a partition operation in progress on the selected partition. This operation always resolves to the Master replica of the partition. You might have to cancel an operation that does not complete by itself, or because of damage to the tree, such as a missing server. However, you might not be able to cancel an operation if it has progressed too far.
Destroy the Selected Replica on this Server. This operation destroys the local replica of the selected partition. All objects in the local replica are destroyed and the replica is either removed completely or changed to a subordinate reference if needed. The objects that are destroyed are converted the external references that require a backlink to the real object. This is done to preserve any ID that may be needed for trustee assignments. If the external reference is not needed, it will eventually be removed.
Designate This Server as the New Master Replica. This operation designates the replica (Secondary or Read-Only) of the selected partition on the local server as the Master replica. This operation sets a replica on the local server as a Master, and cannot operate remotely to designate another server's replica as a Master. Each partition can have only one Master replica, so if another Master replica exists, this operation changes it to a Secondary. Use this operation to designate a new Master replica if the original one is lost. This could occur if the server that contained the Master replica has a hardware failure and must be replaced.
Display Replica Information. This operation generates a detailed report on all the replicas found on the local server. The report lists replica ring information, remote IDs, network addresses, synchronization properties, and other detailed information not found elsewhere. This information is useful for diagnostic purposes when detailed information about the partition and replication state of a server is needed. This diagnostic information is written to the log file, if the file is active.
Delete Unknown Class Leaf Objects. This operation kills all objects that are of the class type "unknown" as long as they do not have subordinate objects. This operation can be harmful because it will only look at the local replica for unknown objects. The local replica may contain an unknown server object which is perfectly fine on another replica, but if you run this option it will delete the local unknown server and attempt to send out an obituary notifying the other replicas.
View Entire Replica Name. This feature allows you to view the entire Directory Services Distinguished Name of the replica, which can be as long as 256 characters. Use this option when the replica name is longer than what the display field allows.
Check Volume Objects and Trustees
This option checks the association of all mounted volumes on the current server with volume objects in the tree. The physical volume is stamped with the ID of its corresponding volume object. DSREPAIR will check the ID it finds on the volume to verify that the ID corresponds to a volume object for the local server. If it does not find a volume object using the ID, it will search the server's context (not bindery context, but the context where the NCP Server object resides) for the volume object SERVER_VOLUME. If it finds a volume object in the server context, it will reference the physical volume to that volume object ID. If no volume object can be found, DSREPAIR will attempt to create one. Once the association between the volume and its object are verified, trustee assignments for that volume are verified.
Check External References
This option validates all entries within the external reference partition and attempts to locate a backlink. After running this option, the log file will display the number of external references along with the number of errors found. The server will get errors if it is having tree-walking problems. Typical errors include -626 all referrals failed, and -634 no referrals.
In addition, the "Check External References" option displays obituary information for all obituaries contained in the local server's database. This information is very useful for troubleshooting obituary problems. Figure 10 shows an example of Check External References output.
Figure 10: Sample Check External References output.
Netware 4.1 Directory Services Repair 4.47 , DS 5.81
	Log file for server "PRV-WWS-RELLIK.SERVERS.PRV.Novell" in tree
    "PRV-WWS-NDS"
	External Reference Check
	Start: Tuesday, July 29, 1997 12:12:05 pm Local Time
01  	Found obituary at VID: 0028F440, EID: 180000E9, DN:
CN=test.O=Novell.PRV-WWS-NDS
02  	TV: 1997/07/29 12:11:38 0007, Type = 0001 DEAD, Flags = 0000
03  	Found obituary at VID: 0024E880, EID: 180000E9, DN:
CN=test.O=Novell.PRV-WWS-NDS
04  	TV: 1997/07/29 12:11:38 0007, Type = 0006 BACKLINK, Flags = 0000
05  	Backlink: Type = 00000001 DEAD, RemoteID = FFFFFFFF, ServerID =
B3000138,
	CN=PRV-WWS-DELILAH.OU=SERVERS.OU=PRV.O=Novell.PRV-WWS-NDS
06  	Found obituary at VID: 00284E80, EID: 180000E9, DN:
CN=test.O=Novell.PRV-WWS-NDS
07  	TV: 1997/07/29 12:11:38 0007, Type = 0006 BACKLINK, Flags = 0000
08  	Backlink: Type = 00000001 DEAD, RemoteID = FFFFFFFF, ServerID =
91000100,
	CN=PRV-WWS-VALERIA.OU=SERVERS.OU=PRV.O=Novell.PRV-WWS-NDS
	Checked 1 external references
On line 01 we can see that there is an obituary for the object "CN=test.O=Novell. PRV-WWS-NDS".
On line 02, the "Type = 0001 DEAD" field designates a primary obituary of the type dead. This means that the "CN=test.O=Novell. PRV-WWS-NDS" object has been deleted.
On line 02, the "Flags = 0000" field designates how far through the notification process this primary obituary has advanced. In this case, the obituary has not advanced at all.
On line 03, there is another obituary value for the test object.
On line 04, the "Type = 0006 BACKLINK" designates that this value is a backlink obituary. (A backlink obituary is used as a notification list.)
On line 05, you can see at the end of the line the ServerID followed by the name of the server to be notified.
From this report, you can deduce that two servers have not been notified regarding the deletion of the "CN=test.O=Novell.PRV-WWS-NDS". To troubleshoot this case further, you would want to use DSTRACE to get error code information.
Security Equivalence Synchronization
This operation allows synchronization of security equivalence attributes throughout the global tree. The operation walks the Directory tree and checks each object for an Equivalent To Me attribute and for the corresponding object referenced by this attribute for a Security Equals attribute. You must log in with rights to walk the Directory tree and read/validate Security Equals and Equivalent to Me attributes on all objects in the tree. You are given the option of logging in upon initiating this operation, unless you have already logged in using the "Log File and Login Configuration" option discussed above.
The Equivalent To Me attribute, used in optimizing security equivalence operations, was introduced in NetWare 4.1. This attribute is properly managed and synchronized with the Security Equals attribute on NetWare 4.1 servers, but NetWare 4.01 and 4.02 servers do not manage this attribute, and thus they must be synchronized manually.
Note: If the logged in user does not have rights to read both attributes, this option will first report that the attributes are out of sync and then will fail if an update is requested.
Upon logging in to the server as the Admin user, two "Scan Equivalence" options are given. These options control how DSREPAIR security equivalence synchronization will be done. These options and their defaults are as follows:
Prompt Before Adding Equivalent To Me? Yes. When set to "Yes", DSREPAIR forces a prompt before adding the Equivalent To Me attribute. It also requires a prompt when an object's Security Equals attribute contains equivalence to another object, and that other object does not have this object in its Equivalent To Me attribute. You must then decide to update the Equivalent To Me attribute on the other object, delete the Security Equals attribute on this object, or do nothing. When set to "No", DSREPAIR assumes the Security Equals attribute to be correct and updates the Equivalent To Me attribute on the other object to contain this object.
Prompt Before Adding Security Equals? No. When set to "Yes", DSREPAIR forces a prompt before adding the Security Equals attribute. It also requires a prompt when an object's Equivalent To Me attribute contains equivalence to another object, and that other object does not have this object in its Security Equals attribute. You must then decide to update the Security Equals attribute on the other object, delete the Equivalent To Me attribute on this object, or do nothing. When set to "No", DSREPAIR assumes the Equivalent To Me attribute to be correct and updates the Security Equals attribute on the other object to contain this object.
DSREPAIR displays the results of these operations and stores them in the log file, if the file is active.
Global Schema Operations
The Directory Services operational (base) schema for NetWare 4.1 has been extended to allow for new services. When you create a NetWare 4.1 tree, it loads the new operational schema. Also, installing the first NetWare 4.1 server into an existing NDS tree loads the new operational schema into the tree. When NetWare 4.01 and 4.02 servers are updated to NetWare 4.1, the schema updates automatically. Loading the new operational schema does not affect any user-defined schema. However, if a server does not have the new schema, it may not synchronize properly. This option provides functions to update the schema in the tree.
The "Global Schema Operation" provides an option to update the schema on all servers in the tree or on only the root server. In addition it allows you to import remote schema.
Update All Servers' Schema. This operation updates the schema on all servers in the Directory tree. Use this option to update the schema on NetWare 4.0x servers in a NetWare 4.1 tree. If a NetWare 4.0x server is updated to NetWare 4.1, it automatically receives the 4.1 schema. Other NetWare 4.0x servers in the tree may not receive the updated schema information. This may result in No Such Attribute (-603) and No Such Class (-604) errors during synchronization.
Update the Root Server Only. This operation updates only the schema on the server that contains the Master replica of the [Root] partition.
Import Remote Schema. This operation allows the server to obtain the schema from a remote tree. It is a good idea to rebuild the operational schema on the Master of the [Root] partition for both trees before running this option. After selecting this option you will be asked to select the remote tree. After selecting the remote tree this option will extend the schema of the current tree to the same level as the remote or target tree. This operation is primarily used when performing a tree merge with DSMERGE.
DSREPAIR displays the results of these operations and stores them in the log file, if the file is active.
View/Edit DSREPAIR Log File
This is the same option as in the DSREPAIR "Main" options menu. It allows you to view the DSREPAIR log file. The default location of the file is
SYS:SYSTEM\DSREPAIR.LOG
When DSREPAIR is loaded, the log file becomes active and the results of the operations performed by DSREPAIR are appended to it. Thus, the file size grows with each repair operation. The log file size is displayed in parentheses at the end of the log file title line.
You can turn the log file off, turn it on again, change the name to write to any local DOS or NetWare Volume, or delete the file by using the "Log File Configuration" option in the "Advanced Options Menu".
Create a Database Dump File
This feature allows you to copy the Directory Services database files to disk in compressed format to be used for off-line diagnostics and repairs. Creating a dump file will record the state of the database, which can be useful in troubleshooting.
Upon selecting this option, you are asked to enter the path name for the dump file, with the default as
SYS:SYSTEM\DSREPAIR.DIB
The dump file can only be written to a NetWare volume, not to a DOS drive. If the file already exists, you are given the options to overwrite the existing file or enter a different file name.
Summary
This version of DSREPAIR offers an efficient means of checking for and correcting many NDS database problems that may arise, and provides an easy-to-use means of maintaining the health of individual servers.
* Originally published in Novell AppNotes
Disclaimer
The origin of this information may be internal or external to Novell. While Novell makes all reasonable efforts to verify this information, Novell does not make explicit or implied claims to its validity.