Installing NetWare Client 32 for Windows 95
Articles and Tips: article
Consultant
Novell Consulting Services
KEVIN RHODES
Technical Writer
NetWare Client Engineering
01 Nov 1996
Provides instructions for various methods of installing Client 32
- Introduction
- Obtaining NetWare Client 32 for Windows 95
- Installing Client 32 Over the MS NetWare Client
- Upgrading from VLMs to NetWare Client 32
- Supporting Microsoft's Peer-to-Peer Services
- Installing Windows 95 and NetWare Client 32 Using MSBATCH
- Installation Issues
Introduction
NetWare Client 32 for Windows 95 features an improved installation process that allows easy initial installations as well as upgrades of previous NetWare client software. For example, the Windows 95-based SETUP.EXE program auto-detects previously loaded LAN drivers and configures the updated software to match the detected settings. Client 32 also supports a "hands-off" scripted installation of Windows 95 and NetWare Client 32 using Microsoft's MSBATCH process.
This AppNote covers the following aspects of installing NetWare Client 32 for Windows 95:
How to obtain the NetWare Client 32 for Windows 95 software and prepare for installations using SETUP.EXE
Examples of installing Client 32 for Windows 95 on a computer running the MS NetWare Client, and of upgrading from the NetWare DOS Requester (VLM) to NetWare Client 32
Enabling support for Microsoft's peer-to-peer services in Windows 95
How to install Windows 95 and the NetWare Client 32 software on a NetWare server to allow a "hands-off" installation of both products at the same time using Microsoft's MSBATCH process
Installation-related issues such as selecting a LAN driver, using third-party LAN drivers, and uninstalling NetWare Client 32
The AppNote entitled "Upgrading Windows 95 Workstations with Automatic Client Upgrade (ACU)" in this issuedescribes how to use Novell's Automatic Client Upgrade process to automate updates to the NetWare Client 32 software.
Obtaining NetWare Client 32 for Windows 95
You can install NetWare Client 32 for Windows 95 from diskettes, from CD-ROM, from a local hard disk, or from a NetWare server. The files needed to install NetWare Client 32 are provided as part of Novell's IntranetWare product (included on the NetWare 4.11 Operating System CD-ROM) and on various other CD-ROMs Novell has distributed. They are also generally available as downloadable files from the sources listed below.
Downloading Client 32 for Windows 95
The downloadable version of NetWare Client 32 for Windows 95 is contained in one of two self-extracting files: one for the diskette version, and one for the version that can be installed from a NetWare server or local hard drive. The latest version is available in English, French, Italian, German, Spanish, and Portuguese.
|
Note: You should also download any patches and updates that are available for Client 32.As of this writing, the latest version of NetWare Client 32 for Windows 95 is v2.11,dated 10-18-96. The is the same version of Client 32 that ships with IntranetWareand NetWare 4.11, with all previous patches incorporated into it. However, youshould periodically check for new patches that become available. |
From the Novell Support Connection Home Page. As of this writing, you can find NetWare Client 32 for Windows 95 on the World Wide Web by setting your Web browser to the following URL (as always, the location of files online is subject to change):
From here, click on Product Support, then on Client 32 for Windows 95, then on File Updates to see a list of available files. Click on the appropriate filename to download the file.
From the Novell FTP Server. The Client 32 for Windows 95 software can also be downloaded by anonymous ftp from Novell's FTP server on the Internet. The path is:
ftp.novell.com: /pub/updates/nwos/nwc32211
From NetWire on CompuServe. To access the NetWare Client 32 for Windows 95 software on CompuServe, type GO NWCLIENT at any CompuServe prompt. Select "Download NW Client 32 for Windows 95" to download the software, along with any patches and updates.
Extracting the Files
The files needed to install NetWare Client 32 for Windows 95 from a NetWare server or local hard disk are contained in the network installation version of the compressed file. After downloading this file, copy it to a directory named \C32W95 (or another name of your choice) on a NetWare server or on a local hard drive. To extract the Client 32 files, go to the directory you copied the self-extracting file to and type the name of the file. As the file decompresses, it creates a full subdirectory structure that should resemble the following:
C32W95 (or whatever name you gave the parent directory)

  ENGLISH

  BATCH

  DIAGTOOL

  NMS

POLICIES
|
Note: The default language of English is used in the examples throughout this AppNote. Ifyou are installing another language version of Client 32, substitute the appropriatelanguage subdirectory name in place of \ENGLISH or \IBM_ENU. |
The NetWare Client 32 SETUP.EXE program does not support long file or directory names, nor does it support the use of spaces in directory names. The directory that contains the SETUP.EXE program, and all parent and child directories, must conform to the standard DOS 11 character (8.3) naming convention.
|
Note: This restriction to use the 8.3 naming convention applies only to the SETUP.EXEinstallation program, not to the NetWare Client 32 product itself. Client 32 forWindows 95 fully supports long file and directory names. |
You should also extract any patch files you downloaded and follow the instructions provided with the patch to copy new or updated files into the appropriate subdirectories. If you have NetWare 3.11 and 4.1 servers on your network, be sure to load the server patches that are included with Client 32.
To support long filenames, NetWare 4.11 servers need to have LONG.NAM loaded. In addition, each volume needs to have LONG.NAM added to it. The NetWare 4.11 installation procedure places the LONG.NAM file in the SYS:SYSTEM directory and automatically loads this name space.
|
Client 32 Requirements Before you install NetWare Client 32 for Windows 95, ensure thatyour workstations meet the following hardware and software requirements: |
A 386 processor or higher
MS Windows 95
A harddisk with 6MB of available storage space
A network board installed
A VGA or better graphics board and monitor
A minimum of 6MB of memory (you should plan on at least 16MB to run Windows 95 efficiently)
For previous versions of NetWare, use the OS/2 name space (OS2.NAM) instead of LONG.NAM. Instructions for loading this name space and the required server patches for NetWare 4.1 and NetWare 3.11 can be found in the Client 32 README.TXT file.
Be aware that each name space added to a volume requires additional server memory. If you add name space support to a volume and the server does not have enough memory, that volume cannot be mounted. For information about how to calculate the memory required for name space support, see Supervising the Network (for NetWare 4.x) or System Administration (for NetWare 3.x). Each name space also uses up to 252KB of disk space.
Making Floppy Diskettes
If you downloaded the diskette version of Client 32, upon extraction the compressed file will create the files you need to make your own NetWare Client 32 for Windows 95 installation diskettes. You will need seven blank, formatted diskettes. To create the diskettes, go to the directory where you extracted the Client 32 files, such as C:\CLIENTS\C32W95, and type MAKEDISK <Enter<. Follow the onscreen prompts to insert and label the diskettes. (The compressed files require at least 512KB of available memory in a DOS box to extract properly.)
The IntranetWare INSTALL.BAT program on the NetWare 4.11 Operating System CD-ROM provides a menu-driven facility for creating these diskettes. Insert the CD-ROM and run INSTALL.BAT. After selecting the language and reading the license agreement, choose "Diskette Creation" and then choose "NetWare Client 32 for Windows 95." Follow the prompts to create a set of installation diskettes.
Starting the SETUP Program
The procedure for starting the SETUP.EXE installation program varies depending on whether you are running it from diskettes, from a local disk or network drive, or from a CD-ROM.
From Floppy Diskettes. To run the Client 32 installation program from the floppy diskettes, place the diskette labeled "Disk 1 - Setup" into drive A. From within Windows 95, choose Start | Run, and enter A:\SETUP.EXE. You can then follow the steps given in the first example below for a network server-based installation. The main difference is that you will be prompted throughout the procedure to insert the required diskettes.
From a Local Disk or Network Drive. The Client 32 SETUP.EXE program is located in the \ENGLISH subdirectory under the directory in which you extracted the Client 32 for Windows 95 files. For example, if you extracted the files in SYS:PUBLIC\CLIENTS\C32W95, change to the \ENGLISHsubdirectory and type SETUP <Enter< to run the Client 32 installation program. Then follow the steps given in the first example below to complete the installation procedure.
From the NetWare 4.11 CD-ROM. You can run the Client 32 SETUP.EXE program from the IntranetWare INSTALL.BAT program on the NetWare 4.11 Operating System CD-ROM. On a Windows 95 workstation, insert the CD-ROM and run INSTALL.BAT. After selecting the language and reading the license agreement, choose "Client Installation" and then select "NetWare Client 32 for Windows 95" to launch the Client 32 SETUP.EXE program. (If you prefer to run SETUP.EXE directly, you will find the program in the \PRODUCTS\WIN95\IBM_ENU subdirectory on the CD-ROM.) Follow the steps given in the example below to complete the installation procedure.
Installing Client 32 Over the MS NetWare Client
|
The Microsoft Client for NetWare that came on the initial release of the Windows 95 CD-ROM does not support NDS connections to a NetWare 4 Directory tree. You must apply Service Pack 1 from Microsoft in order to enable NDS connections. To gain full benefit from a NetWare connection, Novell recommends the use of Client 32. See Appendix A for feature comparison of the MS Clientfor NetWare and NetWare Client 32 for Windows 95. |
This section gives an example of how to install NetWare Client 32 for Windows 95 on a machine that already has Windows 95 installed with the Microsoft Client for NetWare Networks option enabled. These steps assume you have already obtained the NetWare Client for Windows 95 software and followed the preparatory procedures described above, including applying any patches that are available. They also assume you will be running SETUP.EXE from a NetWare server. (Once you start the SETUP program, the procedure is very similar whether you are running it from a server, from a local hard disk, or from a CD-ROM. If you run the program from diskettes, you will be prompted to insert the required diskettes throughout the procedure.)
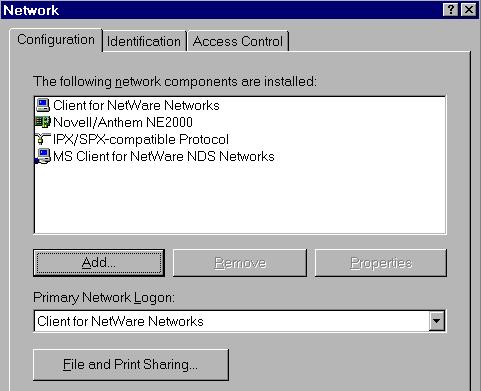
Start Windows 95 on the PC you want to install NetWare Client 32 on. Verify that Microsoft's NetWare client is loaded by right-clicking on Network Neighborhood and then selecting Properties. "Client for NetWare Networks" should be listed as an installed network component, as shown in the sample screen below.
Note: By default, the MS Client for NetWare Networks uses an NDIS 3.1 LAN driver. The Client 32 SETUP program will detect the existingMicrosoft client configuration and apply those settings to the Novell Client 32 configuration. If you want to change from the installed NDIS driver to an ODI driver, you will have to complete some additional steps after Client 32 is installed. (See the section on "Selecting a LANDriver" in this AppNote for more information on whattype of driver to choose.)
The Client 32 SETUP program will completely remove the MS Client for NetWare Networks. Once you have verified that the Microsoft Client for NetWare is installed, click on OK.
Start the NetWare Client 32 for Windows 95 SETUP.EXE program. Follow the instructions given under "Starting the SETUP Program" above for the type of installation you are running.
This example assumes you are running SETUP from a NetWare server the workstation is connected to through the MS Client for NetWare. Drive H is mapped to the SYS:PUBLIC directory on that server.
To start SETUP in this example, click on the Windows 95 Start button and select Run. Type in the full directory path to where the Client 32 installation files were copied. The SETUP.EXE file is in the \ENGLISH subdirectory:
H:/PUBLIC/CLIENT/C32W95/ENGLISH/SETUP.EXE
Press <Enter< or click on OK to continue.
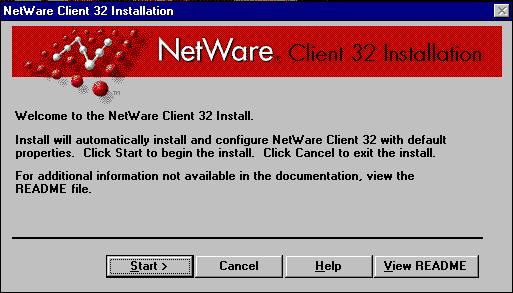
After you consent to the license agreement, the NetWare Client 32 Installation welcome dialog is displayed, as shown below.
Note: You only need to run SETUP once to initially install the NetWare Client32 for Windows 95 files, to replace the NWSETUP.INF file that ships with Windows 95 with the NWSETUP.INF from Novell that contains the Client 32 option. After that, you can change or update the Novell client through the Control Panel | Network interface, or through the Automatic Client Update method, without having to re-runSETUP.
Click on the Start > button to begin the installation process. While SETUP removes the existing client information from the Registry database and adds the new NetWare Client 32 keys to the Registry, several screens similar to the one shown below are displayed:

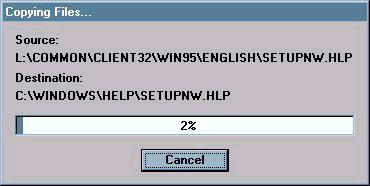
Next, the necessary Client 32 files are copied to the C:\NOVELL\CLIENT32 directory and subdirectories. A window similar to the one shown below displays the progress:
The SETUP program will also copy new *.INF and NWSETUP.DLL files for Client 32. You will see a dialog generated by Windows 95 that says:
Please wait while Windows builds the driver information database.
This process is necessary for Windows 95 to rebuild the index to include the Novell INF files that SETUP just copied to the workstation.
SETUP also copies some Windows 95 support files to the C:\WINDOWSand C:\WINDOWS\SYSTEM directories. If the needed Windows 95 Cabinet (*.CAB) files are not already found on the local drive or in a local directory, SETUP will prompt you for the location of these files. Type thedirectory path to where the .CAB files are located and click OK.
Once the Registry keys have been updated and all files have been copied over correctly, you will see the following dialog:
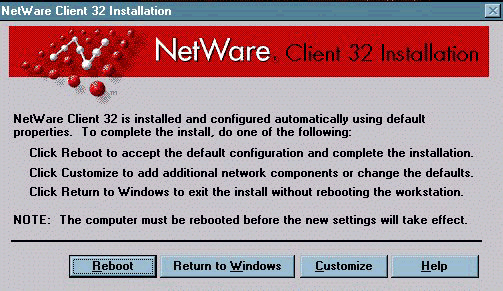
At this point, you can choose to accept the Client 32 defaults, make changes to the default settings, or exit the SETUP program without rebooting the workstation. In most cases, you will want to set a preferred NDS tree/context or NetWare server for the workstation. To do this,click on Customize.
SETUP automatically launches the Control Panel | Network window with the "Configuration" tab active, as shown below:
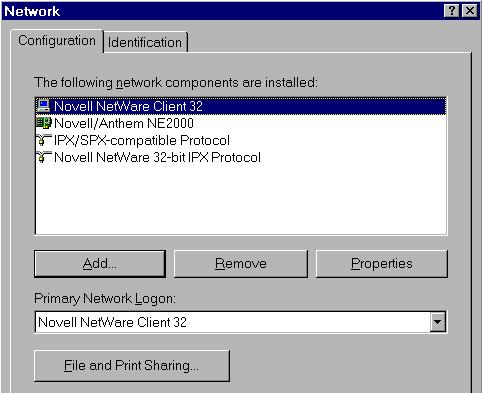
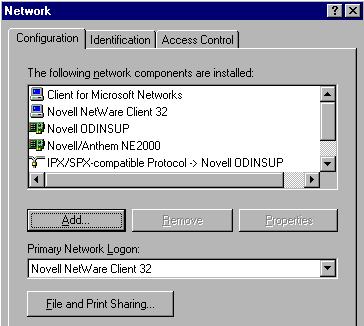
If the Client 32 installation was successful, "Novell NetWare Client 32"and "Novell NetWare 32-bit IPX Protocol" should be listed as installed components. "Novell NetWare Client 32" should also be displayed as the active component in the Primary Network Logon box.
Note that the Microsoft "IPX/SPX-compatible Protocol" remains configured. Do not remove this protocol; it is required when using NetWare Client 32 with either NDIS or ODI drivers.
To make basic Client 32 settings, highlight "Novell NetWare Client 32" in the list of network components and click on the Properties button. You will see a dialog box similar to the following:
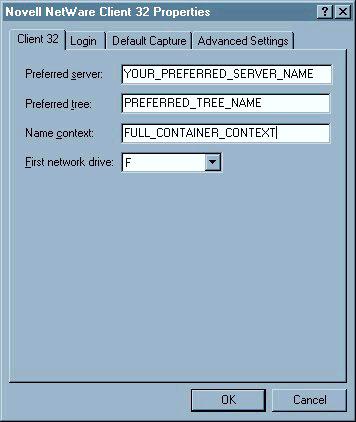
Type in the appropriate settings for each entry on the Client 32 property sheet, according to the following guidelines:
Preferred server is optional for NetWare 4. You can either leave it blank or type the name of the server this workstation uses most frequently.
Preferred tree and name context are usually required for NetWare 4 networks. Enter the appropriate names for this workstation.
You might want to change the first network drive setting if the workstation has a hardware configuration with extra DOS partitions or CD-ROM drives that take up drive letters past the network default of F.
Settings found in the Login, Default Capture, and Advanced Settings property sheets are described elsewhere in this issue.
When you are finished, click on OK to return to the main configuration screen.
At the main network configuration screen, click on OK to complete the installation process. Once the driver information database is rebuilt, you will see the following prompt:

Click on Yes to restart the machine with the Novell Client 32 software installed.
Once the restart completes, you should see the Novell Client 32 logo flash on the screen as the NetWare Provider loads. After the Provider and other Client 32 modules load and the workstation connects to the specified NDS tree or NetWare server, the GUI Login window is displayed so you can log in. See the AppNote "Accessing the Network with the GUI Login Utility and the NetWare Provider" in this issue for additional information on logging in.
Upgrading from VLMs to NetWare Client 32
This next installation example describes the process of upgrading a workstation running the NetWare DOS Requester (VLM) software to NetWare Client 32 for Windows 95. It also shows how to switch from a 16-bit ODI LAN driver to a 32-bit ODI Server (.LAN) driver.
These instructions assume you have the VLMs successfully installed on the Windows 95 workstation through the Novell-recommended procedure. (See "Integrating the NetWare Client for DOS/MS Windows (VLMs) with Windows 95" in the October 1995 Novell Application Notes.)
The network adapter in this example is a Novell/Anthem NE2000 Ethernet board. The exact procedure may vary, depending on what type of adapter you have installed and how it is configured.
At the workstation running Windows 95 and the VLM client, log in (viathe LOGIN.EXE text utility) to a NetWare server that has a copy of the Client 32 installation files.
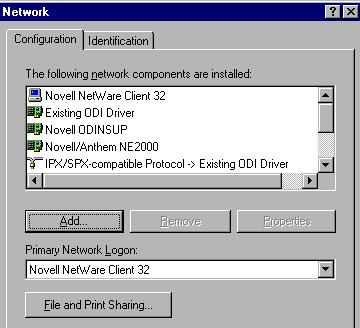
Start Windows 95. Right click on Network Neighborhood and select Properties from the resulting menu. Verify that "Novell NetWare(Workstation Shell 4.0 and above [VLM])" and "Existing ODI Driver"(the 16-bit LAN driver) are both listed as installed network components:
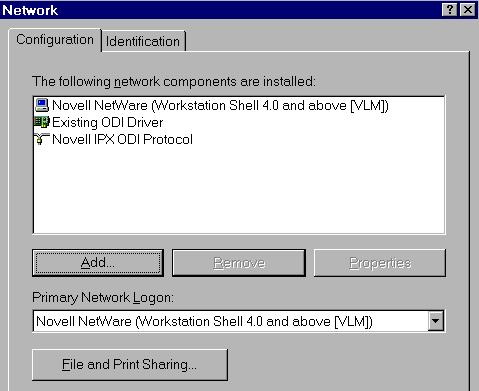
Note: Under this VLM configuration, Microsofts INF setup has installed the MS NetWare Provider for Network Neighborhood and other Windows95 modules.
Click on the Windows 95 Start button and select Run. Type the directory path to where the Client 32 installation files were copied. The SETUP.EXE file is in the \ENGLISH subdirectory. For example, if you have installed a network version of Client 32 for Windows 95 in the SYS:\PUBLIC\CLIENTS\C32W95 directory, type:
SYS:\PUBLIC\CLIENTS\C32W95\ENGLISH\SETUP.EXE
Another method is to click on the Browse... button and select each directory level one at a time until you see the SETUP icon. Double-click on that icon to return to the Run dialog box.
When the correct path and filename appear in the entry box, press<Enter< or click OK to continue.
After consenting to the NetWare Client 32 license agreement, click onthe Start > button in the Client 32 Installation welcome dialog box to begin the installation process. A Status window will indicate the program's progress as it removes the existing client (the VLMs) and adds the new one (Client 32).
Note: Depending on which network adapter is installed, you may see a Select Device screen and be asked to select the appropriate adapter and driver. Follow the screen prompts to complete this process. You may also be asked to indicate where the Windows 95 cabinet (.CAB)files are located. Type in the proper path to the files in the \WIN95directory or insert the requested Windows 95 diskette as prompted.
Once the Client 32 files are all copied, a window is displayed indicating that "NetWare Client 32 is installed and configured automatically using default properties." At the bottom are three choices: Reboot, Return to Windows, or Customize. Click on Customize.
At this point the Novell 32-bit client is still configured to run with the existing 16-bit ODI LAN driver. This is displayed as "Existing ODI driver" in the list of network components, as shown below:
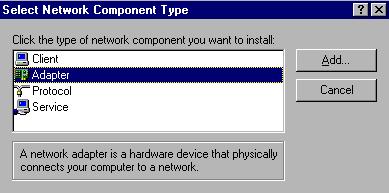
To keep from losing the network connection, you need to add the 32-bit driver before removing the existing 16-bit driver. Click on Add.
Highlight Adapter and click on Add, as shown below:
In the Select Network Adapters dialog box, choose the appropriate driver for you network board. For this example, the manufacturer is "Novell/Anthem" and the network adapter is "Novell/Anthem NE2000 (Novell)".

Note: The label "(Novell)" to the right of the network adapter name indicates an ODI driver, as opposed to "(Microsoft)" which means NDIS. Novell's 32-bit ODI drivers should be your first choice. Use an NDIS driver only if a 32-bit ODI driveris not available.
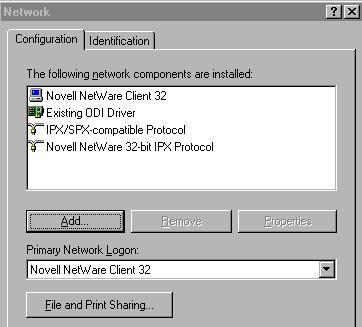
Click on OK. This will return you to the main network configuration window, which will look like the example below:
You can now remove the old 16-bit driver by highlighting "Existing ODI Driver" and clicking on Remove. Then click on OK.
Check to ensure that SETUP has correctly matched the hardware settings on the network adapter (interrupt, I/O address, and so on). To do this, highlight the added driver and click on Properties. The Resources page for the 32-bit ODI driver will be shown, as in the example below:
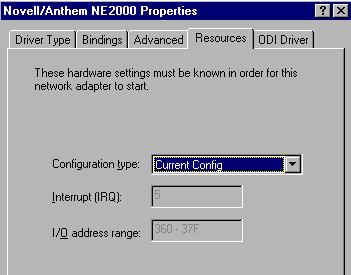
Make any necessary changes so that the settings displayed match those on the network adapter, then click on OK.
At this time you are instructed to restart the computer for the client and driver changes to take effect. In the System Settings Change dialog box,click on Yes for a restart.
The workstation is now configured to run NetWare Client 32 using the 32-bit Novell/Anthem NE2000 ODI driver.
Supporting Microsoft's Peer-to-Peer Services
Since Windows 95 provides built-in peer-to-peer services, you might want to access files on other Windows 95 workstations on the network. This section explains how to add support for Microsoft peer-to-peer services to a Client 32 configuration using the Novell ODINSUP shim.
If you have not already done so, log in via the Novell GUI login window that comes up when you start the computer.
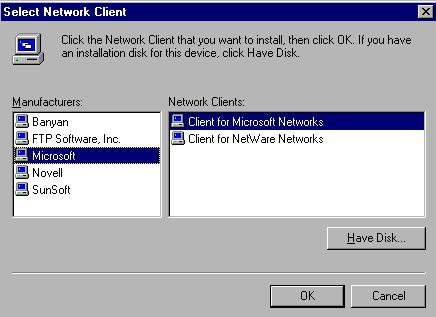
Right click on Network Neighborhood and select Properties. From the Network Configuration page, click on Add.
Highlight "Client" and click on Add. In the "Select Network Client"dialog, select "Microsoft" for Manufacturer and "Client for Microsoft Networks" for Network Client, as shown in the sample dialog below:
Click on the OK button to continue.
Note: If this is the first time you have done this procedure, Microsofts SETUP program will copy the SMB Redirector files from the Windows 95 CD-ROM or from the .CAB files that were copied to a network drive. Make sure you knowthe path to these files.
Click OK to leave the Network Configuration page. You will be promptedin the System Settings Change dialog to restart the machine. Click Yes.
After the computer reboots, you will be prompted to log in to NetWare as usual. You will then need to enter Microsoft networking information,including user name, password, and domain.
Confirm that your changes were made correctly by right-clicking on Network Neighborhood and selecting Properties. The Network Configuration page should look like the sample below:
Now, when you click on Network Neighborhood, you will be able to see both Novell (NCP) servers and Microsoft (SMB) servers, if you have configured your Microsoft network resources correctly. You can tell that the workstation is using a 32-bit ODI driver because the Novell ODINSUP shim is loaded. ODINSUP provides the interface between the ODI and NDIS layers when communicating with Microsoft servers.
|
Note: Do not remove Novell ODINSUP unless you know which network adapter it is boundto. If there is only one network adapter in use, removing Novell ODINSUP alsoremoves NetWare Client 32 for Windows 95. |
Installing Windows 95 and NetWare Client 32 Using MSBATCH
Microsoft provides a batch installation procedure for Windows 95 that runs according to a script contained in a file called MSBATCH.INF. Network administrators can use a customized version of this file to automate the installation and configuration of both Windows 95 and Client 32 on a workstation from a NetWare server. Setting up MSBATCH requires some preparation, but once that is done you can perform a "hands-off" installation on each workstation.
For NetWare Client 32, the MSBATCH installation process has two limitations that you should be aware of:
This procedure is designed for first-time installations of Windows 95 and Client 32. It will not work properly on a machine running NetWare Client32 for DOS/Windows that you now want to upgrade to Windows 95.
MSBATCH supports NDIS drivers only--it does not support Novell's ODI drivers. It will install and configure Client 32 to use an NDIS driver. Infact, the MSBATCH process will fail if you have a 32-bit ODI driver installed on the workstation. Make sure you have a 16-bit (real-mode)LAN driver installed before you run MSBATCH.
The Microsoft utilities you will need to prepare the Windows 95 and Client 32 files on a file server (NETSETUP.EXE and INFINST.EXE) are provided only on the Windows 95 CD-ROM, not on the diskettes. As of this writing, you can download these utilities from Microsoft's World Wide Web site (http://www.microsoft.com/).
To make it easier to follow the MSBATCH setup process, the overall procedure is divided into several sections, each containing a sequence of steps to be performed. We recommend that you read through each section completely as you progess through the setup procedure.
Preparing for an MSBATCH Setup
These instructions assume that you have two NetWare file servers installed:
The source server is the server on which you set up the custom network installation of Windows 95. For this example, the source server is named SRC1. It contains a copy of the Windows 95 cabinet (.CAB) files and the network tools found in the ADMIN directory and its subdirectories on theWindows 95 CD-ROM.
The destination server is the one on which you want to install the files necessary for the custom network installation of Windows 95. In our example, the server is named DEST1.
If you have NetWare Client 32 for Windows 95 on a CD-ROM, you can use that as the source for copying the Client 32 installation files. If not, you should copy the NetWare Client 32 files to a directory on the source server as directed below. The steps assume you have a CD-ROM in drive D.
Before you begin the setup procedure, copy the files and set up drive mappings as follows (substitute your own server names and drive letters):
MAP N:=SRC1\SYS:\CLIENT32\INSTALL (copy the NetWare Client 32 installation files here, or use CD-ROM)
MAP W:=SRC1\SYS:\WIN95 (copy the Windows 95 installation files here)
MAP K:=DEST1\SYS:\ (parent directory for the Windows 95 network setup files)
Configure Windows 95 Setup with NETSETUP.EXE
Start Windows 95. Run the NETSETUP program by choosing Start | Run and typing the directory path to NETSETUP.EXE in the entry box. In this example, the path is:
W:\WIN95\ADMIN\NETTOOLS\NETSETUP\NETSETUP.EXE
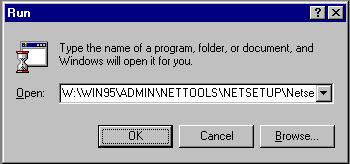
Click on OK to run the program.
In NETSETUP's Server Based Setup dialog box, select the destination for the network setup files by clicking on the Set Path... button. The path can be specified as a currently mapped network drive (K: in this example) or by using UNC naming as shown in the sample screen below:
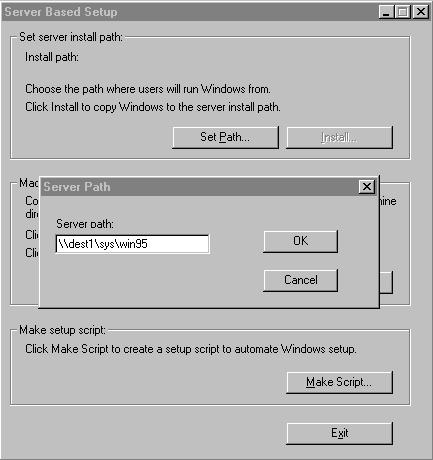
Once you have entered the path, click OK. (If this is the first time you are performing this procedure, click on OK when you are prompted to create the \WIN95subdirectory.)
This process doesn't require any modifications in the Machine directory setup or Make setup script sections of the dialog box. Click on the Install... button to proceed.
In the Source Path window, the "Install policy" section allows you to select where you want the shared files to be installed. For this example, select "Local hard drive" as shown below:
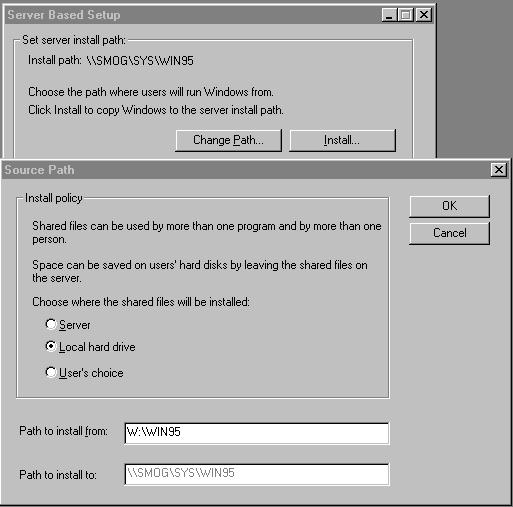
For "Path to install from" specify the location of the Windows 95 cabinet (.CAB) files. For this example it is W:\WIN95. Verify that the "Path to install too" is correct, and then click on OK.
In the Create Default Scripts dialog box, click "Don't Create Default."
In the Product Identification dialog box, click OK to bypass the product ID number.
A Copying Files windows shows the progress as the Windows 95 files are copied to DEST1. When the process has completed, click OK in the Server Based Setup dialog box.
Click on Exit to leave the NETSETUP program.
From a command prompt, go to the K:\WIN95 subdirectory on the destination server. Change the following INF files to Read/Write:
MSBATCH.INF INF\NETDEF.INF
You can do this using the NetWare FLAG command as follows:
FLAG filename+RW -RI -DI <Enter<
The MSBATCH.INF file will be replaced, and NETDEF.INFwill need to be modified later.
Copy the Client 32 Files to the Destination Server
Create a directory (such as K:\C32) on server DEST1 and copy the NetWare Client 32 for Windows 95 files from the CD-ROM (or from the directory on the source server) to this directory. Do not copy the *.INF files from the \PRODUCTS\ADM32\IBM_ENU\BATCH95\NLS\ENGLISH directory on the CD-ROM (or the \ADMIN directory on the server) at this time.
Note: If you use the NetWare INSTALL.BAT program on the NetWare 4.11 CD-ROM to install the NetWare Client 32 for Windows 95 files on a server, it does not create the \ADMIN directory on the server. You can use the Diskette Creation option and select "NetWare Administration Utility for Client 32" to copy the Client 32 administrationutilities to two floppy diskettes.
Rename or delete all of the Client 32 *.INF files in the K:\C32subdirectory.
Copy the following files from the \PRODUCTS\ADM32\<language<\ \BATCH95\NLS\<language<directory on the CD-ROM to the K:\C32 directory on the destination server:
NWCLIENT.INF NWTRANS.INF NWLAYOUT.INF NWIP.INF(if you want NetWare/IP support) NWSERV.INF(if you want SNMP support)
If you have NetWare Client 32 for Windows 95 v2.11 or earlier, you will need to copy the following updated files to K:\C32:
NWCLIENT.INF     9-20-96

     NWLAYOUT.INF    7-8-96 (8-21-96 for standalone setup)

     NWTRANS.INF     1-4-96

     LOCWIN16.DLL    8-29-96

NWSETUP.DLL     8-29-96
These updates are included in a file named W95UT1.EXE, which can be downloaded from the following locations:
NetWire on CompuServe: GO NWCLIENTS
WorldWide Web: http://support.novell.com/search
FTP: ftp.novell.com/pub/updates/nwos/nwc32211
Create the Custom MSBATCH.INF File with BATCH.EXE
In Windows 95, choose Start | Run and type the following in the entry box:
W:\WIN95\ADMIN\NETTOOLS\NETSETUP\BATCH.EXE
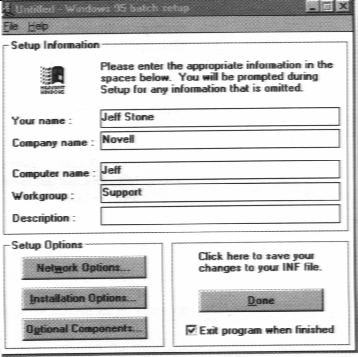
In the "Untitled - Windows 95 batch setup" window, fill in the Setup Information as shown below. If you want this to be an unattended install, enter general information in all of the fields.
Click on the Network Options... button. Remove all options, as shown in the sample screen below:
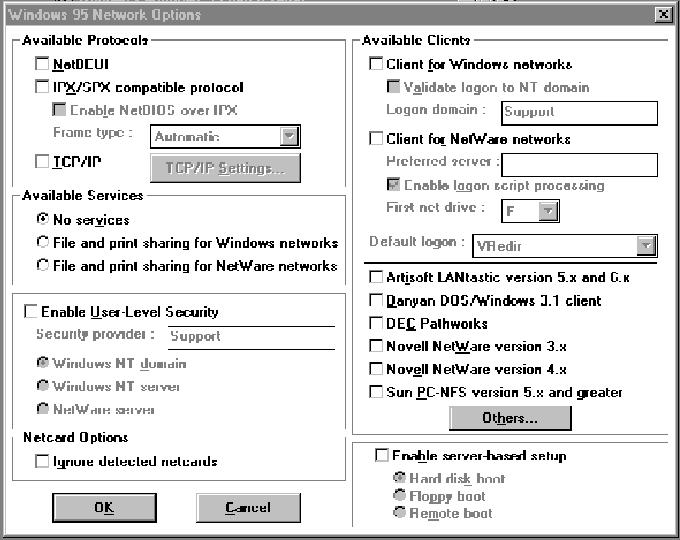
If you want to set up TCP/IP, check the TCP/IP entry in the Available Protocols section. Click on TCP/IP Settings... to configure TCP/IP andthen click OK.
A prompt similar to the following appears:

Answer "No" to this prompt.
In the "Untitled - Windows 95 batch setup" window, click on the Installation Options... button. The following dialog box appears:
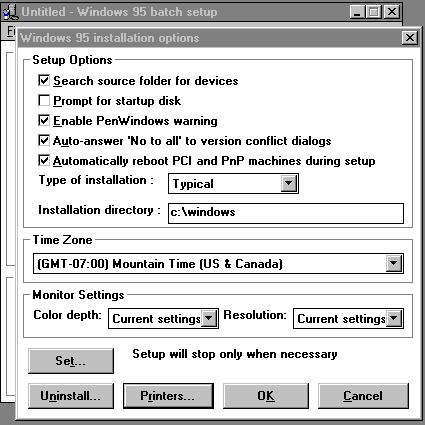
Modify the Setup Options as follows to keep users from having to provide input during the installation process:
Check all the options except "Prompt for startup disk".
Set the "Type of installation" to Typical.
Specify c:\windows as the "Installation directory".
Select your time zone.
Click on the Printers... button at the bottom of the window and choose "Don't prompt to install printers during setup". Then click on OK.
When all these selections have been made, click OK to exit the Windows 95 installation options window.
In the Windows 95 batch setup window, click on Done. You will be prompted to save the batch settings. Save the file as MSBATCH.INFin the K:\WIN95 directory on the destination server. Answer "Yes" to overwrite the MSTBATCH.INF file that already exists in that directory.
Add Client 32 to Windows 95 with INFINST.EXE
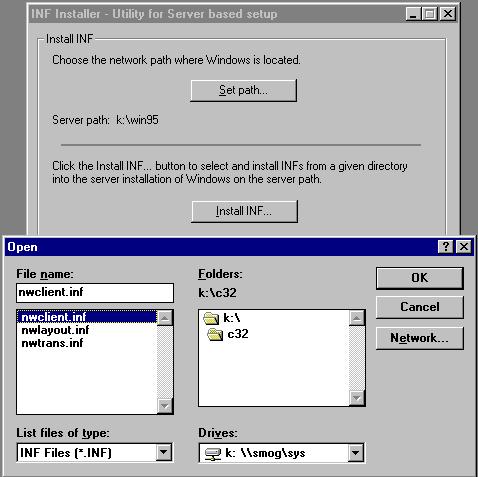
In Windows 95, start the INF Installer (INFINST.EXE) utility. This is found in the W:\WIN95\ADMIN\NETTOOLS\NETSETUP directory on the source server (as well as on the Windows 95 CD-ROM).
In the INF Installer dialog box, click on the Set path... button. In the Server Path entry box, type the directory where Windows 95 is located. In this example, it is K:\WIN95(on server DEST1).
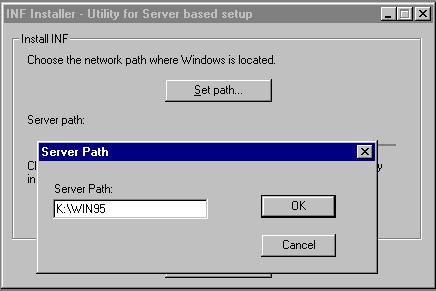
Click OK to continue.
Click on the Install INF... button. Choose the NWCLIENT.INF file that you copied to the K:\C32 directory on the destination server, as shown below. You must use the INF file that is in the directory containing the Client 32 files to be installed.
Once you select the file and click OK, INFINST will proceed to integrate Client 32 into the MSBATCH.INF file. During this process, a number of file copies will take place, which may take a few minutes. Here are some things to be aware of:
When you are prompted for the location of a file, provide either the\C32or \WIN95 directory on the destination server, whichever is appropriate. This will happen a number of times.
Do not keep the existing NETWARE.DRV file, even if it is newer than the NETWARE.DRV file that is shipped with Client 32. Answer "No" in response to the "Version Conflict" message (this message will appear several times).
If the computer appears to be "hung," be patient. It is normal to have periods of time in which it seems nothing is happening. The process will most likely finish normally.
When the process is finished, you will see the message "MSBATCH.INF file updated to integrate INF." Click OK to return to the Install INF window. Then click Exit to leave the program.
Review Client 32 Settings in the MSBATCH.INF File
With the Windows 95 Notepad utility, open the MSBATCH.INF file in the \WIN95 directory on the destination server to review the settings it contains. Following is a partial listing of the MSBATCH.INF file included with v2.11 of NetWare Client 32 for Windows 95. It contains sample settings for Client 32 and NetWare/IP. You can modify these for your own situation.
Sample MSBATCH.INF
; Contains parameters for the Novell NetWare Client 32

[NOVELL32]

PreferredServer=sample

PreferredTree=sample_tree

NameContext=sample.context

FirstNetworkDrive=F
                    ; Letter type

DisplayConnectionPage=off
                    ; ON or OFF
                    ; Display Connection Page on Graphical Login if set to on

DisplayScriptPage=off
                    ; ON or OFF

                    ; Display Script Page on Graphical Login if set to on

DisplayVariablePage=off
                    ; ON or OFF
                    ; Display Variable Page on Graphical Login if set to on

CacheWrites=off
                    ; ON or OFF

CloseBehindTicks=2
                    ; Valid range(0 - 65535)

DelayWrites=on
                    ; ON or OFF

FileCacheLevel=2
                    ; Valid range(0 - 4)

MaxCacheSize=2
                    ; Valid range(0 - 4294967295 KB)

OpportunisticLocking=off
                    ; ON or OFF

TrueCommit=on
                    ; ON or OFF

; Contains parameters for Novell NetWare/IP

[NWIP]

NwipDomainName=novell.com

NearestNwipServers=sample1,sample2,sample3
                    ; Up to 5 servers seperated by commas,
                        Nearest NetWare/IP Servers

PreferredDomainServers=sample10,sample11
                    ; Up to 5 servers seperated by commas,
                        Preferred Domain SAP/RIP servers

RetriesToDSS=1
                    ; Valid Range(0-10)
                        Retries to DSS during startup

TimeBetweenRetries=10
                    ; Valid Range(5-60)
                        Number of Seconds between retries

NSQBroadcast=on
                    ; ON or OFF
                    ; Broadcast SAP nearest
                        server queries to network
Modify the NETDEF.INF File
Depending on which version of Client 32 you have, you may need to make changes to the NETDEF.INF file. This file is found in both the K:\WIN95and K:\WIN95\SUWIN directories. If the following lines exist in the file, comment them out by placing a semicolon ( ; ) in front of them:
;;;;;; NOVELL Directory Services VLM 4.x ;;;;;;;;

; [VLM]

; detection0=custom_dll

; detection_dll=NETOS.DLL

; detection_call=NW_IsNDSinUse

; full_install0=prevent
Installing Windows 95 and NetWare Client 32
You are now ready to install Windows 95 and the NetWare Client 32 for Windows 95 from the server. To do this, run SETUP.EXE from the \WIN95subdirectory, using the following syntax:
SETUP /IW K:\WIN95\MSBATCH.INF
The /IW option (in capital letters) to the SETUP.EXE command line is added to avoid having Windows 95 query for acceptance of the license agreement. Again, keep in mind that the MSBATCH process installs 32-bit NDIS drivers, not ODI drivers. To add ODI drivers later, you can run the Client 32 SETUP program, use the Automated Client Upgrade method, or add the driver manually through the Network | Control Panel interface.
Installation Issues
This section discusses some of the more common questions and issues you may encounter when installing NetWare Client 32 for Windows 95.
Selecting a LAN Driver
With all of the LAN driver choices available for Client 32, it can be confusing to decide which type of driver to use. Novell's general recommendation is:
Use a 32-bit ODI driver whenever possible.
The best choice is to use one of the C-based 32-bit LAN drivers written specifically for Client 32. All of the changes and added functionality that Novell plans to integrate into Client 32 will be implemented in the C-based LAN drivers. Until more C-based LAN drivers become available, you can use many of the assembly-based *.LAN drivers that are already available for use in NetWare servers. But remember, not all of these will work with NIOS. Even if you have a 16-bit board in your workstation, you can still take advantage of a 32-bit LAN driver. Internally, all 386-based machines can execute the two-word code of 32-bit drivers, and it runs faster than one-word code. Thus even 16-bit network boards can see a performance increase running 32-bit drivers. (Of course, as the processed data is prepared to be sent out over the wire, it is encapsulated into data packets whose physical size is determined by the network protocol.)
Use an NDIS 3.1 driver if it is available.
The number of 32-bit ODI drivers is increasing, but there are still many network adapters for which no such drivers are available. A common example is PCMCIA adapters. In this situation you should use one ofthe NDIS drivers provided with Windows 95. You'll also need the VMLID shim.
Use an existing 16-bit ODI driver.
If no 32-bit ODI or NDIS drivers are available for your network adapter,your last option is to use one of the existing 16-bit ODI drivers from previous NetWare client software. You'll also need the PC32MLID shim.
Here is a list of network boards supported by Client 32, as of the latest released version. (This list may change slightly from one release to the next.) Note that, for LAN drivers written by Novell, the 32-bit C-based versions of the LAN drivers usually have a filename beginning with "C"--for example, CNE2000.LAN is the C-based version of the NE2000.LAN server driver.
|
16-bit LAN Driver
|
Board(s)
|
|
NE2.COM |
Novell/Eagle NE/2 |
|
NE2_32.COM |
Novell/Eagle NE/2-32 |
|
NE1000.COM |
Novell/Eagle NE1000 |
|
NE1500T.COM |
Novell Ethernet NE1500T |
|
NE2000.COM |
Novell/Eagle/Microdyne NE2000, National Semiconductor NE2000 InfoMover |
|
NE2100.COM |
Novell Ethernet NE2100 |
|
NE3200.COM |
Novell/Eagle/Microdyne NE3200, Intel EtherExpress32 |
|
PCIMLID.COM |
Accton EN1203 PCI Ethernet, Accton EN1207(-TX) PCI Fast Ethernet |
|
MPX2PNP.COM |
Accton EN166X MPX-Series Ethernet |
|
PCMMLID.COM |
Accton EN2218 Ethernet+Modem/Fax Adapter |
|
E22ODI.COM |
Cabletron Systems Ethernet E22 |
|
F70ODI.COM |
Cabletron Systems FDDI F70 |
|
DE22X.COM |
D-Link DE-220 Family |
|
DLKPCI.COM |
D-Link PCI Ethernet |
|
HPFEODIM.COM |
Hewlett-Packard 10/100VG Bus Master LAN Adapter |
|
E100BODI.COM |
Intel EtherExpress PRO/100 LAN Adapter |
|
NTR2000.COM |
Novell/Microdyne NTR2000 Token-Ring Adapter, IBM Token-Ring Network |
|
LANSUP.COM |
ODI Module for the IBM LAN Support Program |
|
MADGEODI.COM |
Madge Smart 16/4 Ringnode Adapter |
|
OCE2XODI.COM |
Olicom OC-2231 Ethernet PCMCIA Card |
|
OCTOK16.COM |
Olicom Token-Ring PCI 16/4 Adapter |
|
ILANPCI.COM |
Racal InterLan PCI Ethernet MLID |
|
NI6510.COM |
Racal InterLan XLerator/EB/NI6510 Ethernet MLID |
|
SMC8000.COM |
SMC Ethernet LAN Adapter |
|
SMC8100.COM |
SMC TokenCard Elite Family Adapter |
|
SMC9232.COM |
SMC Ether100 Ethernet and Fast Ethernet EISA Adapter |
|
SMCPWR.COM |
SMC 8432/8434/9332 PCI Adapter |
|
TCTOKSH.COM |
Thomas-Conrad TC4035/TC4045/TC4046 Adapters |
|
TC4048SH.COM |
Thomas-Conrad TC4048 Adapter |
|
TCVG45.COM |
Thomas-Conrad VG45 ISA Adapter |
|
TCVG47.COM |
Thomas-Conrad VG47 EISA Adapter |
|
XPSODI.COM |
Xircom Performance Series |
|
TRXNET.COM |
Novell RX-Net/RX-Net II, RX-Net/2 |
|
32-bit LAN Driver
|
Board(s)
|
|
CNE2.LAN |
Novell/Eagle NE/2 |
|
CNE2_32.LAN |
Novell/Eagle NE/2-32 |
|
NE1000.LAN |
Novell/Eagle NE1000 |
|
CNE1500T.LAN |
Novell Ethernet NE1500T |
|
CNE2000.LAN |
Novell/Eagle/Microdyne NE2000, National Semiconductor NE2000 InfoMover,IBM Ethernet Credit Card Adapter II |
|
CNE2100.LAN |
Novell Ethernet NE2100 |
|
CNE3200.LAN |
Novell/Eagle/Microdyne NE3200, Intel EtherExpress32 |
|
CNTR2000.LAN |
Novell/Microdyne NTR2000 Token-Ring Adapter |
|
PCI40.LAN |
Accton EN1203, EN1207 PCI Series Ethernet (960111) |
|
ACC41.LAN |
Accton EN166X PnP Adapter |
|
NE100SP.LAN |
Microdyne NE10/100SP Ethernet Adapter |
|
OCTOK162.LAN |
Olicom 16 bit Token-Ring Adapters (ISA adapter in EISA bus)Olicom 16 bit Token-Ring and Token-Ring PCI Adapters |
Using Third-Party LAN Drivers
If you have a LAN driver for your network adapter that is newer than the one included in the current release of Client 32, you can install the driver during Client 32 setup. You can also update the driver after Client 32 is installed. To be able to select a third-party ODI LAN driver (from a vendor other than Novell) during the Client 32 SETUP program, do the following:
Before you run the Client 32 SETUP program, copy the driver and its accompanying .LDI or .INS file to the \ENGLISH subdirectory (or the installation subdirectory you created).
Open the cour file in a text editor.
Search for the .INF file that corresponds to the LAN driver you want touse. The .INF files for third-party LAN drivers are named ODI xxxx.INF, where "xxxx" is the manufacturer of the network adapter; for example, ODI3COM.INF.
Delete the semicolon at the front of the line.
Save your changes and exit the text editor.
Run the Client 32 SETUP program.
To update a LAN driver after Client 32 has been installed:
Do either of the following:
For 32-bit (*.LAN) drivers, copy the new driver and its .LDI file to the NOVELL\CLIENT32 directory on the workstation.
For a 16-bit(*.COM) driver, copy the new driver and its.INS file to the NOVELL\NWCLIENT directory on the workstation.
Complete Steps 2 through 6 above.
Uninstalling NetWare Client 32
|
For more information about the Client 32 unistall utility, see TID 2910349, "Client 32 for Win 95 Uninstall Summary". TIDs are available on Novell's Web site(www.novell.com), on the ftp server(ftp.novell.com), on the NetWire section of CompuServe, and on the Novell Support Connection (formerly NSEPro)CD-ROM. |
The Uninstall Client 32 (UNC32.EXE) utility is the preferred method for removing Client 32 from a Windows 95 workstation. This utility is available in the W95UT1.EXE update file. When this file is self-extracted, the files necessary to run Uninstall are placed in an \UNINSTAL subdirectory. You must copy these files to a local directory on the Windows 95 workstation. Uninstall will not run properly from a NetWare server. Once you have copied the Uninstall files to a local drive, start Windows 95. Choose Start | Run, and then type the path to the UNC32.EXE file. For example:
C:\NOVELL\CLIENT32\UNINSTAL\UNC32.EXE
The utility's opening screen gives you the option to remove the Novell 32-bit ODI driver as part of the uninstall process. If you want to do this, check the box next to "Remove Novell 32-bit ODI Adapter". Then click Continue.
The status window displays the program's progress as the existing client (Client 32) is removed. Windows 95 will have to rebuild the driver information database several times during the course of this procedure. When the uninstall completes successfully, you will see the message "NetWare Client 32 is now uninstalled from your system." You will need to reboot the computer for the changes to take effect.
|
Note: If you re-install Windows 95 on a machine that contains NetWare Client 32 forWindows 95, Client 32 will no longer work. When you restart the computer, theNovell splash screen will appear but no login window displays. The Network ControlPanel will indicate that the Novell Client is still installed. This situation can beremedied by removing all components in the Network Control Panel, saving thechanges, and then re-installing NetWare Client 32. |
Additional Client 32 Installation Help
There are a number of other issues that might arise when you are installing NetWare Client 32 for Windows 95. We recommend that you read the README.TXT file that comes with Client 32 and the Frequently Asked Questions (FAQ) list for NetWare Client 32 for Windows 95. This, along with several other pertinent FAQs, can be found on the World Wide Web at the following URL:
* Originally published in Novell AppNotes
Disclaimer
The origin of this information may be internal or external to Novell. While Novell makes all reasonable efforts to verify this information, Novell does not make explicit or implied claims to its validity.