Extending ManageWise for the Challenges of the Enterprise
Articles and Tips: article
Consultant
Novell Consulting - Asia Pacific
STELLA ELLIOT
Senior Consultant
Novell Consulting
01 Jul 1996
In a large, heterogeneous enterprise, network management often requires the integration of Novell's ManageWise with an enterprise management system. This AppNote shows you how to use the NetWare Management Agents 2.1 (included as part of ManageWise 2.0), with the least amount of network overhead and the maximum security, reliability, and fault tolerance. It explains how to configure the ManageWise Export Services to allow information gathered by ManageWise to be exported to popular enterprise management platforms: HP's OpenView, IBM's SystemView for AIX, and Sun's SunNet Manager. It also tells where you can get copies of the NetWare MIBs for these platforms and how to load and parse these MIBs.
- Introduction
- ManageWise Overview
- Manually Scoping the Network
- ManageWise Export Services
- The NetWare Management Agent
- System Requirements
- HP OpenView Net Node Manager
- IBM SystemView for AIX
- Using SunNet Manager Console to Manage NetWare Servers
- Summary
- Glossary of Terms
Introduction
In today's heterogeneous networking environment, it is absolutely vital to have information about the health and configuration of the vast range of devices deployed. These tasks are the responsibility of network management systems. In larger enterprises, there may be more than one network management system in use, and different platforms may be used to manage different devices. Likewise, there could be more than one network management center and each center may only wish to manage devices in their region.
Novell provides ManageWise as an integrated console for managing devices in a NetWare network. Many customers want to export the information provided by various ManageWise components to UNIX-based consoles from Hewlett-Packard, IBM, and Sun. This AppNote describes how to do this with the least amount of network overhead and the maximum security, reliability, and fault tolerance.
The AppNote begins with a brief overview of the components included in the ManageWise suite and covers the configuration of the NetWare Management Agents to show how information from NetWare servers can be controlled. It then discusses scoping the network, so that information from selected servers will be sent to predetermined consoles. It concludes with an overview of the changes necessary to the NetWare Management Information Bases (MIBs) to enable them to be loaded on HP's OpenView, IBM's SystemView for AIX, and Sun's SunNet Manager. A glossary is included at the end of the AppNote for those who are not familiar with network management terminology.
|
Note: Pre-edited versions of the NetWare MIBs are contained in afile named NMAUX1.EXE on Novell's NetWire electronicsupport system on CompuServe (GO NETWIRE) or on theWorld Wide Web at URL http://netwire.novell.com.You can download this self-extracting file for free, and thencopy the decompressed files to the MIBs directory of theplatform you are using. |
ManageWise Overview
Novell has its own network management system called Manage-Wise. ManageWise 2.0 provides the most comprehensive management information about the NetWare environment available today. It offers an integrated set of services that provide compre-hensive and cohesive asset management, server management, desktop management, network analysis, and virus protection. The ManageWise suite consists of a number of components:
The ManageWise Console, an MS-Windows application
The NetExplorer Server, the network discovery server
NetWare Management Agent, a NetWare server agent
NetWare LANalyzer Agent, a remote network analysis agent
Intel's LANDesk Manager, a collection of desktop management tools
Intel's LANDesk Virus Protect, a server-based virus protection product
Many third-party vendors provide "snap-in" application modules to allow other devices to be managed through ManageWise. These devices are as diverse as servers, uninterruptible power supplies, hubs, routers, E-mail post offices, PBXes, and paging systems.
Some enterprises may want to use the NetWare Management Agent or the NetWare LANalyzer Agent, or both, in conjunction with another vendor's management platform. This AppNote concentrates on configuring the NetWare Management Agent, the NetWare LANalyzer Agent, and the NetExplorer Server.
Why Combine UNIX and ManageWise Consoles?
In large, mission-critical networks, it is vital to keep the servers and routers up at all times. With many routers to manage, a UNIX-based management console can often provide greater processing power for some of the more complex applications which are not necessarily available on ManageWise. By placing a ManageWise console right alongside the UNIX-based console, ManageWise can be used to manage the NetWare servers and for remote packet capture and analysis via the NetWare LANalyzer Agents.
There are several advantages to this dual-console combination:
Complementary management. The ManageWise system is able provide additional information and management capability in an area not often exploited by UNIX consoles: NetWare.
Distributed processing power. One of the real strengths of NetWare management is the ability to easily deploy agents on NetWare servers, thereby distributing the load across multiple processors. NetWare Management Agents and NetWare LANalyzer Agents can be loaded across the WAN to distant servers, reducing installation costs.
Cost-effective remote management. It has proven much more cost effective to install NetWare Management Agents and NetWare LANalyzer Agents at remote sites than to send an engineer on-site to fix a problem. Recent Gartner reports indicate that the time it takes to recoup the initial outlay for ManageWise is a matter of days.
SNMP: A Standard Management Method
Before we move on, it would be helpful to introduce some basic concepts surrounding the Simple Network Management Protocol (SNMP). SNMP is an open, industry-standard protocol that is used for network device management. The Management Information Base (MIB) is the standard method used to define the set of objects which can be managed at a network device. A MIB is simply a schema which can represent the configuration, performance, fault and accounting information available on a network device via SNMP, the management protocol. The use of SNMP provides conventional techniques for accessing and retrieving MIB object data, executing MIB object value settings, and receiving MIB alarm "traps." Some TRAPs require immediate attention, while others provide you with the information on degraded states or status change.
Each of the management consoles discussed in this AppNote provides key SNMP tools which enable the monitoring and management of NetWare servers. These tools allow MIB browsing, graphing of MIB object results, and event status propagation. The methods discussed in this AppNote will be limited to management of NetWare servers via the Novell NetWare Management Agent.
Configuring the NetWare Management Agent
There are two significant configuration files for the NetWare Management Agent. This is done on a per-server basis, meaning you will need to edit these files on each server that has the NetWare Management Agent loaded. The two files are SYS:\ETC\NWTRAP.CFGand SYS:\ETC\TRAPTARG.CFG.
SYS:\ETC\NWTRAP.CFG
This file is used to configure the parameters used by NWTRAP.NLM, one of the NetWare Loadable Modules comprising the NetWare Management Agent. Most of the file consists of comments describing the Community, Time Interval, Mask, and Severity parameters. You can edit this file with the EDIT.NLM at the server, or using a text editor at a workstation.
# NWTRAP.CFG Configuration File

#

# This file specifies operational parameters to be used by NWTRAP.

# The file is read and the parameters set when NWTRAP is loaded. It must

# reside on volume SYS in the directory SYS:\ETC and must be named nwtrap.cfg

# to be found by NWTRAP. To change the parameters, first edit this file,

# then unload NWTRAP and load it again. Any changes to this file will not

# take effect until the time NWTRAP is next loaded. The parameters are

# specified by using a parameter keyword followed by the desired parameter

# value, as outlined below.

#

# File Format:

# The parameters are specified as follows:

#

# keyword

#   value

#

# There may be one keyword/value pair for each of the four parameters

# settable in NWTRAP.CFG. The keyword signifies the parameter to be set,

# value is the value of the parameter as outlined below.

#

# All Information must start on a new line, one line per keyword and one line

# per value (except for mask value where the value set may span several lines

# as shown below).

#

# Maximum line length, including the newline character, is 128. There may be

# no data past column 127 and the line must end immediately thereafter with

# no intervening white space.

#

# Comment lines begin with the hash mark (#). A comment must use an entire

# line; it may not appear at the end of a keyword or value line.

# Upper or lower case allowed; not case sensitive.

#

# Parameter Specification:

#

# Keyword         Community | Time Interval | Mask | Severity

#

# Value Specification:

#

# Community

#                 SNMP community name e.g. Public. If not specified, the

#                 default Community value is PUBLIC.

#

# Time Interval

#                 The minimum time interval in seconds between the

#                 transmission of any two instances of the same trap.  Alert

#                 conditions resulting in duplicate traps which occur before

#                 the time interval has elapsed will be ignored.  If not

#                 specified, the default Time Interval value is 10.

#

# Mask

#                 The traps to be masked out.  The trap numbers specified

#                 are from NWALARM.MIB.  Each trap number in the list will

#                 suppress the transmission of that trap number.  If not

#                 specified, the default Mask value is no traps masked.

#                 Delimiters between trap numbers are commas, space, <CR<. e.g.<
#                 Mask

#                         123, 278, 370

#                         242 76 362

#                         59

#                         299

#                         321

#

#                 In the mask section below, all trap numbers from

#                 NWALARM.MIB along with the corresponding #TYPE descriptions

#                 are listed but commented out.  Initially, since all the

#                 listed traps are commented out, the "mask" keyword itself

#                 is also commented out.  To mask a trap, be sure the "mask"

#                 keyword is uncommented by deleting the hash mark (#) in

#                 front of the word "mask".  Then find the desired trap in

#                 the list and uncomment just the line containing the number,

#                 again by deleting the hash mark (#) at the beginning of

#                 that line.  If no traps are to be masked (all trap numbers

#                 commented out) be sure the "mask" keyword is also commented

#                 out to avoid a NWTRAP.CFG parse error.

#

# Severity

#                 Any traps of severity less than the value of this parameter

#                 will be suppressed.  Individual trap severities are

#                 specified in NWALARM.MIB.

#                 Parameter value can be:

#                   INFORMATIONAL | WARNING | RECOVERABLE | CRITICAL | FATAL

#                 where

#                   INFORMATIONAL < WARNING < RECOVERABLE < CRITICAL < FATAL<
#                 If not specified, the default Severity value is WARNING.

#

#############################################################################

Community

       Public

Time Interval

       300

Severity

       Warning

#mask

#        "Memory: Short term alloc failed"

#         1

#        "FileSys: Directory write err (no vol)"

#         2

#        "FileSys: File write err, by server (no path)"

#         3

#        "FileSys: File write err, by user (no path)"

#         4

#        "FileSys: File write err, by server (path)"

#         5

#        "FileSys: File write err, by user (path)"

#         6

#        "FileSys: File read err, by server (no path)"

#         7

#        "FileSys: File read err, by user (no path)"

#         8
Community Strings. The NWTRAP.CFG file enables one or more community strings to be entered. Multiple strings can be used where more than one management console is being used, with the multiple community strings being used to scope console access to agents.
Time Interval. The NetWare Management Agent includes features particularly relevant in large enterprise networks where the number of TRAPS arriving at management consoles can be very significant. Similarly, the number of TRAPs crossing a WAN can reduce the bandwidth available for data. The NetWare Management Agent has a throttle mechanism whereby the time interval between repetitive TRAPs can be set so subsequent TRAPs will not be sent during this time interval. This can be set up to 300 seconds.
Severity Level. Traps from NetWare Management Agents are defined at five different levels:
Informational
Warning
Recoverable
Critical
Fatal
It is possible to set the severity level so that TRAPs below that level will not be sent. This feature can be most useful to limit the number of TRAPs when first setting up a server. Once the server is fully operational, this parameter may be adjusted to a higher level.
Mask. Setting a mask enables certain TRAPs to be disabled so they will never be sent. For example, you may find there is one trap at a lower severity level that you would like to receive, but not the rest. With this feature, you can block out the unwanted TRAPs and allow the ones you are interested in to pass.
By defining these settings, the number of TRAPs actually getting out onto the wire will be significantly reduced. This reduction in management overhead means less clutter of superfluous TRAPs at the console and greater bandwidth across the WAN for applications and data.
SYS:\ETC\TRAPTARG.CFG
The NetWare Management Agent supports the sending of SNMP TRAPs over both IP and IPX protocols. TRAPTARG.CFG is used to define the IP and IPX addresses of management consoles.
#######################################################

# traptarg.cfg

# Snmp Agent Trap Target (Destination) Configuration

# This file specifies all managers that are to receive

# snmp trap messages generated by the Snmp Agent (snmp.nlm)

#

# File Format:

#

# Protocol <name<<
#  Specifies the beginning of a list of names or

#  address of managers to which to send traps using the

#  protocol specified by <name< if that protocol is<
#  registered as a service provider to the snmp agent.

#

#  All destinations must be preceeded by white space

#  Each destination must be listed on a separate Line

#

#  The Protocol keyword, left justified, signifies the

#  start of a new protocol section.

#

#  Comments are preceeded by the hash mark, and proceed

#  to the end of the line

#

###########################################################

Protocol IPX

   # In this section you can put SNMP managers that want to receive

   # traps from the local node over IPX.  Managers can be identified

   # by NetWare service name (a NetWare file server name, for example)

   # or by IPX address.  To specify by IPX address, use the following

   # format:

   #          IPX Network Number: MAC Address

   #

   # for example, c9990111:00001B555555

Protocol UDP

   # In this section you can put SNMP managers that want to receive

   # traps from the local node over UDP.  Use either IP address or

   # logical name.  (If you use a logical name be sure the name and its

   # corresponding ip address appear in the sys:etc\hosts file.)

   # By default, the local node sends traps at least to itself.

   127.0.0.1     # send traps to the loopback address

   164.99.32.27     # nw_mw console

National_NMS    # national management console in Atlanta
IPX Addresses. IPX addresses are defined as the address of the console, in the format IPX Segment Address:MAC address.
IP Addresses. IP addresses can also be defined in TRAP-TARG.CFG. Logical names may also be used as long as there is a corresponding entry in the SYS:\ETC\HOST file. An example of a logical name entry could be:
nw_mw_console 164.99.32.27
It would then be possible to define the northwest ManageWise console as either "nw_mw_console" or "164.99.32.27" in the TRAPTARG.CFG file.
The TRAPTARG.CFG file is read only when SNMP.NLM is loaded. Due to the variety of modules which must be unloaded and reloaded with the SNMP module, it may be necessary to bring the server down and then restart it. Any changes made to the TRAPTARG.CFG file will not take effect until the next time you load NWTRAP.NLM, a task which is done by the NMA2.NCF file located in the SYS:\SYSTEM directory.
|
Caution: The standard NetWare Management Agent 2.1 includesa file called FINDNMS.NLM. This NLM "listens" forSAP 0x26A which is broadcast by ManageWiseconsoles and adds the addresses of these ManageWiseconsoles to a dynamic list of addresses, in addition tothose recorded in the TRAPTARG.CFG file. TheNetWare Management Agent will send TRAPs to thiscomposite list, rather than to just those defined in theTRAPTARG.CFG file. Take care not to filter SAP 0x26Apackets at routers if you want to enable this feature.However, if you are scoping the network statically (thatis, determining the consoles which TRAPs will be sentto), you may want to disable this NLM. This can bedone by editing out, or remarking out, the commandto load FINDNMS.NLM in the NMA2.NCF file. |
Configuring Security at the NetWare Server
Configuring security when loading NetWare Management Agent 2.1 on a server involves setting the SNMP community name. Security access for SNMP transactions is configured using either SNMP load command-line parameters or through Novell's INETCFG utility. Setting the MonitorCommunity string allows for read-only access. The default value for read-only access is "public." Setting the ControlCommunity string allows for both read and write access. This community name is disabled by default.
To set read access only (SNMP GETs) when loading SNMP, type:
:LOAD SNMP MonitorCommunity = community_string
To set read/write access (SNMP GETs and SETs), type:
:LOAD SNMP ControlCommunity = community_string
Or, you can use the INETCFG menu utility. Start this utility by typing INETCFG <Enter< at the server console prompt. From the main menu, select "Configure SNMP Parameters," then choose the Monitor State or Control State option. Set security appropriately and be sure to save your changes before exiting the utility.
Manually Scoping the Network
Due to the size of a network or the physical locations of offices or network specialists, it may be necessary to segment the overall network so that one office is responsible for the network in that region. Some networks may have mission-critical devices that they want managed from both a central location and the regional management centre.
The NetWare Management Agents support multiple TRAP targets so that TRAPS can be sent to both IP- and IPX-based management consoles. TRAPs can be sent to the UNIX console for storage, trouble ticketing, quality of service measurement, and possibly AI-based problem resolution. It is likely that the ManageWise console will actually be used to perform further investigation and to resolve the problems.
Figure 1 represents a hypothetical organization which has segmented the network based on sales regions. There are regional management centers in Portland, Provo, Boston, and Atlanta, and a national network operation center also based in Atlanta.
Figure 1: Example of a large enterprise with regional and national network management centers.
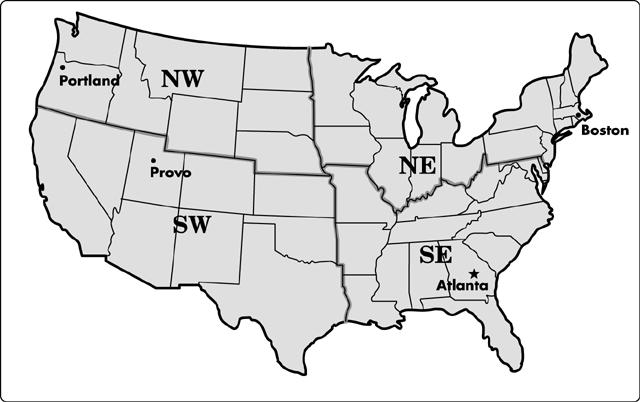
In this example organization, each server in a region could have the IP or IPX address of the regional console defined in its SYS:\ETC\ TRAPTARG.CFG file. Critical NetWare servers could have the IP or IPX address of the national management consoles defined in their TRAPTARG.CFG files as well. In this way, the management staff is able to determine where they want the TRAPs to be sent. This practice of determining what servers are to be managed by which management consoles is known as "scoping" the network.
As shown in Figure 2, SNMP TRAPs can be sent to both IP- and IPX-based management consoles. The ManageWise console is able to manage the NetWare server graphically and in considerable detail. The UNIX-based console can only browse the NetWare MIBs, performing SNMP GETs and SETs on the NetWare server.
Figure 2: Sending SNMP TRAPs to IP- and IPX-based management console.
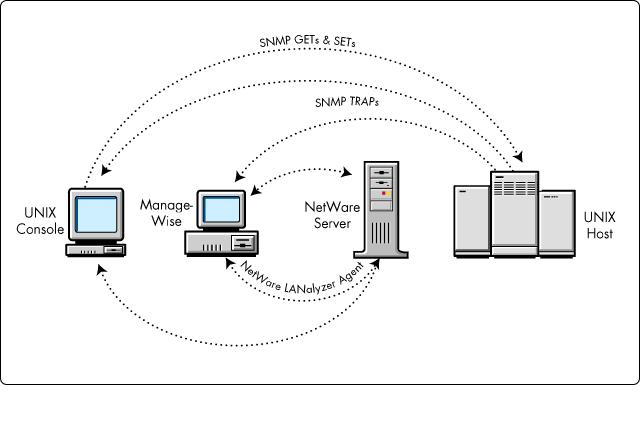
If the NetWare server has the NetWare LANalyzer Agent loaded, the ManageWise console could use that agent to monitor traffic on the segment the server is attached to. Since the NetWare LANalyzer Agent is RMON-compliant, some UNIX-based consoles are able to use it to extract information as well.
The NetWare Management Agent 2.0 supports SNMP version 1 GETs, GET RESPONSEs, SETs and TRAPS against NetWare 3, NetWare 4, and SFT III servers. This means a UNIX-based console will be able to request, receive, and modify NetWare Server parameters via SNMP.
In a large enterprise, it is a very valid configuration to have TRAPs sent primarily to the UNIX-based consoles. However, when an issue relating to NetWare is encountered, the management team can use ManageWise to get detailed information from the NetWare server and rectify the problem.
In another interesting case, a large organization deployed NetWare Management Agents on all of their production servers, with all TRAPs being sent to UNIX-based TRAP managers. The SYS:ETC\TRAPTARG.CFG file on each server had the IP address of regional TRAP manager. The TRAP manager processed the TRAPs and placed them in an SQL database that multiple Windows-based clients could then interrogate.
Scoping with NetExplorer
With ManageWise 2.0, the NetExplorer Server includes a file called NXPCON.NLM which allows for the scoping of the discovery from a given NetExplorer server. In this way, it is possible to ignore TRAPs coming from networks other than those you are interested in.
There are three discovery component NLMs on a NetExplorer Server:
NXPIP.NLM, which is used to discover IP routers.
NXPIPX.NLM, which is used to discover NetWare servers, IPX routers, and IPX workstations.
NXPLANZ.NLM, which queries NetWare LANalyzer Agents for information about all the devices that exist on the segment the NetWare LANalyzer Agent is monitoring. It does this without regard for the protocol the device is using.
It is possible to set what discovery components you are interested in. If there was absolutely no TCP/IP on the network, you might ignore it completely and disable IP discovery through NXPCON.NLM. Likewise, if you didn't have any NetWare LANalyzer Agents on the network, this option could be removed.
You can also set when you want discovery to take place: certain hours of the day for a short discovery and after-hours for a full discovery. This is only going to be valid if all the workstations are left on while the discovery is in progress. The NetExplorer discovery is passive in that it does not actively poll nodes on the network. For this reason, if you have a dedicated NetExplorer Server, it is feasible to leave the discovery to run continuously. Otherwise you might limit discovery to those hours of the day when the server is less heavily utilized.
ManageWise Export Services
ManageWise Export Services is an add-on utility to the Manage-Wise product, designed to increase the visibility of the NetWare servers on large enterprise networks. Its purpose is to export the ManageWise 2.1 topology and alarm data to other network management consoles, particularly those that run on platforms other than MS-Windows. ManageWise Export Services scans the database periodically and sends the data via TCP/IP when there is a request.
NMS Export Services 1.0 worked only with NMS 2.0c and was created for the IBM NetView/AIX platform. It supported only the IBM NetView/AIX Open Technology (NVOT) schema for exporting data. The second release extends the data format to support the Novell Export Import Script (NXIS), which is generic enough to support other network management platforms. This makes ManageWise Export Services attractive to other platforms, such as HP OpenView and SunNet Manager.
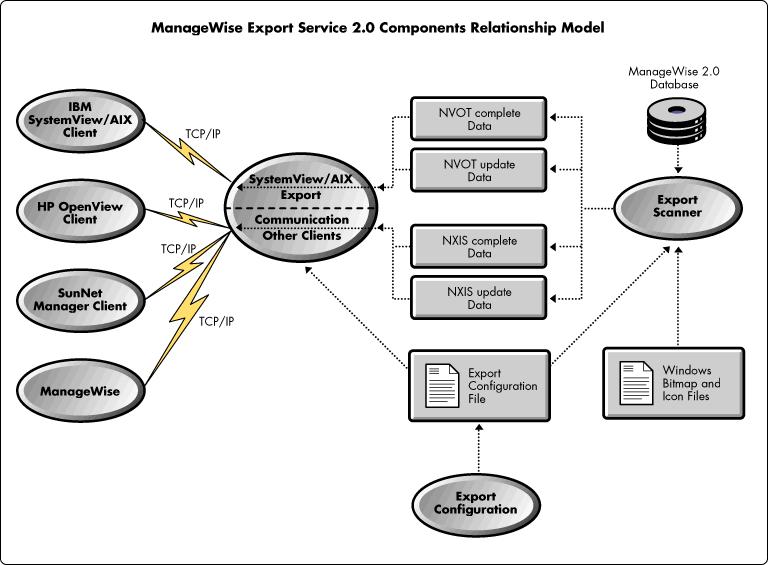
ManageWise Export Services 2.0 consists of three main components:
Export Scanner, which scans the database periodically and writes it into one of two data formats: IBM NVOT or NXIS.
Export Communication, which listens for a connection via TCP/IP and sends the data that is prepared by the Export Scanner. The Export Communication service determines if the request comes from the NetView/AIX or other clients, and then sends the data in either the IBM NVOT or NXIS format accordingly.
Export Configuration, which allows users to configure the data extraction schedule, password, and so on.
A fourth piece, the Garbage Collection component, cleans up outdated data files.
Previously, if a request was made from SystemView for an update of the ManageWise database, the whole database was re-exported. With ManageWise Export Services 2.0, it is now possible to select either the whole database or only the updates since the last time the export was performed. Log files are created on both the Export Scanner and Communications process, and the Export Scanner process can be stopped and resumed at any time.
Figure 3 shows the relationship between the ManageWise Export Services 2.0 components.
Figure 3: ManageWise Export Services 2.0 component relationship model.
|
Note: The latest release of ManageWise Export Services will beavailable as a patch to ManageWise 2.1 in the fileMWXP2.EXE on Novell's NetWire electronic service.Patches for the Sun, HP and IBM platforms will be availablefrom each of those vendors. The patch for IBMSystemView/AIX should be available as part of IBM'sMaintenance Release 3 for NetView, as PTF 434816. |
The NetWare Management Agent
The NetWare Management Agent (NMA) consists of a suite of agent NLMs which reside on the NetWare server, plus a set of related MIBs which can be parsed by the various management consoles. The ability to manage NetWare server configuration, thresholding, performance data, and fault conditions is available via the NetWare Management Agent. The NMA MIB object data can be accessed from NetWare 3.11, NetWare 3.12, or NetWare 4.1 servers. This technology provides you with the data necessary to prevent faults before they happen, the ability to perform tuning techniques on the Novell servers, and long-range server capacity planning.
The NetWare Management Agent provides you with performance aspects of the key server subsystems such as CPU, memory, I/O, storage, and so on. NMA also provides SNMP TRAP generation.
System Requirements
The requirements and methods specified in the remainder of this AppNote assume a basic understanding of NetWare, SNMP, MIBs, and at least one of the specified UNIX-based management consoles. All methods and UNIX-based network management consoles listed here were tested and reviewed using the NetWare server operating systems and NetWare Management Agents listed. Testing of the methodologies was accomplished on Novell's internal network in conjunction with the management platforms listed.
|
UNIX Management Consoles |
SunNet Manager, version 2.2.2 for Solaris 1.1.1(Sun Microsystems) Open View Network Node Manager, version 3.31(Hewlett-Packard) Open View Network Node Manager, version 3.31(Hewlett-Packard) NetView for AIX, version 3x(IBM) |
Running on Sun SPARC Station IPX Running on HP Apollo 9000 Series 700, and on Sun SPARC Station Running on IBM RISC System/6000 |
|
NetWare Versions Supported |
NetWare 3.11NetWare 3.12NetWare 4.1 |
All running on IBM PCs and PCclones with Intel 486 or Pentium processors |
|
NetWare Management Agent (NMA) |
NetWare Management Agent version 2.1 |
NLMs: |
FINDNMS.NLM
HOSTMIB.NLM
NTREND.NLM
NWTRAP.NLM
SERVINST.NLM
MIBs:
NWALARM.MIB
NWHOSTX.MIB
NWSERVER.MIB
NWTREND.MIB
RFC1514.MIB
HP OpenView Net Node Manager
This section describes a method for managing Novell's NetWare servers using the Hewlett-Packard OpenView (HPOV) Net Node Manager. The basic tasks for managing these servers via SNMP will be described. Your level of knowledge pertaining to the HPOV management console, as well as your sophistication in dealing with MIB schemas, will propel you to a more sophisticated level of accomplishment.
The HPOV NetNode Manager (NNM) console provides the tools necessary to enable the user to perform NetWare server configuration management, fault handling, performance monitoring, and capacity planning.
Requirements at the HPOV Console
In order to SNMP manage a device (or agent) with HP OpenView Network Node Manager, ensure that the following requirements are met:
Software Version: HP Open View, Network Node Manager, version 3.x
Hardware Platform: HP Apollo 9000, Series 700 (minimum requirement), or Sun Solaris SPARC Station
SNMP must be running on the console and on the server.
The instrumented MIB(s) or agents must be loaded on the managed server.
The relevant MIB(s) must be parsed at the HPOV management console.
The alarm traps must be configured for receipt by the console.
The trapd daemon must be loaded and running at the HPOV console.
In this case, we will limit coverage to management of Novell's NetWare servers via the NetWare Management Agent.
It is assumed that the previously-stated NetWare server requirements have been met, that the server is attached to the network and accessible via the HPOV console, and that NetWare Management Agent (NMA) is loaded and running on the server. To verify that the NetWare server is available for network access, execute a Ping operation via the HPOV console.
About the HPOV Net Node Manager
The Network Node Manager is an SNMP-based application running under the HP Open View Windows graphical user interface. It is a configuration, performance, and fault management application for multi-vendor TCP/IP networks, It can automatically discover IP devices on the network, and create an environment of interactive maps and submaps. These maps contain related objects which represent entities or resources on the network. Management and edit actions can be performed on these network objects. The NNM can monitor and control agent systems (devices on the network) via SNMP calls.
Using NetWare Management Agent MIBs for HPOV NNM Application
The following amendments to the NMA 2.1 suite of MIBs are necessary in order to compile and load the MIBs on the HPOV console. A version of these MIBs which is loadable on HPOV is available at the following Web site:
http://netwire.novell.com/servsup/binhtml/1203149.htm
MIB Modifications. For each of the MIBs (NWSERVER, NWHOSTX, RFC1514, NWTREND and NWALARM), the following issues were encountered:
Issue - Possible superfluous control character ( ^M ) scattered throughout the MIB. Remedy - Edit the MIB and remove all ( ^M) control characters.
Issue - Seconds were declared in the Textual Conventions section of the MIBs. Remedy - Remove "Seconds" and replace with INTEGER at each occurrence of its use throughout the MIBs.
Utilizing the HPOV SNMP Tools
The HPOV Network Node Manager application can be used to manage Novell's NetWare Servers using the net management protocol, SNMP. The SNMP tools provide services for event management, data retrieval, device monitoring, and object value setting.
Loading the NMA MIB Files
To load a MIB onto the HPOV Network Node Manager, the following steps are required:
Transfer the NMA MIBs to the NNM default MIB directory:
#hpovprompt /usr/OV/snmp-mibs
Make sure that MIB-I and MIB-II have been loaded at the HPOV console.
For each of the NMA MIBs (NWALARM.MIB,NWHOSTX.MIB, NWSERVER.MIB, NWTREND.MIB, ANDRFC1514.MIB), follow the steps listed:
Select the Options> Load/Unload MIBs -> SNMP... menu item.The MIB Load/Unload dialog box appears, which lists the currently loaded MIBs.
At the MIB Load/Unload dialog, click the Load button.
The Load MIB from File dialog box appears, listing the files in the default directory (/usr/OV/snmp_mibs).
Select the appropriate NMA MIB from the scrollable list, then click OK. The MIB is automatically loaded.
The MIB Load/UnLoad dialog reappears, enabling you to load each of the NMA MIBs one at a time.
The NMA MIBs should now all be included in the Loaded MIBs scrollable list, enabling you to use the Monitor >MIB Values > Browse MIB > SNMP... operation.Otherwise, you will receive an error message indicating there was aproblem integrating the MIB.
Click on the Close button to exit this operation.
Gathering NMA MIB Data
The following steps allow you to view NMA MIB values for a selected NMA supported NetWare Server:
Select the desired node in the OVW map.
Select Monitor > MIB Values -> Browse MIB: SNMP... from the menu bar. The Browse MIB dialog box appears.
Select the desired MIB Object by moving up or down the MIB tree displayed in the Browse MIB dialog box. Do this by selecting the appropriate object in the scrollable list and clicking the Down Tree button, or just double-click the MIB object. The level in the MIB tree display descends to the next level. Continue doing this until you've reached the object you want to view.
Start the MIB query by clicking on Start Query; the results are displayed in the MIB Values area. To stop the query, click the Stop Query button.
Monitoring NetWare Management Agent MIB Objects
MIB data may also be collected atregular intervals. MIB data may be collected or monitored based on numeric MIB values (that is, the MIB objects that are defined as Counter, Gauge, INTEGER, IpAddress, and TimeTicks). Make sure you understand the definitions and purpose of the MIB object on which you wish to collect data.
Select the Options > Data Collection: SNMP MIBs ... menu item, and the MIB Data Collection dialog box appears.
Click on Add; the MIB Data Collection / MIB Object Selection dialog box appears.
Specify the MIB object ID for which you want to collect data, by selecting the MIB Object from the MIB tree. Make sure the label is no longer the 14 characters and conforms to UNIX filename conventions. The label is the name under which the data will be saved.
Specify the instance of the MIB object you want to collect data.
Click the APPLY/OK button, the MIB object ID is added to the list of configured MIBs and the MIB Data Collection/Add Collection dialog box appears. Once you have clicked OK or Apply you cannot change the instance without deleting the MIB object and re-entering a new instance.
Add the source name. The name will appear in the List of Collection Sources selection list area.
Specify the collection mode by choosing one option from the Collection Mode option menu.
Specify the polling interval by entering a the desired poll interval.
Click OK and the MIB Data Collection/Add Collection dialog box disappears and the MIB object is added to the MIB Objects Configured for Collection selection list in the MIB Data Collection dialog box.
Click on Apply or OK for the changes to take effect. To cancel all changes and exit click on Cancel which will cancel all changes from the last Apply or from the time you entered the dialog. Data collection is restarted each time you click on Apply.
Setting NMA MIB Objects
The following steps must be accomplished in order to Set MIB objects:
Select a desired Novell NetWare Server with NMA loaded inthe OVW map.
Select Monitor > MIB Values > Browse MIB: SNMP ... and the Browse MIB dialog box appears.
Specify the MIB Object ID for which you want to set the MIB value by traversing down the MIB tree until the desired object is displayed, and then select the object.
Query the MIB object by clicking on Start Query, the results are displayed in the MIB Values list.
Select the desired value you want to change from the MIB Values list. The current value is displayed in the SNMP SetValue field.
Type in the new values for the object in the SNMP Set Value field.
Click on Set. If you want to see the changes on the node right away, select the Diagnose > Network Connectivity > Demand Poll ... menu item.
The Message list area will display a string which indicates the success or failure of the operation.
Start the MIB query by clicking on Start Query button; the results are posted in the MIB values list display.
Receiving NMA TRAPs
The following configuration steps allow for event notification messages and define actions that should be performed when NMA traps are received from a NetWare server to the HPOV NNM console.
At the Novell NetWare server:
Edit the NetWare server's TRAPTARG.CFG file. (This file allows the user to define recipients to receive SNMP traps over IPX and UDP.) Under the Protocol UDP section, add the HP Network Node Manager's IP Address. Ensure that the SNMP Agent and NMA NLMs are loaded on the Server. (Refer to the TRAPTARG.CFG file setup instructions above for more detail.)
At the HPOV NNM console:
Make sure the NMA MIBs are loaded on the NMM Console.
To add alarms individually:
From the Menu bar, select Options > Event Configuration >SNMP ... menu item. The Event Configuration dialog box appears.
If the desired enterprise name does not appear in the Enterprise Identification listing, add the enterprise name by clicking on the Add New Enterprise... button, the dialog will appear. Add the appropriate enterprise name, enterprise ID, and then click on the Add button. The newly added enterprise will appear in the Enterprise Identification listing.
Select the Enterprise name of the target trap from Enterprise Identification selection list; the events configured for the selected enterprises appear in the Event Identification selection list.
Define a new event category by selecting the Configure Event Categories button. The new category will be added to the Event Categories list.
If the preferred event is not enumerated in the Event Identification inventory, an event may be added by clicking the Add... or Copy button (Help is available by selecting the Help button.) An Add Event dialog appears, fill it in appropriately. Save the newly configured event by selecting the OK button.
Select the trap from the Event Identification selection list. The current configuration for the trap is displayed in the Event Description dialog, which may be accessed by clicking the Describe button. The event may be revised by accessing the Modify Event dialog via the Modify...button.
Click the Apply or OK button to accept the new event configuration.
Or, use the XNMEVENTS tool, a much less time-consuming process when many events must be added at once. (For instance, there are 401 traps available in the NMA suite of MIBs).
The ability to configure numerous events at once is available via the HP xnmevents tools and a special trap definition script file.The xnmevents tool merges the specified script file with the /usr/OV/conf/C/trapd.conf event definition file. This file consists of definitions for the handling of SNMP events generated by SNMP agents. The event definition script file can be comprised of four sections: Event Category definitions, Additional Action definitions, Enterprise definitions, and Event definitions.
A sample events definition script file is available at the Web site http:\\netwire.novell.com. Download and execute NMAUX1.EXE, a self-extracting file containing the NMA MIBs edited for use on the HPOV console. The MIBs, along with a sample NMA trap configuration file, are placed in the \HP subdirectory. The NMA2_1.CNF trap configuration script file defines an Event Category for Novell trap events (Novell Events), all NMA event enterprises, and all NMA events. You may rename the script file using the HPOV convention for trap configuration files (that is, rename the file to nma2_1.conf).
Merge the sample trap definitions script file with the trapd.conf file by issuing the following command at the OVW prompt:
#xnmevents -load nma2_1.conf
IBM SystemView for AIX
IBM SystemView for AIX
This section provides a method for managing Novell's NetWare using IBM's SystemView for AIX. The basic tasks for managing these servers via SNMP will be described. Your level of knowledge pertaining to the NetView management console, as well as your sophistication in dealing with MIB schemas, will propel you to a more sophisticated level of accomplishment.
The IBM console provides the necessary tools to enable the user to perform NetWare server configuration management, fault handling, performance monitoring, and capacity planning.
About the IBM NetView Console
SystemView for AIX incorporates a graphical user interface for managing TCP/IP-based internets, using the OVW (Open View Windows) application. The OVW provides map drawing, map editing, and menu management operations.
The SystemView for AIX program discovers and updates the topology of IP networks. The topology information is graphically translated into a view of your network's map. SystemView uses background processes, or daemons, that run continuously providing services in the following categories: Topology discovery and database operation, Event and trap processing, and Host connection. SystemView users can access network manageable objects using a system of interconnected maps and submaps, and network management functionality is available through pull-down menus and dialog boxes.
NetView is an SNMP-based application capable of configuration, performance, and fault management for multi-vendor TCP/IP networks. It can execute SNMP network management operations which monitor and control devices on the network.
Requirements at the SystemView Console
To SNMP-manage a device (or agent) using IBM NetView, ensure that the following requirements are met:
Software Version: SystemView for AIX , Version 3
Hardware Platform: IBM, RISC System / 6000
SNMP must be running on the console and on the server.
The instrumented MIB(s) or agents must be loaded on the managed server.
The relevant MIB(s) must be parsed at the IBM NetView management console.
The alarm traps must be configured for receipt by the console.
The trapd daemon must be loaded and running at the IBM NetView console.
In this case, we will limit coverage to management of Novell NetWare servers via the NetWare Management Agent.
It is assumed that the previously-stated NetWare server requirements have been met, that the server is attached to the network and accessible via the IBM SystemView console, and that NetWare Management Agent (NMA) is loaded and running on the server. To verify that the NetWare server is available for network access, execute a Ping operation via the SystemView console.
Using the NetWare Management Agent MIBs for SystemView
A version of the NMA MIBs, edited for SystemView, is available from Novell as described previously in this AppNote. The NMAUX1.EXE file is a self-extracting file which produces a subdirectory for the IBM loadable NMA MIBs as follows:
\IBM\nwalarm.mib

   nwtrend.mib

   nwserver.mib

   nwhostx.mib

RFC1514.mib
If you do not have access to this self-extracting file, incorporating the following amendments to the NMA 2.1 suite of MIBs will produce a version which is ready to compile and load on IBM's SystemView for AIX.
MIB Modifications. For each of the MIBs (NWSERVER, NWHOSTX, RFC1514, NWTREND and NWALARM), the following issues were encountered:
Issue - Possible superfluous control character ( ^M ) scattered throughout the MIB. Remedy - Edit the MIB, remove all ( ^M) control characters.
Issue - Seconds were declared in the Textual Conventions Section of the MIBs. Remedy - Remove "Seconds" and replace with INTEGER at each occurrence of its use throughout the MIBs.
Utilizing the IBM SystemView SNMP Tools
The IBM SystemView management console can be used to manage NetWare Servers using the SNMP net management protocol. SystemView provides SNMP tools which render services for event management, data retrieval, device monitoring, and object value setting.
Loading the NMA MIB Files
The following steps must be accomplished in order to parse the NMA MIBs on the IBM NetView Console:
Transfer the NMA MIBs into the default directory:
IBM_prompt# /usr/OV/snmp_mibs
Select the Options... > Load/Unload MIBs: SNMP... menu item. The Load/Unload MIBs dialog appears with a scrollable list of the loaded MIBs.
Click the Load... button, a Load MIB from File dialog box appears which contains a scrollable list of the MIB files in the default MIB directory (/usr/OV/snmp_mibs).
Select the NMA MIB to load, these MIBs must be loaded one at a time in the order of their dependency: (1) RFC1514.MIB, (2) NWSERVER.MIB, (3) NWHOSTX.MIB, (4) NWTREND.MIB, and (5) NWALARM.MIB.
Click the OK button. The operation stores loaded MIBs in the /usr/OV/conf/snmpmibdatabase.
Gathering NMA Data via the SystemView Console
Use the MIB Browser to query for NMA MIB values as follows:
Select the Novell NetWare Server with NMA loaded.
Select the Tools... > MIB Browser: SNMP... item from the main SystemView for AIX menu.
In the Browse MIB dialog which appears, enter the community name of the agent, if left blank the default is "public".
Traverse the MIB tree until the leaf object you wish to browse appears in the object listing. Select the object. Selecting the Describe button will produce the Describe MIB Variable dialog which includes the name of the MIB object, its object ID, its MIB object type, and a brief description of its meaning.
Select the Start Query button.
The MIB object information will appear in the MIB Values section of the dialog or if the SNMP Get Request could not be accomplished a message will appear in the Messages section ofthe dialog.
Setting NMA MIB Objects via the SystemView Console
To set a MIB object, the following steps are required.
Obtain MIB object information as described above in the Gathering NMA data via the NetView Console. The data should appear in the MIB Values section of the Browse MIB dialog box.
Select the MIB object to be modified from the MIB Values section of the dialog, the MIB object's instance will appear in the MIB Instance edit box.
Input the Set value in the SNMP Set Value edit box of the Browse MIB dialog.
The Set button will become enabled once these steps have been accomplished. Click the Set button and SNMP Set Request will be issued.
Status regarding the Set request will be posted to the Message listing of the dialog.
Forwarding NMA Alarms to the SystemView Console
The following configuration steps allow event notification messages and define actions that should be performed when NMA traps are received from a NetWare server to the IBM NetView console.
Ensure that the NetView Console's IP address has been added to the NetWare Server's TRAPTARG.CFG file, under theProtocol UDP section. (This file allows the user to define recipients to receive SNMP traps over IPX and UDP.) Ensure that the SNMP agent, and NMA agent NLMs are loaded on the Server.
Make sure the NMA MIB(s) is loaded on the NetView Console, and that the version matches that of the NMA Agent MIB on the NetWare server.
Select a symbol on a submap, then select Monitor > Events > Current Events from the main menu. All uncleared events associated with the selected symbol will be displayed.
Or, select a symbol on a submap, then select Monitor > Events> Event History from the main menu. All historical events will be displayed.
Using SunNet Manager Console to Manage NetWare Servers
This section provides a method for managing Novell's NetWare Servers using the SunNet Manager. The basic tasks for managing these servers via SNMP will be described. Your level of knowledge pertaining to the SunNet Manager console, as well as your sophistication in dealing with MIB schemas, will propel you to a more sophisticated level of accomplishment.
The SunNet management console provides the necessary tools to enable the user to perform NetWare server configuration management, fault handling, performance monitoring, and capacity planning.
About the SunNet Manager
SunNet Manager (SNM) for Solaris is an graphical user interface application using Open Look. SNM provides a set of tools and services which allow the user to perform fundamental tasks in managing a network.
SNM communicates with devices on the network via Proxy Agents which are used to transmit and/or gather information pertaining to devices on the network. The SunNet Manager Console communicates via the Remote Procedure Call (RPC) protocol to an SNMP proxy agent in order to gather NMA data from a NetWare Server. The SNMP proxy agent translates the RPC protocol data request into an SNMP protocol request which is sent to a specific device (NetWare server). The data is returned from the NetWare server via the same path (see Figure 4).
Figure 4: Path of RPC protocol data from SNMP proxy agent to NetWare server and back.

The trap daemon can be configured to forward some or all traps to one or more SNM consoles. The SNMP device issuing the traps must be configured to send traps to the host where the trap daemon resides (see Figure 5).
Figure 5: Configuration of SNMP device to issue traps.
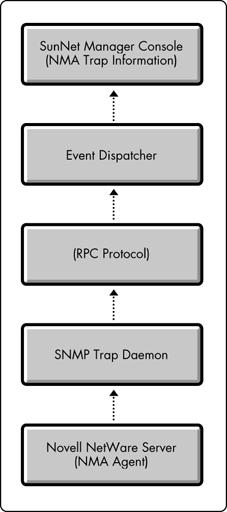
The trap daemon need not reside on the SNMP proxy agent system or the console system. It can be distributed on a network to reduce network traffic and to share the processing load.
Requirements at the SunNet Manager Console
To SNMP-manage a device (or agent) using the SunNet Manager, ensure that the following requirements are met:
Software Version: SunNet Manager version 2.2.2 for Solaris 1.1.1
Hardware Platform: SunSPARC station
SNMP must be running on the console and on the server.
The instrumented MIB(s) or agents must be loaded on the managed server.
The relevant MIB(s) must be parsed at the SunNet Manager console.
The alarm traps must be configured for receipt by the console.
The trapd daemon must be loaded and running at the SunNet Manager console.
In this case, we will limit coverage to management of NetWare servers via the NetWare Management Agent.
It is assumed that the previously-stated NetWare server requirements have been met, that the server is attached to the network and accessible via the SunNet Manager console, and that NetWare Management Agent (NMA) is loaded and running on the server. To verify that the NetWare server is available for network access, execute a Ping operation via the SunNet Manager console.
Utilizing the NMA MIBs on the SunNet Manager
A version of the NMA MIBs, edited for the SunNet Manager, is available at the following Web site:
http://netwire.novell.com/servsup/binhtml/1203149.htm
The NMAUX1.EXE file is a self-extracting file which produces a subdirectory for the SunNet Manager loadable NMA MIBs as follows:
\SUN\nwalarm.mib

   nwtrend.mib

   nwserver.mib

   nwhostx.mib

RFC1514.mib
If you do not have access to this self-extracting file, incorporating the following amendments to the NMA 2.1 suite of MIBs will produce a version which is ready to compile and load on the Sun Net Manager console.
Modifications Common to all MIBs. These modifications apply to all NMA MIBs.
Issue - Possible superfluous control character ( ^M ) scattered throughout the MIB. Remedy- Edit the MIB, remove all ( ^M) control characters.
NWSERVER MIB Modifications. These modifications apply only to NWSERVER.MIB.
Issue - In the IMPORTS section, imports not contained in RFC1155-SMI, RFC-1212, and RFC1215 are not acknowledged by SNM MIB compiler. Remedy - Comment out or remove all IMPORTS related to "FROM HOST-RESOURCES-MIB":
InternationalDisplayString - Replace with OCTET STRING when SIZE is also specified. Add to the Textual Conventions section of MIB the full data type definition for International Display String as contained in the HOST-RESOURCES-MIB. Reference to this data type is accepted where SIZE is not also specified.
DateAndTime- Replaced with OCTET STRING
Kbytes - Replaced with full data type definition as contained in HOST-RESOURCES-MIB which was inserted into the Textual Conventions section of the MIB and then used throughout the MIB.
Issue - In the Textual Conventions Section, enumerated integer type definitions are not accepted. Remedy -Comment out all enumerated Integer data type definitions for TransportDomain and EngineType. Replace with the complete integer enumeration at each occurrence.
Issue- After converting DateAndTime type definition to OCTET STRING, not able to use the "(SIZE 8 | 11))" qualifier for size. Remedy- Comment out the SIZE portion of the DateAndTime definition.
NWHOSTX MIB Modifications. These modifications apply only to NWHOSTX.MIB.
Issue - In the IMPORTS section, only imports contained in RFC1155-SMI or RFC-1212 are accepted. Remedy - Comment out all instances of the following IMPORTS related to "HOST-RESOURCES-MIB":
hrDeviceIndex- Replace with INTEGER
InternationalDisplayString - Replace with OCTET STRING when SIZE is also specified. When SIZE is not specified as a qualifier with International Display string, then InternationalDisplayString may remain as used, and the full data type definition as contained in the HOST-RESOURCES-MIB must be inserted in the MIB.
Kbytes - Replace with full data type definition as contained in HOST-RESOURCES-MIB Insert the full data type definition into the Textual Conventions section of the MIB. The Kbytes type can then be used throughout the MIB.
Comment out all instances of the following IMPORTS related to "RFC1213-MIB":
ifIndex- Replace with INTEGER
Comment out all instances of the following IMPORTS related to "NetWare-Server-MIB":
TransportDomain - Replace with full INTEGER enumeration a teach reference to TransportDomain.
TransportAddress - Replace with full INTEGER enumeration type definition in the Textual Conventions Section of the MIB. This allows for references to TransportAddress throughout the MIB.
RFC1514 MIB Modifications. These modifications apply only to RFC1514.MIB.
Issue - In the IMPORTS section, only imports contained in RFC1155-SMI or RFC-1212 are accepted. Remedy -Comment out all instances of the following IMPORTS related to "RFC1213-MIB":
DisplayString - Replace with full data type definition as contained in RFC1213-MIB. Insert the full data type definition into the Textual Conventions section of the MIB. The DisplayString type can then be used throughout the MIB.
mib-2 - Replace with full OBJECT IDENTIFIER declaration in the OBJECT IDENTIFIER section of the MIB.
Issue- Does not accept DateAndTime type definition. Remedy- Replace all instance of DateAndTime with OCTET STRING.
Issue- After converting DateAndTime type definition to OCTET STRING, still not able to use the "(SIZE (8 | 11))" qualifier. Remedy- Comment out all occurrences of "(SIZE (8 | 11))".
Issue- Does not accept enumeration type definition for "Boolean". Remedy- Replace all references to "Boolean" with INTEGER.
NWTREND MIB Modifications. These modifications apply only to NWTREND.MIB.
Issue - In the IMPORTS section, imports not contained in RFC1155-SMI, RFC-1212, and RFC1215 are not acknowledged by SNM MIB2SCHEMA tool. Remedy- Comment out all IMPORTS related to "FROM HOST-RESOURCES-MIB":
InternationalDisplayString - Replace with OCTET STRING when SIZE is also specified. When SIZE is not specified as a qualifier with International Display string, then InternationalDisplayString may remain as used, and the full data type definition as contained in the HOST-RESOURCES-MIB must be inserted in the MIB.
NWALARM MIB Modifications. These modifications apply only to NWALARM.MIB.
Issue - In the IMPORTS section, imports not contained in RFC1155-SMI, RFC-1212, and RFC1215 are not acknowledged by SNM MIB2SCHEMA tool. Remedy- Comment out all IMPORTS related to "FROM HOST-RESOURCES-MIB":
InternationalDisplayString- Replace with OCTET STRING.
Utilizing the SunNet Manager SNMP Tools
The Sun Net Manager console can be used to manage NetWare Servers using the SNMP network management protocol. SunNet Manager provides SNMP tools which render services for event management, data retrieval, device monitoring, and object value setting.
Creating the SNM Schema Files for the NMA MIBS
Create the SNM schema file for each of the NMA MIBs using the MIB2SCHEMA tools provided by SNM. The SunNet Manager uses schema files to describe the attributes of a managed object.
For each NMA MIB (NWALARM.MIB, NWHOSTX.MIB, NWSERVER.MIB, NWTREND.MIB, RFC1514.MIB), execute the following steps (replace NMAfile referenced in the steps with the appropriate NMA MIB file name):
Place the NMA MIBs at the following location:
#Sun_prompt /usr/snm/agents
At the Sun command line enter:
#Sun_prompt /usr/snm/bin/mib2schema [input NMAfile.mib]

[output NMAfile.schema]
If all goes well, the following files will be created:
NMAfile.schema NMAfile.mib.oid NMAfile.mib.traps (This file will be created only if there are traps contained in the MIB being compiled.) . . .
Otherwise, a list of compilation errors will be displayed in the shell window.
Loading the NMA MIB Files
Load each of the NMA schema files in order to access NMA data via the SunNet Manager.
Open the SunNet Manager console. At the shell command line, type:
usr/snm/bin/snm [-I]
(The "-I" command line argument is used when the database is to be initialized. You will be queried as to whether to create a BasicStart empty management database or a HeadStart management database which contains several nodes on your local network which enables you to use SunNetManager right away.)
Load the NMA MIB schemas.
If the snm -I command line option was chosen, the NMA schema files located in the \snm\agents directory will be loaded automatically by SNM console. If you are using an existing management database, the NMA schema files must be loaded individually.
Select from the SNM menu File > Load > Predefined; a dialog box will appear.
Traverse the directories to the /snm/agents directory, select the NMAfile.schema file you wish to access and click the Load button.
If all goes well, a status line at the bottom of the SNM console window will indicate that the schema was successfully loaded. Otherwise, the status will indicate that errors were encountered which will be enumerated in an error file. The error file can be accessed via the menu View > Error Report.
Gathering SNMP NMA MIB Data
Select a NetWare server object with NMA installed and configured from a SNM Console map. This server could be among the objects discovered by the SNM discovery process, or can be created using the SNM console's graphical editor.
Create a NetWare Server object by selecting the menu bar Edit> Create, a creation dialog will appear. Select Server from the list of object types and click the Create button. A configuration menu will appear; follow the steps for configuring an object.
Configure the NetWare Server object if necessary. Select the object to be configured, select the menu bar Properties... item, a configuration dialog will appear. Insert a name and address for the object, select the NMA schema files, and click the Apply button.
The process of gathering NMA MIB data can be accomplished in various ways.
Quick Dump is available via the glyph menu, by placing the cursor over the server glyph (icon) and clicking the right mouse button, a menu which pertains to the functions available for the selected glyph appears.
Move the mouse cursor over the Quick Dump menu item and click the right mouse button, a sub-menu of schema's pertaining to the server will appear.
By selecting the desired schema with the right mouse button, another sub-menu of the schema's (MIB's) objects will appear.
Place the cursor over the object for which you wish to gather data and click either the right or left mouse button and a table containing the date from the specified server object will appear.
The SNM Console's Request menu bar item will also display a sub-menu containing the Quick Dump series of sub-menus described above.
Set/Get Request is available via the glyph menu by placing the cursor over the server glyph (icon) and clicking the right mouse button, a menu which pertains to the functions available for the selected glyph appear.
The same steps apply for Set/Get Request as described above for Quick Dump. However, instead of immediately supplying the data for the selected MIB object, a dialog appears allowing the user to select either a Get or Set button. This manner of retrieving MIB data will gather only the first row of a table, or whichever key row was specified in the dialog, or in the case of a group the entire group information will be retrieved.
Setting SNMP MIB Objects
Set Requests can be accomplished by following the steps listed:
Set request is available via the glyph menu by placing the cursor over the server glyph (icon) and clicking the right mouse button.
A menu which pertains to the functions available for the selected glyph appear.
The same steps apply for the Set Request as described above for Quick Dump. However, instead of immediately suppling the data for the selected MIB object, a dialog allowing the user to select either a Get or Set operation appears. This manner of retrieving MIB data will gather only the first row of a table, or whichever key row was specified in the dialog. In the case of a group, the entire group information will be retrieved.
If you wish to set an item in a particular row, enter the index key information in the dialog and the value for the attribute you wish to set. Once all values for set table items (indicated by a blank line in the New Value column) have been entered and the Enter key pressed, the items to be set will appear in the Set Information section of the dialog.
The Set button can now be clicked to issue the SNMP SetRequest.
If the set is successfully accomplished, a status line will appear at the bottom of the dialog indicating successful completion.
Forwarding NMA TRAP Information to SNM Console
The following configuration steps are required in order to forward NMA alarms from a NetWare Server to the SunNet Manager Console:
The MIB2SCHEMA utility, as described above, produces files with the extensions ; *.schema, *.oid, *.traps.
Run the BUILD_OIDutility . This will update the object identifier database with the information from the *.oid files.
#SUN_prompt <SNM_path</bin/build_oid
Append the nwalarm.mib.traps and the nwtrend.mib.traps files to the default trap file. The default trap file location is specified in the /usr/snm/snm.conf file as the na.snmp-trap.default-trapfile.
SUN_prompt# cat <SNM_path</agents/nwalarm.mib.oid << /var/adm/snm/snmp.traps SUN_prompt# cat <SNM_path</agents/nwtrend.mib.oid << /var/adm/snm/snmp.traps
Ensure that the NetWare Server's TRAPTARG.CFG file has been edited and that the SunNet Manager's IP Address is available.
Summary
In this AppNote, we have seen that the NetWare Management Agent can be customised to send TRAP information to statically-defined management consoles. Consoles advertising themselves can be dynamically added to the TRAPTARG list unless the FINDNMS.NLM is disabled. This also helps with scoping the network so that information from a group of NetWare servers can be managed from a given management console.
We have seen that by including ManageWise and a Unix-based console in the enterprise management environment, it is possible to export detailed NetWare information to the Unix-based console via ManageWise Export Services. This AppNote has provided comprehensive edit and load instructions for each of the three supported platforms (HP OpenView, IBM SystemView and SunNet Manager).
Rather than editing a "raw" set of NetWare MIBs, pre-edited versions for each platform can be obtained in the NMAUX1.EXE file on NetWire or from Novell's ftp server (ftp.novell.com). In the near future, additional pre-edited MIBs will be made available. Watch for a file called NLAUX1.EXE, which will contain the edited NetWare LANalyzer Agent MIBs for each of these platforms. GWUX1.EXE will provide the same for Novell's GroupWise product.
Glossary of Terms
Agent. A software component that prepares, accumulates, and remotely communicates information to a management software component.
Discovery. The process of identifying and storing information about the internetwork topology and devices in the ManageWise database, which is part of the ManageWise console. The console uses the data to create maps. Discovery is performed by the NetExplorer software.
Discovered Objects. Internet topology and devices that have been identified by NetExplorer, such as servers, routers, hubs, segments, IP networks, and IPX networks.
ManageWise Console. The PC on which ManageWise is installed; sometimes called NMS console. The ManageWise console software includes the NMS graphical user interface, alarm system, NMS database, and Intel's LANDesk Manager tools. The console communicates with the agents on the LAN using SNMP. The console collects data on the behaviour of network devices, and uses the console to display, review, manage, or acknowledge the data.
ManageWise Server. The NetWare 3.x or NetWare 4.x server on which ManageWise is installed; sometimes called the NMS server. The ManageWise server software includes NetExplorer or NetExplorer Plus software, the NetWare Management Agent, the NetWare LANalyzer Agent software, the LANDesk Manager Desktop Access and Inventory Manager software, and the LANDesk Virus Protect software.
Management Information Base (MIB). A schema file which can represent the configuration, performance, fault and accounting information available on a network device, via SNMP.
NetExplorer. The server components of the NetExplorer system, such as NETXPLOR.NLM, the link between the NetExplorer discovery NLM files and the NetExplorer Manager on the ManageWise console.
NetExplorer Manager. The ManageWise console component of NetExplorer. This component controls the frequency and duration of updates from the server components of the NetExplorer system.
NetExplorer system. The complete ManageWise component that discovers information for the ManageWise database. NetExplorer includes server components (NETXPLOR.NLM, NXPIPX.NLM, NXPIP.NLM, and NXPLANZ.NLM) and console components (NetExplorer Manager).
NetWare Management Agent (NMA). A series of NetWare Loadable Modules (NLMs) which provide detailed information to a ManageWise console about the server the NLMs are loaded on.
TRAPs. Messages sent by an Agent to management consoles defined in the SYS:\ETC\TRAPTARG.CFG file on the network device.
NetWare LANalyzer Agent. A set of NLMs that provide remote network analysis of a given Ethernet or Token Ring segment, regardless of the protocol used by the status on the segment, while discovering all nodes on that segment. Multiple segments can be monitored by putting NetWare LANalyzer Agents on each segment. The NXPLANZ.NLM software on the NMS server queries the NetWare LANalyzer Agent-equipped servers using the IP and IPX protocols for information about each of the devices that reside on that segment.
NetWare Management System (NMS). The previous name for the Novell components in ManageWise. ManageWise consists of components from Novell and Intel.
NXPIP.NLM. An NLM installed on the NMS server. It uses the Simple Network Management Protocol (SNMP) to discover IP routers.
NXPIPX.NLM. An NLM installed on the NetWare server. It uses a variety of NetWare, SNMP, and IPX functions, such as SAP and IPX diagnostics, to discover NetWare servers, IPX routers and IPX workstations.
NXPLANZ.NLM. An NLM installed on the NetWare server. It queries NetWare LANalyzer Agents for information about all the devices that exist on their network segments, regardless of protocols.
Simple Network Management Protocol (SNMP). An open, industry-standard protocol used for the management of network devices. The use of SNMP provides conventional techniques for accessing and retrieving MIB object data, executing MIB object value settings, and receiving MIB alarm traps.
* Originally published in Novell AppNotes
Disclaimer
The origin of this information may be internal or external to Novell. While Novell makes all reasonable efforts to verify this information, Novell does not make explicit or implied claims to its validity.