Using Novell's NetWare User Tools (NWUSER.EXE) for Client 32 Workstations
Articles and Tips: article
Research Engineer
Systems Research Department
MIKE HEMSLEY
Software Engineer
Distributed Networks Business Unit
BEN HENDRICK
Corporate Integration Specialist
Novell Consulting Services
01 May 1996
NetWare Client 32 for DOS/Windows includes special support features for workstations running Microsoft Windows 3.1, 3.11, and Windows for Workgroups 3.11. Part of that support is a client utility called the NetWare User Tools (nwuser.exe). This utility is similar to the NetWare User Tools utility released with the NetWare DOS Requester, only it contains added features that will be discussed in this AppNote.
This Application Note covers the features and functionality of the NetWare User Tools utility for the Client 32 platform. It also provides some tips and tricks for using the NetWare User Tools, such as how to disable the NetWare User Tools function buttons, along with some general troubleshooting information.
RELATED APPNOTES Jun 95 "Using Novell's NetWare User Tools (NWUSER.EXE) for MS Windows Clients"
- Introduction
- About the NetWare User Tools
- A Guided Tour of NetWare User Tools
- Tips and Tricks
- Troubleshooting the NetWare User Tools Utility
- Conclusion
Introduction
Novell's NetWare Client 32 for DOS/Windows is designed to give users full 32- bit access to NetWare services and resources on the network. With the large numbers of users staying with Windows 3.1x as a desktop operating system, Novell has continued to support the Windows features with enhancements within the Client 32 architecture. These support features include the GUI login utility and the NetWare Application Manager. Another part of this enhanced support is a client utility called the NetWare User Tools (nwuser.exe). This utility is included in the netware.drv driver that comes with the NetWare Client 32 for DOS/Windows software.
This Application Note covers the features and functionality of the NetWare User Tools so users can work more effectively in the NetWare environment from within Windows. It gives some tips and tricks for using the NetWare User Tools, and ends with a discussion of general troubleshooting issues. It also discusses how to disable the buttons within the NetWare User Tools, thus restricting the users' network access when needed.
Network administrators, support providers, and training organizations can use this information to train users on the proper installation and use of the NetWare User Tools in Windows environments.
|
Note: The information in this AppNote is specific to NetWareClient 32 for DOS/Windows version 1.0. Details of usagemay change and new features may be added in futureversions. |
About the NetWare User Tools
The NetWare User Tools utility works the same for Windows 3.1, 3.11, and Windows for Workgroups 3.11. (For Windows 95, the functionality described below is integrated into the Network Provider API set.) This AppNote assumes you have a NetWare workstation (80386-based PC or better) running DOS 3.x or higher and MS Windows 3.1(1) or Windows for Workgroups 3.11 in 386 Enhanced mode. To get the most from this AppNote, you should have a good understanding of Windows and its terminology.
Nwuser.exe is an executable utility with hooks into netware.drv, the Novell driver that provides the interface into NetWare for Windows users. This driver is loaded in the system.ini file as follows:
SYSTEM.INI
[boot]

network.drv=netware.drv
The netware.drv file itself typically resides in the WINDOWS/SYSTEM directory if Windows is configured locally.
Installing Client 32 with Windows Support
When you install NetWare Client 32 with support for Windows, the installation program sets up drivers, DLLs, and utilities (including NetWare User Tools) that make Windows a more useful NetWare client. As part of the installation program, you select the Windows directory. The installation program defaults to the directory found in the DOS PATH statement on the workstation (usually C:\WINDOWS).
Ensure that the proper local or network directory is selected. This is either done by the user to a directory on the local drive such as C:\WINDOWS, or to a shared Windows directory such as G:\APPS\ WINDOWS through the customized options for Windows. These installation options are covered in the AppNote entitled "Installing NetWare Client 32 for DOS/Windows"in this issue.
A Guided Tour of NetWare User Tools
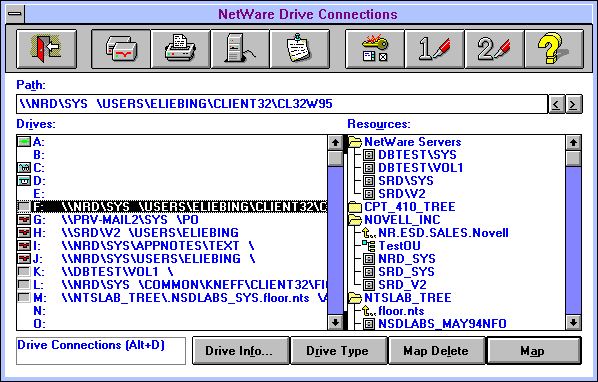
Once you have installed Client 32 with Windows support and go into Windows, you will see a new program group called NetWare Tools, with a "toolbox" icon in it representing the NetWare User Tools (NWUSER) utility. To see what NWUSER has to offer, double-click on the icon. You will see a screen similar to the one shown in Figure 1.
Figure 1: The initial screen of the NetWare User Tools utility.
Across the top of the screen are buttons depicting the different functions you can perform in the utility. For example, you can map drives, set up printing, attach to and logout of servers, send messages to other users, configure the NetWare User Tools utility itself, and so on.
Clicking on the open door button in the upper left-hand corner of the window exits you from the NetWare User Tools. (You can also exit by pressing Alt+X or the <Esc< key.)
The NetWare Drive Connections Window
The first time you start NWUSER, you'll see the NetWare Drive Connections window as shown in Figure 1. From this window, you can map network drives to the servers you are presently attached to. (If you are currently in another NWUSER window, access the drive connections window by clicking on the drives button, or by pressing Alt+D.)
At the bottom of the NetWare Drive Connections window are four buttons: Drive Info, Drive Type, Map Delete, and Map. We'll explain the use of each button in the sections that follow.
Mapping a Drive. There are two ways to map a drive in the Drive Connections window: by using the Map button at the bottom of the window, or by using the Windows "drag-and-drop" technique. We'll explain the button method first.
To add a drive mapping, first go to the Drives list and click on the drive letter you want to use for the mapping. In the Resources list to the right, double-click on the desired volume. You will see the directories that are immediately beneath the volume (provided you have sufficient rights to see them). Double-click on a directory to see the subdirectories beneath it. Keep clicking on subdirectories until you arrive at the directory you are looking for. As you click down the directory structure, the full directory path is displayed in the Path box above.
|
Note: In the NetWare User Tools, paths are displayed accordingto the Universal Naming Convention (UNC). The syntax forUNC is \\Tree_name\Volume\Path. This is differentfrom NetWare's traditional path syntax of Servername\Volume:Path. For NetWare 4 and Directory Services, thevolume may include its full context name; for example,\\NTS_INC\.NRD_SYS.NR.APPNOTES.Novell\Path. |
Before you map the drive, you need to decide where you want the "root" of the path to be. In DOS the root of a drive defaults to the volume level because you can't go any higher than that with the CD (Change Directory) command. NetWare provides a MAP ROOT text command that lets you set a "fake root" further down in the directory path. When a drive is mapped as a fake root, you can't move up a directory level from that point in the path when that drive is your current drive.
In the NetWare User Tools for Client 32, the drive root defaults to the volume level of the path you entered in the Path box. This is the opposite of the DOS Requester version, which defaults to the end of the path. You can use the right-pointing (>) and left-pointing (>) buttons to the right of the Path box to adjust the directory level you want to designate as "root." Clicking on the right-pointing (>) button moves the "root" designation one directory level away from the volume. Clicking on the left-pointing (<) button moves the "root" designation one level up, toward the volume. The current position of the "root" designation is indicated by a space.
Once you've specified where you want the "root" designation, simply click on the Map button at the bottom of the window to map the directory shown in the Path box to the selected drive letter.
To use the Windows "drag-and-drop" technique, you don't need to select a drive letter first. Just click down the directory structure in the Resources list until you arrive at the desired directory. Now click the left mouse button and hold it down. A drive icon will appear to represent the directory. Drag the directory icon over to the drive letter you want to map it to and release the mouse button. The directory is now mapped to that drive letter.
Displaying Information About a Drive Mapping. Highlighting a mapping in the Drives list and clicking on the Drive Info button shows you the directory tree that you are logged in to, which server the directory is on, the full directory path, your user name, your effective rights, and your inherited rights mask to this directory (see Figure 2).
Figure 2: The Drive Info... window shows details about the selected drive mapping.
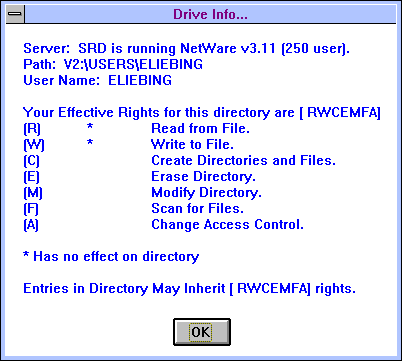
In Figure 2, user ELIEBING is running on a NetWare 3.11 server named SRD. He has all rights but Supervisor (RWCEMFA) in the highlighted directory (SYS:\USERS\ELIEBING).
Clicking on OK returns you to the NetWare Drive Connections window.
Looking at Drive Type Information. If you want to have a drive mapping set up every time you enter Windows, or if you want to make the drive a search drive mapping, highlight the drive and click on the Drive Type button. You will see the "Drive Type" screen, with the Map Path, along with the ability to make the drive letter a permanent drive, and/or a search drive (see Figure 3).
Figure 3: The Drive Type screen allows you to mark the directory in the Map Path entry as a permanent/search drive.
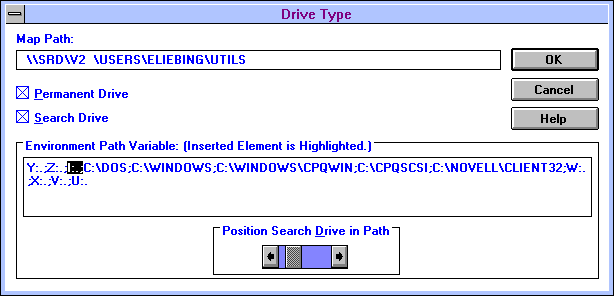
The Map Path entry box shows you the directory path of the selected drive. Underneath are two check-box settings for making the drive mapping a Permanent Drive or a Search Drive (or both).
Setting a Drive Mapping as Permanent. To set the drive mapping as permanent, click on the Permanent Drive box so that an X appears in the box. When you click the OK button, you will return to the NetWare Drive Connections screen and the small icon to the left of the drive letter will change from a plain box to a drive icon. From now on, every time you enter Windows you will see a NetWare Restore Connections window in which the permanent drive mapping is established (see Figure 4).
If you are currently logged in to the corresponding server, the drive mapping is performed automatically and the window disappears on its own. If you are not currently logged in, you will be prompted from the NetWare Restore Connections window to either log in or skip the drive mapping.
Figure 4: The NetWare Restore Connections window is displayed when you start Windows and have made permanent settings.
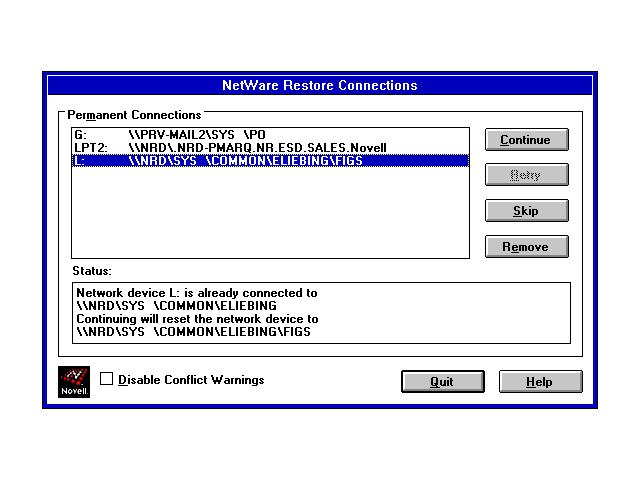
In Figure 4, notice that the Disabled Conflict Warnings box is not checked. This means that NWUSER will display a warning before overwriting any pre-existing, duplicate drive mappings (and Capture statements) with the drive mappings (and Capture statements) you have made permanent. If you don't want to see these warnings, check the Disabled Conflict Warnings box. However, having the conflict warnings initially displayed can be useful when troubleshooting drive mapping problems.
|
Note: You can also check or uncheck the Disable ConflictWarnings setting under the Permanent Connectionsportion of the NetWare Settings (which we'll discuss later). |
If you have set up a permanent drive mapping and you decide you don't want it to be permanent any more, highlight the mapping in the NetWare Drive Connections window and click the Permanent button again to unmark the drive letter. Tthe drive icon to the left of the drive letter will revert to an empty box.
Setting a Search Drive Mapping. If you want the directory in the Map Path box to be designated as a search drive, click on the Search Drive box so that an X appears in the box. You will then be able to select where the search drive will appear in the Environment Path Variable. (If you do not check the Search Drive box, the Environment Path Variable settings remain unchanged.) Click on the right or left arrow keys in the Position Search Drive in Path window (shown in Figure 3) to position the new drive mapping in the path. When you're finished, click on the OK button to return to the NetWare Drive Connections screen. You will see eyeglasses added to the icon to the left of the drive mapping.
Deleting a Drive Mapping. To delete a drive mapping from the NetWare Drive Connections screen, highlight the drive you want deleted and click on the Map Delete button at the bottom the NetWare Drive Connections window.
NetWare Printer Connections
Clicking on the Printer button (Alt+P) in the NetWare User Tools brings up the NetWare Printer Connections window (see Figure 5). From here you can connect logical LPT port designations on the workstation to NetWare print queues on the network. This is analogous to setting up printer port redirection through the CAPTURE text utility in DOS. However, in the NetWare User Tools, you can have up to nine logical printer ports captured, even when connecting to NetWare 3.1x servers.
Figure 5: You set up Capture statements in the NetWare Printer Connections window.
The bottom part of the screen has four buttons: LPT Settings, Permanent, End Capture, and Capture. We'll discuss the use of these buttons a bit later.
Adding a Printer Driver in Windows. Before you can access NetWare print queues through the Printer Connections window, you need to set up printer drivers for Windows printing. You can access the place in Windows where you connect printer drivers to NetWare print queues through a couple of methods:
You can set up printing and attach printer drivers to print queues from the Printers button that is under the Control Panel Icon in the Main group.
You can also do this from the Printer Setup option under the Options pull-down screen in Print Manager (if activated).
The process of connecting printer drivers to NetWare print queues is done through the netware.drv driver that is installed when you install Client 32. This driver contains the NetWare connectivity that is necessary to print to NetWare print queues from within Windows. The screen you see through the Printers icon in Control Panel or through Print Manager is the same one you see when you select the Printer Connections button in the NetWare User Tools.
Let's go through the procedure for adding a printer driver through the Printers icon in the Control Panel. When you click on this icon, you'll see the printer drivers you have selected (if any) for the printers installed on a printer port, such as LPT1 or COM1. To add a new Windows printer driver, click on the Add button, select the printer driver from the List of Printers, and insert the proper Windows diskette as prompted. (You may need a supplemental diskette from your printer vendor that contains the driver you want to add.) Once the driver is added, you will be returned to the Printers window.
|
Note: These are printer drivers that Windows and Windowsapplications will use. DOS-based applications must usetheir own printer drivers in order to print. For moreinformation on many of these printer configuration aspects,see "Printing to Network Printers in Windows 3.1" in theDecember 1994 Novell Application Notes. |
From the Printers window, you next select the Connect button. In the Connect window, click on the Network button to bring up the NetWare Printer Connections screen. (This is the same screen that you see in the NetWare User Tools utility, shown in Figure 5.)
In the NetWare Printer Connections window, you can capture a port by highlighting the desired LPT port and then selecting a print queue from the Resources list. Click on the Capture button (Alt+A) to establish the capture.
We'll give more details about the buttons in the NetWare Printer Connections window under the next heading. For now, close the window by clicking on the Exit button (Alt+X). You will be returned to the Connect window, where you will see that the LPT connection now has a server and print queue designation (see Figure 6).
Above the Ports list, Windows displays the name of the printer driver you have selected for the printer that is servicing the print queue. Be sure that this is the correct printer driver for the print queue/printer you have selected; otherwise, printed output may be unintelligible or it may not print at all.
Figure 6: Sequence of windows when setting up a printer driver from the Control Panel.
Click on the OK button to return to the Printers window. From here you can set your default printer, add and remove printer drivers, and (via the Setup button) set up the printer driver to better match the printing you plan to do. The setup options typically include paper orientation (portrait or landscape), printer font cartridges, and so forth.
Setting Up a Capture in the Printer Connections Screen. A connection you make in the NetWare Printer Connections window between a logical LPT port and a NetWare print queue acts as a CAPTURE statement does in DOS. In fact, typing CAPTURE SH <Enter< at a DOS prompt displays the CAPTURE settings that you have set up in the NetWare User Tools. Likewise, any CAPTURE statements you set up in DOS before entering Windows will be reflected in the Printer Connections window (unless overwritten by a permanent Capture setting, as explained later).
|
Note: NetWare 3.1x utilities support only three LPT settings,while NetWare 4 utilities can handle up to nine logical LPTsettings. See the "Tips and Tricks" section of this AppNoteto find out how to extend the number of logical ports youcan see in NetWare User Tools to nine. You can do thiseven on a NetWare 3.1x network; however, you must usethe NetWare User Tools to manage these changes. |
In the NetWare Printer Connections screen, double-click on the available NetWare servers and NDS tree names in the Resources list to view the print queues that are available to you. You can click and drag a print queue from the Resources list over to the Ports list. Drop the selection on the LPT connection that matches the printer that is servicing the selected print queue. The printer driver should already be set up, as explained in the previous heading.
Print queues listed on the Resources side above the NDS tree name (our example in Figure 5 shows NOVELL_INC as the tree name) are NetWare 3.1x printer services. Those print queues listed below the NDS tree name are NetWare 4 print queues that are available to you.(See the "Tips and Tricks" section of this AppNote for a way to change the current context in a NetWare 4 environment to access other printer and print queue resources.)
Click on the Capture button to establish the Capture statement. (On NetWare 4 servers using NDS, you will see the entire tree name, followed by the full printer and container name, such as \\NTS_INC\.HP-ONLY.PRODUCT.EVAL.NTS.) Once you have done so, you can click on the LPT Settings button (Alt+G) to set all parameters that you would normally include as part of the Capture statement, such as Hold, Notify, Form Feed, Auto Endcap, Direct, Keep, Enable Tabs, Enable Timeout, Enable Banner, and Copies (see Figure 7).
Figure 7: You specify LPT Settings for your Capture statement In the NetWare Settings window.
You can use the Defaults button to make this setting the default for this current LPT setting, or for all LPT settings globally. To make this the default for this LPT setting only, click on Defaults>> and then click the Current LPT Only box so it has an X in it. This option is used mainly for an LPT port that you are defining in some unusual or highly specialized way. To initiate default settings that will apply to all your LPT ports (such as disabling the banner page), make your LPT settings, then click the Defaults>> button and check the box to the left of the Global (All) LPTs entry. Click on Save to save your settings.
When you are finished setting up Capture settings, click on OK. The Capture statements created here work for both DOS and Windows sessions. They remain in effect when you leave Windows and access applications through DOS.
To disable a Capture statement from the Printer Connections window, click on the End Capture button (Alt-E). This has the same effect as running the ENDCAP text utility in NetWare 3.1x, or CAPTURE /ENDCAP in NetWare 4.
Making a Capture Permanent. You can make your Capture statements permanent so that every time you go into Windows, the NWUSER utility takes care of your Capture statements for you. You do this through the Permanent button at the bottom of the Printer Connections window. A small printer icon will appear to the left of the LPT designation. The next time you go into Windows, you will see the Capture statements added through the NetWare Restore Connections window as Windows comes up.
If you are overwriting a CAPTURE command that is in either the system or container login script or in your own personal login script, the Restore Connections window will notify you of the conflict. If you want the Windows settings to always overwrite earlier CAPTURE commands, check the Disable Conflict Warnings box at the bottom of the Restore Connections window. Previous CAPTURE commands will be automatically overwritten.
|
Note: You can also check or uncheck the Disable ConflictWarnings setting under the Permanent Connectionsportion of the NetWare Settings (which we'll discuss later). |
Attaching to Servers
The NetWare Connections button is to the right of the Printer Connections button. By clicking on this button (or by pressing Alt+C), you access the NetWare Connections window from which you can log in (attach) to and log out from NetWare servers or NDS trees. With Client 32, you can attach to more than one NDS tree and therefore map drives to the various servers in these different trees.
The NetWare Connections window is divided into three parts: a Context box, a Connections list, and a Resources list (see Figure 8).
Figure 8: The NetWare Connections window.

In NetWare 4 environments, the Context box displays your current context within the NDS tree. NetWare User Tools uses the short form, leaving out the OU= and O= designations, to display the context. (See the "Tips and Tricks" section of this AppNote for a way to change the current context and see other servers.)
By default, items in the Connections list are sorted by resource type. The default order is bindery-based servers first, followed by the tree names and the NetWare 4 servers that are available in the container that you are looking at. Figure 8 includes the SRD 3.1x server and the NOVELL_INC tree, as well as the servers whose services are presently in use in that tree. Note that NDS trees are identified by a tree icon.
The Resources part of the screen lists the available NetWare 4.x, 3.x, and 2.x servers, your current NDS tree, and other trees you can access. In Figure 8, the list includes servers such as YODA, ZILKER, and ZOMBIE, the current NDS container, and several other NDS trees that are available, such as ALBERTREE and ANCS.
At the bottom of the window are buttons that let you see NetWare information about a server you have selected, set your password, and log out or in.
To attach to a new server, click on the server you want in the Resources list and press the Login button (Alt+I). This brings up the Login To NetWare window (see Figure 9).
Figure 9: The Login To NetWare window.

This window displays the server or tree you have selected and allows you to log in as Guest or as a Registered User. You can only log in as Guest if there is a GUEST account defined for that server. If you are a "registered" user (one with a valid user account set up on the network), verify that the name presented in the User Name box is correct. If it is, press <Tab< to move to the Password box and type your password. Now press <Enter< (or click OK). The server you are logged in to appears in the Connections list.
|
Note: The login box only attaches you to the server and does notexecute any login scripts. It is the same as logging in with aLOGIN /NS (No Script) command. The "Login" optionunder NetWare User Tools does authenticate you to NDSin NetWare 4. However, if you want to run a login script,your initial login should be done at the DOS command linewith the LOGIN text utility before you load Windows, orthrough the GUI Login utility that comes with Client 32. |
In Client 32 you can log in to more than one NDS and set up drive mappings to services within the other trees. To do this, select an NDS tree that you have rights to, then fill in your username and password in the Login To NetWare window. Once you are attached, you can select the Drive Connections window to map a drive to the directory you want to access. You can also select the Printer Connections window and send print jobs to printers and print queues found in the other NDS tree.
Viewing NetWare Information. Once you are logged in, you can see information about a server by either double-clicking on the server name in the Connections list, or by highlighting the server and clicking on the NetWare Info button (Alt+F). This displays information such as the server name and version, who you are logged in as, your connection ID, and your connection type (see Figure 10).
Figure 10: The NetWare Info... window displays details about your server connection.
This information is similar to that displayed by the WHOAMI text utility in DOS.
Changing Your Password. To change your password while in Windows, highlight the server on which you want to change the password and click on the Set Pass button (Alt+T). (In NetWare 4, you highlight the NDS Tree in the Connections window rather than the server itself.) You will see a NetWare Set Password window similar to the one shown in Figure 11.
Figure 11: You can change your password in the NetWare Set Password window.
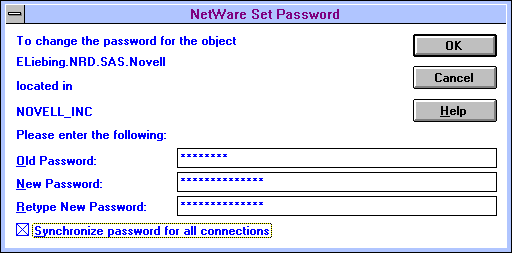
From this window, you can change the password for you as a user object on the server or container object that you have highlighted. Type in the old password once and the new password twice. If successful, you'll see a message that says "The password was successfully changed."
You can also check the Synchronize Password For All Connections box to ensure that your password is syncrhonized to all of the servers that you are currently logged in to.
Sending Messages
Sending brief messages has been a part of NetWare since its inception. You can send two one-line messages (one for the screen and one for the message buffer) to anyone who is logged in to the servers you are.
|
Note: While you can send more than two messages, the messagebuffer will only hold one message and discards any othermessages sent after the buffer is full. |
The NetWare User Tools also has messaging capabilities that allow you to send up to two messages to users or groups. To use the NetWare User Tools for sending messages, click on the button that looks like a wrinkled note tacked to a bulletin board, or press Alt+M.
At the top of the NWUSER window, you see a Message box in which to type in your message. The two sides of the main window are divided into a Connections side and a Resources side (see Figure 12).
Figure 12: The NetWare Send Messages window.
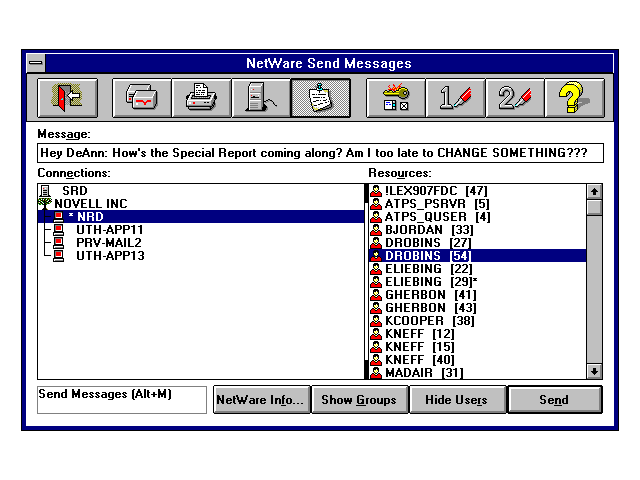
As you click on a server on the Connections side, the users and groups on the Resources side change to reflect the new selection. (See the "Tips and Tricks" section of this AppNote for a way to change the current context for access to other resources.) The NetWare Info button is available if you want to see general information about the server you have highlighted. This is the same information you see from the similar button in the NetWare Connections window.
You can send messages to groups or users or both. If you want to see just users in the Resources list, click on the Hide Groups button (Alt+G) on the bottom of the window. Now no groups will be displayed in the Resources list. The Hide Groups button changes into a Show Groups button.
Conversely, if you don't want to see any users in the Resources list, click on the Hide Users button (Alt+R). No users will be displayed in the list, and the button changes into a Show Users button.
To send a message, type the text of the message in the Message box. You can type in up to 256 characters, including spaces, and the text will scroll horizontally within the Message box. Then highlight a user or group in the Resources list and press <Enter< or click on the Send button at the bottom (Alt+N).
The length of the message you can send depends on the version of NetWare running on your current server. On a NetWare 3.12 or 4.1 server, the maximum is 250 characters minus the message header, which has the following format:
From <username< [<connection number<]:
The maximum for all other versions of NetWare is 58 characters. The Client 32 version of NetWare User Tools won't let you type in more characters than can be sent for the type of server you have selected in the Connections list.
If you send messages to users who are in DOS, the text is displayed in a box in the middle of the screen. The box expands to fit the size of the message being sent. DOS-based recipients can clear the message by pressing Ctrl-Enter.
NWUSER provides a buffer that allows you to send two messages to a person or group. Once the first message is received and appears on the recipient's screen, the second message goes into the buffer. If you try to send a third message before the recipient has cleared the first one, you will see the error "Message NOT Sent To: Username[ConnectionNumber]" because the message buffer is full.
Checking the NetWare Settings for Windows
The NetWare Settings button is to the right of the Message button and is shown as a key, a menu, and a check box. When you click on this button, you will see the NetWare Settings window divided into four pages: User Tools, NetWare, Startup, and Login (see Figure 13).
The User Tools Page. The User Tools page contains information about Resource Display Options, Enable Hotkey, and Drive Mapping Option.
Figure 13: The NetWare Settings window is where you set various options for the NetWare User Tools utility through the four pages.
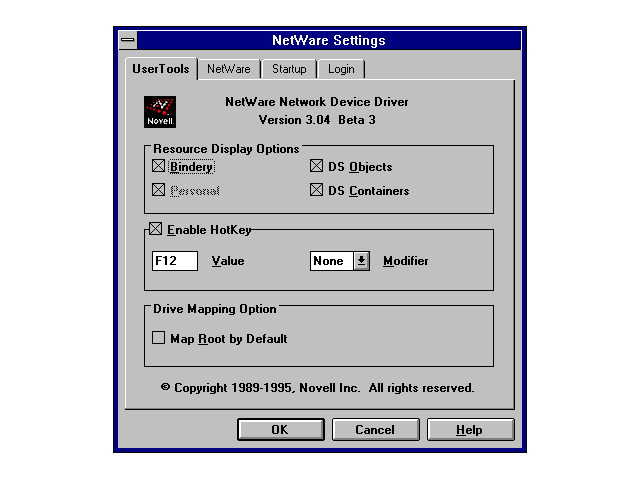
The Resource Display Options include four settings for the different NetWare platforms you may be attached to. For example, if you are logged in to NetWare 2.x, NetWare 3.1x, and NetWare 4 servers, you can use this option to display the resources of these servers with their own particular picture descriptions.
The default is to have all resources selected; however, only those resources whose functions are enabled appear in black. Those resources whose functions are not enabled appear "grayed out" like Personal (for Personal NetWare) in Figure 13. You can use this color distinction to help troubleshoot resources problems (see "Losing Directory Services Functions" later in this AppNote.)
Depending on your rights, you can enable or disable the Bindery, Personal, DS (Directory Services) Objects, and DS Containers entries. For example, if you didn't want NDS containers to appear as a resource in the screens of NetWare User Tools, you would click on the DS Containers entry and remove the X from its box. Then you would not be able to browse up or down the NDS tree to view resources in other containers.
The Enable Hotkey box has two related entries: Hotkey Value and Modifier. Check the Enable Hotkey entry to enable the Hotkey function. You can then press the function key shown as the Hotkey Value (F6 is the default) to bring up the NWUSER utility any time you are in Windows. (This doesn't apply when you are in a DOS session in Windows.)
With the Hotkey enabled, the NWUSER utility makes the following changes to the NETWARE.INI file:
NETWARE.INI [options] HotKeyEnabled=1
You can modify the function key designation by clicking the Modifier box and selecting one of the following options: None, Ctrl, Shift, or Alt. If you select Shift for the Modifier, for example, you must press both the Shift and the F6 keys together to hotkey to the NetWare User Tools utility. If the key combination you choose is already being used by NETWARE.DRV in some way, you'll hear a beep and won't be able to select it. For example, NETWARE.DRV uses the F1 key to display Help, so you can't select that key. Neither can you select F2, F5, or F10. (F10 activates the dialog box menu, just like when you click on the bar icon in the upper left-hand corner of a window.)
Other applications may use certain key combinations which NETWARE.DRV can potentially interfere with. In this case, you will need to select a different key combination to activate the NWUSER utility. This can get rather tricky, given the number of different Windows applications available.
If you change your mind and want to go back to the F6 default, click Cancel at the bottom of the screen before you click on the OK button. Or if you try another Hotkey sequence and don't like it, you can highlight the Hotkey Value box later and change it back to F6 or to a different value.
|
Note: You can run NWUSER as a minimized icon rather thanhaving to press F6 every time you want to bring up theutility. See the "Tips and Tricks" section of this AppNotefor details. |
The Drive Mapping Option is for those who are used to having the NetWare User Tools utility map root drives because of the DOS Requester's connection with DOS. To set NWUSER to map drives to root by default, click to the left of the Map Root by Default entry so there is an X in the box. You would then work towards the volume level with the arrow keys in the Drive Connection window if you wanted to move the "root" level up the directory path.
The Netware Page. The NetWare page contains the following settings: Message Reception, Print Manager Display Options, and 386 Enhanced DOS Sessions (see Figure 14).
Figure 14: The NetWare page gives you three options to set: message reception, printing options, and enhanced DOS sessions.
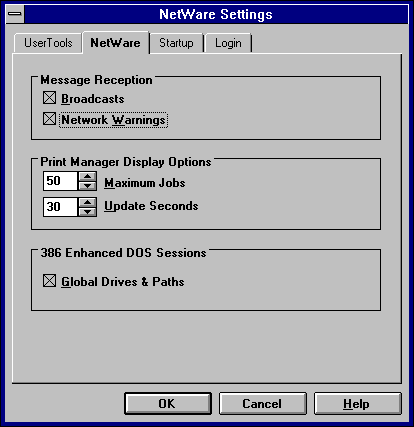
The Message Reception settings affect broadcasts and warnings. Broadcasts are server broadcasts, such as "The server volume is almost out of disk space." The Network Warnings entry affects the display of any problems that might be happening when Windows loads the NETWARE.DRV driver and tries to set up the NetWare environment.
To receive either or both types of messages while you are in the Windows environment, click on their corresponding boxes. If you don't want these messages displayed at your workstation, uncheck the appropriate boxes.
|
Note: If you are having problems with the NetWare User Tools, itis a good diagnostic step to enable the Network Warningsentry so you can track any problems you might be havingas Windows loads. |
The Print Manager Display Options include two options: Maximum Jobs and Update Seconds. The Maximum Jobs entry allows you to display up to 250 jobs in the NetWare print queue through a Print Manager's view of the print queue. You can also set the number to display only one print job (the default is 50). You can have more jobs than this in the queue, but you just can't see them.
If you want the information on the screen updated more than every 30 seconds (the default), you can use the Update Seconds entry to change the update rate on jobs in the print queue. If you lower this number, Windows will have to update the screen more often and printing will slow down a bit because more time is being spent on screen updates. When many jobs are queued up for printing, this can also consume some network bandwidth as the data is periodically retrieved from the server. (The update interval has little or no effect on the print job once it is being serviced by the print server.) You can set the option down to 1 second or up to 65 seconds.
The 386 Enhanced DOS Sessions option has just one entry, Global Drives & Paths, which can be enabled (checked) or disabled. This option is mainly for the NetWare DOS Requester and not for Client 32, since Client 32 and its NETWARE.DRV driver take care of global and private drives differently than the VNETWARE.386 driver does for the DOS Requester.
|
Note: The initial release of Client 32's NWUSER utility has onlyglobal drive capability, which means that all changes in aDOS will affect other DOS sessions. A later release ofClient 32 may allow private drive mappings. When thisfeature becomes available, follow the information containedin the next two paragraphs. |
When enabled, this option allows you to share the changes you make through Drive Connections to affect all DOS sessions and Windows applications you go into. For example, you can change your drive mappings through the Drive Connections button, go into a DOS session, and see that the drive mappings are there, even after you exit Windows and go to DOS.
With the Global Drives & Paths disabled (unchecked), you will use NetWare drive mappings that you had when you went into Windows. Drive mappings made in two different DOS sessions will work independently of one another. The same drive letter in two separate DOS sessions can be mapped to two different paths.
The Startup Page. The Startup page contains the following options: Windows Login and Permanent Connections (see Figure 15).
Figure 15: The Startup page lets you set the Windows Login and Permanent Connections options.
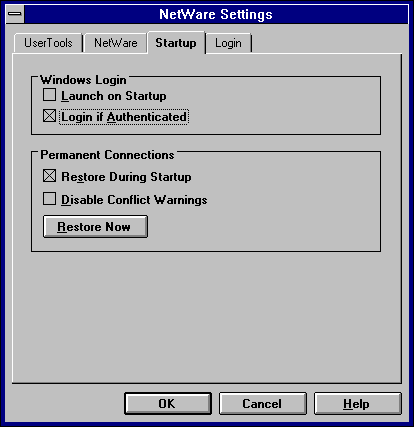
Under Windows Login, the Launch on Startup option brings up the Client 32 GUI Login utility if you are not logged in already. If you do not check this box, you won't get the GUI login choice when Windows comes up. The Login If Authenticated entry means "show me the GUI login even if I am logged in." If the box is not checked, you won't see the GUI login if you are logged in.
Permanent Connections also has two entries: Restore During Startup and Disable Conflict Warnings. You need to have the Restore During Startup entry enabled if you want to use the Permanent buttons under the NetWare Drive Connections and NetWare Printer Connections windows. This way, the next time you go into Windows, your drive mappings, printers, and server connections will be restored.
The Disable Conflict Warnings entry prevents NWUSER from showing you messages that a network drive mapping set up in Windows is going to overwrite a NetWare drive mapping that you have in place before going into Windows.
For example, if you map drive M as a permanent drive mapping in Windows, but it's already mapped to a different directory, you will see a Status message in the NetWare Restore Connections that says something like this:
Network device M: is already connected to

\\SRD\V2\USERS\ELIEBING

Continuing will reset the network device to

\\SRD\SYS\COMMON\ELIEBING
When you press the Continue button, the drive mapping is overwritten.
You also can check the Disable Conflict Warnings box that you see at the bottom of the Status Message in the NetWare Restore Connection screen. Then you won't see messages when other drive mappings overwrite current drive mappings.
The Login Page. The Login page gives you the following five choices: Display Connection Page, Display Script Page, Display Variables Page, Save Settings when Exiting Login, and Restore Permanent Connections (see Figure 16).
Figure 16: The Login page contains settings for the NetWare GUI Login utility.
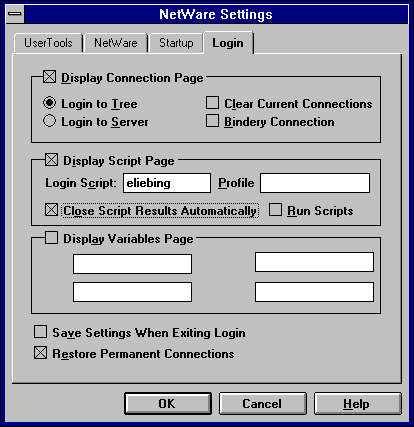
The first three settings determine which pages you see when the NetWare GUI Login utility is launched. (You can also manually add the appropriate command line option in the Properties for the GUI Login utility as explained in the AppNote entitled "Using the Client 32 GUI Login Utility and the NetWare Application Manager (NAM)" in this issue.)
Display Connection Page causes the Connection page to be displayed. This is the same as adding the /c option to the LOGINW31 command in your properties page for GUI login. You can choose whether to initially show a Login To Tree or to a Server window. You can also select to clear current connections, which determines whether the new login connection retains and augments your existing network connections or starts over from scratch. (Placing an X in the box clears the connections, while leaving the box clear retains existing connections.)
The Bindery Connection entry allows you to connect to resources through bindery services. Check the box for bindery-service authentication, or leave the box unchecked if you want to use Directory Services login capabilities. (This option is ignored if you select the Login To Tree option.)
Display Script Page causes the Script page to be displayed. This is the same as adding the /s parameter to the LOGINW31 command in your properties page for GUI login. You can tell the GUI Login utility to run the login scripts that you normally run, or you can have it run the script specifed in the Login Script box. Type in the drive, path, and filename of the script that you want to run, such as:
G:\USERS\ELIEBING\CONNECT2.NRD
The script file must be in ASCII text format. You can put in login script functions, just as you would through the INCLUDE login script statement.
In the Profile box, you can specify a login script to run in place of the regular profile script. Follow the procedure explained above for specifying the filename. You can also use the name of an object in the NDS tree you are logging in to. The object must have a Login Script property and you must have Read rights to the object.
If you check the Close Script Results Automatically box (the default), the Login Results window will close automatically once the login script finishes running. If the box is unchecked, the results window stays open until you click on the Close button. In either case, the results window will stay open if you have login script errors or if you have messages displayed in your login script through the DISPLAY script command.
If you check the Run Scripts box (the default), your login scripts will be run when you log in. If you don't want to run the login scripts when logging in through GUI Login, uncheck this box.
Display Variables Page causes the Variables page to be displayed. This is the same as adding the /v parameter to the LOGINW31 command in your properties page for GUI login. You can specify up to four identifier variables that accompany your login name. These are used to launch certain portions of a login script. For example, if you wanted to log in to a server and set up a test environment that uses SVGA monitors in Windows, you could specify "SVGA" as the %2 variable. In your login script, you would place commands in an IF/THEN statement that would be processed only when the script variable is used. For example:
If "%2" = "SVGA" then map root ins

s12:=sys:\apps\win\winsvga
To ensure that you see all of the GUI Login pages when the utility is launched, add the /a parameter to the LOGINW31.EXE command line in the property page for the GUI Login. Or you can keep the initial default of displaying just the Login page.
The Save Settings When Exiting Login box at the bottom of the Login page allows those settings that you change when you are in the GUI Login utility to become a part of what you see the next time you run the GUI Login utility. The Restore Permanent Connections box, if enabled, calls NETWARE.DRV to restore whatever permanent connections you have set up in the NetWare User Tools utility. This is similar to initializing Windows after you have logged in to the network from DOS.
Saving the NetWare Settings. Once you have made your selections to the NetWare Settings pages, click on OK to put those changes in place and return to the NetWare User Tools main window. If you don't want to keep your selections, click on Cancel.
Making Buttons for Yourself
You can add utilities and applications to the user-definable buttons marked as 1 and 2. To do this, click on the button that looks like a 1 followed by a pen. You will see a screen similar to Figure 17, labelled as the User Defined Path window.
Figure 17: Type the path to the executable file you want to run in the User Defined Path window.
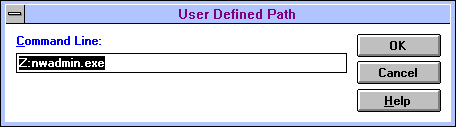
In the Command Line entry box, you can type in the path to the application or utility you wish to execute, including the executable name of the program. You can also add parameters to the Command Line entry you type in, just like you do when you add parameters at a DOS command line.
For example, if you wanted to add the NWADMIN utility to the 1 button, type Z:NWADMIN.EXE in the Command Line box and click OK. (If you have Z:\SYS\PUBLIC as a search drive before going into Windows, you can simply type NWADMIN.) The 1 icon changes to the icon for NWADMIN. From now on, you can click on this button to bring up NWADMIN from within the NetWare User Tools.
If you type something wrong in the Command Line box, click on the Cancel button instead of OK.
|
Note: To change one of the user-definable buttons after it hasbeen defined, press the Alt key as you click on the 1 or 2button to again bring up the User Defined Path window.You can now redefine the 1 or 2 button as something else. |
You can choose anything you want for the user-definable button in NWUSER. Popular additions include E-mail programs, Print Manager, RCONSOLE, NWADMIN, and the PCONSOLE utility.
Using NetWare User Tools' HELP Screens
The NetWare User Tools come with online help, which is accessible via the Help button (the question mark icon at the far right of the NWUSER window). Clicking on the Help button brings up a help window that matches whichever button option is selected at the top of the screen. For example, if you are in the Printer Connections window, you will automatically go to the Printer Connections Help window. If you have trouble understanding the meaning of the different icons you see in the various screens, highlight the button at the top and click the Help button.
You can jump to any part of Help by selecting one of the topics under the How To... section. Or you can click the Search button and type the word you want to look for. If the word is a topic, you will see the list of topics that match the word you typed. You can also click on the Contents button to see a list of tools that are available to you, followed by a How To... section that brings you right to a topic. Once you have selected a few actions, you can click on the History button to instantly bring you back to a particular Help screen you have already accessed.
Tips and Tricks
This section presents a number of tips for getting the most out of NetWare Client 32 in the Windows environment. It also presents some tricks for doing things you may not know how to do.
Disabling the Novell Startup Bitmap
By default, a Novell NetWare bitmap image is displayed on the screen when NETWARE.DRV initializes. You can disable this as follows:
Go to the Windows Notepad and open the NETWARE.INI file.
Add the bolded line shown below under the [Options] section of the NETWARE.INI file:
Save the file and exit Windows. When you restart Windows, the Novell bitmap will no longer be displayed.
[Options]HotKeyEnabled=1Messages=1DisableLogo=0
Minimizing NWUSER to a Desktop Icon
You may have noticed that the NetWare User Tools window has no minimize button associated with it. If you want to run the utility as a minimized icon, open the NetWare Tools folder and click once on the NetWare Tools icon to highlight it. Press Alt+Enter to bring up the Program Item Properties window. Click on Run Minimized (Alt-R) and then OK. Double-click on the NetWare Tools icon to bring up the utility, which will appear as a minimized icon on the desktop. You can hereafter bring up the utility any time by double-clicking on its desktop icon.
|
Note: As a driver-based application (part of NETWARE.DRV),nwuser.exe is treated like a screen saver and its iconalways appears in the foreground on the Windows desktop.Also, its icon remains on the desktop even after you exitthe utility. |
Bringing up NWUSER by pressing the Hotkey (F6 by default) continues to work even when the utility is minimized as an icon. Keeping NWUSER running minimized instead of exiting the utility saves initial startup time. Whenever the utility is started up, it must rebuild the Resources list from scratch. If you are running the minimized option and you double-click on the NWUSER icon or press the Hotkey, the Resources list doesn't have to be rebuilt, only refreshed. On small networks users might not see much difference, but on larger networks it can take some time to initially build the Resources list.
Note: Clicking once on the minimized NWUSER icon displays a menu that includes the following options: Drive Connections, Printer Connections, Server Connections, and Send Message. If you select one of these, the utility will come up with the corresponding window active.
Extending the Number of Ports Available for Capture
The NetWare User Tools have greater capabilities than the NetWare utilities that come with NetWare 3.1x or those that support NETX. For example, the Client 32 NetWare User Tools can support more than eight server connections and up to nine LPT connections for CAPTURE statements.
To enable printing above three LPT ports to six or nine ports, place the following lines in the NET.CFG file and in the WIN.INI file:
NET.CFG
NetWare DOS Requester

Network Printers=6 (default is 3, but can be set up to 9)
WIN.INI
[Ports]      (match the number you set for Network Printers;

LPT1:=         3 is the default)

LPT2:=

LPT3:=

LPT4:=
 LPT5:=
 LPT6:=
By placing the port numbers in the win.ini file, you tell Windows that it can access more than its default of three LPT printers. You can then use these LPT designations for designating print drivers to print queues on NetWare servers.
|
Note: The NetWare 3.1x version of the CAPTURE text utilitydoes not support ports greater than LPT3, butCAPTURE.EXE from NetWare 4.x does. However, you canuse the NetWare User Tools to manage printing in aNetWare 3.1x environment and can therefore have morethan three LPT printer connections. |
Changing Your NetWare 4 Context
When running NetWare User Tools in a NetWare 4 environment, notice the small icon next to the full context path entry in the Resources list. This entry displays the distinguished name of the container you are currently in (such as nr.esd.sales.novell). To the left is a small icon of an arrow pointing up and two dots. Clicking on this entry moves you up one level in the NDS tree, displaying the Organizational Units and associated objects that you have rights to beneath the new location (including the OU that you just left).
Using this method, you can find server, printer, user, and group objects in containers other than the one where you normally work. If you have sufficient NDS rights, you can select the desired object as a service. For example, you can access print queue objects that you want to print to. You can do the same for servers you want to access, as well as users and groups for sending messages.
Navigating a Large Network
In large networks, climbing up and down the Directory tree as described in the previous tip can be a labourious process. If you need to connect to a server that is in a different Organizational Unit than the one you are in, a quick method is to switch to Program Manager, open a DOS box, and attach to the server by typing
LOGIN ServerName/NS <Enter<
Now switch back to the NetWare User Tools and you will see the server appear in the Connection side. With the proper rights, you can then map a drive to needed directory.
Client 32 has multi-tree connection capabilities. If you need to map a drive or access a server that is not in your current NDS tree, simply bring up the NetWare Connections window in the NetWare User Tools and double-click on the NetWare DS Trees folder in the Resources portion of the screen. Highlight the tree you want to attach to, and click on the Login button. Enter your name and password, and the new tree will be added to the Connections portion of the screen.
To make another NDS tree your current tree, highlight the tree in the Resources list, then hold down the Ctrl key while you double-click on that tree name. An asterisk indicates that this is now your current tree. Since many Novell utilities are not yet capable of handling multiple trees, you can use this trick to run the same utility (such as PCONSOLE) for two different NDS trees. Simply start PCONSOLE in a DOS box with your first tree selected as the current tree. Then switch to another tree using the above key-mouse sequence and start another instance of PCONSOLE. From this second instance of the utility, you can access print queues and print servers that are in the second NDS tree.
If you receive a message that servers or trees can't be found but you know they are out there, try another variation on the above trick. The servers you see listed in the Resources side of the NetWare Connections window are the servers that your default server (the one with the asterisk by it) knows about through its routing tables. Depending on how large your network is, how many network segments it has, and the kinds of routing filtering that is in place, you may be able to see a different Resources list from another server.
To do this, highlight another server in the Connections list, then hold down the Ctrl key while you double-click on that server. This action changes that server to your default server (note that the asterisk moves to the new server). You can now see the servers that this server knows about on the network by clicking on the NetWare Servers folder under the Resources side of the NetWare Connections window.
For large networks using RIP and SAP filtering, you may see an entirely different set of servers that you can now access. If one of these is the server you are trying to attach to, switch to the DOS box and try logging in again. Or you can use the NetWare GUI Login if you want to run the login script on that server.
The servers in the Resources list with empty icons next to them are servers that you are not attached to. When you log in to a NetWare 2.x/3.1x server or a 4.x server that is not in your Directory tree(s), that server moves to the Connections list with a bindery connection and is placed above the Directory tree icon. If the NetWare 4 server you log in to on the Resources side is in your Directory tree, that server is moved to the Connections side (no password is needed) and it is listed underneath the Directory tree icon. The icon changes to a small server icon when you are attached to a server.
|
Note: If your name does not appear in the Logged In As entry butyou see that you are Directory Services-Authenticated inthe Connection Type entry, chances are you are havingproblems with Directory Services functions in the NetWareUser Tools. See the heading "Losing Directory ServicesFunctions" in the troubleshooting section of this AppNote. |
You can span trees and attach directly to NetWare 4 servers in other trees through the NetWare Connections screen.
Administering User Interface Restrictions
In some circumstances, network administrators may need to disable certain network functions to prevent users from corrupting their work environment. This is possible with the Client 32 NETWARE.DRV file. Most of the additional capability involves restricting user access to all or portions of the user interface provided by NETWARE.DRV in the NetWare User Tools. However, the same user interface is accessed by File Manager, Print Manager, Control Panel, and other programs, and the restrictions apply there as well. Substantial flexibility is available, ranging from disabling all interfaces to disabling only the Send Message capability. You also have the ability to specify capture defaults for LPTs captured with NWUSER.
You accomplish these restrictions by adding entries to [Restrict] section in the NETWARE.INI. This mechanism is simple but has been deemed adequate, since many administrators have some form of capability to distribute .INI modifications to users' desktops from a centralized administration point. For those who use a network installation of Windows, the client checks for a NETWARE.INI file in the shared Windows directory. If such a file exists, it reads the restrictions from that location. This provides a secure location to store the restrictions. If the administrator chooses not to restrict the users of the shared Windows install, the client will read the private Windows copy of NETWARE.INI.
Entries Under the [Restrict] Heading. The following user interface restrictions may be included in the [Restrict] section of the NETWARE.INI file (you may need to create the heading):
|
[Restrict] |
|
|
UserTool=0 |
Disable all user interfaces provided by NETWARE.DRV |
|
NoHotKey=1 |
Disable all Hotkey access to the interfaces provided by NETWARE.DRV |
|
NoDrives=1 |
Disable the "NetWare Drive Connections" (MAP) portion of the NETWARE.DRV interface |
|
NoLPTs=1 |
Disable the "NetWare Printer Connections" (CAPTURE) portion of the NETWARE.DRV interface |
|
NoConnections=1 |
Disable the "NetWare Connections" (LOGIN/LOGOUT) portion of the NETWARE.DRV interface |
|
NoSend=1 |
Disable the "NetWare Send Messages" (SEND) portion of the NETWARE.DRV interface |
|
NoSettings=1 |
Disable the "NetWare Settings" portion of the NETWARE.DRV interface |
|
NoUser1=1NoUser2=1 |
Disable the user-definable button (1 & 2) portion of the NETWARE.DRV interface |
|
Note: The default value for each of these settings is the oppositeof the setting to enable it (0 for 1, 1 for 0). |
Specifying Capture Defaults for Windows Captures. As the network administrator, you can create a set of global defaults that determine which options users would automatically have when they capture an LPT port using NWUSER. The change can then be distributed to all the users that you administer. You can also specify a set of capture flags for LPTs that are captured in NWUSER.
The implementation is two-tiered: flags may be specified for each LPT (LPT specific default), or they may be specified for all LPTs (global default). If LPT1 is captured, NETWARE.DRV first looks for defaults for LPT1. If the defaults are found, they are used. If not, NETWARE.DRV checks for a set of global defaults, which are used if they exist. Otherwise, the initial flags assigned by Client 32 are used.
Follow these steps to create global default print capture settings:
Capture a port to a queue using NWUSER.
Click on the LPT Settings button.
Modify settings as desired. For example, turn off Form Feedand Banner, the two settings most commonly changed whensetting up Capture statements.
Click on the Defaults >> button to expand the dialog.
Click the Global (All) LPTs check box.
Click the Save button.
If the Current LPT Only box is checked, the default capture settings will apply only to the current LPT displayed in the title of the dialog box.
These settings are stored in the [Defaults] section of the NETWARE.INI file. The entries are named LPTx-OPTIONS, where x is a number ranging from 0 to 9. The set of options stored under LPT0-OPTIONS is significant, as these are the global defaults. Options stored in LPT1-OPTIONSthrough LPT9-OPTIONS correspond to specific options for the LPT.
NETWARE.DRV also has a switch available so you can disable the interface to prevent users from modifying the default capture settings. This allows you to dictate the defaults and prevent subsequent user modifications.
To disable user access to the edit print flag default settings portion of the NETWARE.DRV interface, add the following to the [Restrict] section of NETWARE.INI:
NoDefLPTSettings=1
Implementing the Restrictions. If Windows is installed on a local hard drive, you will need to make the changes to the local NETWARE.INI file, either by copying an updated file or by editing the existing file to include the desired settings. In a typical Windows installation, the NETWARE.INI file is located in the C:\WINDOWS directory. If Windows is installed in a shared Windows directory on the network, create a NETWARE.INI file in the shared directory and add the [Restrict] section heading, along with any desired settings.
|
Note: Only the [Restrict] section is read from the sharedWindows directory, and only during the initial load ofWindows. If you make any changes while Windows isrunning, Windows must be restarted for the changes totake effect. |
Troubleshooting the NetWare User Tools Utility
Users and administrators face several common problems when running NetWare Client 32 with Windows support. Numerous problems can occur if you try to set up Windows support manually without using the Client 32 installation program. Other problems involve the loss of Directory Services functions when in the NetWare User Tools. Another problem occurs when you use a different shell other than Windows Program Manager shell.
Improper Installation
The procedure for setting up Windows support in Client 32 is covered in the AppNote entitled "Installing NetWare Client 32 for DOS/Windows" in this issue. It is important that you run the Client 32 installation program in order to get all of the necessary network settings in the Windows .INI files. Failure to do so can lead to an unstable Windows environment.
Loss of Directory Services Functions
The loss of Directory Services functions in the NetWare User Tools can affect printing as well as access to Directory Services through the utility. The main reason for these problems is the loss of Unicode support. The following sections describe a troubleshooting and repair technique for this problem.
Troubleshooting Print Queue Connections. In the NetWare Printer Connections window, you may have noticed that some of the print queue names have their full NDS object path defined for them (such as \\NTS_INC\.NRD-HP.NRD.SAS.NTS) while others do not (\\srd\srd-pmarq). When a print queue has its full NDS object path defined, it means that you have attached to the server containing the print queue as a Directory Services user and that you are accessing the print queue object. When a print queue has two backslashes, it means that you have attached to the server containing the print queue as a bindery user. Bindery connections show both the server name and the print queue name, while Directory Services connections show the full path, including the tree name.
While the server name versus tree name/full context syntax was done for convention only, you can use this convention as a means to troubleshoot your printer connections if you work in a mixed NetWare 3.1x and 4.1 environment, or if Directory Services isn't functioning properly in the NetWare User Tools.
For example, suppose you see that you have a bindery connection to an NDS print queue (you see two slashes and the server name instead of the treename and full print queue object name). One reason is that you have a bindery connection to the print queue, even though you can attach to different NDS trees.
|
Note: Be sure that bindery services is enabled on the containerthat holds the print services you are accessing, or youwon't be able to access the services. You set binderyservice through the SET Bindery Context =ContainerName console command on the server wherethe print queue physically resides. (For more informationon setting bindery context, see the NetNote entitled"Changes in the NetWare 4.1 Bindery Context Parameter"in the June 1995 issue of Novell Application Notes. |
If you should have a DS connection to this NDS tree, check to see if you are running with Directory Services enabled in Windows. The easiest way to see if Directory Services is enabled is to click on the NetWare Settings button and look at the DS Objects and DS Container entries under the Resource Display Options portion of the User Tools page. If the objects are grayed out (they should be black), you do not have a proper Directory Services connection. If your Directory Services connection failed and the container that you are accessing resources through does not have Bindery services enabled through the SET Bindery Context = ContainerName console command, you will not have access to any of its services, including printing.
To fix the loss of Directory Services, see the following heading, "Restoring Directory Services Functions."
Restoring Directory Services Functions. Most users lose their Directory Services functions in Windows because the NetWare Windows driver could not find the Unicode tables. Directory Services uses the NWInitUnicodeTables call to enable DS functions. As Windows loads, the NetWare Windows driver looks for the Unicode tables in four places:
The current directory (WINDOWS\SYSTEM)
The directory where the Windows shell loads (such as progman.exe in the WINDOWSdirectory)
The NLSdirectory directly beneath the current directory
A directory in the workstation's PATHvariable.
You usually lose Unicode support if you didn't use the Client 32 installation program to install Client 32 with Windows support.
Another reason for seeing this problem is if you are using a Windows shell other than Windows Program Manager (this might include shells such as Xerox's TabWorks, Norton's DeskTop, or PC Tools). Often these third-party shells are not found in the WINDOWS directory (for example, TabWorks creates it own C:\TABWORKS directory) and the shell program points to that directory in the system.ini file. Because the \NLS directory containing the Unicode tables is not found directly under the new shell program directory, the Unicode tables are not found and Unicode support fails.
Again, to check if Directory Services is enabled, click on the NetWare Settings button and look at the DS Objects and DS Container entries under the Resource Display Options window. If the objects are grayed out (they should be black), you do not have proper Directory Services support in the NetWare User Tools. This doesn't mean you are not logged in and authenticated to Directory Services. It simply means that Directory Services functionality through the NetWare User Tools is not enabled.
If you have somehow missed the network warnings that Directory Services functions have failed, go to the NetWare Settings screen and click on the Network Warnings entry. If you exit Windows and then go back in, you will see a message that tells you Directory Services could not find the Unicode tables to function properly and you are without Directory Services functions. The message should look similar to the following:
NWDRV-3.00-30--There was a problem loading the

Unicode tables. All NetWare directory services

functions are disabled.
You can fix this problem a couple of ways. You can create an NLS directory under directory where the shell program is located (in my example C:\TABWORKS\NLS), then go to the \WINDOWS\NLS directory and perform an XCOPY *.* C:\TABWORKS\NLS /S/V command to copy all of the Unicode tables into the NLS directory and the help files into the language directory located under the NLS directory (such as \NLS\ENGLISH).
You can also add the directory containing the Unicode files to the PATH variable in the autoexec.bat file. For example, the PATH=C:\DOS; C:\WINDOWS;C:\UTILS variable would include PATH=C:\DOS; C:\WINDOWS;C:\UTILS;C:\WINDOWS\NLS in the variable statement.
Conclusion
With the popularity of Windows as a desktop operating system, system administrators can expect to spend more time configuring and maintaining Windows clients. When properly installed, NetWare Client 32 and its NetWare User Tools utility can assist you in supporting Windows clients in a NetWare environment.
This Application Note covered the features and functionality of the NetWare User Tools. The AppNote provided some tips and tricks for getting more out of the NetWare User Tools. It covered some general troubleshooting techniques and provided solutions to common problems managers and users face when running the NetWare User Tools.
* Originally published in Novell AppNotes
Disclaimer
The origin of this information may be internal or external to Novell. While Novell makes all reasonable efforts to verify this information, Novell does not make explicit or implied claims to its validity.