Migrating a Network to NetWare 4.0: An Example
Articles and Tips: article
Senior Consultant
Systems Research Department
01 Apr 1993
This AppNote describes the process of migrating a NetWare 2.x/3.x-based network to NetWare 4.0. Although the company described in this AppNote is fictional, the upgrade described here was actually done in a lab setting. Details of the planning and installation process will differ for every organization, but this example illustrates how planning and preparation can simplify the process of migrating to NetWare 4.0.
- Wigitech
- Advance Planning and Preparation
- Installing NetWare 4.0 on the Servers
- Migrating NetWare 2.2 Servers
Wigitech
Wigitech, the famous (though fictional) widget manufacturer based in southeastern North Dakota, employs just over 1,000 people. The company has two sites: its corporate offices in Fargo and a research and development/manufacturing site about 80 miles west in Jamestown. Wigitech has been in business for 30 years. However, since the late 1980s, the company has been facing an economic slump and increased pressure from competitors.
Wigitech's management recognized the need for new factory automation, quality assurance, and management information systems. To connect these systems, the company decided to use NetWare for two main reasons: (1) they already had a NetWare LAN providing file and print services in the corporate offices; and (2) local networking provides the lowest initial costs and greater scalability.
Currently, the company has hundreds of PC and Macintosh workstations which are used for everything from word processing to automated control of factory processes. Data for the company's quality assurance and statistical process control systems is both automatically collected and manually entered, then gathered over the network.
Wigitech's 25 file servers and 674 workstations are distributed among its departments as follows:
|
Department |
NetWare3.11 File Servers |
NetWare2.2 File Servers |
PCs |
Macs |
|
Corporate Administration |
1 |
0 |
50 |
2 |
|
Finance* |
0 |
0 |
10 |
0 |
|
Sales and Marketing |
4 |
1 |
45 |
20 |
|
Human Resources |
1 |
1 |
10 |
10 |
|
Information Services |
1 |
0 |
7 |
0 |
|
Engineering |
9 |
0 |
180 |
20 |
|
Engineering Documentation** |
0 |
0 |
15 |
5 |
|
Manufacturing |
7 |
0 |
300 |
0 |
|
Total |
23 |
2 |
617 |
57 |
*Shares file services with Corporate Administration **Shares file services with Engineering
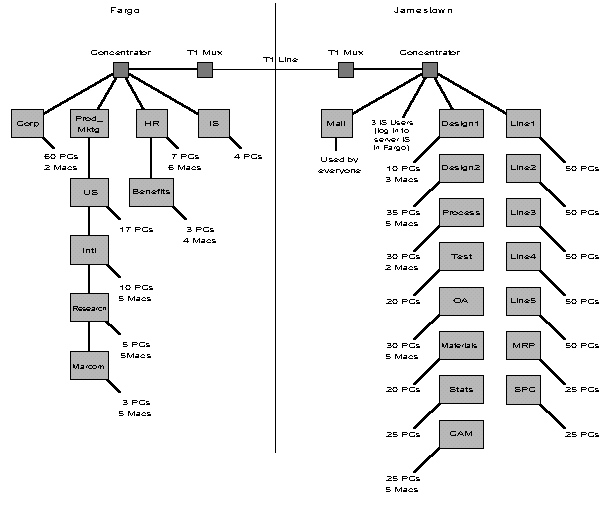
Network Topology
Wigitech's two sites are connected by a T1 line, with the servers and workstations distributed between the two sites as shown in Figure 1.
Figure 1: Wigitech's network topology.
Advance Planning and Preparation
Wigitech's small Information Services (IS) department was charged with planning and implementing the transition to NetWare 4.0. To minimize disruptions in productivity and give users time to adapt to the new environment, they decided to migrate all the file servers to NetWare 4.0 over a period of three months.
At the outset, the IS team identified a number of preparatory tasks that needed to be done before they began actually installing NetWare 4.0 on any servers:
Designing an appropriate Directory tree
Installing the new NetWare 4.0 workstation software
Upgrading the file server hardware
Planning for adequate server time synchronization
Cleaning up the bindery
Backing up the current file systems
The following sections describe each of these preparation and planning steps.
Directory Tree Design Alternatives
To the director of the IS deparment fell the task of designing and implementing the corporate Directory. The first Directory tree design was perhaps the most obvious - a single Organization container at the top, plus one Organizational Unit for each company site (see Figure 2).
Figure 2: First design of Wigitech's Directory tree.
This initial design was based on an impression that the Directory is simply a distributed version of the bindery. Each site would operate as if it had one bindery-based file server that all users logged in to. All resources (volumes, printers, print queues) would be in the same Organizational Unit with all users at the site. Access would be controlled by membership in groups. When a new user is added at a site, he or she is added to groups that have been granted access to the resources associated with the user's job function.
The IS director soon realized that this design used groups to do what could be better accomplished by creating more Organizational Units. In his second Directory tree design, the director added Organizational Units for each department at each site (see Figure 3).
Figure 3: Second design of Wigitech's Directory tree.
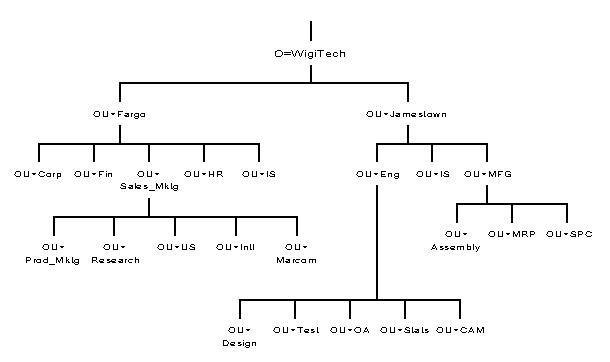
In this tree, network resources used by each department would be in the same Organizational Unit with the users in the department, so there would be little need to use groups to control access to resources.
The director discovered a problem with this design in his own department. The IS department's file server is located in Fargo, but three IS staff members work at the Jamestown site. The Jamestown IS employees would log in to the Directory at one context, but their file server would exist in a different context. Other departments would eventually experience similar problems because the company planned to move its Engineering Statistics department to Fargo, closer to employees' homes.
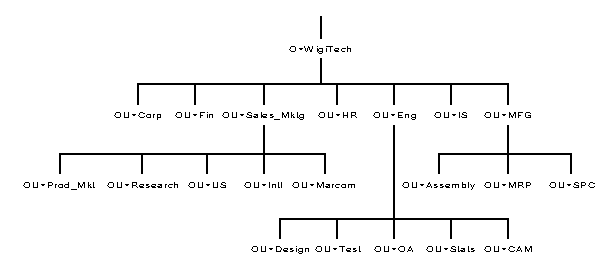
The final design, shown in Figure 4, removed geography from the Directory tree and strictly followed the company's organizational structure.
Figure 4: Final design of Wigitech's Directory tree.
Installing DOS Workstation Software
The 250 workstations on the five manufacturing lines are used for data entry and process control. Because of the critical nature of the applications that run on these machines, IS configured them to be easy to maintain and upgrade as a group. Although the machines came from several different manufacturers, all are configured as follows:
386DX 33 MHz processor
4 MB RAM
One 3.5-inch diskette drive
One 40 MB hard disk drive
MS-DOS 5.0
QEMM memory manager
NE2000 network interface card
Identical network drivers, NET.CFG files, and NetWare shell versions
Identical AUTOEXEC.BAT and CONFIG.SYS files
To upgrade these workstations to the new NetWare DOS Requester, IS modified the system login scripts on each of the five manufacturing line servers to execute a batch file that does the following:
Checks for the existence of C:\NWCLIENT\VLM.EXE (to see if the workstation has already been upgraded).
If the directory does not exist, create it and copy the ODI LAN driver, IPX, NET.CFG, and the NetWare Requester (VLM) to the directory.
Copy a modified AUTOEXEC.BAT and CONFIG.SYS to the workstation.
The 122 DOS workstations at corporate headquarters in Fargo required more individual attention because of variations in hardware and system software. Many of these users load TSRs in their AUTOEXEC.BAT; others have entries in their CONFIG.SYS or AUTOEXEC.BAT to load specific drivers or memory managers. As a result, nearly every CONFIG.SYS and AUTOEXEC.BAT file is unique.
Because Microsoft Windows users ran Windows from the network, new NetWare Windows drivers were installed to the Windows directory over the network.
However, the DOS Requester INSTALL program had to be run on each workstation individually. To accomplish this task, IS used a remote workstation management program (LANSight from Intel). This program allows a network administrator to take control of a user's workstation over the network. Once each user had logged in, a network administrator from the IS group called each user and asked to take control of his or her workstation for a few minutes. The network administrator then ran the DOS Requester INSTALL program from the network.
Here are the steps to install the DOS Requester from the network:
Create a subdirectory on a network drive (SYS:PUBLIC\DOSWIN, for example).
Use XCOPY to copy all files and subdirectories from the WSDOS_1 and WSWIN_1 diskettes (use XCOPY's /S command line option).
Create a subdirectory called "DOS" under the DOSWIN directory.
Copy the WSDRV_1 and WSDRV_2 diskettes into the DOS subdirectory.
Both driver diskettes contain a file called DRIVERS.DOS, so when you copy the second diskette to the network, you will overwrite the DRIVERS.DOS file from the first diskette. The INSTALL program needs the data from both files, so you need to append the two files. To do this, put the first diskette back in the drive, and then type:
COPY A:DRIVERS.DOS + Z:\PUBLIC\DOSWIN\DOS\DRIVERS.DOS
   Z:\PUBLIC\DOSWIN\DOS\DRIVERS.DOS
(This command assumes that you are using drive A and copying the files to Z:\PUBLIC\DOS\DRIVERS.DOS.)
If you have third-party drivers to add, copy them to the DOS directory, then see if their drivers list file can be appended to DRIVERS.DOS. If not, either modify the DRIVERS.DOS file with the additional driver listings, or delete the DRIVERS.DOS file. If there is not a DRIVERS.DOS file in the DOS directory, the INSTALL program will create a list of drivers it finds in the DOS directory. You can delete any drivers you do not need from the DOS directory to reduce the number of selections in the list.
After you have prepared the DRIVERS.DOS file, you can install the DOS Requester on each workstation by running its INSTALL program from the network directory where you have copied it (DOSWIN in the example above).
After Wigitech IS upgraded all workstations at the Fargo offices, there remained 195 PCs in Engineering, and 50 PCs in Manufacturing's Materials Requirements Planning (MRP) and Statistical Process Control/Quality Assurance (SPC/QA) groups. Fewer of these PCs were configured to run Microsoft Windows, but there was greater variety of device drivers and memory managers in use.
Fortunately, IS's three network administrators and technicians at the Jamestown site had some help in upgrading these machines. Most Engineering employees maintained the systems software configuration on their own workstations. IS copied the DOS/Windows and OS/2 client installation programs to the company's E-mail file server, then distributed a memo with instructions on how to run the programs. Most engineers were able to upgrade their workstation client software unassisted.
Wigitech was able to upgrade nearly all of its PC workstations to the NetWare DOS Requester in a week.
Upgrading File Server Hardware
Based on the formula for calculating RAM requirements for NetWare 4.0 servers (discussed in "Planning for NetWare 4.0 Installation, Server Migration, and Coexistence" in this issue), Wigitech determined they should add RAM to some of their file servers. For example, Engineering's file server (TEST) was running NetWare 3.11 (though probably not optimally) with 8MB of RAM. Before installing NetWare 4.0, they decided to upgrade the server to 16 MB RAM, based upon the following estimate:
|
Basic server RAM |
5.5 |
|
PSERVER requirements |
2.0 |
|
Disk cache (.008 x 600 MB disk) |
4.8 |
|
Mac name space (5 x 10000 files/1,048,576) |
0.05 |
|
Additional cache buffers |
2.0 |
|
Other NLM requirements |
0.0 |
|
Total |
14.35 MB |
Wigitech also decided to purchase a new file server to use as the root file server. Their file server CORP, with a 25 MHz 486 processor, would have been adequate. However, the server's volumes were nearly full, and adding more disks to the file server (in addition to the burden of managing Directory partitions) might have impacted both file service and Directory Service performance.
Wigitech took advantage of the current low hardware prices and got a new 66 Mhz 486 machine to use as the new CORP file server. They transferred the old CORP server to the Finance group, and renamed the server FIN.
Time Synchronization Planning
Because the connection between the two sites was reliable, Wigitech decided to keep its time synchronization design simple. By default, when the root server in a new Directory tree is installed, it is configured as a Single Reference time server. All other servers are, by default, Secondary time servers. It was decided to initially use the default configurations and designate one server at the Jamestown site to be the reference time server.
Once all servers were installed, they plan to reconfigure the root server as a secondary server and make the Mail server at the Jamestown site the Single Reference time server. Having two Single Reference time servers on the network at the same time would cause error messages to be displayed on both file servers. However, if both servers are reconfigured at approximately the same time, there should be no difficulties.
Before installing the first NetWare 4.0 server, IS logged in to each file server, set the system time according to a quartz clock, then logged in 24 hours later to verify that each server clock was accurate. The internal clocks on most computers are accurate, but accurate time is important enough to the operation of Directory Services that it is worth verifying that a file server keeps accurate time before installing NetWare 4.0.
Bindery Cleanup
To gather information that would be useful to clean up the binderies of its file servers, IS logged in to each server and ran the PRINTUSR, PRINTGRP, and DUPBIND utilities (mentioned in "Planning for NetWare 4.0 Installation, Server Migration, and Coexistence" in this issue.) The output was saved to a file named for each file server. Figure 5 shows sample PRINTUSR output.
Note: PRINTUSR, PRINTGRP, and DUPBIND can be downloaded from Compuserve's NetWire forum (GO NOVLIB). PRINTGRP displays a list of group members and trustee rights, similar to the listing created by PRINTUSR. DUPBIND scans a bindery for two or more objects of different types that have the same name. (Because these three utilities are being distributed outside of regular Novell distribution channels, they are not supported by Novell's Technical Support organization.)
Figure 5: Sample output from the PRINTUSR utility.
F:\USERS\MADAIR> printusr -r -u -l dstuart

PRINTUSR -  Print information about users (Mar 03 1993)
Copyright (c) 1988, 1993 by Novell Inc.  All rights reserved

- - > Unsupported product of Novell Inc.  Distribute freely.

User: DSTUART (Dan Stuart)
 Last login:  3/07/93 20:40:47
 Groups:
  EVERYONE (Everyone)
  RESEARCH (Systems Research Department)
 Security Equals: (Other than user groups)
 * * * NO SECURITY EQUALS FOUND * * *
 Trustee assignments:
  [RWOCD SM] SYS:MAIL/20099
  [RWOCDPSM] V2:USERS/DSTUART
 Disk utilization:
  Volume           Total KB        Used KB
  SYS              1984768         24
  CSDEC92          2146925696      0
  NSEPRO11         2147372160      0
  V2               1990792         21204
 Login script:
  map display off
  map f:=V2:\users\dstuart
  map ins S1:=sys:public
  map ins s2:=sys:public\msdos\v5.00
  map ins s3:=sys:apps\wp51
  map ins s4:=sys:common
  map ins s5:=sys:\research\users\dstuart5
First, IS looked at the output from PRINTUSR for users who had not logged in recently. They found several obsolete user accounts and deleted them.
At Wigitech, most user accounts are named by the users first initial and last name (JSMITH, for example). The output from PRINTUSR showed a few exceptions to this standard in Engineering, where certain user accounts were created to allow a user in another department to log in and get access to data. The server supervisors were notified to either delete the account or change its name to conform to the user naming conventions.
The output from DUPBIND showed where two or more bindery objects on a file server had the same name. There were a few places where this occurred. For example, server HR had both a group and a print queue named MAC. The print queue was renamed to APLLAS2X-HR to conform to the company's new standard for naming Directory objects.
As shown in Figure 5, PRINTUSR has an option to include the login script for each user in its output. IS used this option to find and remove duplicate ATTACH commands from login scripts. Although it does not create a problem in a login script on a NetWare 2.x/3.x server, when a login script on a NetWare 4.0 server has two lines that attach to the same file server, all drive mappings made after the first ATTACH command are deleted when the second ATTACH command is executed.
Finally, IS used the output from PRINTUSR to create a large map of the Directory tree with each user object placed in the correct NDS context. IS first looked for users that had accounts on two or more file servers that were to be installed in different Directory contexts. When two bindery-based file servers are migrated to different Directory contexts, if a user has a user account on both file servers, two separate user accounts are created in the two contexts (see Figure 6).
Figure 6: Migrating a user with two user accounts to two contexts.
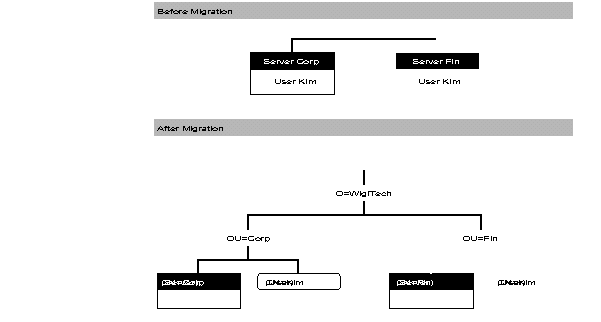
In this situation, users will be able to log in at either context and have different parts of the Directory tree visible to them.
To simplify Directory management and to make life simpler for users, IS decided that each user should have only one context where they login to the Directory. At this "login context," users are granted rights to all Directory objects they should have access to.
For each user, IS determined which context that user object should log in to. After all servers were migrated, IS plans to delete all user objects for that user other than the one in each user's login context, and grant the login context object rights to the containers each deleted object was in. The end result would be that users would log in to the Directory at one point in the Directory tree, and at that point be granted access (without further authentication) to every part of the company network that they had access to before migration.
When two bindery-based file servers are migrated to the same Directory context, if a user has a login script on both file servers, only the login script on the first file server upgraded will migrate to the Directory (see Figure 7).
Figure 7: Migrating a user with two user accounts to one context.
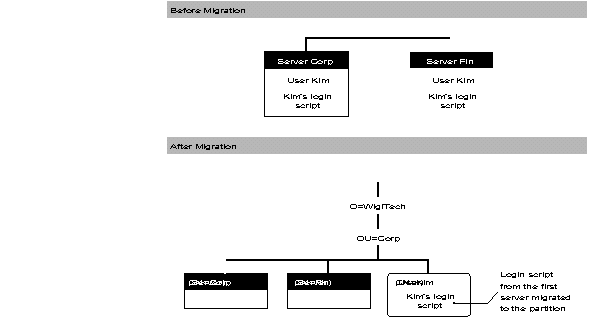
To take care of possible problems here, IS located users who had login scripts on two or more file servers that were to be installed in the same context. The login scripts were merged to create one login script which provided all the drive mappings, printer captures, and so on, of both login scripts.
File System Backup
As a final step, IS made a complete backup of each server and ran the BINDFIX utility. If BINDFIX found any errors in the bindery, they backed up the server again.
Installing NetWare 4.0 on the Servers
The first server Wigitech decided to install NetWare 4.0 on was their new CORP file server. A completed NetWare 4.0 Installation Worksheet for server CORP is given on the following pages. All information required by INSTALL is filled in on the worksheet.
NetWare 4.0 Server Installation Worksheet
Server Name:CORP IPX internal network number: 00FF0001
Directory Services Context: ___OU=CORP.O=WIGITECH______
|
Hardware/Driver Configuration |
||
|
RAM: ___32__MB |
Location of server boot files: |
|
|
0 Floppy disk |
||
|
x Hard diskDOS partition |
Path: C:\SERVER.40___ |
Network Board and Drivers
|
Name |
LAN driver |
I/O port |
MemoryAddress |
Interrupt (IRQ) |
NodeAddress |
NetworkAddress |
Frame Type |
|
NE2000 |
NE2000.COM |
300 |
3 |
1 |
00FF0000 |
802.3 Raw |
|
|
|
|
|
|
|
|
|
|
|
|
|
|
|
|
|
|
|
|
|
|
|
|
|
|
|
|
Disk and Other Boards (SCSI controllers, video adapters, etc.)
|
Name |
Driver(ifany) |
I/O port |
Memory Address |
Interrupt (IRQ) |
DMA channel |
SCSI Address |
Other Information |
|
DCP 1020 |
IDE.DSK |
1F0 |
14 |
||||
|
DCP 1020 |
IDE.DSK |
170 |
11 |
||||
|
Adaptec 1540 SCSI |
AHA1540.DSK |
330 |
0 |
Requires ASPITRAN |
|||
|
|
|
|
|
|
|
|
|
|
|
|
|
|
|
|
|
|
Disks
|
Drive Make/Model |
Size (MB) |
Mirrored withdisk # |
Assigned toVolume (name) |
|
1. CP-3554 |
554 |
3 |
SYS: |
|
2. CP-3554 |
554 |
4 |
ARCH: |
|
3. CP-3554 |
554 |
1 |
SYS: |
|
4. CP-3554 |
554 |
2 |
ARCH: |
|
5. Toshiba TXM3301B |
CD-ROM |
CDROM: |
|
Volume Information |
|
Volume Name |
FileCompression(ON/OFF) |
BlockSuballocation(ON/OFF) |
DataMigration(ON/OFF) |
Name Spaces |
|
SYS: |
ON |
ON |
OFF |
MAC |
|
ARCH: |
ON |
ON |
OFF |
MAC |
|
CDROM: |
||||
|
Directory Services Configuration |
Server Context
|
O= |
WIGITECH |
|
OU= |
CORP |
|
Other OUs= |
Administrator Name (for this context): Admin____
Administrator Password: __widget$#@!____(if recorded here, this form should be kept in a secure place)
Partition Management (This information is required only if you want to use a partitioning and replication scheme that differs from NetWare 4.0's default scheme. See "Partition Management Planning" for more information).
|
Partition name(root containerobject for this partition): |
[Root] ___ |
|
Otherservers/containerobjects in this partition |
|
|
|
|
|
|
|
|
|
|
|
|
|
|
|
|
|
|
|
|
Locations of replicas of this partition Master replica: |
CN=CORP.OU=CORP.O=WIGITECH |
|
Read-onlyreplicas: |
|
|
|
|
|
|
|
|
|
|
|
|
|
|
Read/Writereplicas: |
CN=MAIL.O=WIGITECH |
|
CN=IS.O=IS.O=WIGITECH |
|
|
|
|
|
|
|
|
|
|
Time Services Configuration |
|
Time ServerType: |
x Single Reference |
Server TimeZone: __USA Central___ |
|
0 Reference |
||
|
0 Primary |
Daylight savingstime observed: YES/ NO |
|
|
0 Secondary |
|
NLM Configuration |
|
NLM to be installed |
ConfigurationInformation |
|
ASPITRAN.DSK |
Adaptec NetWare ASPI Transport Layer |
|
CDROM.NLM |
|
|
REMOTE.NLM |
|
|
RSPX.NLM |
As shown on the worksheet above, Wigitech installed a Toshiba TXM3301B CD-ROM drive (with an Adaptec 1540 controller) on its CORP file server. After installing NetWare 4.0 once from CD- ROM, Wigitech planned to migrate other 3.x servers in-place by running INSTALL from the CD-ROM on server CORP.
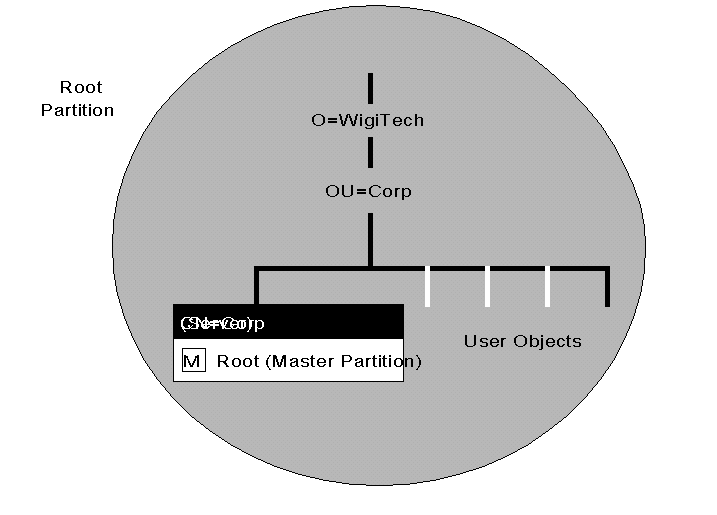
Building the Directory Tree
After the first server (CORP) was migrated to NetWare 4.0, Wigitech's new Directory tree looked like the one shown in Figure 8.
Figure 8: Wigitech's Directory tree after migrating server CORP.
As IS migrated subsequent file servers to NetWare 4.0, they placed each server into its context in the Directory tree. The second server they migrated was FIN (formerly server CORP), followed by IS's own server (IS), then the corporate mail server (MAIL, the first server migrated at the Jamestown site). Up to this point, migration was proceeding at the rate of one department per week (also, one server per week). This gave IS time to deal with user questions and changes to login scripts, trustee rights assignments, and so on.
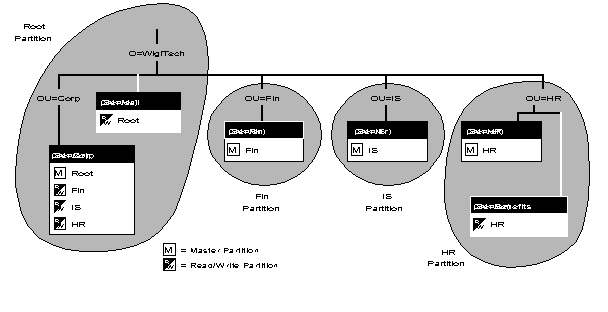
Human Resources had two file servers - HR and BENEFITS, a NetWare 2.2 server. (The migration method used for BENEFITS is described in "Migrating NetWare 2.2 Servers" below). IS migrated both of these servers in one week. At this point, Wigitech's Directory tree looked like the one in Figure 9, which shows the location of Directory partition replicas.
Figure 9: Wigitech Directory tree and partitions after migrating five more servers to NetWare 4.0.
Providing Bindery Emulation
Directory Services-based client software is not yet available for Macintosh computers, so IS had to consider how Macintosh users would access the Directory. When a Macintosh client (or a DOS client running NETX) logs in to the Directory, it logs in under bindery emulation.
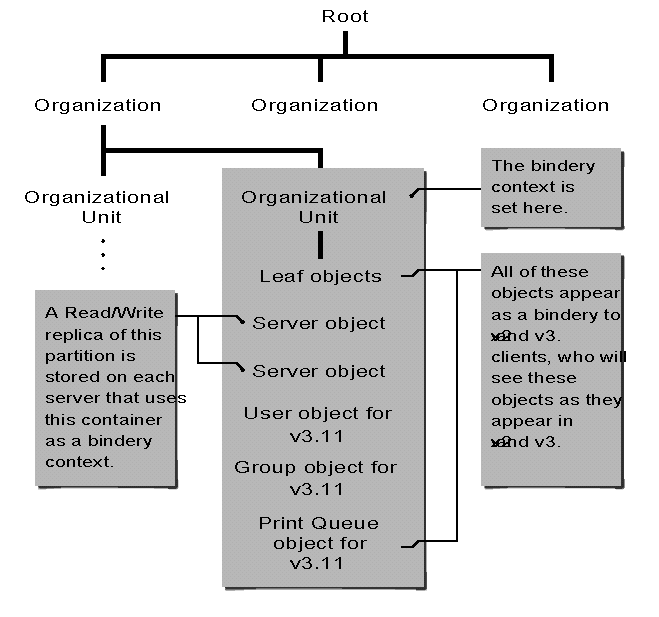
Under bindery emulation, the file server acts as if it has a bindery containing all user, group, print queue and other objects in the container object (see Figure 10).
Each NetWare 4.0 file server has a SET BINDERY CONTEXT parameter that determines the file server's position in the Directory tree under bindery emulation. By default, the BINDERY CONTEXT value is set at installation. To disable bindery emulation, enter "SET BINDERY CONTEXT =" at the file server console.
Wigitech's Human Resources department has a single Organizational Unit containing two file server objects. Several Macintosh users log in to one or the other of the two file servers. Because the bindery context of both file servers is set to OU=hr.O=wigitech, Macintosh users who log in to either of these file servers have the same view of the Directory. Most significantly, this means they have access to the same set of print queues (provided their user objects have been granted rights to use the print queues).
Figure 10: NetWare 4.0's bindery emulation allows a server to act as if it has a bindery within a certain context.
Partition Management
Before starting to migrate their network, Wigitech's IS team sketched a diagram of its Directory tree with all file server objects and the location of all Directory partition replicas.
This diagram, shown in Figure 11, immediately showed them two things:
They needed at least one more replica of the root partition.
Four file servers (CORP, PROD_MKTG, DESIGN1, and SPC) would become critical to the operation of the Directory, with one Master replica and two or more Read/Write replicas stored on each.
Besides the Master replica of the root partition on server CORP, the only other replica was on the company's mail file server. This was a good location because the mail server was located at the Jamestown site, while the Master replica was in Fargo. By replicating the root partition on the mail server, IS was able to provide local access to the root partition at both sites. IS decided to create at least one more replica of the root partition (on server IS), to provide a higher level of fault tolerance.
Figure 11: Location of Directory partition replicas.

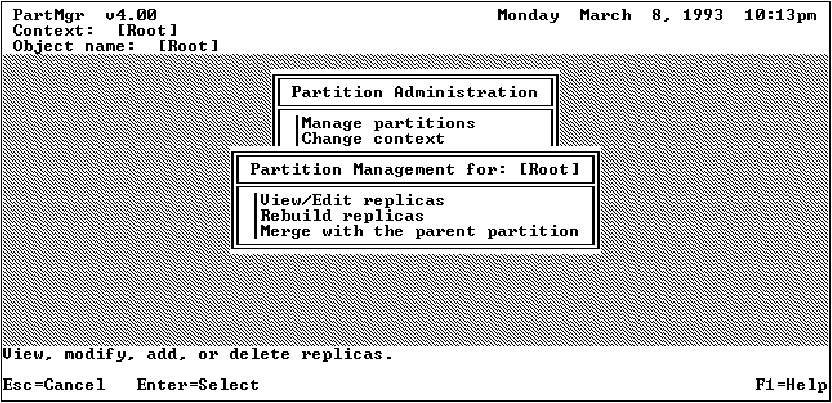
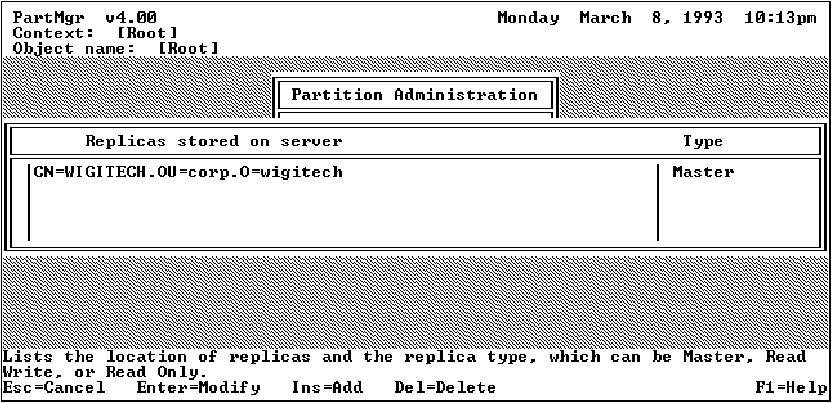
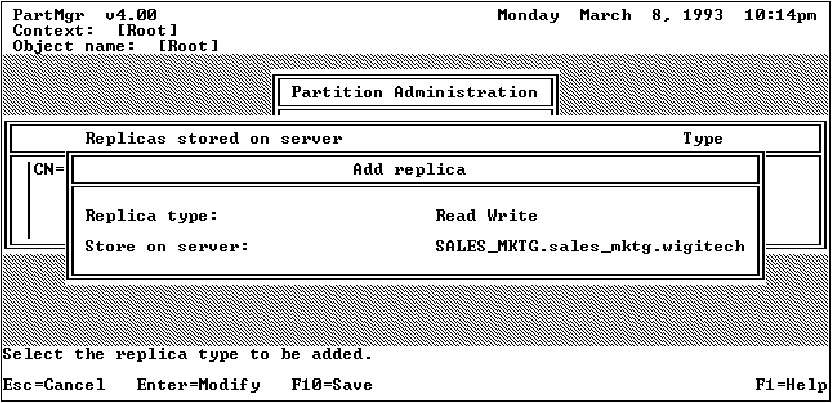
Steps for Replicating a Partition. You can replicate a Directory partition using either the PARTMGR text utility, or by selecting the Partition Manager menu option in the Windows-based NWAdmin utility. The following are the steps Wigitech took to replicate the root partition of their Directory.
1. Run PARTMGR, select the context (partition) to be replicated, then press <F10< to select management options for the partition. The root partition is represented as the period in PARTMGR's opening screen, shown in Figure 12.
Figure 12: Screen for selecting a partition to replicate in PARTMGR.

2. When the "Partition Management" menu appears (see Figure 13), select the "View/Edit Replicas" option.
Figure 13: Options for managing replicas of the selected partition.
3. Press <Insert< to add a replica of the selected partition (see Figure 14).
Figure 14: Screen for adding a replica of the selected partition.
4. Enter the partition type ("Read Write" or "Read Only") and the name of the server that will store the replica, as shown in Figure 15.
Figure 15: Screen for specifying the replica's type and location.
Evaluating Fault Tolerance. After identifying which file servers would be most critical to the Directory, IS decided to reassess possible points of failure for the servers. They recalculated RAM and disk requirements for each of the servers, and made adjustments to their hardware upgrade plans. They looked at how disk mirroring and duplexing were used on each server and decided whether the use of fault tolerance features on each server was in line with the critical role each server was to play in the Directory.
While considering the physical location of replicas of the root partition, IS also noticed that both replicas of their own Organizational Unit's partition were located in Fargo. Although IS had only three employees in Jamestown, they decided that both network efficiency and fault tolerance suggested they replicate the IS partition in Jamestown. After most of the servers at the Jamestown site were migrated, IS used PARTMGR to create a Read/Write replica of the IS partition on server SPC in Jamestown.
Migrating NetWare 2.2 Servers
As mentioned previously, Wigitech decided to upgrade its two NetWare 2.2 file servers to NetWare 4.0. Both were 25 MHz 386 computers, so the CPU was compatible with NetWare 4.0. Both servers had 8MB of RAM, but required at least 12MB to run the upgrade utility. IS decided to upgrade both servers to 16MB of RAM.
Because the server hardware was adequate and in-place migration is relatively simple, IS decided to use that method to migrate these servers. Essentially, the procedure is as follows:
Boot the 2.x file server with the upgrade diskette and run SERVER.EXE.
Load 2XUPGRDE.NLM to upgrade the server's bindery to 3.x format.
Run the regular NetWare 4.0 install program and select the "Upgrade a 3.x server to 4.0" menu option to migrate the server to NetWare 4.0.
The 2.x-to-4.0 migration process is documented fully in the NetWare 4.0 Installation and Upgrade manual.
Planned Enhancements to the Directory
After most servers on the network had been migrated to NetWare 4.0, IS had a meeting to discuss plans for future enhancements to the Directory. IS realized there were many features of NetWare Directory Services that they had not taken advantage of, that would create a more usable network for the company's users. Some of the items IS planned to investigate further were:
Organizational Role objects. On the assembly line, users could log in as an Organizational Role, rather than as a user object. This would give Users access only to the databases and applications they need for the job they are performing.
Directory Map objects. Directory Map objects could be created for most applications used in the company. This would enable IS to install an upgrade to an application, then change the directory map to the new version of the application, and not have to change the login script of everyone who uses the application.
Time Services configuration. IS was aware that the default Time Services configuration left open the possibility that an engineer bringing up a test file server could disrupt the operation of Directory Services. They decided they would look into how they could configure Time Services to prevent this from happening.
SFT III. IS decided they would look into using NetWare SFT Level III, when it was available for NetWare 4.0, on the four main Directory servers.
* Originally published in Novell AppNotes
Disclaimer
The origin of this information may be internal or external to Novell. While Novell makes all reasonable efforts to verify this information, Novell does not make explicit or implied claims to its validity.