Creating Personal Mailing Groups in Groupwise
Articles and Tips: tip
Novell Systems Research
01 Feb 1996
A number of customers (including myself) have asked how to create personalized groups in GroupWise to send the same message to a select list of people. Creating personal mailing groups in GroupWise isn't necesarily hard, but these simple pointers can help a lot.
GroupWise 4.1 allows the creation of both Public and Personal Groups. Public Groups are those set up by the system administrator for company-wide use. Here at Novell we have hundreds of these groups defined. But even so, individual users still find occasion to send e-mail messages to a particular group of people that isn't already defined as a Public Group. This is where Personal Groups enter the picture.
The easiest way to create a Personal Group is to go to the GroupWise Address Book. This can be accessed from the main button bar or from the New Mail creation window. The Address Book is a list of all defined e-mail users in the system. The way you see these names displayed is highly configurable, but you usually see the Last Name listed first, followed by First Name, Mail Stop, Dept, Phone, User ID, and Location. At the top of the window you'll see buttons for both Public Groups and Personal Groups. Click on Personal Groups and then Create/Edit Group>> to start creating your own group.
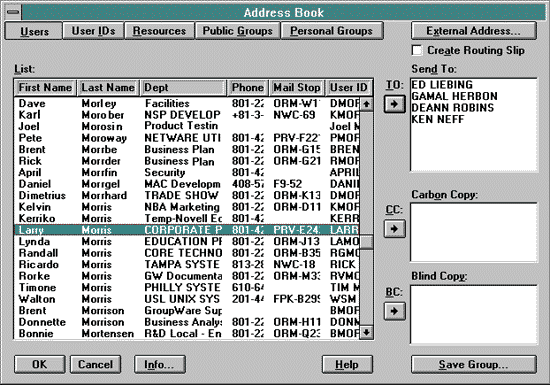
To find a user's name quickly, simply start typing the last name of the individual (or the first name, depending on which field your GroupWise has set as the search field). The more characters you type, the more precise the find operation will be. Once the name of the user you want to add to your group is highlighted, click on the Right-Arrow button to add the name to the Sent To list at the right-hand side of the Address Book window (see Figure 1).
Figure 1: Creating a Personal Group in GroupWise.

Once you have selected all of the names for your group, click on the Save Group button in the bottom right-hand corner of the Address Book window. You will see the Save Personal Group window prompting you to enter a name for the group. Once you type in the group name and press <Enter>, the group is added to the Personal Groups list. From now on, you can select which group you want to send to by clicking on the Personal Groups button.
The above procedure assumes that the users you want to send to all appear in the address book or in one of the Public Groups that are already available. If a person you want to include does not appear in the Address Book, you can add the person by clicking on the External Address button and typing in the appropriate e-mail address and routing information.
* Originally published in Novell AppNotes
Disclaimer
The origin of this information may be internal or external to Novell. While Novell makes all reasonable efforts to verify this information, Novell does not make explicit or implied claims to its validity.