Could there be a better tool?
Articles and Tips:
01 Feb 2006
The Monitor for Novell GroupWise 7 has some cool new features. Let's take a look at a few tips so you can get the most out of the improvements. For the tips in this article, I'll assume you have installed and configured a working copy of Monitor. These tips will help you with some of the features that are new to Monitor for GroupWise 7. (For more information on how to set up and configure Monitor, click here.)
New Feature Tip 1: Gateway Accounting Log Report
Gateways such as the GWIA and Async Gateway can send you accounting logs each night to provide information on what mail is passing through them. This information is in an ASCII delimited text file that can be manipulated with various third-party tools. Starting with GroupWise 7, you can now get reports on your gateway accounting logs directly from Monitor; however, to do so requires some configuration. To make sure your Monitor will receive the account log reports, take the following steps.
First, make sure your Monitor has an MTP port set for "listening" to other MTAs. If you have enabled Performance Testing for your GroupWise Monitor, you're already done with Step 1. These steps comprise the same procedure that enables the MTP link for Performance Testing for all versions of GroupWise Monitor. If you have already completed this task, jump to Step 2.
Take the following steps to set up Monitor to listen on an MTP port:
In ConsoleOne, create an External GroupWise domain for the Monitor Agent. In our example, it will be "ExternalMonitor." Set this domain version as "7," and link through a convenient domain. (See Figure 1.)
Choose an MTP port for your Monitor Agent. It is best to NOT make this port 7100, as you might later choose to put an MTA on the same server, and forget that Monitor has taken that port. I've chosen port 7103 for our Monitor agent.
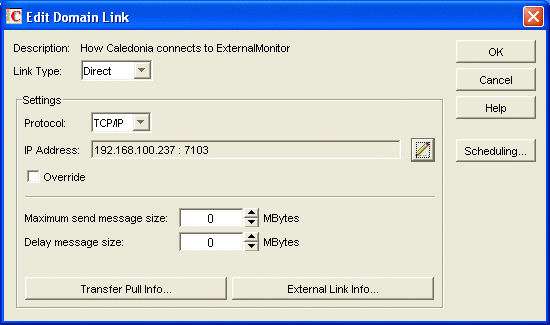
In the Link Configuration for the domain designated in Step 1 for the "link through" domain, change the Monitor Agent domain's link to TCPIP and enter the IP address and port (in our case 7103) for the Monitor Agent.
Go to the Monitor Agent Console. In this example, we'll use the Web Console because it is valid for both the Windows and Linux Agents, and with GroupWise 7, it has become the preferred point of access for Monitor administration. To get to the Monitor Agent Web Console, go to http://yourmonitoragent:8200. For example, enter the following URL in your Web browser address field: http://192.168.100.237:8200.
Click on Preferences, and scroll down to the MTP settings. Enter your IP port here, which is 7103 in our example. (See Figure 2.)
Restart your Monitor Agent to make certain the settings become effective. The MTA for your "link through" agent should show the ExternalMonitor domain as Open.
Create a post office and user for your Monitor Agent so the accounting logs can be delivered:
With your new ExternalMonitor domain selected in ConsoleOne, right-click and choose New | External Post Office. Let's name our post office ExternalPO.
Now right click on the ExternalPO object and choose New | External User. Let's name our External User "GWMONUser."
Once you have completed these steps, configure your accounting logs to be forwarded to the GWMONUser. At present, you can't select an external user as a gateway accountant. Thus, you must have your current gateway accounting user forward the accounting logs to the Monitor user.
Verify that you have a Gateway Administrator who is an Accountant. In ConsoleOne, select each gateway for which you want to have accounting logs. Edit the properties of the gateway, and under Groupwise | Gateway Administrators tab, verify you have a user listed as an Accountant, or add a user if you do not.
In the mailbox for the user who is your gateway accountant, create a rule to forward all gateway accounting logs to the GWMONUser. Note that this rule sends all messages with the subject of "Accounting Data File" to the Monitor Agent. GWIA logs are sent with a subject of "Agent Accounting Data File." Other older agents, such as the Async Gateway, might have "Gateway Accounting Data File" as the subject line for the e-mail. This particular rule will trigger either type of accounting log file you receive.
Now, each night when the gateway sends the accounting log to the accountant, the accountant will forward that log on to GroupWise Monitor.
Figure 1: GroupWise Monitor Performance Testing and Gateway Accounting require an External Domain for communication with your GroupWise System.
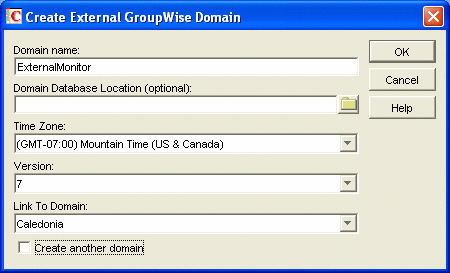
Figure 2: The GroupWise Monitor External Domain is linked to another domain in your system via a direct TCP/IP link.
To view the accounting logs from the Monitor Web Console (See Step 1.d), choose Reports and click on Gateway Accounting. From there, you can choose which agents for which you want to see the logs. The reports provide a lot of useful information. For example:
Log Stats per User shows a list of users and the number of messages and total size of messages passing through the gateway.
Log Stats per Domain shows what domains you are receiving from and sending to.
Individual User Stats shows the individual pieces of e-mail that are passing through the gateway for a particular user.
New Feature Tip 2: Trends Reporting
The new Trends reporting feature, found in the Monitor Web Console Reports, allows you to build various graphs showing trends for your agents. We will show one example for a GWIA report.
Click on Reports | Trends from the Monitor Web Console.
At the Trends page, click on GWIA and enter a report name in the Trend Name field, and check the following items:
gwiasmtpdConnectionRefused
gwiasmtpQueueSend
gwiasmtpQueueReceive
Click Add Trend at the bottom. You can now view this trend by clicking the Trend name at the top of this window. Figure 5 shows the resultant graphs for this particular trend.
Note: You can build a trend report for any of the MIB values that Monitor tracks; your resultant graphs will seem almost endless!
New Feature Tip 3: System Map
Another new feature of GroupWise 7 Monitor is the ability to have a map of your system outlining where your agents are, and the state of agents in the map. This allows you to have an up-to-date status of your system in a visual format that you might have on a large monitor in your IT center. You can use any type of map in .png or .jpg format. To create your map settings, take the following steps:
Find or create maps of your office, campus, region or country, and copy them into the maps subdirectory of the monwork directory. This will be in one of two folders:
/tmp/gwmon/monwork for Linux
c:\gwmon\monwork for Windows.
In the Monitor Agent Web Console, click Map | New. (Note: This is not available in the Windows Console; you must do this from the Monitor Agent Web Console.)
Click the map you want to set up. Then specify a name for the map, and click Create.
Select an agent you want to include on this map in the drop-down list. Then click the place on the map where that agent is located. The agent name appears in a blue box.
Select additional agents and locations as needed by following the preceding steps.
In the Line Color drop-down list, select a color to show down links between locations. Make sure you select a color that shows up well on the particular map. This will determine the color of line that will appear on the map when the link between these agents is down.
Once your map includes all the needed GroupWise agents in their respective locations, click Done.
Once you have created your map, you can view it as follows:
In the Monitor Agent Web console, click Map | View.
Click a map to view agent status.
At this point, the Monitor Agent checks the status of each agent on the map. Any agent that is down or that has a status of Major or Critical, displays in red on the map. Agents with statuses of Warning or lower do not display on the map. If a link between agents is down, a line displays between them.
* Originally published in Novell Connection Magazine
Disclaimer
The origin of this information may be internal or external to Novell. While Novell makes all reasonable efforts to verify this information, Novell does not make explicit or implied claims to its validity.