Extending the Power of ZENworks
Articles and Tips:
Heath Upton
01 Feb 2006
Consider the different hardware and software configurations you have in your company. Can you count them all on one hand? If you count on both hands and both feet, would that be enough to cover your organization's varied OS environments? For most, it isn't near enough, but there are ways of taking the pain out of deploying and maintaining all those computers. Consider a Standard Operating Environment (SOE) as a first step.
Many organizations realize the benefits of deploying an SOE. They can reduce costs, improve service levels and productivity, and provide a secure and stable platform for business applications. But what is an SOE?
Introducing ENGL Imaging Toolkit
The core component of an SOE is the operating system; it provides the basis upon which the other SOE components such as applications and organizational policies can be reliably built and deployed. The ENGL Imaging Toolkit provides a modular turn-key solution for the deployment and maintenance of Windows 2000 and XP Professional workstations as part of an SOE project.
Novell ZENworks 7 provides a powerful imaging framework that supports the creation of base and add-on (layered) images. ENGL developed a methodology called Smart Windows Deployment that leverages ZENworks imaging capabilities to the fullest. The approach is to make the build process as modular as possible. This is important for a number of reasons:
Maintenance You can update individual components rather than one big image.
Flexibility The build can easily be tailored and extended.
Distribution In multisite environments, only the components that change need to be replicated between sites.
The ENGL Imaging Toolkit consists of three components: Zim, Ztoolkit and Zwake. Each addresses a different element of the process of automatically deploying Windows across many different hardware types throughout your organization.
Enhanced Imaging with ENGL Zim
ENGL Zim provides a front-end interface to the ZENworks Imaging Linux environment on the workstation, and lets you configure how ZENworks imaging is presented to technicians and end users. Zim lets you deliver imaging tasks based on a user's eDirectory identity. It simplifies the end-user experience. Zim can also automate manual tasks, such as restoring ZENworks images and 'hiding' complex imaging tasks behind a single menu option.
Organizations increasingly have a requirement to minimize the time involved in deploying or redeploying workstations. The ability for anyone to be able to image or reimage a machine means that you can reduce the training and deployment costs by using a simple and intuitive front end to the imaging environment.
Enhanced Windows Deployment with ENGL Ztoolkit
ENGL Ztoolkit enables complete automation of the Windows 2000 or XP build process from the point the machine first boots the OS to the machine being ready for the end user to log in and begin work. Ztoolkit takes care of the following without any manual intervention.
computer naming
ZENworks workstation registration
Active Directory/Domain registration
application delivery
customization of the Windows environment.
Ztoolkit can perform many build tasks that traditionally require extensive scripting and batch files just by using a single configuration file. Combined with ZENworks 7 Desktop Management, you can deliver thousands of workstations that are all built to exactly the same standard.
Enhanced Lights-out Deployment with ENGL Zwake
ENGL Zwake is a task-based, lights-out scheduler, which extends ZENworks Wake-on-LAN (WoL) capabilities. It lets you schedule a sequence of imaging-related tasks to perform against target workstations. For example, you can select a group of workstation objects in eDirectory and specify a start time for tasks. Then Zwake can perform a series of tasks, such as setting the ZENworks "restore image on reboot" flag and then sending WoL packets to start the image deployment process on those machines.
Creating the Build Process
UNIVERSAL BASE IMAGE
The process of deploying Windows using the ENGL Imaging Toolkit starts with the creation of a universal base ZENworks image.
ENGL recommends that the Universal Image is kept as clean as possible so it consists of just the core OS and major service packs. Keeping the base image as lean as possible will require minimal maintenance when support for new machines is required and applications are added or removed. In normal circumstances, the base image will only be rebuilt when a major OS service pack is released. Because of the modular nature of the ENGL build process, all other SOE components can be delivered using ZENworks add-on images or application packages.
USING ZTOOLKIT BUILD WIZARD
The Ztoolkit Build Wizard helps you create a Universal Image and guides you through the process of defining how Windows will be built and configured for your SOE. The wizard interface presents each element which helps first-time users through the process of Windows deployment.
The Ztoolkit Build Wizard helps you with several tasks:
computer naming
regional settings
multilanguage pack installation
Novell client installation
ZENworks Management Agent installation
ZENworks Workstation registration and group membership
Active Directory membership and security
ZENworks application delivery
Windows customization.
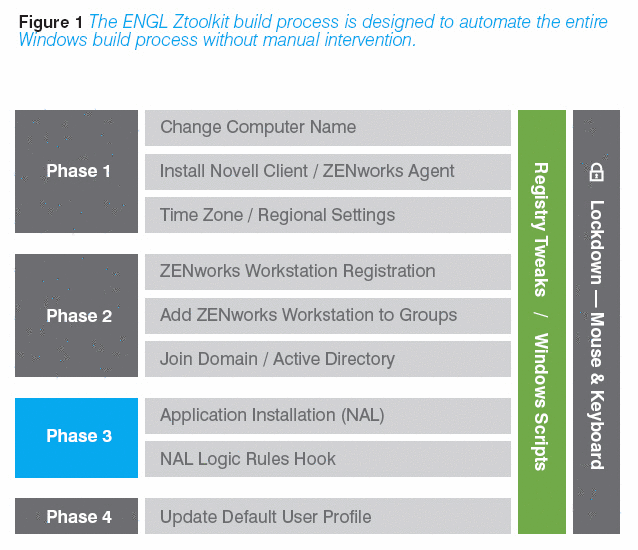
The Ztoolkit build process has four phases and each ends with an automated reboot. (See Figure 1.) Each phase performs a series of tasks and can interact with eDirectory or Active Directory as required. For security, you can disable the keyboard and mouse (including special Windows keys and even the Ctrl-Alt-Delete reboot keys) during the build process. You can tailor the build process to always deliver your exact requirements. If the machine is turned off during the build process, Ztoolkit will begin where it left off when it is restarted.
Figure 1: The ENGL Ztoolkit build process is designed to automate the entire Windows build process without manual intervention.
Customizing the Build Process
The Ztoolkit build process allows you to tailor the Windows environment to a specific set of SOE requirements. You can call registry updates or scripts to make specific changes to the environment before and after each individual build phase. For example, it's common to disable balloon pop-up tips in Windows XP during the build process: create a phase1-before.reg file with the necessary registry keys and update the registry with that .reg file before Phase 1 begins.
You can also use the included Ztoolkit ActiveX control in build process scripts to perform tasks such as LDAP queries, ZENworks Image-safe Data (ZISD) queries and Windows customization. A common use for the ActiveX control is to retrieve information from ZISD that was stored at imaging time. For example, using ENGL Zim, you can store location information, such as multilanguage requirements, in ZISD that you can then retrieve and use during the Windows build process.
Once you define the build process, the Build Wizard creates all the required core components, including the Universal Image creation process and ZENworks add-on images. After creating the base image and build components, you need to address the other elements of the automated build.
Handling OEM Drivers
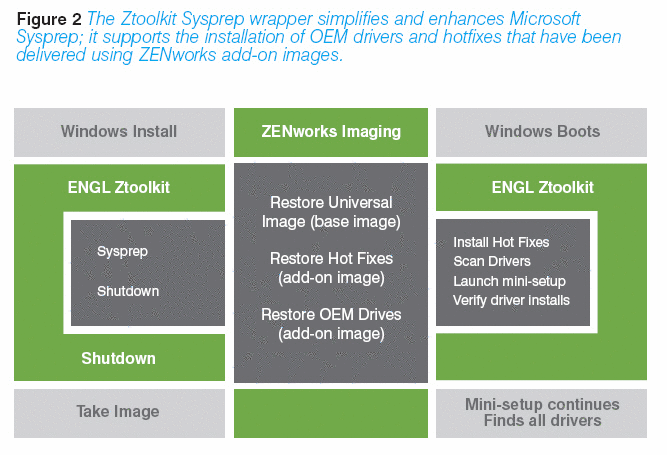
Windows drivers often cause organizations to maintain many different images to cater to their different hardware platforms. Remember, the Universal Image only contains the base Windows OS; it does not contain drivers for the many OEM hardware components that exist across the desktop, laptop and tablet machines where the image will be deployed. Many organizations use Microsoft Sysprep (System Preparation Tool) in an attempt to separate an image from the underlying hardware; however, Sysprep has some driver discovery limitations and it does not create a truly portable Universal Image.
To address these limitations, ENGL Ztoolkit includes a Sysprep wrapper that provides more functionality around Sysprep. It includes dynamic discovery and validation of drivers during the imaging process as well as hotfix installation. (See Figure 2.)
Figure 2: The Ztoolkit Sysprep wrapper simplifies and enhances Microsoft Sysprep; it supports the installation of OEM drivers and hotfixes that have been delivered using ZENworks add-on images.
Creating OEM Driver Add-on Images
Suppose your organization delivers a new hardware platform into your IT environment. Typically, you'd try to make an existing image 'fit' on the new hardware, or else build a new image for that hardware platform. Ztoolkit ships with a driver extraction tool that lets you extract OEM drivers from a Windows machine.
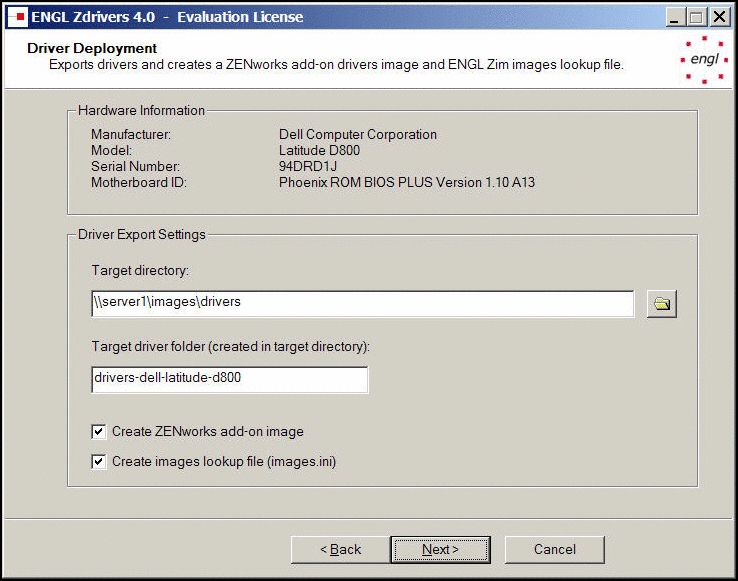
In this scenario, you can take a new hardware platform and let it boot and perform the manufacturer's OEM Windows installation. Then run the Ztoolkit driver extraction tool, Zdrivers, from a USB key or network path. Using the Zdrivers wizard, select the drivers and then export them to a directory. It will create a ZENworks add-on image that contains all of the drivers for the specific hardware platform. (See Figure 3 AND Figure 4.) It will name the image using a standardized naming convention of 'drivers--.zmg'.
Figure 3: Zdrivers uses device filters to let you extract OEM drivers while excluding drivers that are in the Windows base image.

Figure 4: Zdrivers creates a ZENworks add-on image that contains the extracted drivers as well as a lookup file that ENGL Zim uses to automatically select and restore OEM driver images.
Hotfixes
Patch management is a critical element in maintaining the stability and security of an SOE. Using the ENGL Imaging Toolkit, you can build machines with the most current Microsoft hotfixes and apply them during the build process. This approach has two key advantages over delivering hotfixes after the machine has finished building:
Hotfixes are applied before hardware discovery or, before the network card is installed. (See Figure 2.)
The workstation is secure, stable and useable at the end of the build process without applying more patches.
In addition, you don't need to modify or re-create the Universal Image when new hotfixes are released. You can integrate hotfixes into the automated build process by adding the relevant hotfix executable to a ZENworks add-on image.
Once you deploy the machine, ZENworks Patch Management can maintain the patch status of the machine until the next time you image or replace it.
Multilanguage Support
If your organization is using Windows 2000 or XP, you can localize the user interface using Multilingual User Interface (MUI) packs. MUI lets you change the user interface language of the OS according to the preferences of your individual users. Because the ENGL Imaging Toolkit is modular, you can easily integrate and deliver MUI packs into the build process on a location-specific basis.
The Ztoolkit Build Wizard can automatically create the MUI addon images. Use a standard naming convention, such as mui-.zmg to name your image. A ZENworks application object installs the MUI pack during phase 3 of the build process. (See Figure 1.) You can apply multiple MUI packs if the relevant MUI pack image has been restored. You can do this only if the application also has a system dependency on a specific MUI language directory.
Deployment
We've discussed how to create a few different modules used in the build process. Figure 5 shows the build components and the order (bottom to top) in which they will be restored. The deployment process will restore the first four image components (the Universal Image base image, hotfixes, Novell Components [Novell Client and ZENworks Management Agent] and ENGL Ztoolkit Build Process add-on images) to every machine.
The last two add-on images will be restored on a per-machine basis using environmental information and lookup tables to determine delivery.
Figure 5: Based on ENGL's Smart Windows Deployment methodology, ZENworks base and add-on images are restored to machines based on hardware and location.
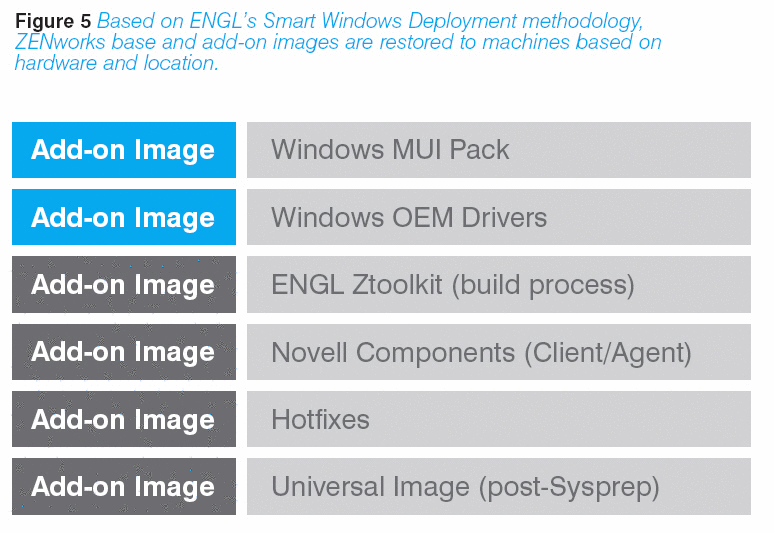
Image Deployment
After creating the components of the automated build process, you can deliver the relevant images to target workstations in several ways:
manually, from the machine using PXE, CDROM/DVD or USB key
automatically, using ZENworks imaging policies
lights-out using Wake-on-LAN
Zim operates in all of these environments and delivers the relevant images to the workstation with or without user intervention. You can automate the entire imaging process using a BASIC-like script language.
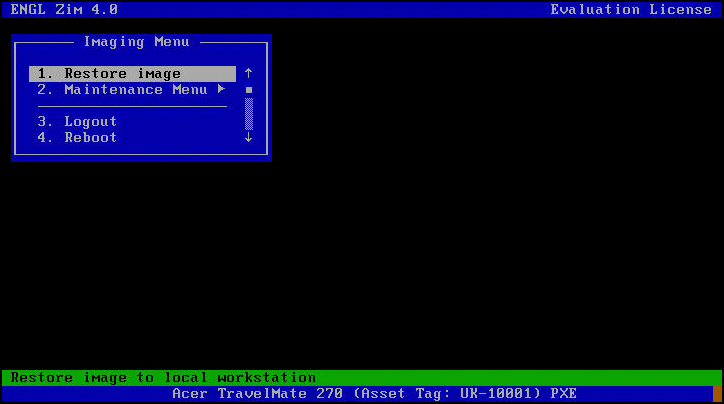
For manual imaging, Zim secures ZENworks imaging using an LDAP login panel. After authentication, Zim displays an imaging menu based on the user's identity. (See Figure 6.)
Figure 6: ENGL Zim displays customizable imaging menus with customizable help that anyone can use.
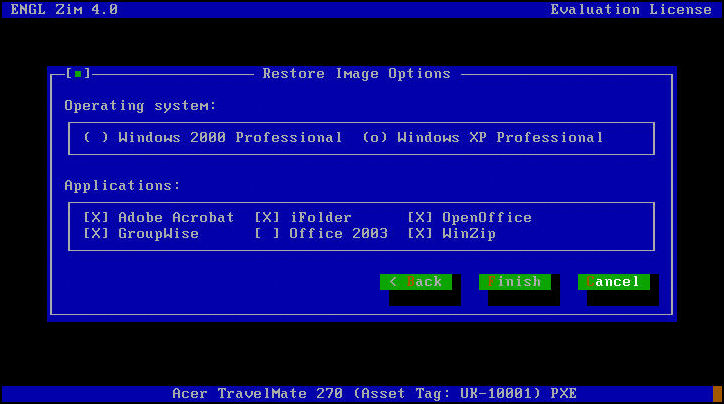
If you have workstations that ZENworks is not managing or if you have new hardware, you might need to "touch" those workstations to set the initial configuration. Using Zim, set all of the needed configurations before imaging. Then use them during the build process as discussed before. This greatly reduces the "touch time" because you can provide all the needed information and then leave the machine to build.
ENGL Zim forms are one method of gathering build information using an easy and intuitive interface. (See Figure 7.) Once you enter the information, Zim processes the information and performs the appropriate imaging tasks.
Figure 7: The forms functionality in ENGL Zim is easy to use and lets you group information onto different pages in wizard-style windows.
Launched manually or automatically, Zim can natively retrieve information from ZISD, eDirectory (via secure LDAP), the machine's BIOS or lookup files. Using this information, the correct images are selected and restored to any given machine.
For example, Zim will restore the OEM driver image that is based on the specific model information from the BIOS of the workstation. In Figure 4, Zdrivers created a driver add-on image for a DELL Latitude D800. Zim retrieves this information and based upon it, Zim looks up the relevant add-on images to restore.
Now you know how to develop and deploy a Standard Operating Environment using Novell ZENworks 7 and the ENGL Imaging Toolkit. Because your organization keeps changing, so will your IT requirements. As long as companies develop new software and hardware, your deployments, updates and modifications will never end. Deal with it. ENGL gives you an easy way to stay on top of those changes and continue to adapt to them while delivering a secure and robust SOE. So put your shoes back on and stop counting the various configurations in your organization. Just make the images and let ZENworks and ENGL do the rest.
For more information about ENGL, please visit www.engl.co.uk.
At A Glance: The Three ENGL Components
ENGL Zim is a front-end interface to the ZENworks Imaging Linux environment on the workstation. It lets you configure how ZENworks imaging is presented to technicians and end users.
ENGL Ztoolkit lets you automate the entire build process of Windows 2000 or XP from the point the machine first boots the OS to the machine being ready for the end user to log in and begin work.
ENGL Zwake is a task-based, lights-out scheduler, which extends ZENworks Wake-on-LAN (WoL) capabilities. It lets you schedule a sequence of imagingrelated tasks to perform against target workstations.
* Originally published in Novell Connection Magazine
Disclaimer
The origin of this information may be internal or external to Novell. While Novell makes all reasonable efforts to verify this information, Novell does not make explicit or implied claims to its validity.