Automating Unattended Installations Sans Media
Articles and Tips:
01 Apr 2006
In our last segment, we learned how to use the AutoYaST tool to create an AutoYaST XML file, which is used to perform a "scripted" installation. Once created, we could use the AutoYaST file and the first installation CD to perform an unattended installation.
In this article, we'll take the auto installation of SUSE Linux Enterprise Server servers a step farther by performing a complete installation remotely, over the network, without requiring the use of any installation media.
To perform a remote unattended installation, we'll take advantage of two key pieces of technology:
The Dynamic Host Configuration Protocol (DHCP) allows us to provide a system on the network with a wide range of configuration information. While normally used to provide systems on a network with IP-related information (such as an IP address, default gateway and DNS information), DHCP can be configured to provide a wide range of "other" information including information about images available for booting over the network (much like its predecessor, BOOTP).
Numerous implementations of DHCP exist, but in this article we'll focus on the Internet Systems Consortium (ISC) version (which is included with SUSE Linux Enterprise Server 9). While our focus is on the ISC version, the concepts discussed apply to most DHCP implementations, including the versions available with NetWare and Windows (though their configurations will differ).
Using DHCP we can provide boot information to the Preboot Execution Environment (PXE). Most modern x86-based PCs implement the PXE protocol in the BIOS and support network-booted applications. It does this using three distinct technologies, which allow for a consistent set of "preboot" services within the BIOS:
PXE provides a uniform protocol that can be used to request network address and bootstrap program information (in our case, we'll be using pxegrub). The protocol allows the BIOS to request (and DHCP to provide) network boot information. The BIOS can then use this information to download and execute images from the network.
PXE provides a uniform set of API's that are built into the BIOS and can be used by the boot program (pxegrub) to manage devices on the system. These APIs allow lightweight bootstrap applications (such as pxegrub) to manage and utilize devices on the system (such as the network card). This enables a booted image to download additional software from the network and/or work with the devices on the installed system.
PXE provides a standard method of initiating the preboot firmware (a way to enable PXE booting in the PCs BIOS). This is typically done by enabling the PXE system (often called the "Network Boot" option) in the system BIOS.
Using the PXE architecture with a protocol such as DHCP, we can provide client systems with applications that can retrieve and install software over the network (tasks such as loading an operating system, booting a "rescue" disk, or even controlling boot loader configuration over the network).
Installing the TFTP server and boot files
To download images over the network, a Trivial File Transfer Protocol (TFTP) server is required. The TFTP server provides a lightweight method for network applications to download files from a central server. SUSE Linux Enterprise Server provides a freely available TFTP server in the 'tftp' package. The server can be installed using the yast -i tftp command. Be sure to execute the command as root user.
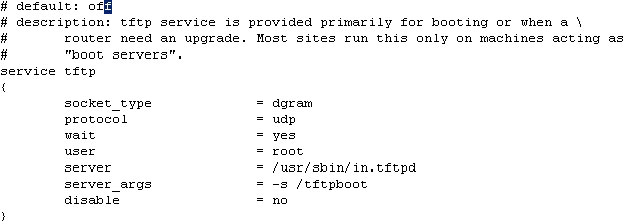
The TFTP server is started through the xinetd daemon process and is disabled by default. Once the package is installed, modify the /etc/xinetd.d/tftp file to enable the service and restart xinetd using the rcxinetd restart command. (See Figure 1.)
Figure 1: To enable the tftp server, set the disable option to no. (The default is yes.)
To allow booting over the network, place network installation images in the '/tftpboot/boot' directory. Create the directory if it does not already exist, and copy the '/boot/grub/pxegrub' file into the directory. The PXE grub image is a version of GRUB (the Grand Unified Boot Loader) that uses the PXE environment to download and execute boot images over the network.
To provide network booting, a few other components are required as well (two of which are available on CD 1 of your installation media): Mount your installation media and copy the file "boot/loader/initrd" from your media to the /tftpboot/boot directory. The 'initrd' file is the initialization root disk that is used to start the SUSE Linux installation; the file contains the linuxrc application and the YaST installer that is used to perform the installation. Next, copy the 'boot/loader/linux' image to the /tftpboot/boot directory. The file contains the Linux kernel image that will be used to boot the system for the installation.
Configuring pxegrub
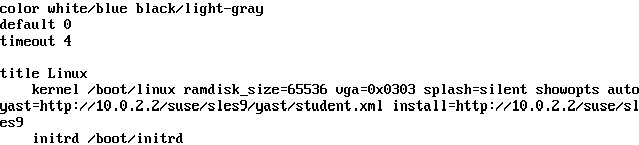
When the system first boots the pxegrub image, pxegrub will connect to the DHCP server to attempt to determine where its boot loader menu is located. It will then download the menu from the network. The boot loader menu contains the location of the initrd disk image and Linux kernel image, as well as any parameters that will be used to perform the installation. (In our case, we'll point it to the appropriate AutoYaST file and installation source location.) This is just as we did in the previous article when we booted from CD.
Create a /tftpboot/boot/menu.lst file such as the one shown in Figure 1. The /boot/linux and /boot/initrd files specified are relative to the root directory of the TFTP server from which pxegrub retrieves the menu.lst file. In fact, when using pxegrub, files that don't have a device specified are assumedto come from the tftp server. Aside from the locations of the boot images, the arguments used are those you would use for a typical GRUB boot file (installed locally). The autoyast and install arguments specify the location of the AutoYaST file and installation media on the network. (See Figure 2.)
Figure 2: This sample menu.lst file used by GRUB performs a network installation.
Configuring DHCP
The last step in performing an automated, unattended installation is to configure the DHCP server on the network. The DHCP server can be configured to provide a generic GRUB configuration file for all hosts on the network, or to provide a specific GRUB configuration file for each host on the network (in which case the MAC address of each host is required). The DHCP server must be configured to send the appropriate information to the workstation so it knows from where to download boot images. The appropriate options for DHCP are listed in Table 1.
Table 1
|
Option
|
Description
|
|
option pxe-menu code 150 = text; |
This line must go at the top of the DHCP configuration file. It informs the DHCP server that the term "pxe-menu" is used to send an "option-150" message (which is a text message) to a client. GRUB uses the "option-150" message to tell it where its configuration file is. |
|
next-server 10.0.2.2; |
This line goes in the subnet section, or host specific section of the DHCP configuration file. It tells the PXE boot system from what TFTP server to download a boot image. GRUB also uses this when retrieving its configuration file, and any images on the TFTP server. Note: Your DHCP server and TFTP server can be two separate systems! |
|
option pxe-menu "/boot/menu.lst"; |
GRUB uses this option to specify where its configuration file is. Note: This sends an option-150 text message to the client. This path is relative to the /tftpboot directory on your TFTP server. |
|
filename "/boot/pxegrub"; |
This line specifies where to obtain the boot loader. The PXE system uses this to download the PXE image that is used by GRUB. |
|
hardware ethernet 00:50:56:0A:56:56; |
This line specifies the MAC address of the host. When specified (this must be in a host block), it limits the host(s) that can receive the DHCP information listed in the block. |
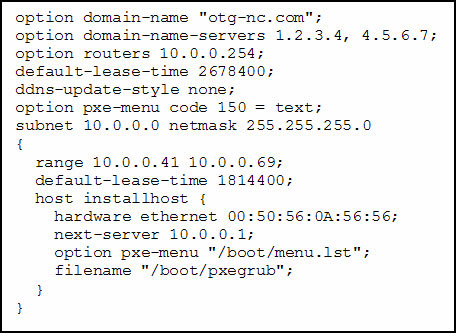
Figure 3 shows a sample DHCP configuration file (/etc/dhcpd.conf). This configuration file uses PXE to boot the system with MAC address '00:50:56:0A:56:56', then download the pxegrub image and grub configuration (/boot/menu.lst) files from 10.0.0.1.
To create a generic configuration, simply move the 'next-server', 'option', and 'filename' lines outside of the 'host' block shown. This causes the options to be sent to all hosts on the '10.0.0.0/24' network (or whichever network you specify). You can use multiple host blocks to define different boot images or GRUB configuration files for different systems. For example, if you have a mix of 32- and 64-bit systems and want to install the appropriate version of SUSE Linux Enterprise Server on each.)
Figure 3: This sample DHCP configuration file boots the system with MAC address 00:50:56:0A:56:56.
Configuring the BIOS
Once you've installed the appropriate files on your TFTP server and configured your DHCP server, you're ready to test your first automated installation. To do so, enter the BIOS of the system you are installing over the network and enable the Network Boot functionality. Once network boot is enabled, you should be able to reboot your system and reconfigure the boot order to ensure that booting from the network is the first option. Some systems won't show the network boot option in the boot order immediately after the BIOS change; you need to reboot the system and reenter the BIOS. Reboot your system and it should download the pxegrub loader and configuration file, and then proceed to download the appropriate Linux images and reinstall the system using the parameters specified in your AutoYaST configuration file.
Other Related Features
Using DHCP and PXE we've seen how to configure and perform a completely hands-off installation of SUSE Linux Enterprise Server over the network. You can also use these techniques to provide additional control and management functions for systems located on the network.
Because PXE combined with pxegrub allows us to manage GRUB configuration files over the network, we can remotely manage boot configuration files for systems on our network even when booting from a local disk. For example, we can remotely control the operating system booted when a system starts up for multiboot configurations, remotely control GRUB boot passwords, and even switch the functionality of systems when needed, such as changing a system to a thin client or kiosk mode when needed. This method can also be used to download other images, such as a G4L (Ghost for Linux) image to perform automated imaging of Windows systems on a network.
Using Wake-On-Lan, we can send a specific set of packets over systems on a network to turn them on from an off state. Combined with PXE and DHCP, we can use Wake-On-Lan to perform nightly reinstallations of shared workstations, or even bring systems online for a nightly virus scan or software update. You can download a sample Wake-On-Lan application from here.
* Originally published in Novell Connection Magazine
Disclaimer
The origin of this information may be internal or external to Novell. While Novell makes all reasonable efforts to verify this information, Novell does not make explicit or implied claims to its validity.