Automating Installations with AutoYaST
Articles and Tips:
01 Mar 2006
So you've decided to go mainstream with Linux in your enterprise, and are now faced with the daunting task of installing SLES on hundreds of systems. Fear not! The days of doing installation by hand with Linux disappeared years ago--as did the concepts of having to image systems. Today, SUSE Linux Enterprise Server installation is fast, easy and automated with the use of the AutoYaST tool.
The normal installation of Linux involves answering a number of questions during the installation process, along with the need to change media so the installation loads the appropriate package(s). While this might be effective for a single installation every once in awhile, this method becomes cumbersome when installing many systems.
With Windows systems, you would perform a single installation, and then create a disk image. The downside to such a method is that the image is hardware specific; if you change out a hard drive or install a new network card, you may find that your image no longer works, and a reinstallation is necessary. In addition, an image consumes valuable storage sometimes up to 10GB of disk space!
The AutoYaST installation method allows for almost complete customization of an installation by using an XML control file. You can easily create and modify this hardware-independent file using the Autoinstallation tool. Best of all, AutoYaST files are portable; a configuration can be created once, and often used on a wide range of hardware configurations with little or no change! In this article, we'll focus on creating a basic AutoYaST configuration file to perform automated network installations.
The first step in enabling automated network installations is to create a network installation server. The YaST Installation Server tool (under Miscellaneous) walks you through the process. It copies the media to your hard disk, and configures the appropriate services to ensure the media is available over the network. You can also use the tool to apply the latest service packs to your installation server ensuring that future installations will automatically occur with the latest service packs installed.
Note: AutoYaST will still work without an installation server, but you must swap disks.
Once you have your install server configured and running, decide where you want to store your YaST configuration files. Place your AutoYaST file somewhere on the network where they are accessible to the system installing them; however, AutoYaST files can be on a floppy disk because they tend to be very small or even on a customized installation CD. In this case, let's assume the files are in a 'yast' directory under the installation source (typically under /srv/).
AutoYaST requires two pieces of information to perform an automated installation:
the location of the installation media on the network
the location of the AutoYaST configuration file.
The YaST installation tool downloads the AutoYaST XML file, parses it and then uses the information stored in the file to configure the system.
Use the Auto-installation tool to create a template based on a system we installed. We can then modify this template to suit our needs. For more customization, we can create a variety of installation scripts that can perform additional scripted tasks, such as downloading and compiling special software, or emailing install logs to the administrator.
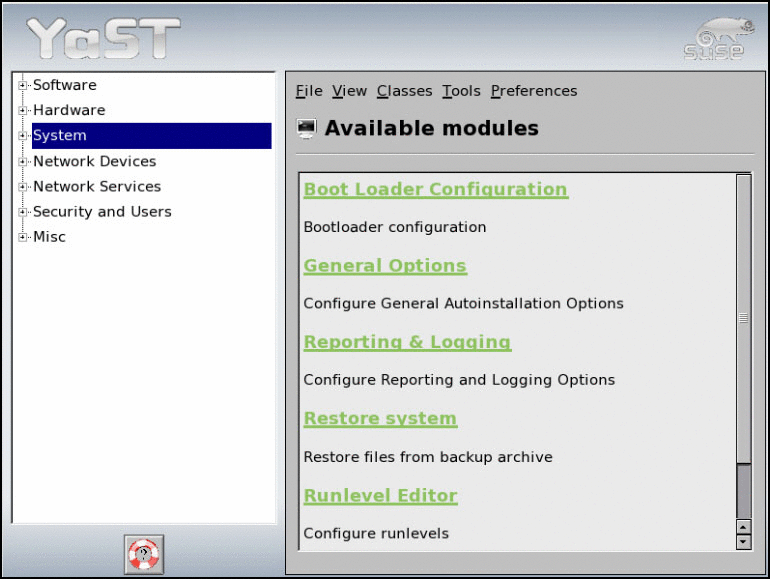
After installing and configuring the template system, start the Auto-installation (under Misc) tool to create an AutoYaST file based on that system. When you start the tool, notice the expandable tree view on the left. (See Figure 1.) This lets you drill down to specific installation components and configure them. In this case, let's base our installation on the currently installed system so we'll have the tool create an AutoYaST file based on the current system's installation.
Figure 1: During the installation, the navigation tree on the left lets you drill down to and configure specific components.
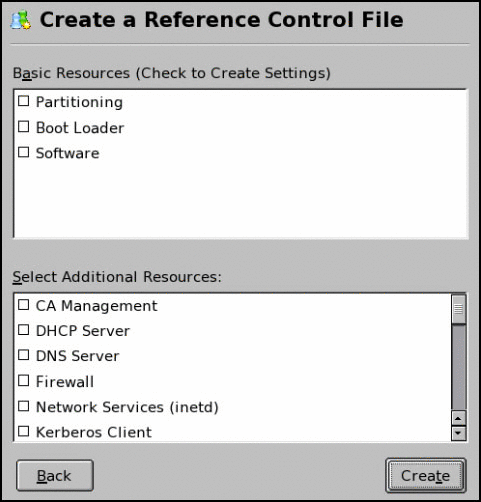
To create a reference profile based on the current system, choose Tools, and then Create Reference Profile from the drop-down menu. Now tell YaST which components of the system you're interested in. (See Figure 2.) In this case, we're creating a file to perform plain installations of systems so we'll choose Partitioning, Boot Loader and Software. If you leave out one of these, the system will automatically use the default settings for these options.
Figure 2: Select the pieces of the system on which you want to base your AutoYaST file.
If you configured additional resources on your server, you can select those resources and have the tool automatically attempt to re-create their installed configuration. Later, we'll see how it's possible to include entire configuration files in your AutoYaST files.
Figure 3: Once the profile has been generated, the settings of the current system are shown in the profile.
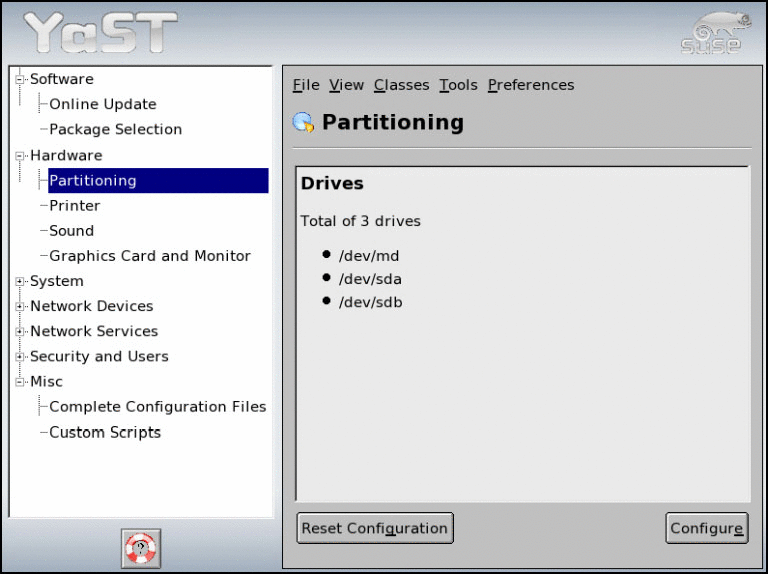
Once you create your reference control file, return to the main screen. Notice the tree view is now populated with settings based on your current system configuration. By selecting different areas of the configuration file, we can easily customize the installation options related to that section.
Now that we've created our base configuration, let's configure the other important system options.
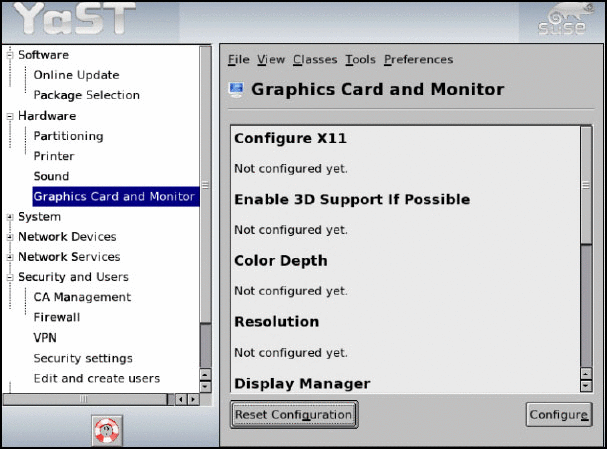
Just as when you performed your initial installation, the installer will auto-detect your video settings and create an XF86Config file that represents your hardware configuration. This allows your windowed environment to automatically be set up when the install completes; however, in some cases, using a system-generated video configuration just doesn't work. Choose Graphics Card and Monitor to set the various video card related options, for example, to set the default resolution to a lower value. But remember this uses the configuration specific to the video card and monitor combination in use. (See Figure 4.)
Figure 4: Select Configure to change the default video configuration.
Under System, ensure the Runlevel is appropriate for the system you are installing . A runlevel of "3" causes the system to initialize without the GUI interface, while a runlevel of "5" causes the GUI to run, which is usually required by users on desktop systems.
If your environment uses specialized configuration files (for example, you've modified your '/etc/sshd.conf' file to deny logins from the user 'root') you can include those configuration files in your AutoYaST file. (See Figure 5.) When the system is installed, these files will be extracted from the AutoYaST file and installed on the system before services are started. Using this configuration method lets you to apply changes to the system being installed even when those changes are specific to your needs. To do this, select Complete Configuration Files under the Misc option, and click the Configure button.
Figure 5: You can add custom configuration files to an AutoYaST file.
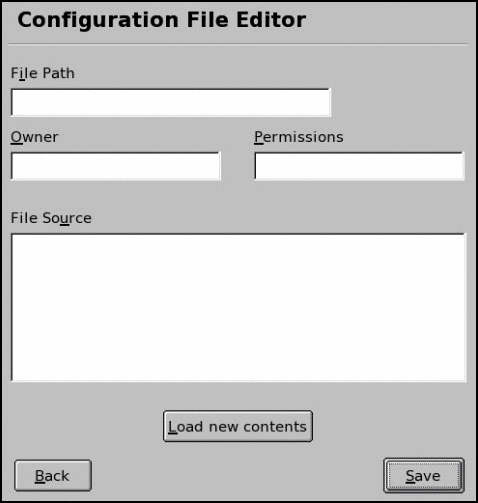
To add new files, simply choose the New option, and then specify the file name, permissions and ownership (using a userid:groupid syntax) of the new file. The tool lets you select files from your current system to include in the AutoYaST file, or you can type the contents in directly.
Embedding files into AutoYaST files is convenient and simple. But for more complex configurations or situations in which multiple configurations share the same embedded file, it makes sense to separate the file from the main AutoYaST file. In addition, you might need to go outside of what you can get from a normal text file for several other situations. For example, suppose you want to send an e-mail notification whenever a new system is installed, or perhaps you need to install additional software by compiling it from source code. These situations require a different mechanism--a script.
AutoYaST can also execute scripts during the installation process. This lets you generate your own custom installation applications, which helps you meet your deployment goals. The YaST installer can execute scripts at a few points during installation:
Before the installation starts, YaST can execute scripts. These scripts are often used to perform tasks that might be required prior to the installation. A common use is to use a script to modify the drive parameters of IDE drives, to speed up copying files to disk. These scripts often run with the network enabled -- which allows them to interact with the network.
After the packages are installed on the system, YaST changes the root directory using the "chroot" command. (Until then, the root directory is a RAM disk.) Before the system performs the chroot, scripts (called chroot scripts) can be executed. This is before the system reboots, but after all the packages are installed.
Another script can also be run just after the "chroot" command. Scripts that run before the change of root have access to the applications and files that are on the install media (the initial root disk); after the chroot occurs, scripts don't have direct access to those files, although they do have access to all the software installed on the target system.
Once the installer has finished copying files to the hard disk and reboots, a user script (or set of scripts) can execute. These scripts are network-required post-installation scripts. That is, they require the network to be present and execute after the initial installation steps, but before the final steps (such as video configuration and user creation) are complete. On the positive side, these scripts can interact with the network (later scripts can't), so they can download and install software and packages from the Internet; however, they can't perform tasks that are related to users since users haven't yet been created!
The last set of scripts that execute are called post-installation scripts. They are run after the installation is complete, but before the run level switch that brings the system to multiuser mode. While these scripts can't access the network, they are run when the system installation is complete: all users have been added and all devices have been configured.
Scripts that execute with the network enabled can be specified as URLs instead of being directly included in the AutoYaST file. This lets you easily manage and change them in a single, centralized location. The output of scripts that run after the installation are stored in /var/adm/autoinstall/logs/[script_name].log. Scripts are first run in the category and then the order in which they appear.
While you can add standard pre- and post-installation scripts through the Auto-installation tool (through Custom Scripts under Misc), many of the script types above can only be added by editing the AutoYaST XML file directly. You can find examples of adding scripts to AutoYaST files in the AutoYaST documentation.
Now that you've created your AutoYaST file and saved it on your installation server, proceed with the AutoYaST installation. Next month, we'll cover the process of configuring your DHCP servers so systems can directly boot and install via the network, but for now we'll settle for starting the installation via CD.
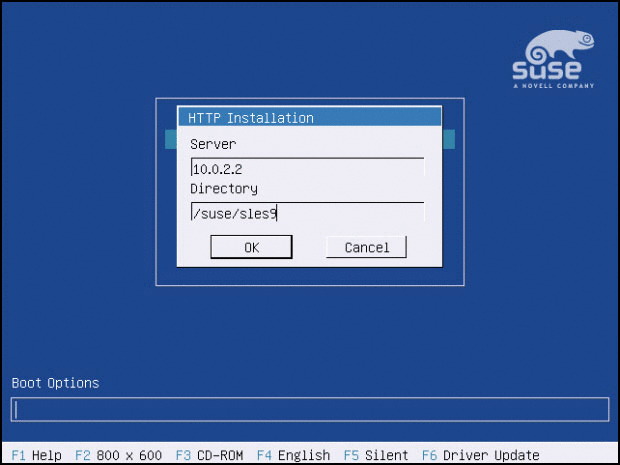
Insert the SUSE Linux Enterprise Server CD 1 (or CD 2) into the CD-ROM drive of the computer to be installed. When the system boots from the CD, the GRUB installation screen appears. (See Figure 6.) To perform an HTTP installation, press F3, select HTTP from the list and then enter the specifics of your installation server. (See Figure 7.)
Figure 6: When the system boots from the CD, the GRUB installation screen appears.
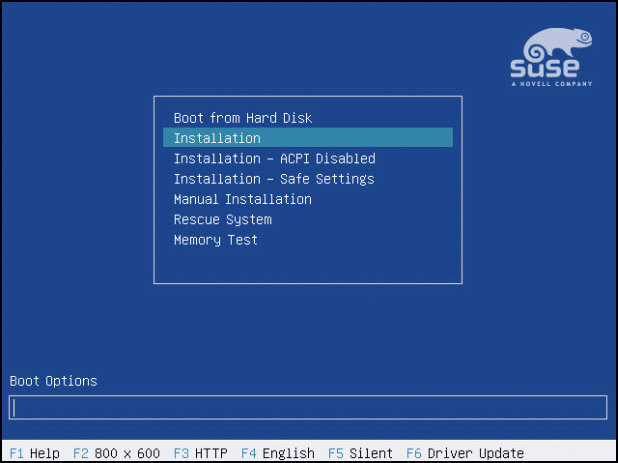
Figure 7: To perform an HTTP installation, press F3, select HTTP from the list and then enter the specifics of your installation server.
Once you've configured your installation server, tell the system to perform an AutoYaST installation and specify the location on the network of the AutoYaST file by adding the "autoyast=" argument to your boot line. (See Figure 8.) This argument passes into the kernel as an argument and is then used to download an AutoYaST file, which controls the rest of the install process.
Figure 8: After you've configured the installation server, specify where the AutoYaST file is on the network and perform an AutoYaST installation by adding the "autoyast=" argument to the boot line.

Now that you've set up an AutoYaST file, take a look at its contents; it's fairly easy to understand and manipulate to further customize your automated installations.
Next month we'll go a step further and examine how you can use the pre-boot execution environment (PXE) and a DHCP server to eliminate that pesky first step of having to walk to the PC and insert the CD.
AutoYaST uses device names when partitioning devices -- so regardless of your hard drive size, make, or model, if the device name is the same (such as IDE0) it will be partitioned (so long as it has ample space).
You might consider using logical volumes that are of the minimum allowable size when partitioning -- so you can expand you file system(s) once the installation has completed.
* Originally published in Novell Connection Magazine
Disclaimer
The origin of this information may be internal or external to Novell. While Novell makes all reasonable efforts to verify this information, Novell does not make explicit or implied claims to its validity.