Manage Your Assets
Articles and Tips: article
Randy Britton
01 Jun 2005
Administrators and bean counters both need IT asset information; however, the type and format of information they need from an asset management system differ significantly. Network admins want the details including the paths of the available applications and the number of open memory slots. If you're on the finance side or a C-level executive, you want to know a few other things: Are you buying software that isn't being used? Are you going to get hosed on your next software audit? Do you have disgruntled employees running amok with hacker tools?
Now network administrators and bean counters alike have some good news! Novell recently completed the acquisition of Tally Systems, a pioneer of asset management described by a recent news article as "the yardstick by which all other asset management tools are measured." Novell is now shipping a new product called ZENworks Asset Management. Let's take a closer look at this new product and its capabilities.
Introducing ZENworks Asset Management
ZENworks Asset Management integrates asset inventory, usage and license reconciliation capabilities to provide the most complete, accurate view of software installations and license compliance available. The combination of data enables you to get a complete view of your IT assets. This ensures license compliance and eliminates software overspending so you only purchase the licenses you need. The three components, or modules, of ZENworks Asset Management are:
Asset Inventory: automatically inventories hardware and software and details PC and network assets across enterprises
Software Usage: tracks who uses software applications and how often and allows you to identify unused software to reduce software expenses
Software Compliance: based on a comprehensive license knowledgebase, this component provides an ongoing view of your software license compliance status and allows you to track license purchases and reconcile them to your software inventory. Software Compliance also helps you establish and enforce software standards.
Asset Inventory
Asset management starts with an accurate inventory of IT assets in your organization. Asset Inventory automatically inventories software and hardware, detailing PC, server and network assets across the enterprise. You get the data you need to ensure license compliance, save on software licensing and support, and fuel all your other critical IT projects including: migrations, lease management, help desk, budgeting and planning, and asset redeployment.
Novell ZENworks Asset Management provides several benefits in three major areas:
Reporting
comprehensive Web reporting with multiple graphing options
hundreds of built-in reports and queries
asset history and trend analysis
custom reports and alerts
multiple graphing/display options
Recognition
automatically recognizes tens of thousands of products
recognizes not only software, but also hardware and network devices
monthly knowledgebase updates
software suite recognition
local product recognition for proprietary and legacy products
unlimited user-defined fields for data collection
Operation
integrated client push utility
out-of-the-box or customized inventory process
networked, dial-in and standalone PC inventories
flexible kick-off options (e.g., client, login script, system policies)
multiple scheduling options
scan-on-demand for real-time inventory of specific PCs
integration with ESD, and asset management tools
automatic product updates
ZENworks Recognition Technology
Looking at the contents of a hard drive for executable files isn't difficult. The hard part is making sense of what's there. Several inherent problems exist:
File header information in executable files is inaccurate, misspelled and often missing.
In a Windows environment, executable files are different from applications.
You need an auto-discovery tool to see what's really on your desktops--not just the vendor's "best guess."
Novell installs and analyzes every application that it adds to its knowledgebase. Skilled technicians build accurate and reliable "fingerprints" for each identified piece of software.
License Tracking
Software license data comes in many forms and from many sources, including software reseller reports, spreadsheets and ERP systems. Often the data is inconsistent across sources and not normalized for processing. ZENworks Asset Management allows you to import licensing data from any source in a tab-delimited text file format. Other important license tracking features are:
imports licensing data without any scrubbing or formatting because it includes Reseller Connectors for SHI and Softchoice (Novell is working with other top resellers to add more connectors.)
automatically builds a catalog of unique products based on five key attributes, significantly reducing reconciliation effort in later phases
allows manual input of purchase records (purchases can be captured at requisition, which is generally the earliest point in the lifecycle.)
supports any combination of these license tracking options
Software Discovery
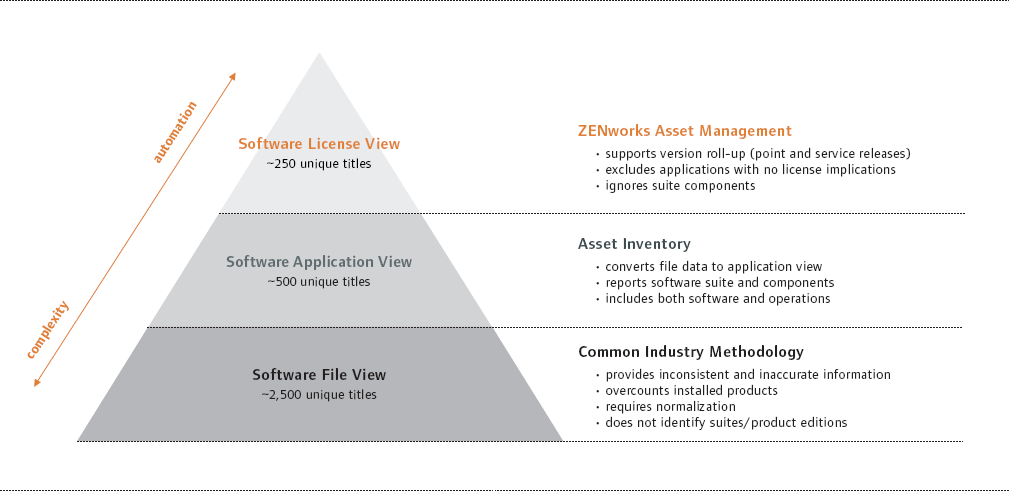
The first, and in many respects, the most fundamental phase in the license compliance project is software discovery. Unlike most configuration and asset management tools, ZENworks Asset Management employs a number of sophisticated techniques to ensure that your software inventory is complete, accurate, normalized and tuned for license compliance reconciliation and reporting. The ZENworks Asset Management Knowledgebase is the key to provide a "License View" of software discovered on your network. The Knowledgebase is maintained by a team of technology analysts, who update and add hundreds of products each month. The Knowledgebase provides a set of filters that create the License View, which:
rolls up point releases and service packs
excludes titles with no license implication (such as Adobe Reader)
ignores suite components if they were installed as part of the suite
identifies standalone suite components when installed outside of the suite
distinguishes between full and runtime editions
Reconciliation
The next phase in the process combines licensing and discovery data to show compliance status on a product-byproduct basis. ZENworks Asset Management includes an auto-reconciliation feature that attempts to match products found on the system to cataloged products using several text-matching algorithms. The auto-reconciliation process can also be used to create a set of licenses based on the clean, normalized manufacturer and product names contained in the Knowledgebase.
After products are found and cataloged, they are linked to a common license, and you get an immediate picture of over- and under-licensed situations. The ZENworks Asset Management Compliance Report represents a near real-time view of potential risk and cost-savings scenarios because:
discovery data is constantly updated as scheduled inventories occur and
license quantities are updated as purchase records are imported
Application Usage Analysis
Another facet of compliance and software asset management is application usage trend analysis. With ZENworks Asset Management, application usage tracking occurs at the workstation level and captures the following information for both local- and server-run applications:
daily total runtime
daily active (foreground window) time
workstation
user
When combined with the compliance status, this information provides another key perspective for decision making. For instance, in under-licensed situations, you might be able to uninstall the applications from workstations on which they have not been used for an extended period of time.
ZENworks Asset Management also enables tracking of suites at the suite level for license reconciliation and also at the underlying component level to allow for usage analysis. This is useful to determine if employees are using all the components of a suite. If not, you can provision them with a more limited suite edition.
Figure 1: The License View of discovered software products becomes the basis for the reconciliation between software inventory and licensing data. By normalizing and filtering the discovered product list as described here, the asset manager typically reduces the number of titles they need to reconcile by a factor of 10 when compared to other tools.
License Allocation
While legal compliance is generally relevant at a corporate level, day-to-day license management often requires tying licenses to organizational units, such as a site, department or cost center, and even to individual workstations. ZENworks Asset Management allows you to break down overall license quantities and allocate them to specific groups or workstations. Because the solution not only identifies risk issues and cost-savings opportunities, but also gives you granular views so you can take action, it helps you determine:
which departments have more installations than allocated licenses
which high-priced applications are installed on workstations with no allocation
which workstations within a cost center are consuming allocated licenses but don't have the software installed
Don't worry if you haven't kept records that show how licenses are allocated. ZENworks Asset Management includes a set of wizards that establish baselines from which you can manage allocations.
Purchasing Standards
Almost every organization strives for an environment in which standards are part of day-to-day operating procedures. Standards come into play in many areas. Some relate to specific configurations and images while others relate to approved software applications at an organization level.
ZENworks Asset Management helps create and manage your list of approved applications. You can create an approved list or a set of standards categories (e.g., Standard, VP Approval, and Policy Violation). Either way, you track purchasing standards and report on exceptions.
Custom Reports and Alerts
The ZENworks Asset Management Web Console includes hundreds of standard reports that provide a host of views into common IT asset management focus areas. All Web Console reports offer numerous drill-down points that allow you to follow through various lines of questioning and return the right answer. Reports are available in tabular or graphical format and can be exported to a spreadsheet format.
No matter how complete your asset management reports, they are not relevant unless they are in the right hands at the right time. Hence, the ZENworks Asset Management Web Console lets you create a set of custom reports and generate e-mail alerts based on an unlimited set of criteria.
Custom reports and alerts offer these capabilities:
report description, columns, column order, group by and record selection criteria
edit, copy, run, schedule, archive and set alerts based on report definitions
Note: You might want to revisit this section of the Web Console after you scanned additional PCs to see multiple entries in these reports and to create your own reports and Alerts using the Custom Reports feature.
How It Works
Install ZENworks Asset Management and set up the inventory process. You can install the product out-of-the-box with the wizard-driven interface. You can install it using default options or fine-tune your inventory process by setting a schedule, selecting a deployment method, such as login, e-mail or CD, and defining the inventory experience, for example, to disallow enduser involvement or data entry at the PC.
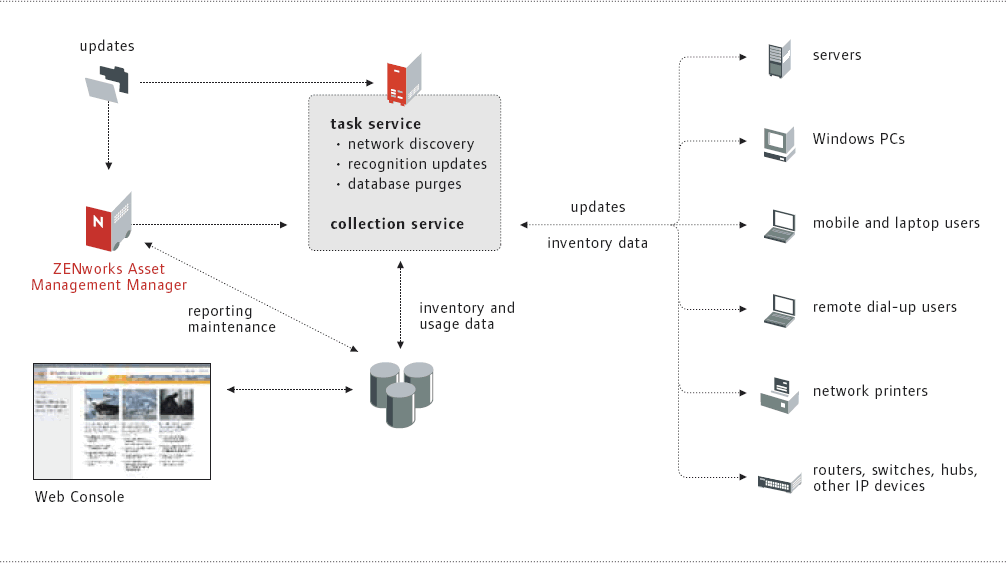
Utilize your current network architecture to collect data. ZENworks Asset Management utilizes TCP/IP connectivity to move inventory collectors from one central or several distributed servers to PCs or workstations. Remote PCs are inventoried over dial-up connections and standalone (unconnected) PCs are inventoried via CD. Inventory results are automatically loaded and aggregated in an MSDE, Microsoft SQL Server or Oracle database.
Run and analyze reports and queries. ZENworks Asset Management includes a wide variety of reports that provide a quick, thorough view of workstation details, software installations by department or vendor, leased PCs, history, changes and trends. Queries identify machines that, for example, don't meet migration requirements, applications that indicate security risk, or PCs that don't have the latest service pack.
Figure 2
User Interface
ZENworks Asset Management has two primary user interfaces. Figure 4 shows a thumbnail view of each interface and some of the primary functions of each.
Figure 4a: The Manager is the central console from which all product administration functions can be handled.
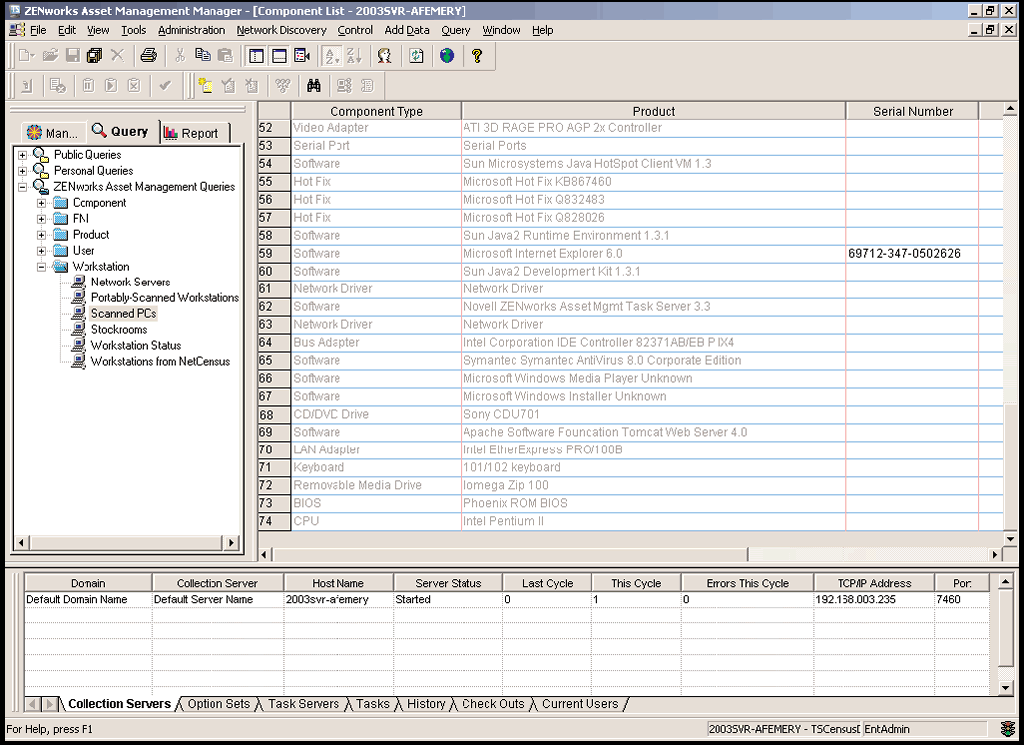
Figure 4b: The Web Console is where the majority of ZENworks Asset Management users access the reports and analysis they need to complete projects.
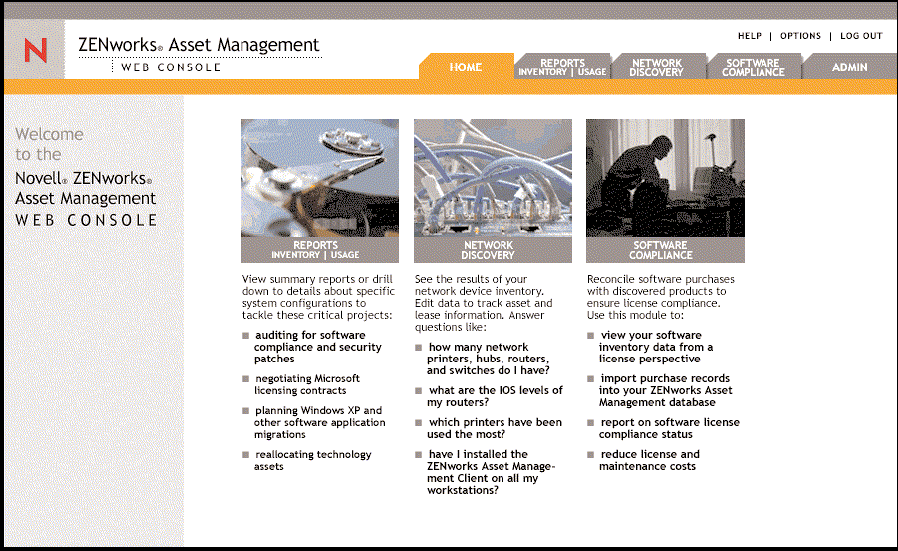
Web Console
Information is presented in an easy-to-use, point and click format.
Reports allow the user to drill down to various levels of detail to get exactly the information they need.
Custom report and alerts features are available.
Users can edit certain information about network devices.
All software compliance functions are included.
Manager Console
Use the Manager Console to access the following:
Remote Client Install Utility for deploying the ZENworks Asset Management client
Inventory and network discovery configuration and scheduling options
ZENworks Asset Management Live product updates
Product knowledgebase (product recognition) updates
Legacy reports and query tool
Data input and editing screens
Product licensing information
Discovering Devices on your Network
Use the Network Discovery Engine (NDE) to scan your network or a subnet of your network and collect information about workstations, routers, printers and other hardware devices connected to your network.
Note: To get as much information as possible from the NDE about Windows workstations; such as operating system version, machine make and model; SNMP and WMI services must be installed and enabled on the machines you are scanning. For SNMP, you must provide a valid community name. By default, ZENworks Asset Management uses "public" as a community name. To add other names, choose Options from the Manager's Network Discovery menu, and add additional names to the list at the bottom of the window. For WMI, the evaluation machine's login must have Administrator permissions for the machine you are scanning, and Windows PCs must have WMI enabled for it to collect certain details.
To start a Network Discovery:
In the Manager's left pane, click the Management tab and expand Public Network Discovery Tasks.
Double click Default Network Discovery Task.
In the Subnet tab, choose to scan a
local subnet,
a range of IP addresses or
a set of subnets.
Note: Limit your initial Network Discovery to one or two subnets, as each subnet can take 20-40 minutes to scan.
After selecting the network segment to be scanned, click the General tab and click Schedule to set the schedule for the network scan. Choose Immediately from the Act dropdown menu and click OK to save. The task will kick off the network discovery.
Click the Task tab at the bottom of the Manager window to see the status of the Network Discovery task.
Figure 3: In addition to license compliance tracking, ZENworks Asset Management also provides features, like license allocation and purchasing standards, that are important in the overall software asset management program.

Installing the Client Software on Your PCs
On a new installation, the most efficient way to install ZENworks Asset Management Collection Client software on the machines you want to scan is through the Remote Client Install Utility. If you are a ZENworks customer, you can use ZENworks to distribute the ZENworks Asset Management client.
Note: Use the results of the Network Discovery Engine network scan to target ZENworks Asset Management client software deployments.
To use the Remote Client Install Utility to install client software:
From the Tools menu, choose Remote Client Install. The Remote Client Install Utility's main window appears.
In the left frame, browse to locate the computer(s) on which you want to install client software.
Click to select the appropriate computer(s).
From the Edit menu, choose Add to Workstation List, or drag them to the right frame. The selected computers appear in the workstation list.
From the Install menu, choose Start Install. Click the Start Install tool, or press Ctrl+I. The Install Settings dialog appears.
Verify your install settings and click OK. The status of the selected computers changes to Authenticating. Once authentication is successful, the status changes to Copying Files. When the status changes to Install succeeded, the installation is complete.
Note: You can use the Remote Client Install utility to install client software only on NT/2000/XP machines.
You can also deploy the ZENworks Asset Management client through other methods, such as login scripts. (See the Manager's online help topic Performing Automated Inventories, available from the Inventory Process book for more information.)
Once you have installed the ZENworks Asset Management Collection Client software on each machine, the machines are ready to scan. In fact, as soon as the client software is installed, the machine begins collecting data and logs in to the Collection Server with an update. Within a few minutes of when you install client software on a machine, inventory data for that machine is available.
Collecting data from PCs
To view and change inventory schedules, do the following:
In the left frame, click the Management tab and expand Public Collection Schedules.
Double click Default Schedule to view and change scheduling options. Separate schedules can be established for groups of PCs across your enterprise. For detailed help, press F1 while in this dialog.
To view and change inventory options, do the following:
In the Manager's left frame, click the Management tab and expand Public Collection Options Sets.
Double click Default Option Set to view and change collection options. As with schedules, separate option sets can be established for groups of PCs. For detailed help, press F1 while in any of the tabs within the dialog.
Scanning a Group of PCs
To scan PCs other than the evaluation machine, you must install the ZENworks Asset Management software on each machine you want to scan as per step 1. Once installed and the inventory schedule has been set, the client software does the following:
When the machine starts up, it logs into the Collection Server.
If the machine hasn't been scanned in a specified number of days (as specified in a Collection Schedule), a scan starts.
Once the scan is complete, the machine connects to the Collection Server and uploads its collected data.
Running Reports and Queries
Exploring Network Discovery Reports
You can browse the collected data in the Web Console after the Network Discovery Task is complete:
Start the Web Console.
Click the Network Discovery tab.
In the left frame, expand the Device List to see a list of devices grouped by Type.
If you want to change the Device Grouping and Sub-Grouping, click the Device List in the left frame. Then in the right frame, change the Group By and Sub-Group By values and click Submit.
In addition to the Device List, review the reports available in the Reports and Custom Reports folders in the left frame.
Note: Click the ZENworks Asset Management Client Status report to see lists of Windows workstations that have the ZENworks Asset Management client and those that do not.
Exploring Asset Inventory and License Compliance
You can view your Discovered Products List easily. The ZENworks Asset Management Knowledgebase provides accurate software inventory data by presenting a license view of this information in the Software Compliance module. To present the license view, we start with software products in the ZENworks Asset Management inventory and then pass them through the license portion of the knowledgebase to accomplish three things:
Consolidation of related versions, service releases and language versions to the minor release level into a single product. For example, 3.1.
Exclusion of products, such as browsers and viewers that do not have license compliance implications.
Distinction between software suites and related components so they are counted properly for license compliance. For example, if a PC has Office XP Professional installed, the underlying components are ignored for reporting purposes. Conversely, if one or more of the components is discovered on a PC and the related suite is not, the components are reported.
To see the license view of the software inventory collected as part of your evaluation:
Launch the Web Console.
Click the Software Compliance tab.
From the Discovered Products menu, choose Reconcile to License Record.
You'll then see your software inventory--a list of all products discovered on the workstations you've set up to scan. This list is filtered through the License Knowledgebase, so that only the products recognized as requiring license tracking are shown.
In the Installed Quantity column, drill down to see a list of workstations that have a particular product installed.
Then drill down on the machine name to see the distinction between the full software inventory and the license view.
Importing and Entering Purchase Records
Software Compliance allows you to record software purchases and reconcile this information to discovered products. The basis for establishing license proof-of-ownership is the transaction itself whereby key information such as date, reseller, purchase order and invoice, are tied directly to compliance status reports.
You can get purchasing data into ZENworks Asset Management in two ways:
Import: You can use a tab-delimited text file to import purchase records into the Software Compliance database. (See Web Console help for details on the required import file format.)
Input: License transactions can also be entered through the user interface:
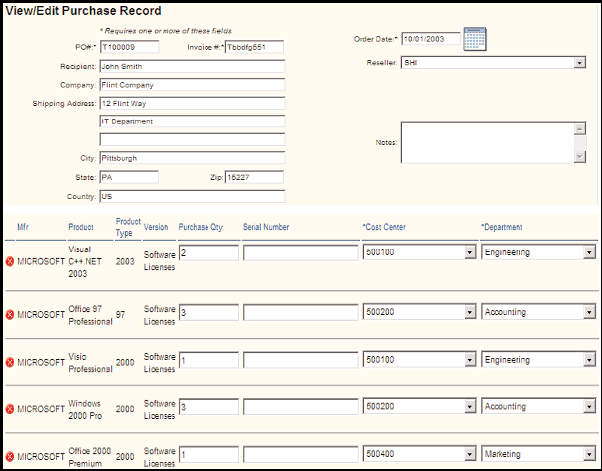
From the Purchase Records menu, choose Add Purchase.
Complete the purchase record's header information.
At the lower left of the right frame, click Choose Product and then click Add New Product. Purchased products are stored as unique Catalog Products.
Enter the information about the product and click Next.
Enter the purchase information for the product and click Done.
You have just created a Purchase Record entry and a Product Catalog entry. You can now tie a Discovered Product to this Purchased Product, i.e., Product Catalog, by creating a License Record and reconciling it to both the Discovered Product and the Purchased Product.
Reconciling Products
The best way to reconcile Discovered Products to Catalog Products is to use the Auto-reconcile feature:
From the License Records menu, choose Auto-reconcile.
Click Start Auto-reconcile at the bottom of the page.
A list of proposed License Records is generated based directly on Discovered Products. Matching Catalog Products are suggested based on text matching. If no Catalog Products are listed with the License Records, then no matches were found.
To create one or more License Records and reconcile them to Discovered Products in one step, select the check box to the left of a product (or click Select All) and then click Create Licenses.
You can also create License Records manually and then reconcile them to Discovered Products:
From the License Records menu, choose Add License Record.
Enter information about the License.
Click Reconcile to Catalog Product.
Select the appropriate product from the catalog and click Done.
Click Reconcile to Discovered Product.
Select the appropriate product from the Discovered Products list and click Done.
The License Record is now complete. It has both a catalog product and a discovered product tied to it and it is the vehicle for tracking compliance for this license.
Viewing Your Compliance Status
Now that you have scanned at least one PC, entered a purchase record, added a license record and reconciled the Purchased Product to a Discovered Product, you can view the compliance status results: From the Reports menu, choose Compliance Report. The license you created is displayed on this report along with the License Quantity and the Installed Quantity, both of which are drill-down values that allow you to get supporting license transactions and related PC information.
Note: Although Usage is part of the evaluation software, you must rescan the evaluation machine and other PCs that you've scanned in order to harvest usage information.
Allocating Licenses
Purchasing and installing software is not the end of the license tracking story. You might need to move licenses around between machines, departments or sites.
ZENworks Asset Management allows you to allocate licenses to Departments, Cost Centers, Sites or to individual PCs. Allocations allow you to ask yourself several questions to isolate related exceptions: "Who should have the software installed?" "Why am I allocating a license if it's not used or installed?"
To see how to use ZENworks Asset Management to manage License Allocations:
Under the License Records menu item, click License Allocation and then Allocation Workstation.
Choose a License Record by clicking the name of the License.
The following message appears: "No demographic allocations have been selected." To choose a demographic, click Options and then OK.
To allocate license from this License Record to one or more individual scanned PCs, click Add Workstations at the bottom of the License Allocation Worksheet.
Enter the criteria in the Find Workstations to Allocate Licenses page and click Search.
Choose one or more PCs and click Done. Licenses have now been allocated to these PCs.
To view one of the License Allocation reports, under the Reports menu item, click on License Allocation and then Current Allocations.
Figure 5: tt5_05
Managing Software Standards
You can use ZENworks Asset Management to manage software standards:
Under the Discovered Products menu item, click Manage Software Standards.
A list of all Discovered Products is shown. Unlike in the License View, all products are listed here, even those that have no license implications because you might want to categorize them too.
You can define as many standards categories, e.g., Standard, Nonstandard, Policy Exception, etc., as you'd like and assign one or more products to it. As a result, you can report the software discovered in your organization according to your standards policies.
Proven Technology
The release of ZENworks Asset Management provides unmatched accuracy for a true accounting of your hardware and software assets. The award-winning asset tracking and discovery tools report on the full range of IT devices: servers and routers, desktops and handhelds--and the software running them.
ZENworks Asset Management can scale to your environment whether you have 100 PCs at one location or 100,000 PCs all over the world.
With powerful software usage and license tracking tools, ZENworks Asset Management allows you to cut the costs associated with enduser support and reduce your legal exposure with simplified management of software license compliance. Combined with the strengths of the Novell ZENworks Suite, Novell is helping to ensure that your IT environment is stable, secure and reliable--today and in the future.
So What's The Big Deal?
Following are only some of the reasons why you'll want to use Novell ZENworks Asset Management:
to get a license view of your software inventory: Reconcile the applications that are pertinent to your business with your software purchase data.
to ensure compliance: Your company might be at risk because of illegal software usage. The key to mitigating the risks associated with an audit and avoiding the related costs is to show due diligence through an ongoing compliance program.
to reduce software and support costs: Your company might be buying more software licenses and maintenance coverage than it really needs. With reports that illustrate installation, usage and purchases, you will quickly find ways to save money on product maintenance and purchases.
to prepare for vendor negotiations: You can get the best deals when you enter negotiations armed with reports that show exactly how many licenses you really need.
to avoid audit stress: Eliminate manual inventories and the time it takes to sort through file cabinets and financial systems to find and then reconcile purchase licenses with installed applications.
What's on my machine?
ZENworks Asset Management automatically conducts an inventory of the evaluation machine.
To view the inventory data:
Launch the Web Console.
Click Reports and then the Inventory/Usage tab.
In the right frame, select Inventory Type from the System Group dropdown list, and click Submit.
In the left frame, expand the System List and then the Inventory Type folder.
Click on the Workstation folder to view the evaluation machine.
In the right frame, click the machine name to drill down into the workstation detail report.
On the detail report, notice the links below the basic workstation information that take you to the Hardware, Software, Hot Fixes, Logical Drives, Network Drivers and History sections of the Workstation Detail page.
Below the Systems List in the left frame is a Reports folder, containing a set of subfolders that holds standard Web Console inventory and usage reports. Browse through any of these reports to get a sense of the power of ZENworks Asset Management. Pay special attention to the reports that highlight Software:
AntiVirus Details: shows not only the installed antivirus software and version but also the virus engine and definition details. As part of the monthly Knowledgebase updates, Novell tracks this information for the top antivirus vendors.
. By Category: shows the software installed that the evaluation machine organized by categories and subcategories assigned by Novell in our Knowledgebase.
. Microsoft Products: shows a summary of the Microsoft applications organized by groups used by Microsoft for conducting and reporting audit results.
* Originally published in Novell Connection Magazine
Disclaimer
The origin of this information may be internal or external to Novell. While Novell makes all reasonable efforts to verify this information, Novell does not make explicit or implied claims to its validity.