Smooth Mooves: GroupWise 6.5 Transitioning to Linux
Articles and Tips: article
09 Dec 2004
In recent Novell Connection articles you have seen how to create new GroupWise domains and post offices on Linux in new and existing GroupWise systems. You have also seen how the various client options available for Linux can give your Linux desktop users access to your GroupWise systems.
In this article, I'll show you how to bite the bullet and bring existing GroupWise components to Linux painlessly and safely. From my experience in the past few months working with organizations who are eager to embrace GroupWise on Linux, I've found that not all of them want something new for their Linux servers. They do, however, have existing needs to relocate GroupWise components from their current location to the Linux platform.
Here are the components that are available to run on Linux:
MTA
POA
GWIA
WebAccess Application
WebAccess Agent
ConsoleOne/GroupWise Administration
GroupWise Monitor Application
GroupWise Monitor Agent
As you can see, all of the core GroupWise 6.5 agents are available for Linux. Feel free to mix and match components any way you choose for the best utilization of Linux in your environment. For our purposes, we are going to move an existing post office to Linux so the company can test the post office agent for our users.
Let's look at some of the scenarios where organizations with existing GroupWise systems are planning to use Linux.
Company A has a large network consisting of NetWare and Linux servers, and realizes that now is a good time to start leveraging the organization's investment in Linux to include GroupWise (which had heretofore been unavailable on Linux). By moving a few GroupWise domains and post offices to Linux servers, Company A can better manage its NetWare resources and get more value from its Linux servers.
Company B has a number of NetWare and Windows servers, and has been known to use whatever resource is available and accessible at the time. Some of Company B's GroupWise domains and post offices have been placed on Windows servers over time. Company B sees the availability of Linux as a GroupWise server platform as a way to increase performance for these post offices. Moving the post office from Windows to Linux also makes a lot of sense for Company B, because licensing issues surrounding Windows servers is making the idea of upgrades difficult for the organization.
Company C is looking at Linux as an option for the organization and has the IT department busy testing various scenarios for including Linux as a server platform on the network. The IT department has already experimented with installing a test GroupWise system on Linux and feels that Linux looks very promising. However, the IT department has reached the point where it needs some real world testing of the system, and wishes to move the small IT post office from it's current location to the Linux server, so that the department can test the system live.
You might have other needs that encourage you to add Linux to your GroupWise server mix. With these ideas in mind, let's look at how to take a current GroupWise post office from its current location (either NetWare or Windows) and move it to a SUSE LINUX server. This article will focus on moving to SUSE LINUX Enterprise Server (SLES) 8.1. Any supported Linux platform will do, and I will be certain to give you a few gotchas that would apply if you wanted to put GroupWise agents on a 2.6.5 kernel.
Getting Ready for the Move
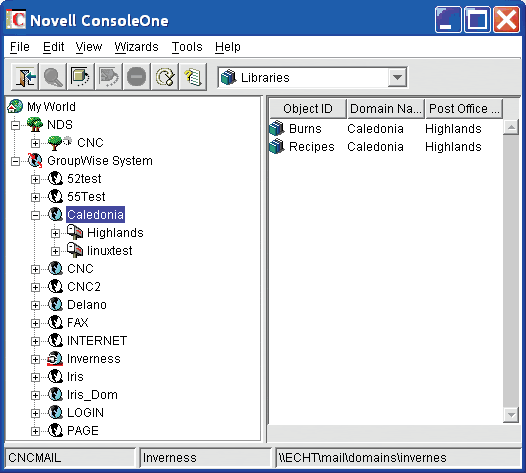
Let's look at our test system for a moment. Figure 1 shows the GroupWise view for our system. As you can see, we have a number of GroupWise domains and post offices available to us. For our purposes, we will move the Highlands post office to our Linux server.
Figure 1: The GroupWise View shows the post office we wish to relocate.
If you have a GroupWise library using external document storage locations, we need to stop here and prepare the post office for moving. In fact, if external storage locations are even defined for the library, whether they are in use or not, the Linux POA will not load. Thus, before we can begin to move the post office, we need to move all documents from the document storage locations back under the post office and remove all storage locations from the system. This need not be done on the same day you plan on relocating your post office. Be sure to allow ample time for the task depending on how large the libraries in question are!
Checking out and checking in all documents is not as difficult as it might seem. It can, however, take a fair amount of time. Remember, each document must be: accessed by the POA; uncompressed and unencrypted; and saved to the location you specify for the check out. If your library is large, you will probably want to check the documents out in batches based on document number, performing the operation over a few days prior to relocating the post office. Here are the steps to follow:
In ConsoleOne, edit the properties of your library. Go to the Storage Areas tab. Check the box that says "store documents at post office."
Now for the fun! We need to check out every single document in the library. This can be accomplished in one of two of ways:
You can find all documents in the library (or a selected range subset of the documents), select everything in your find results window and, under Actions, choose Check Out.
You can use a third party product that will check out all of the documents for you. One such product is available at www.caledonia.net/docrevue.html.
Once all documents are checked out, you need to check them all back in. (Yes, this is a tedious task, but alas, one that really needs to be done if the post office you want to move has libraries. I had to perform this very task on my own post office when I moved it to Linux!) If you have checked all documents out through the same client, you can go to Actions | Check-In and "Show all checked out documents in selected library" to mark all for check in. Note: checking these documents out and in again can take a long time to complete. Upon checking back in, the document must be "saved" again. Since you have indicated that documents can only be saved under the post office now, each document will be placed in the GWDMS directory structure under the post office directory.
Verify that you can open a couple of documents. Look at the activity log of the document to see the new location of the document if you have any doubts about where they now reside.
Back in ConsoleOne, from the Storage Locations tab of the library, delete all storage areas that remain for this library.
Run a GWCHECK, choosing Analyze/Fix Library and remove deleted storage areas. (Check the box that says to "move" the documents first just to be safe, but no documents should be there now.)
Once your documents are all under the post office, and the document storage locations have been successfully deleted, you are ready to move the post office!
Moving the post office from NetWare or Windows to Linux is a relatively simple task. Here are the steps to move the post office:
Unload the existing GWPOA agent for this post office. If the post office allows for direct access, also make sure that no users are still accessing the post office directory.
Rename the post office directory to avoid any accidental access while relocating the post office.
Ensure that all file and directory names for the post office are lowercase.
Copy the post office directory structure from it's current location to the Linux server.
Install and configure the GWPOA on Linux
Load the GWPOA for the relocated post office
Load ConsoleOne and edit the post office location, agent address and link information if necessary.
Verify that the MTA for this post office can see the post office and that the post office agent can see the MTA.
So, let's see how this all works.
First, go to the server where your POA is loaded for this post office. Press F7 at the agent console to unload the agent.
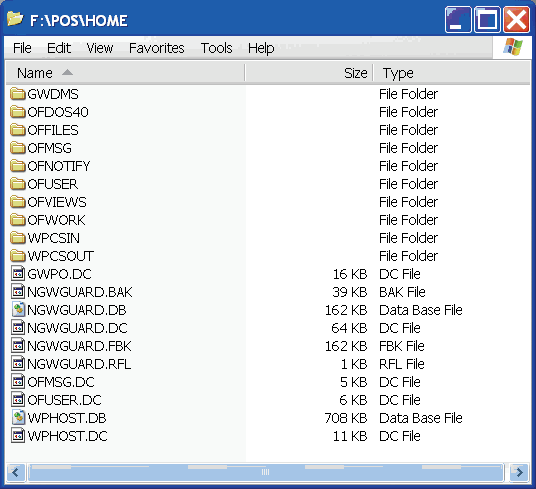
After the post office agent is unloaded, prepare to copy the post office structure to Linux. Let's look at the current directory structure of our post office. Figure 2 shows the post office directory for the Highlands post office. Notice that most files and directories are in all uppercase. It is important to know that while both NetWare and Windows respect case during the Save process, neither of them discriminate case upon reading. Now, this might be a long way around saying they are not case-sensitive, but it's an important concept to understand. Let's take an example. If I'm creating a WordPerfect document and choose File | Save As, entering MyLetter.WPD will show the case distinctions in this document name when I view the document in Explorer or from a command prompt. However, I cannot save another document named myletter.wpd in the same folder where myletter.wpd resides.
Figure 2: This directory structure shows the post office files for the Highlands post office.
Now it's time to get your GroupWise CD out. Better yet, since you will of course want the latest and greatest, you can download the most current released version of GroupWise for Linux. At the time of this publication, Service Pack 2 was available for GroupWise for Linux in the GWLinux652 download at http://support.novell.com/ cgi-bin/search/searchtid.cgi?/2969065.htm. After downloading and extracting this file, you will have a directory structure that looks very much like a standard GroupWise installation CD. (See Figure 3.) Change to the "admin" directory of the SP or CD. In my case, I extracted the files to /root/temp/GW_Linux. Thus I would need to perform the command
cd/root/temp/GW_Linux/admin
to change to the proper directory.
Figure 3: The extracted support pack structure is very much like the GroupWise installation CD.
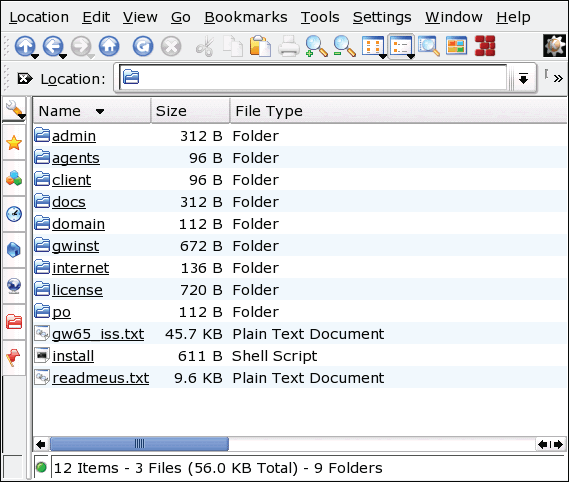
The rpm file for dbcopy is in this directory. The rpm will be named according to the service pack level that you are using. For example, it might be named novell-groupwise-dbcopy-6.5.2-0622.i386.rpm.
The dbcopy utility will allow us to migrate the files from NetWare or Linux and change the case all at once. Here's the command you should run (substituting the actual name of your dbcopy rpm):
rpm -U novell-groupwise-dbcopy-6.5.2-0622.i386.rpm
This command will install dbcopy into the /opt/novell/groupwise/agents/bin directory of your Linux server.
Once I am ready to move the post office directory structure to Linux, I will rename my post office directory to avoid any accidental access by users or even administrators using ConsoleOne, NWADMIN, etc. You could of course move the post office structure. However, I like to be safe and keep a readily accessible backup. It's much easier to get back to square one if the original post office directory is still out on the original server in case it is needed!
If necessary, change your existing ngwguard.db file so that it is all lowercase. You can rename this via Windows Explorer, via command line (rename NGWGUARD.DB, ngwguard.db), etc. Your ngwguard.db file is the only file you need to rename to lowercase for dbcopy to do its magic properly.
On Linux, open up a command line session.
"su root" to become root for this session.
Create a directory structure for your post office. For our purposes, we have created /grpwise/pos/highland.
Create a mount point for your domain. We have chosen /mnt/NetWare as the mount point for our NetWare servers. Our NetWare server name is BIGGAR, and we have created /mnt/netware/biggar -- thus when we complete our mount below we will have a mount point of /mnt/netware/biggar.
Issue the following command to mount the NetWare server that currently holds your domain:
ncpmount -S server -A 123.123.123.123 -U
userid -P password /mnt/netware/server
Replace your server name for "server" and your server's IP address for 123.123.123.123.
For example:
ncpmount -S biggar -A 192.168.100.200 -U
danita.cnc -P password /mnt/netware/biggar
Note: You might wonder about the "user.context" vs. ".user.context" in this example. While ".user.context" works on some versions of Linux, it fails on others. In my testing, "user.context" has always worked on all versions. Keep this in mind if you experience any problems authenticating with ncpmount.
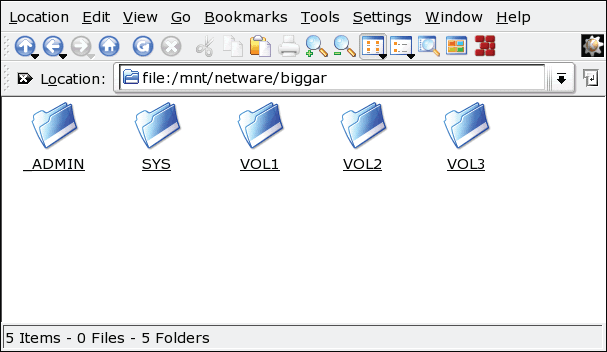
Figure 4 shows the resulting mount point with our NetWare volumes listed.
Figure 4: A directory showing our mounted NetWare volumes.
cd to /opt/novell/groupwise/agents/bin to access dbcopy.
Run dbcopy to copy your files from the NetWare server to the Linux location like this:
./dbcopy -M <source> <destination so for our situation it would be
./dbcopy -M
/mnt/netware/biggar/vol2/pos/highland.old
/grpwise/pos/highland
Note: Although there are many ways to change the case of files, it is recommended that you use dbcopy. While we generally say that all files should be lowercase, there are instances where post offices have been migrated from GroupWise 4.1 where the ngwguard.db file actually references them in uppercase. By using dbcopy with the -Migrate switch, you will avoid any problems if you have such a situation, as dbcopy will copy the files in the case designated in the ngwguard.db.
Now that our post office is in the proper location, we can install the GroupWise agents to this server. If you have GroupWise for Linux on CD, you could use the agents on the CD. However, there may be newer agents in the GWLinux652 files we had you download earlier in this article. Still logged in as root, you should perform the following steps:
cd to the location where you extracted the files -- here is an example, if the files were under
t/temp:
root/temp/gwlinux652
In this directory you will see an install script called "install" - to run this script perform the following:
./install
Follow the prompts to install agents. This installation process is very similar to installing an agent on NetWare or Windows. The agents will now be installed into
/opt/novell/groupwise/agents
When the agent installation is finished, indicate that you would like to configure the agents now. If for some reason you move past this screen accidentally, go back through the steps in these instructions until you reach the "Configure GroupWise Agents" option that is available in Step 3 above.
Choose to Add a Post Office. Enter the post office name (Highlands in our case) and the post office location (/grpwise/pos/highland for our example). If for some reason at this time you are told that there are no post office files in this directory, and you are sure the files are there, double-check that your wphost.db file is all lowercase.
Finish the configuration and choose "yes" to launch the agents on startup.
When you perform these tasks, a startup file is created for the post office's POA and if you chose to launch on startup, symbolic links were created in the proper run level directories to start the agents automatically. Looking at the /opt/novell/groupwise/agents directory you will see directories named bin, lib and share. Under bin you will see the agent executables, as well as default startup templates. Under the share directory are a couple of directories, and the highland.poa startup file that was created by our installation. Let's run this agent now and see what it looks like.
From a command prompt, change to the /opt/novell/groupwise/agents/bin directory. From here, type the following:
./gwpoa -show @highland.poa &</p>
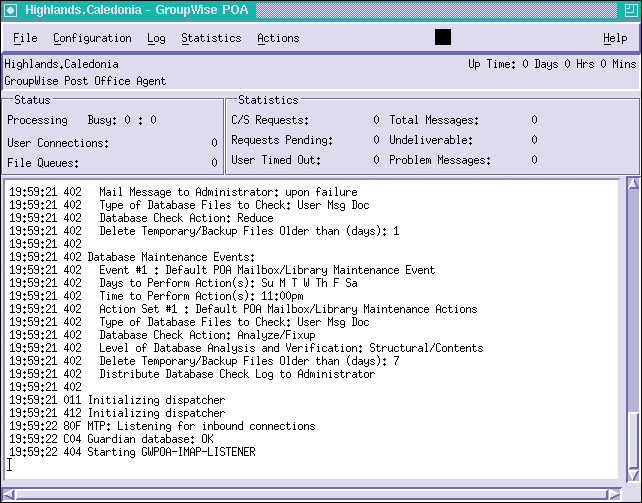
This should bring up the agent screen as shown in Figure 5.
Figure 5: A look at the GroupWise Post Office Agent on Linux.
Note: You might receive an error that states "connection to ":0.0" refused by server" if you did not issue an "xhost +localhost" command before your "su root" command (if needed). In order to avoid this, you should always run "xhost +localhost" before the "su root" command if you intend to run a GUI application from that command line session.
Note: If you are running SUSE LINUX 9.1 (or another 2.6.5 or later kernel) you will get a "floating point exception" error when you load an MTA. To remedy this, you must execute the following prior to the ./gwmta command: "export LD_ASSUME_KERNEL=2.4" This does not seem to be necessary for the POA, but is necessary for the other agents. If you are starting the agents with the scripts that are created by the installation, this should not be an issue, as the command is issued for you by the script.
If all has gone according to plan, your POA should be running properly. Now we need to do some housekeeping to tell the GroupWise system where this new POA resides so that the owning domain knows where to contact it.
At this point, we have not installed ConsoleOne for Linux. That is not a problem, because we can still easily administer our GroupWise system from the same Windows workstation as prior to the post office move.
Load up ConsoleOne on your Windows workstation and attach to the domain that owns this post office (Caledonia in our example).
Edit the properties of the POA for Highlands. Go to the network address tab and change the IP address of the POA to the address of the Linux server where the post office is now running. Edit the link configuration for this domain. Check the post office links to make certain that the new IP address/port is listed for the link from this domain.
Once you see that the MTA can see it's post office again, edit the properties of the post office that we have moved (Highlands) and change the location of the post office database. In our case, we have moved the Caledonia domain to a server named Lochee so our location is now \\lochee\grpwise\pos\highland. By waiting until the domain can see the post office, you can ensure that the administrative message changing the location of the post office will be replicated properly. Since the MTA for the post office's domain did not change, the post office should still be looking to the proper IP address for the MTA. If for some reason you have difficulty with the post office talking properly to the MTA, you can rebuild the post office database to a local drive, and get it to the Linux server via NCPMount, FTP, Samba, etc., just as you would for a remote post office in a NetWare/Windows GroupWise system. You may also have to edit post office links for your WebAccess agents and GWIAs (if necessary), as these do not seem to update automatically in many cases.
Now that your POA and MTA can see each other and are happily communicating, log into the post office with a GroupWise client. If you are logging in via a Windows workstation, directory services should redirect you to the new IP address. However, if the login fails, type the IP address of the new location of the POA into the field for the IP address after the redirect fails. And voila. You are now connected to your post office on the Linux server.
That wasn't too painful was it? Now that everything is up and running, I'd like to just point out where the GroupWise install puts everything during the installation process.
GroupWise Software Distribution Directory
The GroupWise SDD is located at /opt/novell/groupwise/ software. This SDD contains only Linux agents and the Cross-Platform client. You will need to continue to have an SDD on another platform for managing Windows and NetWare agents, and the Windows client.
GroupWise Agent Software
The GroupWise agent software executables are installed to
/opt/novell/groupwise/agents/bin.
The agent startup files are created in /opt/novell/groupwise/agents/share. The startup files, for the most part, look just like those created for NetWare and Linux.
GroupWise Script
The GroupWise startup script (grpwise) is located in /etc/init.d. This is very similar to the grpwise.ncf that is created when you run the agent installation on NetWare. This script starts the MTA and POA automatically on reboot if you instructed the agent installation routine to include the agents in the bootup process. This script does not load with an interactive screen. It can be compared to running the agents as services on a Windows server. For this reason, I recommend that you always include the /http startup switches in your agent startup files when running agents on Linux. By utilizing the HTTP monitor for your agents, you can avoid needing to load Linux agents with an interactive screen.
If you chose to have the GroupWise agents loaded upon startup, the install routine creates a symbolic link called S99grpwise in the /etc /init.d/rc5.d and /etc/init.d/rc3.d directories, this loads agents when the SUSE LINUX server boots into runlevel 5 or runlevel 3 restart.
You can use the grpwise script in the init.d directory to start, stop and restart the agents without rebooting. You can also create your own scripts to start and stop the agents so that you don't need to reboot the server.
Relocating GroupWise post offices, domains and agents to Linux is very much like moving them to a new NetWare or Windows server, with a few key caveats. If you've ever moved a domain or post office in the past, you will find that this is easy work. And if this is your first time, just follow the directions, and you will be up and running in no time!
Criteria for moving domains and post offices to Linux.
In our stated purpose, we are moving a domain and/or post office to Linux to either add Linux to our existing network, leverage existing Linux servers by giving them more work, or evaluating Linux as a platform for our organization. Given this purpose, if we choose to move a domain, we should look at what type of a domain to move.
Because of the nature of the Primary Domain, I would recommend that it not be moved to Linux unless all administrators will have access to the domain directory via ConsoleOne. If the domain you wish to move is the primary, you can easily promote another domain to primary (remember this is typically a political designation in many organizations). Also, all gateway agents should run on the same server holding the domain database for that agent. So, if your domain is the owner of a GroupWise Internet Agent (GWIA), for example, and you do not wish to move the GWIA at this time, you should perhaps consider installing a GWIA under a different domain, etc.
Moving post offices to Linux is typically just as easy as moving them to a new location on NetWare or Windows. There is however one major caveat: external document storage locations. The post office agent cannot even load on Linux if storage location definitions are defined. Thus, if you plan on moving a post office that has external storage locations to a Linux server, all documents must be placed under the post office before the move.
* Originally published in Novell Connection Magazine
Disclaimer
The origin of this information may be internal or external to Novell. While Novell makes all reasonable efforts to verify this information, Novell does not make explicit or implied claims to its validity.