Tool Time: The Native Version of GroupWise 6.5 for Linux
Articles and Tips: article
01 Jul 2004
In a prior article titled GroupWise 6.5 for Linux, in the past March/April issue of the magazine, we explained how to integrate GroupWise 6.5 for Linux into an existing NetWare/Windows environment. This article continues the theme of GroupWise 6.5 for Linux, but in a pure Linux environment. It serves as a quick guide for getting a basic GroupWise 6.5 for Linux system up and running in a completely Linux-based environment. Many who read this article may be new to Linux, GroupWise and other Novell technologies such as eDirectory. So, I won't assume much in this article; the only assumptions I've made are:
that you have the CDs that come with GroupWise 6.5 for Linux,
that you have already installed Novell eDirectory and ConsoleOne on the Linux server, and
you work in your organization's IT/IS group.
If you haven't complied with my assumption #2 above, or you are new to Linux, you should check out the sample chapters of Success with GroupWise 6.5 for Linux found at www.novell.com/connectionmagazine/2004/07/pdf/gwlinuxsuccess.pdf. They'll give you a good background so I don't lose you through the rest of this article.
Intro to the Premier Groupware Suite
GroupWise is a Novell electronic messaging solution, often referred to as a groupware suite. GroupWise is a powerful e-mail and calendaring package and a whole lot more! Users can access their GroupWise mailboxes via a variety of clients. GroupWise clients run on Linux, Windows and Macintosh. It also has a Web-based solution called GroupWise WebAccess which supports browsers of all types, right down to browsers on wireless devices.
When you first implement GroupWise, you must establish a GroupWise system with a mandatory administrative hub called the primary domain. (For more information on GroupWise terms, see The GroupWise Glossary.) Once you create the primary domain, you can create other administrative and messaging hubs, called secondary domains. You can also create post offices. Always create post offices below either an existing primary or secondary domain. You must associate users with a post office when you add them to the GroupWise system. A user's actual mailbox data is stored in the post office.
Typical GroupWise systems have a primary domain, some secondary domains and post offices, an Internet SMTP gateway (called the GWIA) and a GroupWise WebAccess solution. Post offices typically have users, resources and distribution lists associated with them.
All GroupWise software components are considered clients, agents or gateways. A client accesses a mailbox at a post office.
A Post Office Agent (POA) runs at the post office and moves messages in and out of the post office. Every post office has its own POA running against the post office. Each POA can be administered in ConsoleOne and is represented as an object.
A Message Transfer Agent (MTA) runs at the domain level. The MTA moves messages to post offices, or to other agents or gateways. The MTA is also responsible for propagating administrative changes to the GroupWise Directory Store. The MTA is represented as an object that can be administered in ConsoleOne.
The GroupWise Directory Store (GDS) is housed in two kinds of databases, namely domain databases (WPDOMAIN.DB) and post office databases (WPHOST.DB). Domain databases are modified directly by ConsoleOne with the GroupWise snapins or through administrative changes committed to the domain database by the MTA. Post office databases are modified, but only through administrative messages that flow to the POA that come down from the post office's owning domain and its MTA. The GroupWise Directory Store is a fast storage database, but it has very little authentication and rights capabilities. Because of this, the WPDOMAIN.DB portion of the GDS is closely coupled with eDirectory (formerly called NDS). The GroupWise snapins to ConsoleOne don't allow the GDS to be modified unless it is associated (grafted) into an eDirectory tree.
Taking the First Step: Installing GroupWise Administration
Note: I've written the following instructions as though you're using a server loaded with SUSE LINUX Enterprise Server 8 (SLES 8) with the KDE desktop. If this is not your exact configuration, wing it.
You create and administer your GroupWise system from within ConsoleOne. However, you first must install the GroupWise administration snapins to ConsoleOne. Following are the steps:
Insert the GroupWise 6.5 for Linux Administration CD into the SLES 8 server's CD-ROM drive.
Make sure that the CD-ROM drive is mounted on the SLES 8 server. On most systems this is as simple as clicking on the icon on the desktop that looks like a CD. If the CD is not mounted, then mount it from the Control Center. Select Start Application | Control Center | Information | Block Devices. Determine which device is the CD-ROM drive and mount it. If the Control Center utility is not at the menu path stated above, then launch the kcontrol utility from a terminal session by entering the following command:
kcontrol
Open up a terminal session, and log in as the root user by entering the following command:
su root
Change to the CD-ROM drive, and run the GroupWise 6.5 for Linux install utility by entering the following:
cd /media
Note: Replace "cdrecorder" with the name of your CD-ROM drive.
After choosing the language, you should get an installation screen like the one shown in Figure 1.
Figure 1: The GroupWise 6.5 for Linux GUI installation utility.
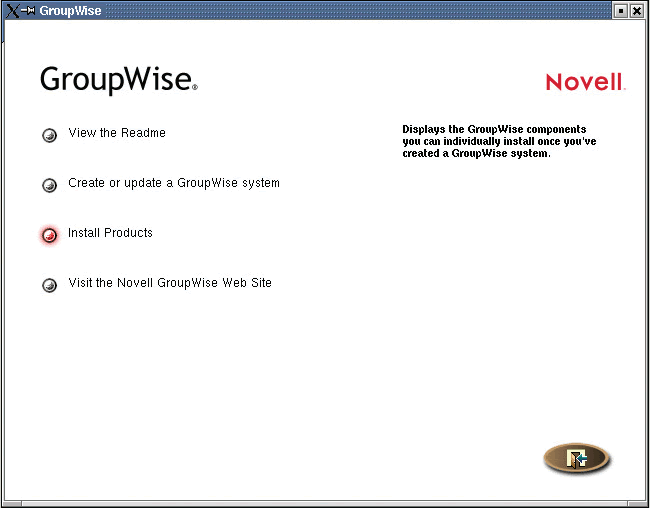
Proceed to the administration installation by selecting Install Products | GroupWise Administration | Install Administration.
After the administration installation completes, exit the GroupWise 6.5 for Linux installation utility.
Run ConsoleOne, and Authenticate to eDirectory
Launch ConsoleOne from a terminal session by entering the following command:
/usr/ConsoleOne/bin/ConsoleOne
When loading ConsoleOne, you'll see the ConsoleOne GroupWise snapins load. You'll first be asked for a "mount" directory. Just select OK without changing the directory path.
Although ConsoleOne and the GroupWise snapins are loaded, you can't take any GroupWise administration actions until you authenticate to eDirectory. To authenticate to eDirectory, do the following from within ConsoleOne:
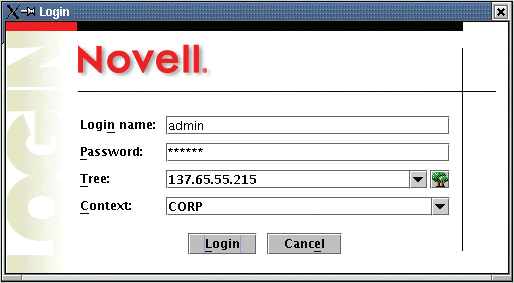
Select the NDS object and then select File | Authenticate and complete the fields on the Login dialog box as shown in Figure 2. For the tree name, enter the IP address of your SLES 8 server.
Create a GroupWise System
Having installed the GroupWise Admin snapins and being authenticated to eDirectory in ConsoleOne, you're now ready to create your GroupWise system.
Highlight the GroupWise icon, and then select Tools | GroupWise Utilities | New System
In the New System wizard, proceed to the Software Distribution Directory screen. Indicate that the path to the Software Distribution Directory is the GroupWise 6.5 for Linux Administration CD that you have mounted. So for our example, the path could be: /media/cdrecorder.
Select Next, and when prompted for the eDirectory tree, indicate the tree that will house your GroupWise system.
Select Next, and mark the Extend eDirectory schema check box.
Select Next, and indicate a system name; in our example, the system name is CORP_MAIL_SYSTEM.
Figure 2: Novell eDirectory Cache Settings in iMonitor
Create the GroupWise Primary Domain
Select Next, and enter the name for the GroupWise Primary Domain. In our example system, the name is CORP. Choose the name of your domain(s) wisely as they cannot be changed.
Select Next, and enter the domain directory path. Indicate a location on the Linux server, e.g., /mail/corp. The directory path must be eight characters or shorter. Also, keep the names lowercase. Linux is case sensitive and the GroupWise agents like lowercase and sometimes will only work with lowercase directories.
Select Next, and indicate the eDirectory context in which the domain will be placed. This location isn't permanent; you can move the domain to another eDirectory context later if needed.
Select Next, then choose the language for the GroupWise domain.
Select Next, then choose the appropriate time zone for the GroupWise domain.
Create the First GroupWise Post Office
Now the installation wizard will take you through the process of installing the first GroupWise post office in the GroupWise system. The post office is going to be created under the primary domain. Although you may want to design things differently, the wizard requires you to create the post office under the primary domain. Just remove it later if you want to create a post office under a secondary domain.
Select Next, and enter the name of the post office, e.g., CORPPO.
Select Next, and enter the path where you want the post office created, e.g., /mail/corppo. Again, keep the names lowercase. Remember, Linux is case sensitive. Be safe by using all lowercase.
Select Next, and enter the eDirectory context in which the post office will be placed. Like the primary domain location, this location isn't permanent; you can later move the post office to another eDirectory context if needed.
Select Next, and choose the language for the GroupWise post office.
Select Next, and choose the appropriate time zone for the GroupWise post office.
The domain and post office information you have entered is sufficient for creating a domain and post office object. A post office is serviced by a POA and a domain is serviced by an MTA. The wizard will now prompt you for information with which it will create and configure the POA and MTA.
Create the MTA and POA Objects
Select Next, and make the link from the MTA to the post office a TCP/IP link.
Select Next, and enter the IP address of the server where the post office is being created; keep all other default settings.
Select Next, and enter the IP address of the server where the domain is being created; keep all other default settings here as well. In our scenario, the domain and post office are being created on the same server.
Add Users to the Post Office
You can always add users to the post office later, but at this point you can indicate that current users in the eDirectory tree should be added to the post office. I'll explain later how to create a user on a post office.
Select Next. If you want to add users to the new post office, click Add.
Then browse the eDirectory tree and select the users to be added to the new post office.
Create the System and Install GroupWise Agent Software
At this point the New System wizard has all the needed information to create a basic GroupWise system.
Proceed through the wizard to create the GroupWise system.
Select Next to install the GroupWise MTA and POA agent software.
Note: If the installation wizard for the GroupWise agent software does not launch, go to the root of the GroupWise 6.5 for Linux administration CD and launch the Install utility by entering the following command:
./install
Then choose the language you want to install and select Install agents. Take both actions you are given to install and configure the agents.
Start the GroupWise MTA and POA
As you'll see below, you configure and troubleshoot the MTA and POA identically except for the filenames you use to start them. The GroupWise agent install wizard created a script to start the GroupWise MTA and POA. Log in as the root user to start the GroupWise agents. At a terminal prompt, enter the following script to start the MTA and the POA.
/etc/rc.d/grpwise start
To check the status of the agents, use the status usage command:
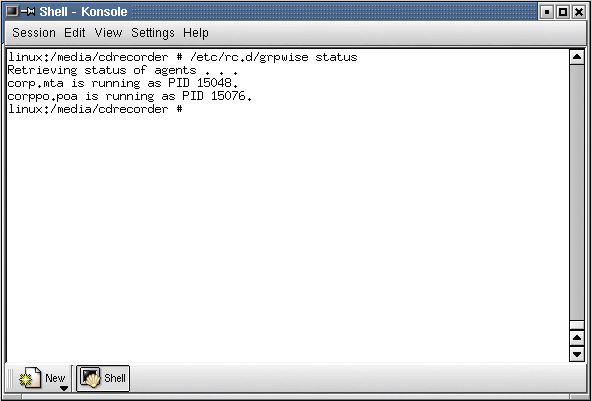
/etc/rc.d/grpwise status
The grpwise script also supports the stop usage command in order to stop the GroupWise agents. Figure 3 shows the status of the GroupWise MTA and POA objects on a sample system.
Figure 3: Checking the status of the GroupWise MTA and POA.
Troubleshooting the GroupWise MTA
The GroupWise MTA has a Graphical User Interface (GUI). By default though, the grpwise script does not show the MTA's GUI screen. However, when you're just beginning to configure and run an MTA, it's useful to have a GUI screen for troubleshooting purposes.
The MTA program code is located in the /opt/novell/ groupwise/agents/bin directory. The MTA has a startup file in the /opt/novell/groupwise/agents/share directory. The name of the file is generally <omain name>.mta. So in our example scenario, the name of the startup file is corp.mta. To see the name of the *.mta file, change to the .../share directory mentioned above, and get a directory listing (ls); it will be in the list.
Armed with the name of the *.mta startup file, you can start the MTA so it shows the GUI interface screen. Make sure that the GroupWise MTA isn't already running. Use the /etc/rc.d/grpwise status script and usage command to see if the GroupWise agents are running. Use the /etc/rc.d/grpwise stop command to stop the GroupWise agents.
We'd use the following command in our example corp system to start the GroupWise MTA with it's GUI screen:
/opt/novell/groupwise/agents/bin/gwmta -show
@../share/corp.mta &
Here's an Explanation of What This Command Line Means:
|
COMMAND
|
DESCRIPTION
|
|
/opt/novell/groupwise/agents/bin/gwmta |
Execute the gwmta (MTA) code. |
|
-show |
Show the GUI screen. |
|
@../share/corp.mta |
Look at the configuration file (corp.mta) in the /share directory which is off of the parent directory to the /bin directory where the MTA code is located. |
|
& |
Run as a background thread. The terminal session from which you started the MTA can be closed down without the MTA closing down. |
The MTA's GUI screen has a few menu choices that are helpful when troubleshooting the MTA. For example, to see the MTA's connection status to a POA or another MTA, choose Configuration | Status. Figure 4 shows the GroupWise 6.5 for Linux MTA with the GUI screen shown.
Further Configuration of the GroupWise MTA
The GroupWise MTA can be easily configured from within ConsoleOne. To see the MTA object, load ConsoleOne and authenticate to eDirectory and then connect to a GroupWise domain. Then, with the GroupWise System object expanded, highlight the GroupWise domain object, and select the Message Transfer Agents drop down menu choice. Then you'll see the MTA object. You can edit this object and make configuration changes. For example, I like to change the log settings so that the GroupWise MTA is using a verbose logging level. For more information on fine tuning a GroupWise MTA, see Chapter 9 of Novell GroupWise 6.5 Administrator's Guide or the Novell documentation site at www.novell.com/documentation.
Troubleshooting the GroupWise POA
Just like the GroupWise MTA, the GroupWise POA has a GUI. The POA program code is in the /opt/novell/groupwise/agents/bin directory. Also, just as the MTA, the POA has a startup file located in the /opt/novell/groupwise/agents/share directory. The name of the file is generally <post office name>.poa. So in our example scenario the name of the startup file is: corppo.poa. Change to the .../share directory and get a directory listing (ls) to determine the name of the *.poa file.
Figure 4: The GroupWise 6.5 for Linux MTA GUI screen can be helpful when troubleshooting.
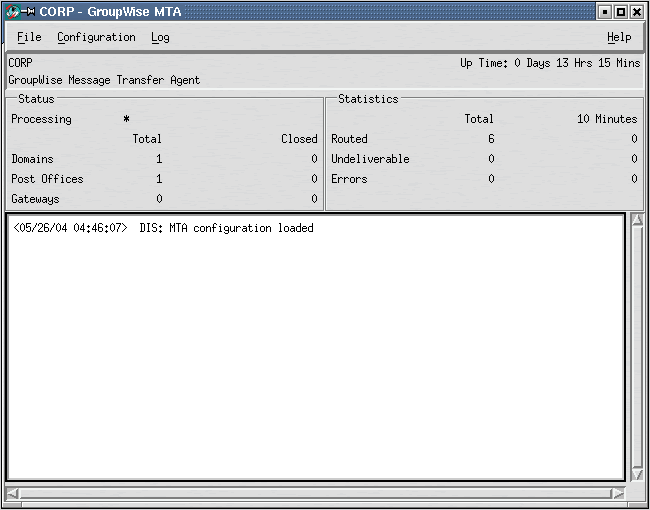
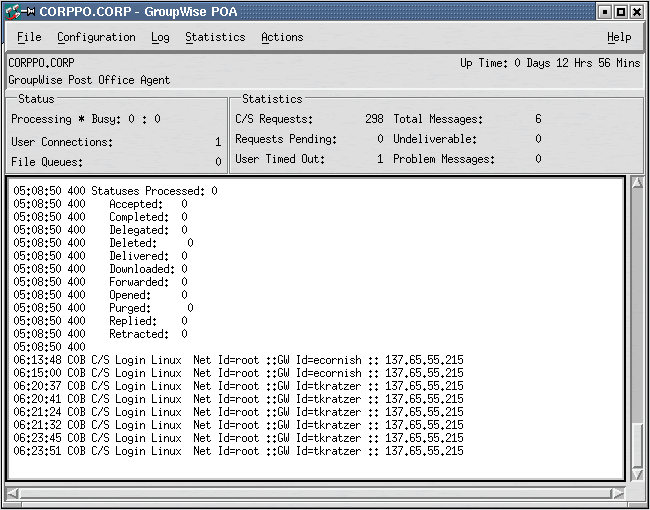
Figure 5: The GroupWise 6.5 for Linux POA GUI screen offers a few menu choices that may help you troubleshoot the POA.
Now that you know the name of the *.poa startup file you can start the POA so that the GUI screen will show. For our example system, we'd enter the following command:
/opt/novell/groupwise/agents/bin/gwpoa -show
@../share/corppo.poa &
The POA's GUI screen also has several menu choices that are helpful if you need to troubleshoot the POA. For example, to see the statistics of what the POA has done since it has been loaded, select Statistics | Misc. Statistics. Figure 5 shows the GUI screen of the GroupWise 6.5 for Linux POA.
Further Configuration of the GroupWise POA
As with the MTA, the POA is also configured from within ConsoleOne. To see the POA object, once again load ConsoleOne and authenticate to eDirectory and then connect to a GroupWise domain. Then with the GroupWise System object expanded, highlight the GroupWise post office object, and select the drop down menu choice of Post Office Agents. Then you'll see the POA object. You can edit this object and make configuration changes if you want. For example, as with the MTA, I usually change the logging level for the GroupWise POA to verbose. For more information on fine tuning a GroupWise POA, see Chapter 8 of Novell GroupWise 6.5 Administrator's Guide or the Novell documentation site at www.novell.com/documentation.
Creating User Accounts
For a user to have a GroupWise mailbox, they must be associated with a GroupWise post office when the user is created. Generally, users are also added to the Novell eDirectory tree (NDS) when they're created. The simplest way to create a user's mailbox is to do the following:
Highlight the post office to which the user's mailbox will be assigned.
Select File | New | User
When prompted, select the eDirectory container in which you will create the user.
In the Name field, enter the eDirectory name (which is also the mailbox name by default) of the user. For example: TKRATZER.
Enter the Surname, for example: Kratzer.
Choose Define Additional Properties at the bottom of the New User dialog.
Select OK, and when prompted for a password, enter the eDirectory password for this user.
Note: This is not the user's GroupWise mailbox password per-se.
When the user's property screen comes up, go to the General | Identification page, and enter the user's Given name.
Next, go to the GroupWise | Account page, and select Change GroupWise Password button and assign the user a mailbox password. Then select OK.
Installing the GroupWise 6.5 for Linux Client
GroupWise supports multiple clients and methods for accessing a GroupWise mailbox. So even though your GroupWise system is running on a Linux server, it can support GroupWise clients such as the GroupWise for Windows client. The GroupWise 6.5 for Linux CD set comes with the GroupWise 6.5 for Linux client. Following are the steps for installing it:
Insert the GroupWise 6.5 Cross-Platform Client CD at a Linux-based computer.
Mount the CD.
Open a terminal session, and log in as the root user.
su root
Run the GroupWise 6.5 for Linux client install script from the CD. For our example Linux computer, I'd enter the following command:
/media/cdrecorder/install
Note: Replace cdrecorder with the name of your CD-ROM drive.
The install script installs the GroupWise package using the Red Hat Package Manager (RPM) utility. To query for the GroupWise installation information, use the following command in a terminal session:
rpm -qa | grep groupwise
Logging Into a User's Mailbox
Now with the GroupWise client installed, you are ready to log in to a GroupWise post office as the GroupWise user you just created. To log in, do the following:
Click on the GroupWise icon that should have been installed to the desktop of the Linux computer. If you can't find the GroupWise icon, run the GroupWise client from a terminal prompt by typing the following:
/opt/novell/groupwise/client/bin/groupwise &
Enter the client startup information. For the User ID in our example system, it's tkratzer. The password is the GroupWise password. For the Address field enter the IP address of the POA. The Port should be the POA's Client/Server port, which is generally 1677.
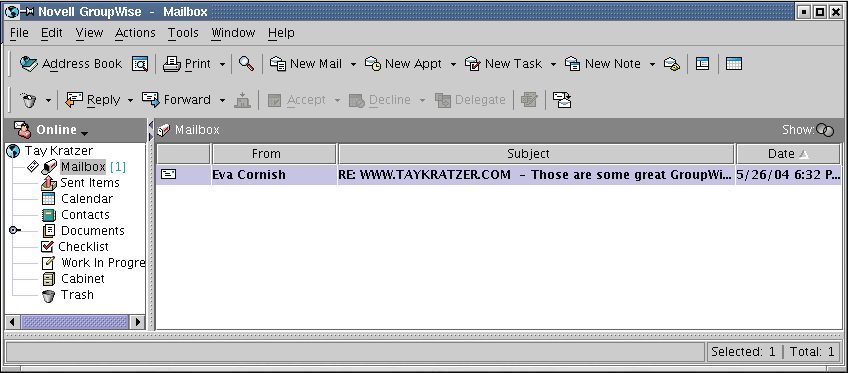
Select OK and the GroupWise client should load the GroupWise mailbox you specified. Figure 6 shows the GroupWise 6.5 Cross-Platform client on a Linux machine.
Figure 6: The GroupWise Cross-Platform Client on the Linux platform.
Summary
You have now created a base GroupWise system on which you can continue to build out into a much larger and enhanced GroupWise system. GroupWise on the Linux platform has all the trappings of a mature groupware solution because it embodies the 15+ years of refinement made to the GroupWise product.
The GroupWise Glossary
Client A GroupWise client is a full-featured client that can access a GroupWise user's mailbox at a post office.
ConsoleOne Is the primary administrative tool for many of Novell's products, GroupWise included.
Domain Database Every domain database has a name of WPDOMAIN.DB. The GroupWise snapins to ConsoleOne must connect to a WPDOMAIN.DB in order to allow an administrator to administer the GroupWise system. MTAs and gateways also require connectivity to the WPDOMAIN.DB. Updates to the WPDOMAIN.DB are made either by the MTA or the GroupWise snapins to ConsoleOne.
Gateway GroupWise supports a variety of gateways. The most popular gateways are the GroupWise Internet Agent (GWIA) and the GroupWise WebAccess gateway. The GWIA allows for SMTP messaging across the Internet. The GWIA also supports other protocols such as IMAP and POP3. The GroupWise WebAccess gateway allows browser and wireless device access to GroupWise.
GDS GroupWise Directory Store. The GDS is contained within domain databases (WPDOMAIN.DB) and post office databases (WPHOST.DB). Changes to the GDS are made by the GroupWise snapins to ConsoleOne, with the snapins connected to a WPDOMAIN.DB. When changes are made, they are replicated to the rest of the GDS by the MTAs and the POAs in the GroupWise system.
Mailbox The GroupWise environment and messages that are accessible via GroupWise clients, or other standards-based clients such as POP3 or IMAP4 clients.
MTA Message Transfer Agent. Every GroupWise domain has an MTA associated with it. An MTA routes messages and processes administrative updates to a domain's WPDOMAIN.DB database.
POA Post Office Agent. Every GroupWise post office has a POA associated with it. The POA routes messages in and out of a post office.
The POA also processes updates to a post office's WPHOST.DB database. GroupWise clients or processes that access a GroupWise mailbox do so by getting a connection to the POA.
Post Office All GroupWise user's mailboxes are associated with a post office. Many other objects must also be anchored to a post office object, e.g., resources and distribution lists. In a GroupWise system most of the action and data retained is at the post office level.
Post Office Database Every post office database has a name of WPHOST.DB. Changes to the WPHOST.DB are only made by the post office's POA. The POA requires connectivity to the WPHOST.DB. The WPHOST.DB acts as the authentication database for a post office and the address book for GroupWise clients.
Primary Domain The primary domain is the main administrative replication hub for changes in the GroupWise system. Every GroupWise system has one primary domain. All administrative changes to the GroupWise Directory Store (GDS) are replicated to and through the primary domain. The primary domain cannot relegate it's function to any other domain in a GroupWise system, but it can perform all the functions that a secondary domain can.
Secondary Domain Since there is only one primary domain in a GroupWise system, all other domains are considered secondary domains. Technically, there are other domain types, but that's beyond the scope of this discussion. As a GroupWise system expands and grows, particularly across wide area networks, it is necessary to create secondary domains. All domains are serviced by an MTA that routes messages in and out of the domain.
SMTP Simple Message Transfer Protocol. This is the Internet-based protocol that allows for exchanging electronic messages in a standard manner.
Snapin The primary administrative tool for many Novell products is ConsoleOne. GroupWise is administered through ConsoleOne with the help of GroupWise-specific snapins. These snapins are designed to display and administer GroupWise objects correctly.
* Originally published in Novell Connection Magazine
Disclaimer
The origin of this information may be internal or external to Novell. While Novell makes all reasonable efforts to verify this information, Novell does not make explicit or implied claims to its validity.