Full Speed Ahead: Installing SUSE LINUX Standard Server Quickly and Easily
Articles and Tips: article
Ronald Nutter
01 May 2004
"If you've installed Linux before, you're going to be a little bored with what I've got to say."
If you're one of the 6,000 it professionals who attended BrainShare 2004 in Salt Lake City, Utah, you came away clear on at least this point: Novell is committed to its Linux strategy and entrenched in the Linux space. Evidence of this point was everywhere at the 20th annual Novell techfest--from the guest appearance of Linux creator Linus Torvalds, to the Linux core of the BrainShare network, to the Linux focus of nearly one quarter of the event's 350 breakout sessions. Stay tuned for a BrainShare network story in the July/August issue.
BrainShare attendees' interest in Linux was equally clear. Linux-related sessions were among the event's most popular. In fact, of the recorded live sessions available from Tech-Sessions and included on the DVD titled "BrainShare 2004 Top 50 Recordings," roughly half of them are Linux-centric sessions, which are also available on a separate DVD. (To order recordings of packaged or individual BrainShare 2004 sessions, visit www.tech-sessions.com.)
Not surprisingly, many of the Linux sessions focused on SUSE LINUX. As you know, Novell recently purchased SUSE LINUX AG of Germany, including the SUSE LINUX Enterprise and Standard server operating systems (OSs) that support Novell Nterprise Linux Services. With Nterprise Linux Services, Novell makes available its renowned network services on Linux. Novell backs these services running atop SUSE LINUX (or Red Hat) with its global support infrastructure, which includes training, developer, consultant and technical services.
Interest in SUSE LINUX was high at BrainShare 2004. In fact, the TUT109 tutorial session titled "SUSE LINUX Installation for First Time Users" was among seven of the event's most popular sessions, attracting a total of more than 800 attendees. (The slides from this presentation are available free of charge at www.novell.com/brainshare/catalog/controller/catalog.) In this session, Ronald Nutter helped first-time users set up SUSE LINUX Standard Server 8 as if they were preparing it for Nterprise Linux Services. (Nutter is the network manager at Georgetown College in Georgetown, Kentucky as well as the helpdesk editor for Network World and a contributing editor to Tech Republic.)
Support for up to two Intel or AMD 32-bit processors (x86) is not what attracts small- to medium-sized organizations to SUSE LINUX Standard Server 8. The secret to this product's appeal among these organizations is its ease of use and relatively low cost. Graphical configuration wizards help even Linux novices set up this server OS--and at a cost as little as $449, these novices are willing to give SUSE LINUX a try. (For more information, see www.suse.com/us/business/products/server/standard/index.html.)
Before, During and After
This article rehashes some of Nutter's session--but not all of it, because an eight-page article can't adequately cover the same amount of material that Nutter can cover in a 60-minute tutorial: I have only a few thousand words to work with and, more important, you have limited time. What this article offers is a handy reference of Nutter's tutorial (if you attended it) or a condensed version of it (if you missed it).
Your time constraints (and my word-count restrictions) dictated the intent (and scope) of this article about installing SUSE LINUX Standard Server 8, which is three-fold:
to offer tips about what you need to know and decide before you install the OS;
to give hints about what you can expect while you install the OS; and
to provide pointers about everyday tasks you will perform after you install the OS.
Also be aware from the outset that this article is in keeping with Nutter's assumptions about the audience for his tutorial: while you might be proficient or even expert on NetWare and Windows, you have little if any experience with Linux. In other words (and as Nutter told his session attendees), "If you've installed Linux before, you're going to be a little bored with what I've got to say."
Get Ready
When you're ready to set up SUSE LINUX Standard Server 8 in your lab (and later, on your live network), plan on the task taking about 30 to 45 minutes. That estimate doesn't necessarily include the time you'll spend making a few basic decisions and gathering information before you start the installation program. (For a generic Linux pre-installation checklist, see http://algolog.tripod.com/lnxchk.htm.)
While it's true that you can gather information as you go, Nutter recommends otherwise: "Better to have [the information you need] up front," Nutter says, "so you don't have to go searching [for it] in the middle of the install."
DOS Boot
One of the first questions to consider is this: Will you install SUSE LINUX alone on your hard disk or will SUSE LINUX share the hard disk with another OS, say Windows, for example? If you want SUSE LINUX to share the hard disk with another OS that you're already running, you have a few pre-installation tasks that, while not difficult, do take some time.
First, you need to determine how much of the hard disk is allocated to the already-installed OS. To do so from Windows 2000 or Windows XP, use the Disk Management option in the Computer Management application, an Administrative Tool accessed from the Control Panel. If you're using Windows 95, you can view information about how the hard disk space has been allocated using fdisk (which you launch from the MS-DOS prompt).
In either case, if Windows has not consumed all of your hard disk space, your next step is to resize the Windows partition. Tools such as Symantec Corporation's PartitionMagic (formerly PowerQuest Corporation's product) simplify this task. (For more information, see www.powerquest.com.)
If you'd rather not spend a dime on the task, you can use the fdisk utility. You can find directions for creating partitions using fdisk on The Linux Documentation Project Web site in The Linux Partition HOWTO, which you can view at http://en.tldp.org/HOWTO/Partition/index.html. (This Web site is loaded with online documents that are particularly useful for first-time Linux users.)
When you install Linux on a system that has Windows (or another OS) already installed, SUSE LINUX Standard Server 8 installs the GRand Unified Boot (GRUB) manager from the GNU organization. (For definitions of GRUB, GNU and other Linux-related terms, see Linux Lingo.) Like its predecessor, Linux Loader (LILO), GRUB is software that, once installed on the boot sector of a machine's hard disk, enables you to select from two or more bootable operating systems installed on the same hard disk. (For more information about GRUB and LILO, see Chapter 4, "Booting and Boot Managers," in the SUSE LINUX Administration Guide available online at http://www.novell.com/documentation/suse/pdfdoc/ SuSE-Linux-Adminguide-9.0.0.0x86.pdf.)
The Hardware Hunt
The next step is to familiarize yourself with your hardware, some of which might require upgrading to work properly with the SUSE LINUX drivers out of the box. Before the installation, prepare a list of your hardware, noting (at least) the vendor and device name and ID. (For hardware hunting tips, see See What You've Got.)
The device most likely to present a hardware-compatibility problem is your graphics card. The good news is that even if the SUSE LINUX default driver does not recognize your graphics card, the card will probably still work. The bad news is that resolution will be limited (by default, 800 x 600 pixels).
Armed with your hardware list, check out the SUSE LINUX hardware database at http://hardwaredb.suse.de. From here, you'll be able to determine whether SUSE LINUX Standard Server 8 supports your hardware. (See Figure 1.)
Figure 1: You can search the SUSE LINUX hardware database to determine the degree to which Linux supports your hardware devices. Support is indicated by the words: not, partially, problematic, full, or unknown.
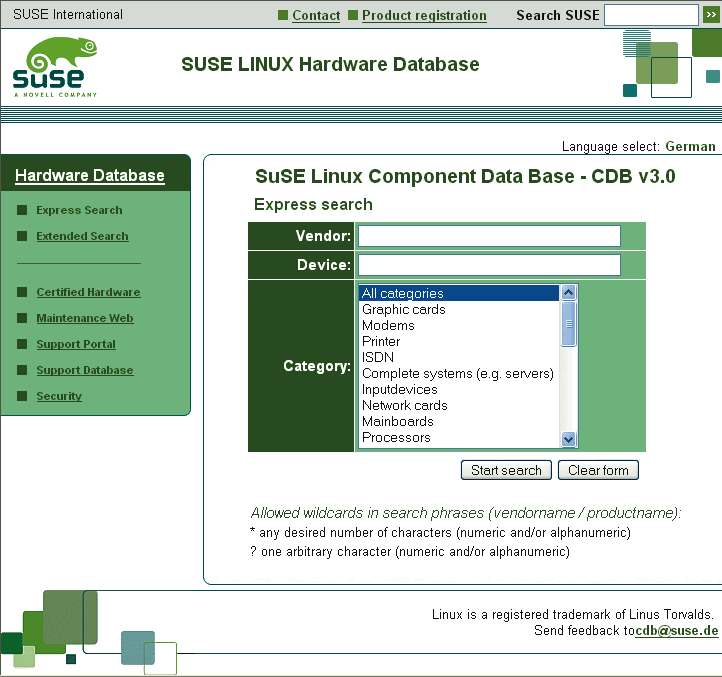
You can conduct an express or an extended search of the hardware database. The extended search enables you to search for your hardware based on vendor and device names, IDs, hardware category (such as Graphic Cards) and, optionally, subcategory (such as Graphic Card Chipsets). The express search enables you to search by vendor and device names and broad categories (including Input Devices, Graphic Cards, Network Cards and Modems). In either case, the returned list notes the degree to which the product or products are supported, indicated by the following words: not, partially, problematic, full, or unknown.
You can also check to see whether your hardware is either SUSE READY or SUSE CERTIFIED at www.suse.com/en/business/certifications/certified_hardware/index.html. To do so, click the name of the SUSE version you're running, in this case, SUSE LINUX Standard Server 8, to display a list of all hardware (listed by vendor and product) that is either SUSE READY or SUSE CERTIFIED. Either of these labels guarantees that the product has been tested and determined to operate fully and properly with this version of the SUSE LINUX OS.
Network Nitpicks
Prior to launching the SUSE LINUX Standard Server 8 installation program, you should also have the usual list of network information handy. You know the list I'm talking about: server IP address, subnet mask, gateway and addresses for your Domain Name Service (DNS) servers and proxy servers. Nutter explains that SUSE LINUX does not in all cases automatically detect and use proxy servers, the addresses for which you might need to manually enter during the installation.
Set To Go
Having partitioned your disk (assuming you chose to do so) and armed with your hardware and network information, you're ready to launch the installation program. To do so, insert the CD titled "SUSE LINUX Standard Server 8 Installation CD 1."
GUI or Text
The first screen you see lists various installation options. (See Figure 2.) From this screen, click Installation (highlighted by default) to install SUSE LINUX Standard Server 8 using the Graphical User Interface (GUI) or hit the F2 key to initiate the textmode installation.
Figure 2: You can install SUSE LINUX Standard Server 8 using a graphical user interface (GUI) or text mode. From this screen, you initiate the GUI by selecting the default-installation option or initiate the text-mode option by pressing the F2 key.
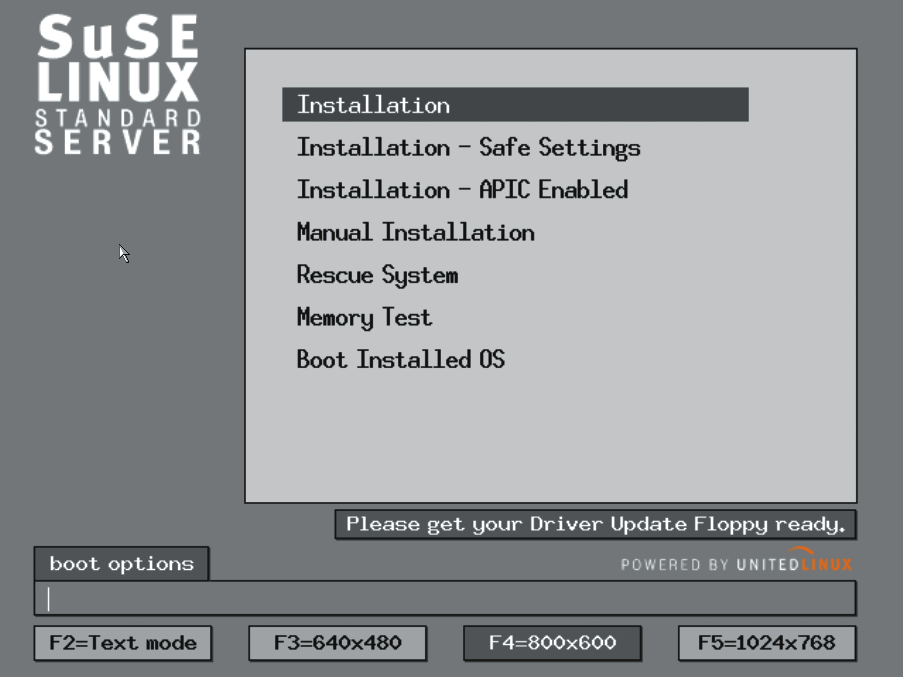
Nutter walked through both the GUI and text-mode installation procedures in his tutorial session, starting with the GUI installation. When you install SUSE LINUX Standard Server 8 on a production server, Nutter concedes, you should opt for the text-mode installation. On a production server, you want your server resources devoted entirely to servicing the network and do not want to share those resources with the GUI. Also, Novell recommends the text-mode installation if you plan to run Nterprise Linux Services atop SUSE LINUX. If that's your plan, you'll want to conserve resources to maximize your server's performance.
That said, Nutter believes that the GUI installation is a great place to start in a test environment. The GUI eases the transition from the Windows or NetWare world to the Linux world. With the GUI, first-time users can familiarize themselves with the command lines at their own, comfortable pace.
The GUI and text-mode installation procedures for SUSE LINUX Standard Server 8 are not as dramatically different as you might think. Aside from the obvious disparity in appearance and a few dissimilar screens, the main difference between these installation modes boils down to navigation. As you probably would expect, you typically cannot use your mouse to navigate the screens when you are installing the OS in text mode. Instead, you navigate the screens using your keyboard. For example, you use the arrow keys to move up and down lists, the Tab key to move from one section of a screen to another, the spacebar to highlight items in lists and the Enter key to activate highlighted items.
Whether you opt for the GUI or text-mode installation procedure, SUSE LINUX Standard Server 8 simplifies the task with Yet another Setup Tool (YaST) 2, the SUSE LINUX distribution's claim to fame. Available in either graphical or text mode, YaST2 guides you through the installation procedure, offering dialogs that explain for each step what you should do and why.
Standard or Basic
Whether you opt for the GUI-based or the text-mode installation, YaST2 next displays a series of screens that prompt you to read and access the user license agreement, specify your language, and then choose between a Standard or Basic installation. (See Figure 3.)
Figure 3: Novell recommends the Basic installation option if you plan to run Nterprise Linux Services atop your SUSE LINUX platform. The Basic option installs only the components you need to get SUSE LINUX Standard Server 8 up and running.
The Standard installation is the complete installation that includes the graphical front-end for configuring the Internet gateway and the file, print and e-mail servers all included with SUSE LINUX Standard Server 8. The Basic installation skips those accessories and is the short path to getting you up and running. More to the point in this context, the Basic installation is all you need if you plan to run Nterprise Linux Services atop your SUSE LINUX platform.
Once you select the Basic installation, YaST2 prompts you to specify your clock and time-zone settings. YaST2 then prompts you to double check your installation settings and the default plan for the SUSE LINUX partitions. (See Figure 4.) After you do so, you select either Yes, to start the installation, or No, to go back and correct any mistakes you might have made.
The Partition Plan
As you can see in Figure 4, YaST2 shows you the number and type of partitions it will create by default for SUSE LINUX Standard Server 8, as well as the space it will devote to each partition. Because the SUSE LINUX installation program automatically partitions the portion of your hard disk where you are installing Linux, you don't have to worry about this information. However, in Nutter's opinion, it doesn't hurt to check out this information--and might actually help you a little.
Figure 4: Yet another Setup Tool 2 (YaST2) shows you the number and type of partitions it will create by default for SUSE LINUX Standard Server 8, as well as the space it will devote to each partition.
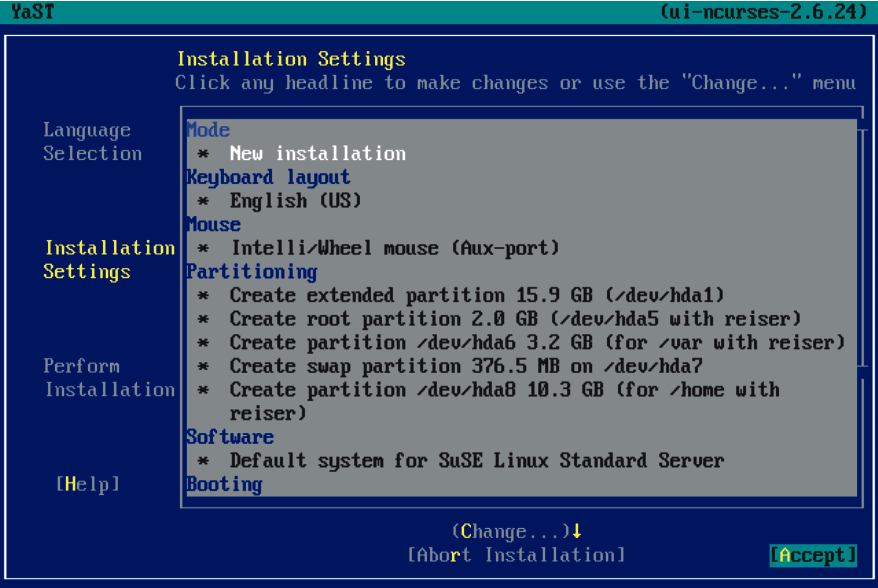
Like all Linux distributions, SUSE LINUX creates more than one partition within the partition where it is installed. The point of doing so is security related: if one part of the disk is damaged, the damage doesn't automatically endanger the entire system or all of your data.
Also seen in Figure 4, SUSE LINUX (like all distributions) creates two types of major partitions:
data partitions, which include the root partition and contain all the data to start up and run the system;
and swap partitions, which expand the computer's physical memory by setting up space for extra memory on the hard disk.
Only the SUSE LINUX system can access the swap partition, which is hidden during normal operation and ensures that you won't get irritating (but all-too-familiar) out-of-memory messages.
If nothing else, taking a moment to look at the partition plan will help familiarize you with the Linux file system and standard terminology in the Linux world. For example, you might notice the subdirectories labeled hda and numbered. Linux refers to IDE drives as hd (and SCSI drives as sd). If there is more than one hard disk on a machine, the disks are noted by a letter (for example, hda). The number that follows represents the partition number
Show Details - For the Sake of Curiosity
When you select Yes to start the installation, the SUSE LINUX installation program prepares your hard disk. After doing so, YaST2 prompts you to insert the second of the two CDs required for the Basic installation: United Linux CD 1. (Yes, it's another 1.)
When thus prompted, you are also given the option to "Show Details." Nutter recommends selecting this option, which displays the names of the files the program is copying. Selecting this option enables you to "see what's going on and gets you used to some of the files you're going to see," says Nutter. (You'll notice one thing right away: Linux uses forward slashes (/) rather than the backslashes (\) you're probably used to.) While the names of the files might not mean a lot to you initially, the more you view them, the sooner you will make sense of things.
At the end of this step, YaST2 returns a screen explaining that the base installation is complete and notifying you that your machine will now reboot.
The Root Password
When the system reboots, you are prompted to create a password for the root account. Like the admin account in the NetWare world, the root account in the SUSE LINUX world has special privileges-- endless privileges, in fact--including rights to add users, install software packages, and perform network and other system configuration tasks.
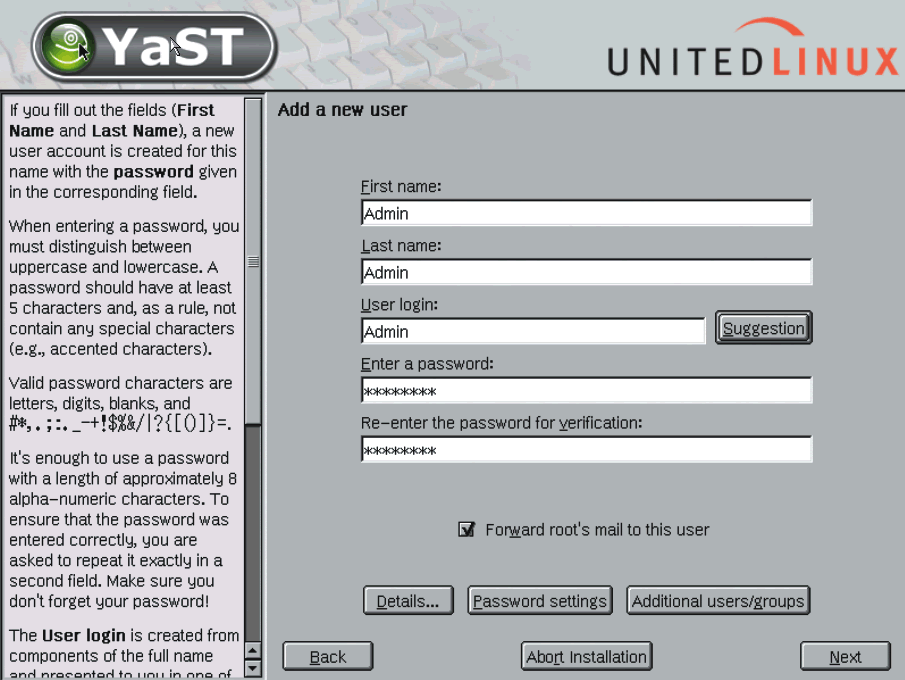
Unless you need to perform these administrative tasks, do not log in as root. Instead, log in using the name and password for the regular user account that YaST2 prompts you to create immediately after you specify the password for the root account. (See Figure 5.)
Figure 5: By forwarding mail to a user account with fewer privileges than the root account, you ensure that you receive notifications about system and application errors.
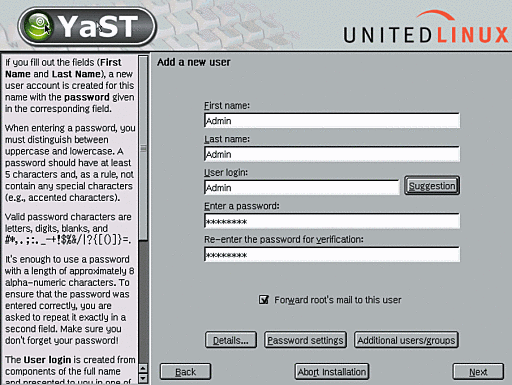
As you can see in Figure 5, when you create this user account, YaST2 also prompts you to forward root mail to this user account. "To the average person," Nutter points out, this option is "not going to mean a whole lot." However, selecting this option is important. When SUSE LINUX and many Linux applications experience problems, they generate mail messages that they send to the root account. If you never log in as root, you never get the messages. By forwarding root mail to the newly created user account, you ensure that you receive the notifications of system and application problems.
Skip Detection
After you create the regular user account, the installation program "goes through a few gyrations," as Nutter puts it, and then starts writing the system configuration file. During this process, the system begins to detect hardware, for example, local printers. "At this point in the game," Nutter advises, "skip detection because your goal is to get the system up and running." The detection screens give you the option to Skip Detection.
When you select this option, YaST2 shows you what it knows about your hardware, including your network interfaces, printers and modems. From this screen, you can select the hardware headlines (such as Network interfaces) or the Change option to access the configuration screen for a particular hardware device. You may then add another device or edit the one listed.
For example, Nutter recommends changing the settings for your network interface card, which by default is configured to use the Dynamic Host Configuration Protocol (DHCP). When you select the Edit option on the Configuration Overview screen for your network interface card, you're prompted to enter the changes, in this case, the static IP address, the subnet mask and this server's host name, for example.
Ready to Roll
At this point, the installation program writes a new set of files, brings the network configuration online, reboots and "you're ready to roll," says Nutter.
The first and most important thing to remember when you're rolling in the Linux world, says Nutter, is to "stand by your man." When he says this he's referring to the Linux online help system, which you can access at any point by typing man subjectofinterest at the command-line prompt. "If there's help on the system, you'll find it," with this command, says Nutter. If there's no help on the system, "there's always Google." (Yes, he's serious.)
For example, you can type man vi at the command line prompt to find more information about vi (pronounced "vee-eye"). vi is a text editor included with SUSE LINUX and commonly used in the Linux world. vi, Nutter says, will "be your best friend."
You can find information about vi commands on any number of Web sites on the subject, including the following, to list only a few:
Nutter's personal preference for vi information is O'Reilly's 71-page vi Editor Pocket Reference. A companion volume to the more complete Learning the vi Editor, the vi Editor Pocket Reference presents "movement and editing commands, the command-line options, and other elements of the vi editor in an easy-to-use tabular format," says the O'Reilly Web site (http://safari.oreilly.com/?XmlId=1-56592-497-5).
vi always starts in command mode. In this mode, vi interprets the characters you enter as commands, not as input into a file. In command mode, you can move through the text, as well as search, replace, mark blocks and perform other editing tasks. vi also operates in insert mode (sometimes called text mode), to which you switch simply by typing i in the command mode. (To return to command mode, you press Esc.)
In either mode, remember that vi is case sensitive. For example, the command vi --R file invokes vi on file in read-only mode, while the command vi --r file recovers file and recent edits after a crash. In text mode, an uppercase D deletes up to the current line, while two lowercase d's delete the current line.
In Nutter's tutorial, he cited examples of how to open or create files in vi. To open an existing file or create a new one, you need only type vi file. You also can create a new file using the touch command, touch file, which creates a zero-byte file.
More Where This Came From
Nutter had more to say on the subject of everyday tasks in the Linux world. For example, he discussed .tar and .rpm files, ifconfig, and add-ons for SUSE LINUX that he finds particularly useful.
For information on these subjects, you can view Nutter's slides by downloading his presentation (TUT109) from the Web site identified in the introduction (www.novell.com/brainshare/catalog/controller/catalog). Be warned: these slides do not include Nutter's notes. If you want to hear the explanations that accompany these slides, you can purchase a recording of his session, which has been synchronized with the slides, for US$15 from www.tech-sessions.com.
See What You've Got
You have several options for finding out what hardware you've got. The best option is to dig out the documentation that came with your hardware.
If you can't find your system documentation (or never had any), try checking the system provider's Web site. Some system providers (including IBM, Dell, HP, Compaq, Gateway and the rest of the big names in hardware) list the details of their systems on their Web sites.
If you've lost your documentation and your provider doesn't list your system's specifications, you'll need to resort to alternate sources for gathering hardware information. Windows is a pretty good source, if you happen to have it running on the server where you plan to install SUSE LINUX Standard Server 8. (Check out the System Information and the Device Manager, both accessible from My Computer.)
If you've got DOS loaded on an x86 machine about which you need more information, you can download PC-CONFIG. PC-CONFIG is available for free from www.holin.com and enables you to detect complete and thorough information about your hardware, including (but not limited to) CPU type and speed; RAM size; hard disk size, brand and version; VGA chip; and PCI slot cards. Laura Chappell also refers to a hardware-auditing freeware tool named Aida32 in her article in this issue. (For more information, see Aida32.) It performs intensely detailed audits of system hardware and software which will give you every detail imaginable. This is the most thorough source of information and is sure to be replete with all the details you might need.
If you've got neither DOS nor Windows (nor any other OS), you can't find your system documentation, and your system provider does not list the specifications for your machine online, you might have to resort to slightly more awkward methods for hardware detection. For example, you might need to speed read the system information as it buzzes by when you first start your computer. Alternately (and probably more realistic), you can access the system BIOS before the OS loads. With any luck, your BIOS will display all the information you need.
Linux Lingo
COPYLEFT is the term playfully given to the General Public License (GPL) that uses copyright law to ensure that no one claims ownership of open source software. According to the GPL, to which any Linux distribution is bound, anyone who redistributes open source software must pass along the code and the rights to copy and change that code.
GNOME is the acronym for the GNU Network Object Model Environment, initiated by Miguel de Icaza of the now Novell-owned Ximian. GNOME is a computer desktop environment designed to make UNIX and UNIX-like operating systems, such as Linux, easier for non-technical users. (See also KDE.)
GNU (ga-new) is the recursive acronym for GNU's Not Unix and is a Unix-like operating system, the source code for which can be copied, modified and redistributed. Richard Stallman initiated the GNU project and the Free Software Foundation that defined the General Public License (GPL, more commonly known as copyleft), to which GNU and all open source software is bound.
GNU/LINUX is a term that some people consider the most precise term for what is more commonly known as "Linux." GNU/Linux refers to the complete operating system formed by a combination of the Linux kernel and the libraries and tools developed by the GNU project.
GRUB is the acronym for GRand Unified Boot loader from the GNU Organization. GRUB is a boot manager program that, once installed on the boot sector of a hard drive, enables you to choose one of the two or more operating systems installed on the same disk that you would like to boot. (See also LILO and GNU.)
KDE is the acronym for the K Desktop Environment and is a free, graphical desktop environment for Unix and Unix-like operating systems, such as Linux. (See also GNOME.)
LILO (lee-low) is the acronym for Linux Loader. LILO is a boot manager that, like GRUB, enables you to choose the OS you want to boot from one or more operating systems installed on the same hard disk.
LINUX technically refers to only the Linux kernel, which is the free computer operating system kernel that Linus Torvalds developed in 1991. The Linux kernel is the heart of the Linux operating system (also called GNU/Linux) and Linux distributions, such as SUSE LINUX. Initially developed for the Intel 80386 processor, Torvalds and his crew of developers have since ported the Linux kernel to many other platforms.
LINUX DISTRIBUTIONS are formed from the Linux kernel, GNU/Linux and open source software, such as Web servers, programming languages, databases, desktop environments (such as GNOME and KDE), and office suites (such as OpenOffice.org).
SUSE (pronounced soo-za) is the acronym for the German phrase "Software- und Systementwicklung," which means "Software and System Development" and refers to both the company and the major Linux distribution now sold by Novell. The SUSE LINUX distribution's claim to fame is its installation program, YaST2.
X WINDOW SYSTEM provides the underpinnings for a graphical user interface (such as Xfree86) and is the standard for Unix, Linux and other Unix-like operating systems.
XFREE86 is a free and open source implementation of the X Window System that provides a graphical user interface for Linux and other Unix-like operating systems.
YaST2 is the acronym for Yet another Setup Tool and the graphical installation program for the SUSE LINUX distribution that significantly eases the installation and setup of the OS.
* Originally published in Novell Connection Magazine
Disclaimer
The origin of this information may be internal or external to Novell. While Novell makes all reasonable efforts to verify this information, Novell does not make explicit or implied claims to its validity.