ZENworks Personality Migration: Collect, Store and Apply Desktop Personalities... Transparently!
Articles and Tips: article
Ron Tanner
01 Mar 2004
Spend a few minutes on two different desktops and you'll notice at least this much: no two desktops are alike. Users endow their desktops with unique personalities, painstakingly defined by desktop, network, printer and application settings that reflect their preferences. As a network administrator on the desktop management front, you deal with these quirky personalities on a regular basis and know how fragile they really are. Every time you replace a failed hard drive, upgrade an old PC or migrate desktops to a new OS, you risk losing desktop personalities-and when personalities go missing, users start grumbling.
Who Can Blame Them?
Some of the settings that define desktop personalities help users perform their jobs efficiently and effectively. For example, some of these settings facilitate printing on local printers, enable access to specific network drives and reflect user preferences for accessing applications (via shortcuts, for example). Other settings include Microsoft Word spell checker that users modify to catch and correct the words they commonly misspell. Settings that define desktop personalities also include customized templates that generate regularly used formats and macros that automate editing tasks and shortcuts. Other such settings can make it easier for users to get to important documents buried ten folders deep in a file system.
Despite the fact that desktop personalities make users' work lives easier, what happens to these personalities when you restore a desktop that inexplicably crashes, upgrade desktop hardware or upgrade the system to a later version of the OS? Given your time constraints, desktop personalities sometimes get lost during these routine transitions. After all, manually collecting, then storing and later applying desktop personalities is prohibitively time consuming and labor intensive in a network environment.
Then again, who says you have to manually collect, store and apply desktop personalities? Instead, you can automate these tasks with ZENworks Desktop Management (a.k.a., ZENworks for Desktops 4.01), a component of ZENworks 6, the latest version of the award-winning Novell Desktop Management solution. (For more information about ZENworks for Desktops 4 awards.)
Introducing ZENworks Personality Migration Powered by Miramar Desktop DNA
ZENworks 6 and ZENworks for Desktops 4.0.1 provide policydriven automation for complete desktop management. ZENworks Desktop Management enables you to centrally manage desktops and laptops located at work or at home-whether or not these workstations run Novell Client32.
Of course, you probably already knew all of that. What you might not know is that ZENworks 6 also features personality migration software. ZENworks Personality Migration powered by Miramar Desktop DNA, which is also bundled with ZENworks for Desktops 4.0.1, enables you to transparently collect, store and apply these personalities on the users' workstations.
The Partners Behind the Personality
To provide ZENworks Personality Migration, Novell partnered with the market leader, Miramar Systems.
Miramar Systems delivers solutions that enable you to manage, integrate and make use of your existing technology assets. Miramar solutions are based on patented Desktop DNA technology that provides a feature-rich, cost-efficient software solution for automating the migration of workstation personalities. (For more information about Miramar, visit www.miramar.com.)
ZENworks Personality Migration
Whether you are migrating workstation personalities after upgrading to a new operating system, upgrading workstation hardware or recovering from a workstation failure, ZENworks Personality Migration collects (and later applies) the settings that comprise workstation personalities.
ZENworks Personality Migration determines what settings to collect based on the policies that you specify when you create a Desktop DNA template. (For more information about templates, see Creating the Template.) ZENworks Personality Migration later applies the collected settings, again based on the policies you specify in the Desktop DNA template you create.
If you are migrating workstation personalities after migrating to a new operating system, ZENworks Personality Migration also transforms settings while applying them to workstations. That is, ZENworks Personality Migration translates settings from older versions of the operating system and applications to suit the context of the new operating environment.
For example, ZENworks Personality Migration translates Windows 2000 settings to suit a Windows XP environment. In fact, it migrates and translates settings between any version of a 32-bit Windows operating system: Windows 95, Windows 98, Windows NT4, Windows 2000 Professional and Windows XP Professional.
ZENworks enables you to collect and later apply workstation personalities from and to several workstations simultaneously rather than having to do so one machine at a time. This is possible by using two ZENworks application objects which you create using ConsoleOne snap-ins for ZENworks: the Pack and Unpack application objects. (For more information about these objects, see Creating the App Objects on p. 72.)
As with other ZENworks application objects, you associate the Pack and Unpack application objects with users or groups of users, which you can then use to trigger the processes of packing and unpacking workstation personalities.
ZENworks also enables you to automate the central storage of many users' personalities. In this version of ZENworks Personality Migration, you store the personalities on a dedicated storage server. In the context of a system migration, ZENworks also contributes inventory, imaging and application management functions. These functions give you a full suite of tools for automating systemmigrations. For example, ZENworks inventory reports which workstations on your network meet hardware requirements for Windows 2000 Professional upgrades. These devices can then be targeted to receive the new OS image by ZENworks. Once the OS is deployed, applications are automatically restored as soon as the user logs in. Personality is then restored onto the new OS for the user of the machine.
The net result of the ZENworks for Desktops 4.0.1 and ZENworks Personality Migration integration is this: it enables you to migrate workstation personalities network-wide as quickly and easily as you (or your users) can launch an application on a desktop.
Server Preliminaries
You can put ZENworks Personality Migration to work in any environment running ZENworks for Desktops 2 or higher. To put your personality migration plan into action, install ZENworks Personality Migration software, which ships on a CD included with ZENworks for Desktops 4.0.1 and ZENworks 6. (If you download either of these products from the Novell Web site, ZENworks Personality Migration software comes along for the ride.)
You place the ZENworks Personality Migration software on a share of any server with 60MB for the program and plenty of space for the actual DNA personality files. As an administrator you will want to install ZENworks Personality Migration on a Windows 2000, Windows 2003, Windows XP or Windows NT4 system where you can create your DNA templates.
To get your server ready to serve up ZENworks Personality Migration and accept DNA personality files, do the following:
Create a share and give your users read rights to that share.
Create a \ddna directory in that share. This will hold ZENworks Personality Migration executable, DNA templates, and workstation DNA personality files.
Copy the contents of the \ddnarun directory from the ZENworks Personality Migration CD into the \ddna directory on your server.
Create a \ddna\templates directory to hold your DNA templates.
Create a \ddnadata directory in your share and give your users create rights into that directory. This is where the DNA personality files for the workstations will be stored. The size requirements of this directory vary depending on the number of users in your network and the size of the collected personalities.
That's it...you're done. Now your servers are prepared to deliver and receive workstation DNA personalities.
Workstation Preliminaries
In order to collect and apply workstation personalities using ZENworks Personality Migration, workstations need to attach to the network in order to gain access to the \ddna directory you created.
In addition, ZENworks Personality Migration runs only on workstations on which Microsoft XML parser 3 is installed. The Microsoft XML parser 3 is an integral part of Windows XP Professional and systems running Internet Explorer 6. On systems other than these, you'll need to install and register the parser .dlls. (For information on how to do this, see XML Parser 3-Speedy Delivery.)
Creating the Template: Policies for Collecting and Applying Personalities
Within the \ddna directory, you also created a \template directory, where you store the Desktop DNA template (or templates) that you create using ZENworks Personality Migration DNA Template Editor. Why do you need a template?
Without a template, you would need to run the ZENworks Personality Migration executable on one machine at a time, selecting each application and attribute you want to capture. Instead, ZENworks Personality Migration enables you to create a DNA template and then specify the location and name of this template in the ZENworks Pack and Unpack application objects that you create. (For more information, see Creating the App Objects on this page.) Hence, when the ZENworks Pack application runs on a user's workstation, it can refer to this template for your collection policies to determine what settings it should be gathering.
The DNA template or templates you create using ZENworks Personality Migration DNA Template Editor specify which system and desktop settings, applications and application settings, and folders and files you want to collect from workstations to represent these workstations' personalities.
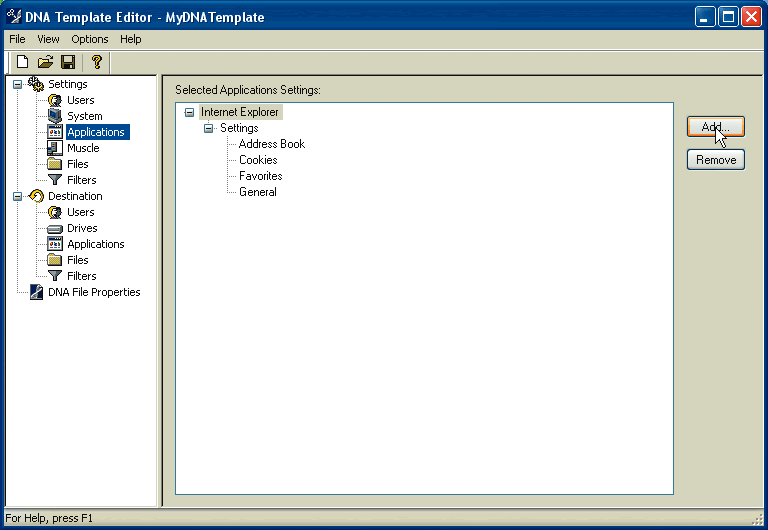
Create the Desktop DNA templates from the server or workstation where you installed ZENworks Personality Migration by running the DNA Template Editor. This editor will present you with a category of settings on the left of the screen that represent groups of settings that can be collected. Select the category on the left and click the Add button to add the specific components that you wish to collect from the workstations. (See Figure 1.) The categories of settings include:
System setting including networking, control panel, desktop, keyboard, and mouse.
Applications and settings including preferences, macros, and browser bookmarks.
Files and folders you want to backup or migrate to a new machine.
ZENworks Personality Migration powered by Miramar Desktop DNA includes the DNA Template Editor to create policies to apply to the collection or application of desktop personalities.
Figure 1
Once you have identified the settings, files and applications that you want to collect, save the template into the \ddna\templates directory on your server share. As you can guess, you are free to have any number of templates that you wish. In the application objects that you give to your users you will identify which template you want applied.
Creating the App Objects
The final step to setting up ZENworks Personality Migration is to create the ZENworks pack and unpack application objects that users can launch in order to store and restore their personalities. These application objects store the steps taken for packing, storing and unpacking of workstation personalities and the order of execution for these processes.
For example, the Identification properties of the Pack application object specify (among other things) the path to the ZENworks Personality Migration executable (stored in your \ddna directory). In Identification properties, you also specify how you want the application to run. Novell suspects that most production environments will choose to run the application once (in which case, users launch the application) or force the application to run (in which case, the application launches automatically).
Among the most important properties in the Pack and Unpack application objects are the macros. The macros automate the steps and order of steps to be taken to pack and unpack workstation personalities. (See Figure 2 and Figure 3.)
ZENworks Personality Migration includes the Template Wizard application, which simplifies the process of creating a Desktop DNA Tempate.
Figure 2
Macros stored in the ZENworks pack and unpack application objects dictate the steps to be taken to pack, store and unpack workstation personalities and the order of execution of these steps.
Figure 3
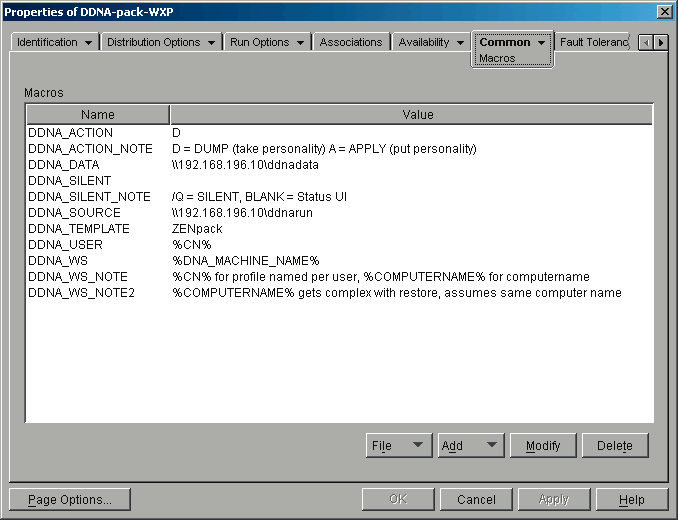
For example, the DDNA_ACTION macro indicates whether the process defined is the pack process (indicated by a D, for Dump) or the unpack process (indicated by an A, for Apply). You also indicate in these macros the location of the \ddna directory and the name of the Desktop DNA template to which this application will refer for packing (or unpacking) policies. Also, the macros specify the location of the \ddnadata directory, so the Pack application knows where to store the personalities and the Unpack application knows where to find them. (For descriptions of the ZENworks Personality Migration macros, look at the help system under command-line switches and command-line rules.)
In addition, the application objects enable you to ensure that you pack personalities only from workstations running older versions of Windows. For example, you can specify that the Pack application can run only on Windows 95/95, NT 4 or 2000 and then specify that the Unpack application runs only on Windows XP. Also, if you have multiple users on the same machine, you can modify the application objects to write to a workstation-named DNA file under a user directory in the \ddnadata server directory. And you could direct the application object to not allow the Unpack to run unless that workstation file exists in the \ddnadata directory, to keep users from attempting to run unpack on personalities that do not exist (See Pack and Unpack Macros). If you want to go all the way, then you could include a post-launch script that will log the user out, because some personality settings will not be visible until the user logs out and back in.
Pack and Unpack Macros
Table identifying macros and their values for the two applications objects: Pack and Unpack, which will take and apply a personality onto a Windows workstation. These macros are defined under the Common->Macros tab of the application object properties.
|
Macro
|
Value
|
Notes
|
|
DDNA_ACTION |
D or A |
D=dump, take the personality of the machine. A=apply a personality to a machine. |
|
DDNA_DATA |
UNC path to ddnadata share |
Directory where the personality file will be stored or retrieved |
|
DDNA_SILENT |
/Q or Empty |
Q=silently perform the action. Empty=provide a progress dialog as action is performed |
|
DDNA_SOURCE |
UNC path to ddnarun share |
Directory where executables can be located |
|
DDNA_TEMPLATE |
Template file |
Filename of template, in the templates directory, to use |
|
DDNA_USER |
%CN% |
User name of the current user |
|
DDNA_WS |
%DNA_MACHINE_NAME% |
Workstation machine name |
Table identifying path, parameters and working directory of Pack and Unpack application objects.
|
Path %DDNA_SOURCE%\DesktopDNA.exe |
|
Parameters %DDNA_ACTION% %DDNA_DATA%\%DDNA_USER%\%DDNA_WS% /T %DDNA_SOURCE%\Templates\%DDNA_TEMPLATE%.dtf /M /X %DDNA_SILENT% |
|
Working Directory %*tempdir% |
|
ADDITIONAL AVAILABILITY OPTION Show if File exists: %DDNA_DATA%\%DDNA_USER%\%COMPUTERNAME%.dna |
|
Including this requirement in the Availability->System Requirements of the Unpack application object will keep the Unpack from appearing on users' lists unless they have a personality stored on the server for the specific computer they are working on. |
XML Parser 3-Speedy Delivery
ZENworks Personality Migration requires that the Microsoft XML parser 3 be installed on the workstation. The XML parser is an integral part of Windows XP professional and systems with Microsoft Internet Explorer 6 installed. Other configurations will require the installation of the XML parser. Full details about the XML parser 3 can be found at: http://www.microsoft.com/downloads/. Don't forget to look for support packs for the XML parser; they are up to SP4.
The easiest way to install the XML Parser is to create an application object that can install the XML parser 3 system and list the XMLParser application object as a dependency in the Pack and Unpack application objects.
What Happens When It's All Put Together?
In a typical environment with your Pack and Unpack objects, the following scenario would occur:
Step 1
Your users will be presented with an Pack application object. They can click the object to take the personality and write the file onto the server that is storing your personality files. If you automate this application, the next time the user logs in or the ZENworks management agents refresh with the system, the Pack application will automatically run.
Step 2
Once you are confident that the Pack applications have run, you can unleash the new OS by identifying the workstations in eDirectory and selecting them to receive the specified image at the next boot. Then you can ask the system to reboot or wake-up those workstations.
Step 3
Once the workstation reboots, it will see that there is an image to be deployed and will startup ZENworks imaging to receive and apply that new OS image. The new OS image could be a SYSPREP'ed image that will automatically walk through the discovery and setup of the system on the hardware.
Step 4
Once the image is completely delivered and SysPrep has done its job, the newly imaged workstation will be at the workstation login prompt waiting for the user.
Step 5
Once the user logs into the system and the application launcher is started, they will be presented with the Unpack application object. When they select that application object, their personality file will be retrieved from the server and restored onto that desktop. If you have automated the personality Unpack, the personality will automatically be applied when the application launcher starts.
Step 6
If you automatically log out the user then they will be presented with the login dialog. They log in and see their familiar desktop, bitmaps, icons, mouse orientation, etc.-all on the new OS.
ZENworks Personality Migration can make the move to a new OS more appealing and less disruptive to your users.
If you want to go further and create your own custom migration scripts for your environment, Miramar provides additional Migration Toolkit tools: DNA Director, DNA Studio and DNA Options Editor. These tools are additional product offerings available through your Novell representative.
Conclusion
ZENworks Personality Migration enables you to migrate desktop personalities with relative ease and under almost any circumstance, lowering the costs and hassles associated with desktop management.
With ZENworks Personality Migration, you can prepare for hard disk failures and system upgrades by routinely packing desktop personalities and storing them on a dedicated server. The next time a user's hard disk goes bad, you'll have a new machine with all its old tricks before that user has a chance to complain. When you finally get around to replacing the receptionist's seven-year-old PC, she'll find the state of affairs on her new machine identical to the state of affairs on her former relic, right down to the seaside wallpaper.
When you migrate your 1,000 desktops from Windows 98 to Windows XP, migrating desktop personalities will blend smoothly with the entire process. Using ZENworks inventory functions, you can determine which machines meet the hardware requirements and auto-launch the pack application on those machines. After storing the personalities and migrating to XP, you can then autolaunch the unpack process. All of the users with the new OS will notice the new OS but little else. They'll be content, your helpdesk will be spared a few dozen calls, and you'll be free to move on to other more important tasks.
* Originally published in Novell Connection Magazine
Disclaimer
The origin of this information may be internal or external to Novell. While Novell makes all reasonable efforts to verify this information, Novell does not make explicit or implied claims to its validity.