Novell ZENworks for Desktops 4: Managing Pure Windows Desktop Environments...
Articles and Tips: article
Ron Tanner
01 Jun 2003
Still looking for a way to perform desktop configuration management and asset tracking in a pure Windows environment?
The issue of automated desktop management has been around for a long time, but its importance continues to gain momentum. Increased security concerns and the usual cost-cutting measures are making comprehensive management of desktops a necessity. Security concerns have also left system administrators scrambling to keep all their Windows servers and desktops up to date, consuming critical IT resources. In addition, growing scrutiny of software asset tracking at the desktop is making complete desktop management an important cost-containment and legal requirement.
It's a well-known fact that Novell ZENworks for Desktops 4 provides a comprehensive desktop management solution in a NetWare environment. However, ZENworks for Desktops 4 also holds its own in a Windows-only environment. And yes, that means networks with Active Directory or Windows NT domains, and no Novell servers or client software running on the desktops! ZENworks for Desktops is a component of the Novell Resource Management solution allowing organizations to consolidate management of diverse IT resources using directory-based identities and policies to automate and optimize the value of those resources.
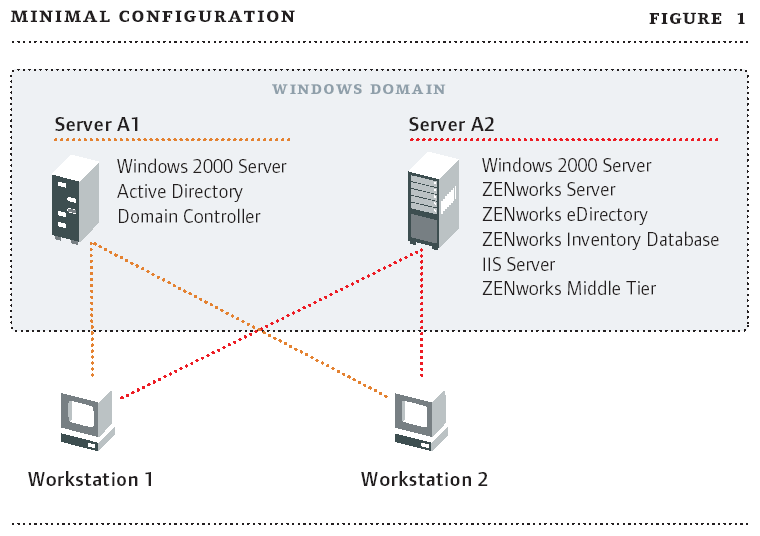
This article outlines the detailed steps to install ZENworks for Desktops 4 in a pure Windows environment running Active Directory. Once your pre-flight checklist is completed, the installation process can be broken down into three phases or segments. For purposes of this article our installation uses two Windows 2000 servers named AD-Server1 and AD-Server2. This is a minimal configuration. The actual installation of ZENworks for Desktops is quite simple. In fact, most of your time will be spent preparing the Active Directory environment for the ZENworks installation.
Article Sections
A - Phase 1 - eDirectory/ConsoleOne Preparation & Installation
B - Phase 2 - DirXML Preparation & Installation
C - Phase 3 - ZENworks for Desktops Installation
Pre-Flight Checklist
Before starting the installation phases of ZENworks for Desktops 4, make sure to download or print the following:
Two Windows 2000 servers are required (minimum) as shown in Figure 1. Server1 functions as the Active Directory domain controller. Server2 will contain the ZENworks server with eDirectory, ZENworks middle-tier software, and IIS
Download the following files for later use (http://download.novell.com):
eDirectory 8.7 or higher for Windows NT/2000
DirXML 1.1a for Windows NT/2000
DirXML Active Directory driver and utilities found in the Novell Technical Information Document (TID #2964748)
DirXML Password Synchronization 1.0 for Windows
DirXML Password Synchronization Update (pwdsnc1.exe)
Print TID #2962702 for instructions on applying the password synchronization update
Figure 1
A - phase 1 - eDirectory/ConsoleOne preparation & installation
Download eDirectory by performing the following steps:
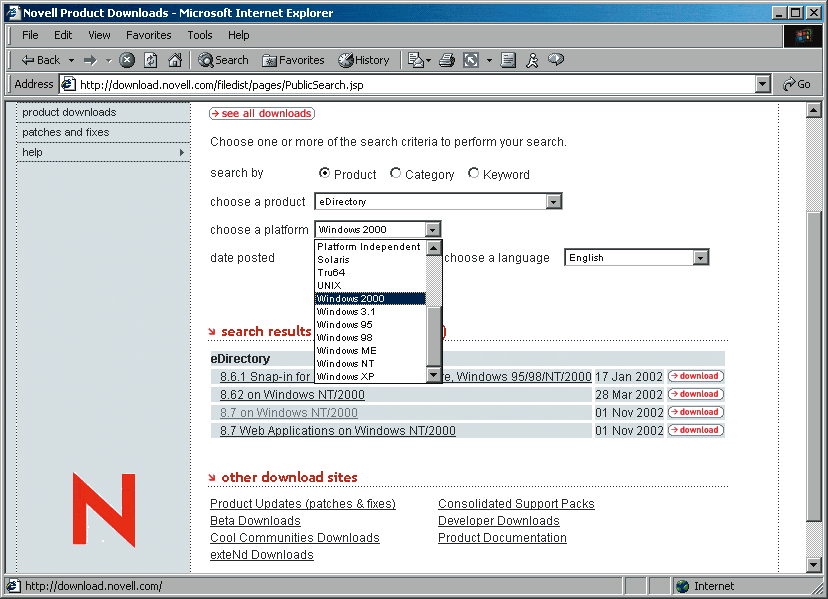
From http://download.novell.com, download eDirectory for the Windows 2000 platform. Under Choose a product, select eDirectory. Under Choose a platform, select Windows 2000. (See Figure 2.) Then click on Submit search.
Go to http://www.novell.com/products/edirectory/customer_license.html and click the "I Accept" button for the license agreement.
Select the appropriate eDirectory version from the available license list.
Provide your contact information. Include a correct e-mail address to which your license will be sent. When you receive the e-mail, save the two attached files to a floppy diskette.
Figure 2
Install eDirectory onto the Active Directory server (in this example AD-Server2) by following these steps:
Log onto the Windows 2000 server (AD-Server2) as administrator. Launch the eDirectory execution program downloaded in the previous section.
Choose to install both eDirectory and ConsoleOne onto the Active Directory server. Follow general installation prompts.
Choose a tree name (e.g., AD-TREE) context for the AD-Server2 server and Admin user object, and a password. Place the server object and admin object under a container such as Servers. The server object could be AD-Server2.servers.ad and the admin name would be Admin with the context of AD.
Accept the HTTP Stack Ports as default; there will be no conflicting stack ports on this server.
eDirectory, however, must not interfere with the Active Directory server using the default 389/636 ports and the ports must be changed for eDirectory. Change the clear text port to 388 and the SSL port to 635. Uncheck the Require TLS for Simple Bind with Password. This is necessary to allow password synchronization to function.
This article outlines the detailed steps to install ZENworks for Desktops 4 in a pure Windows environment running Active Directory.
ConsoleOne Installation
The installation of ConsoleOne will automatically start at the completion of the eDirectory installation. Proceed to install ConsoleOne onto the AD-Server2 server and accept the default installation.
Verify eDirectory Functionality
Once eDirectory is installed, verify that eDirectory is functioning properly on the Active Directory server by following these brief steps:
Log in to AD-Server2 as the user Admin with your password for eDirectory by selecting the Advanced tab of the login and filling in the tree name, context of Admin and server name as previously defined.
Verify that you are logged into the tree as Admin by rightclicking on the red N in the taskbar and selecting Connections. Verify that you have a resource for the tree and the server and user name of CN=Admin. Authentication state on the server should be Directory Services and Tree should be AD-TREE.
Launch ConsoleOne to view the tree along with the admin and server objects.
B - phase 2 - DirXML preparation & installation
The next phase is to prepare DirXML administration. DirXML is a bidirectional data sharing service that allows data to be synchronized between directories. (For more information on DirXML, see Novell DirXML Starter Pack Opens the Door to Secure Identity Management in this issue.)
Create an Administrator Account in Active Directory for DirXML
To isolate changes that may occur with different administrator accounts in Active Directory, Novell recommends creating a separate account for DirXML with Administrator privileges in Active Directory. Follow these steps to create an administrative user:
Log onto the AD-Server1 server as administrator of the domain.
Launch the Active Directory Users and Computers option by launching Start -> Programs-> Administrative Tools-> Active Directory Users and Computers.
From Active Directory Users and Computers, select the container where you want to add the DirXML administrator user and click Create a New User.
Enter the name for the user. For example, enter Novell as the first name, DirXML as the last name, Novell DirXML as the full name. User login name should be novelldirxml@ad.com.
Set the password for the new user. Mark Password Never Expires so that an expired password won't disable the driver unexpectedly. Click Next, review the summary and click Finish.
In the Tree view, select Builtin-> Administrator's properties-> Members-> Add.
Select the full name of the user you created (Novell DirXML), click Add and click OK twice. Close the Active Directory Users and Computers Window.
In the Administrative Tools window, select Domain Controller Security Policy.
In the Tree View, expand Security Settings-> Local Policies-> User Rights Assignment. Set Log On As a Service-> Security-> Add-> Browse.
Select the user you created (Novell DirXML), click Add, and click OK three times. Close the Domain Controller Security Policy. Reboot the system.
Figure 3
Install DirXML
Now, you're ready to install DirXML on the Active Directory server by performing the following:
Log on to the Windows 2000 (AD-Server2) server as the DirXML administrator and log in to eDirectory as Admin user.
Launch the DirXML 1.1a installation program, downloaded earlier in the pre-installation procedures (nt\install.exe). Click Next on the DirXML Welcome screen and accept the licensing agreement.
Choose to install the DirXML Engine and Drivers and the DirXML Management Utilities on the component installation page. Click Next.
On the following component page choose DirXML Engine and the appropriate Core Driver (DirXML Driver 2.0a for Active Directory) and click Next.
Verify that the tree name is correct and press Enter. Browse to the admin user and password. Your admin user name will be "CN=admin.O=ad". Click Next.
Choose ConsoleOne snapins for DirXML and DirXML Pre-configured Drivers for additional installation. Click Next.
Deselect all of the preconfigured drivers except the appropriate Active Directory driver. Click Next. Click Finish on the summary dialog. The Installation of DirXML will continue. eDirectory will shut down and the installation will proceed.
Click OK on the dialog box warning about the possible conflict with eDirectory and the LDAP system. When DirXML is installed, eDirectory will come back up.
On the final dialog box, uncheck "Launch ConsoleOne DirXML Configuration Wizards" and click Close. The configuration wizards will be launched at a different time.
Configure the DirXML Drivers
Now that eDirectory and DirXML have been installed on the AD-Server2 server, configure the DirXML drivers to initiate synchronization between the Active Directory Domain and eDirectory. Configure the DirXML drivers by doing the following:
Log in to the AD-Server2 server as administrator and in to eDirectory as Admin user.
Open a DOS box and execute the readDomainGUID.exe program found on the Active Directory server. Make sure to run the tool from the c:\novell\nds directory. Cut and paste the Graphical User ID (GUID) returned by the utility into a text file and save it for later use.
Launch ConsoleOne.
Extend the eDirectory schema to accommodate the new Active Directory driver. This is done by following these steps:
Launch the schema import tool by selecting in ConsoleOne Wizards-> NDS Import/Export.
Select Import LDIF file and click Next.
Browse to and select the AD-Driver-Schema.ldif file on the ZENworks diskette or directory previously downloaded from TID#2964748. Click Next.
Enter the Server DNS Name/IP Address field 127.0.0.1 and 388 in the Port field.
Select Authenticated Login and enter the admin user object and password in the fields. Remember to enter the LDAP version of the admin user name including the container (cn=admin,o=ad). Click Next. Click Finish on the Summary screen.
You should get a scrolled output of the import. Verify that the total entries processed are three and that there were no errors. Click Close.
Create an organizational unit (OU) container in the directory under the AD organizational container. Call this OU DirXML. All objects related to DirXML will be created under this container. If desired, create a user organizational unit container under AD.
Select the parent container (AD) of the new DirXML organizational unit. Then on the menu select Wizard-> Create a new Application Driver.
On the creation wizard, select "in a new driver set." Click Next.
Enter a driver set name, such as ADDriverSet. Browse to and select the DirXML container for the context and the ADSERVER2 server for the server field. Click Next. The wizard will now create the objects for the driver set.
Select Import preconfigured driver and browse to and select AD-Driver.xml stored on your ZENworks diskette. Click Next.
Warning: The install of DirXML will put an addriver.xml file in the system. This will also come up on the list. Make sure you choose the new \AD-Driver.xml.
Now configure the driver parameters. They are presented on the wizard page and are visible by using the scrollbar. Use the table to the right as your guide. (See facing column.)
Click OK and click Yes to set the security equivalences of the driver.
Click the Add button and browse to the admin.ad user and add it to the list. Click OK.
Click Yes on the "Novell recommends you identify all objects that represent 'Administrative Roles'" dialog box.
Click the Add button and browse to and select all users that are administrators of eDirectory. This will prevent them from being created in the Active Directory domain and synchronized. Click OK.
Click Finish on the summary page to complete the wizard.
|
Field
|
Input
|
|
1 Driver Name |
Leave the name of the driver as the default. |
|
2 Active Directory Account |
Enter the domain administrator account created earlier (novelldirxml@ad.com). |
|
3 Authentication Password |
Enter the password for the domain administrator account. |
|
4 Retype the Password |
Re-enter the domain administrator account password. |
|
5 DNS Name of Domain Controller |
Enter "LDAP://<DNS name of AD-01>" into the address of Active Directory Domain controller field. Do not enter an IP address. This may be LDAP://ad-01.da.com. |
|
6 Domain GUID |
Enter the GUID for the domain. Cut and paste the GUID that you saved in a text file into this field. |
|
7 Data Flow |
Leave this to the default Bi-directional. |
|
8 Active Directory Base Container |
Enter the base container in Active Directory. This is the container where you want users to be synchronized with eDirectory (e.g., CN=Users, DC=ad, DC=com). |
|
9 eDirectory Base Container |
Enter the container where you want users to be created and synchronized with Active Directory (e.g., users.ad). You can browse for this container by clicking the browse button. If you are going to mirror the Active Directory containers, then this would be the top container in eDirectory. |
|
10 Publisher Placement |
Choose Flat or Mirror. Choosing Flat places all user objects coming from Active Directory into the same container. Choosing Mirror recreates the user objects and the containers in eDirectory. |
|
11 Subscriber Placement |
See field 10 to choose placement. |
|
12 Driver Polling Interval |
Enter the desired polling interval. Labs can set this to one minute. Live environment should be set around 15 minutes. |
|
13 Use Secure Authentication |
Leave the default Yes. |
|
14 Enable PasswordSync |
Leave the default Yes. |
|
15 Install Driver as Remote/Local |
Set to Local. |
|
16 Remote Host Name and Port |
Ignore and leave as defaulted. |
|
17 Driver Password |
Ignore and leave blank. |
|
18 Retype the password |
Ignore and leave blank. |
|
19 Remote password |
Ignore and leave blank. |
|
20 Retype the password |
Ignore and leave blank. |
Note:Before getting the DirXML driver running, install the Password Synchronization software as described in the next section.
Install Password Synchronization
Password Synchronization allows user objects created in Active Directory to have the same password as their corresponding user in Active Directory. This is necessary to permit single-login to both Active Directory and eDirectory when users log in to their workstations.
With ConsoleOne, you can set an initial password when creating a user account by marking the Assign NDS Password checkbox and then selecting the Prompt During Creation radio button. ConsoleOne sets the password before an account is associated in NT or Active Directory accounts, thereby preventing the initial password from being synchronized. Passwords will be synchronized only after the first password change. To avoid this delay, you can:
Unmark Assign NDS Password during user creation and assign the password later. A brief delay will allow account associations to be completed.
Select Prompt user on first login so that password setting is delayed until the account is actually used.
The Microsoft Management Console lets you set an initial password on a user account simply by typing the password at account creation. The password is set before Password Synchronization is able to associate an eDirectory account with the Active Directory account, so Password Synchronization service is not able to update the eDirectory account immediately. However, the service will retry the password update and the account will be properly updated within several minutes.
Install Password Synchronization by performing the following steps:
Log in to AD-SERVER2 as administrator and Admin user in eDirectory.
Ensure that ConsoleOne is closed and launch the installation of Password Sync that you previously downloaded from the Novell Web site.
Click Next on the welcome screen. Read the license and click Yes to accept it.
Select both the Password Synchronization Service and PasswordSync Snap-in for ConsoleOne on the component menu. Click Next.
Click Next on the review settings page. The installation program will now copy the files to the AD-SERVER2 server.
On the Setup dialog box, select the AD domain and browse to the ADDriver (ADDriver.ADDriverSet.DirXML.ad) object in eDirectory. Click OK.
Leave the object name as the default. For the Context, verify that it is the DirXML container that was previously created and click OK.
When asked to give the password sync object rights, select the container where the user objects, synchronized from Active Directory, are expected to reside. Be sure to assign these rights for every container of users that will be synchronized. Click OK.
When prompted to put filters on each Domain Controller, click Yes.
A list of Domain Controllers will be presented. Select AD-Server1 and click Add. Warning: this will reboot the AD-Server1.
Wait until AD-Server1 is rebooted and the dialog shows ADServer1 status of Running. Click Close and then Finish.
Follow the instructions found on TID#2962702 that was previously downloaded. This will apply the update of Password Synchronization previously downloaded. Don't forget to reboot both AD-Server1 and AD-Server2 after applying the update.
Finalizing the DirXML Driver Configuration
Now that DirXML drivers and PasswordSync driver have been installed and configured, the next step is to finalize the configuration to have these drivers start automatically and function properly. Perform these steps:
Log in to AD-Server2 as administrator and as Admin in eDirectory.
Launch ConsoleOne.
Select the ADDriverSet object under the DirXML container in ConsoleOne and right mouse click to select properties.
Select the DirXML-> Drivers tab.
Select the ADDriver in the list and click the Start button. Verify that the driver has started by watching the status field change to Running.
Click the Properties button and select the Startup Option tab and change the startup to be Automatic. Click Apply and then click Close.
Open NDSCons.exe and verify that dirxml.dlm is running.
Verifying DirXML and Password Synchronization are working
Now verify that eDirectory, DirXML and Password Synchronization are working properly. Create a few users in Active Directory to verify that they are also automatically created in eDirectory with the proper passwords. You can also create a user in eDirectory using ConsoleOne as Admin and verify that the same user with the password specified is created in eDirectory.
Note: The default synchronization rules will not create an Active Directory user until the full name attribute field is populated in eDirectory. This can be done under the properties of the user object, on the General tab.
Obtaining and Applying an Activator License for DirXML Now that eDirectory, DirXML and Password Synchronization are working properly, the last segment in this phase is to activate the DirXML licenses before installing ZENworks:
Log in to AD-Server2 as the administrator of the domain and as admin in eDirectory.
Launch ConsoleOne and browse to and select the DirXML container.
Select Wizards-> Create a DirXML Activation Request.
On the Welcome screen, browse to and select the DirXML driver set (ADDriverSet.DirXML.da) and click Next and enter your Novell customer ID. Click Next.
Insert your ZENworks diskette and use it to store the activator request. Click Next and then click Finish to exit the Activator wizard.
On a workstation with Internet access, launch a browser and go to the Novell Activator Web site (www.novell.com/activator).
Log in with your Novell profile user name and password and click the Browse button on the Web page. Locate and select the request.req file on the ZENworks diskette.
Click Submit at the bottom of the page.
On the Novell Product Activator page, select DirXML Password Synchronization and click Submit. This will generate an activator license for the DirXML 1.1a engine, the Active Directory Driver and the Password Synchronization driver.
This will result in an e-mail being generated with an attached Activation Credential file (<bunch of numbers>.act). Save this file onto your ZENworks diskette.
Go back to AD-Server2 and log in as administrator of the domain and as admin in eDirectory.
Launch ConsoleOne and browse to and select the DirXML container.
Select Wizards-> Install a DirXML_Activation.
On the Welcome screen, browse to and select the DirXML driver set (ADDriverSet.DirXML.da) and click Next.
Insert the ZENworks diskette into AD-Server2.
In the Specify a file field, browse to and select the .act file that was previously saved on your ZENworks diskette. Click Open and then click Next.
On the conclusion page, click View to see if the activation file installed is considered valid. Click Cancel and then Finish.
C - phase 3 - ZENworks for desktops installation
Install ZENworks for Desktops 4
You're now ready to install ZENworks for Desktops 4 into the pure Windows environment. ZENworks for Desktops 4 can be broken into five main categories: Policy Management, Application Management, Imaging, Inventory and Remote Control. Depending on your unique network criteria, you can choose to install one or all of these components.
You may also choose for your environment to have workstation objects available in your eDirectory tree. Installation of these objects impacts whether certain features are available to the end user. See ZENworks for Desktops documentation for more information regarding these features (http://www.novell.com/documentation).
ZENworks for Desktops 4 will be installed onto AD-Server2, where eDirectory is located, by doing the following:
Log in to AD-Server2 as administrator of the domain and as Admin user for eDirectory.
Insert the ZENworks for Desktops program CD and select English and New Installation.
Choose Install ZENworks for Desktops Server to start the Installation wizard.
Read the Welcome and click Next. Read the license agreement, choose Accept and then click Next. Click Next on the information page.
Browse and select the eDirectory tree you installed on ADServer2 (AD-TREE). Make sure the extend schema option is checked. Click Next.
Select all of the components of ZENworks for Desktops that you need for your environment. Click Next.
Click Add server and add AD-Server2-NDS to the server list and select all of the appropriate components to install on this server. Click Next.
Click Next on the Database file installation path to accept the defaults.
Select Configure Standalone for Inventory. The container should be the same as where your server is located (servers.ad). Click Next.
Click Next on the XMl Proxy configuration to accept the defaults.
Click Next on the Remote Management File installation paths to accepts the defaults. Click Finish on the summary dialog box.
The schema will now be extended in eDirectory. Then click OK on the Schema Extended Successfully dialog box.
A dialog pops up giving a warning about certain ZENworks for Desktops process and services that cannot be running. Since this is the first time that we have installed ZENworks for Desktops, none should be running. Make sure that you have closed ConsoleOne. Click OK.
The ZENworks for Desktops software and servers will now begin to install on AD-Server2.
Click OK on the Please Reboot dialog box.
Click No on the view log files dialog box.
Reboot server AD-Server2 to complete the installation. When AD-Server2 comes back up, additional installation processes will be activated and completed.
Installing ZENworks for Desktops Middle-Tier Server
Now you need to install the ZENworks for Desktops middle-tier if you wish to deliver ZENworks for Desktops features through the browser and over the Internet. ZENworks for Desktops middle-tier server will be installed on AD-Server1 where IIS is present. The installation of the middle-tier requires the Novell client to be installed on the IIS server that runs the installation. Therefore, the middle-tier will be placed onto AD-Server1 from AD-Server2 where the client is already running with eDirectory. Install the ZENworks middle-tier by performing the following:
Log in to AD-Server2 as Admin user of eDirectory and as administrator of the domain.
Insert the ZENworks for Desktops Program CD and choose English, New Installation.
Choose Install ZENworks for Desktops Middle-Tier Server to launch the installation wizard.
On the Welcome screen, click Next. Read the license and choose to accept it and click Next. On the Information screen, click Next.
On the Select Middle-Tier Server screen, choose Add Server.
On the Add Server dialog choose AD-Server2. Then click OK.
Back on the Select Middle-Tier Server screen, in the sections devoted to ZENworks for Desktops Middle-Tier Server on Windows 2000, enter the following:
Login name (administrator@ad.com) in the Domain Username field.
Enter the administrator password in the Password and Confirm Password fields.
In the section on Primary eDirectory Tree Information enter the following:
DNS/IP, enter the address or DNS name of AD-SERVER2.
User context, enter the context of the eDirectory tree that contains the user objects that will be using this middle tier.
Admin username, enter the administrator's user object (e.g., admin.ad) and password.
Click Next and then click Finish on the Summary screen.
The ZENworks Middle-Tier System will now install.
Click OK on the Please Reboot dialog.
Select No to not view the log files of the installation.
Reboot AD-SERVER2 to complete the installation.
Deploying ZENworks for Desktops Agents
The final step is to install the ZENworks management agents onto your workstations and begin using the ZENworks features to manage those devices. The full agents may be installed on a workstation by running the setup.exe found at \\AD-Server2\novell\public\zenworks. The Application viewer agent is automatically installed when a user first goes to the myapps.html page on the ZENworks server (http://AD-Server2.da.com/mayapps.html).
If you wish to have the Web page install the full agents (approximately 8.5 MB), copy setup.exe to the \\AD-Server2\inetpub\wwwroot directory and replace the following line in the myapps.html: document.write("codebase=\"http://ad-Server2.da.com:80/ZfdWebSw.exe\""); With the following: document.write("codebase=\"http://ad-Server2.da.com:80/setup.exe\"");
Conclusion
Network administrators running in a Windows-only environment with Active Directory can gain the advantages of desktop management and asset tracking through the deployment of ZENworks for Desktops 4. By following these steps, you can enable a pure Windows workstation without a Novell client to receive applications, desktop preferences and permissions in a consistent and organized manner. No desktop should be left unattended without ZENworks for Desktops 4.* Originally published in Novell Connection Magazine
Disclaimer
The origin of this information may be internal or external to Novell. While Novell makes all reasonable efforts to verify this information, Novell does not make explicit or implied claims to its validity.