Protocol Filtering: Creating Cool Filters
Articles and Tips: article
01 Apr 2002
Editor's Note: The following article is an excerpt from Laura Chappell's book Packet Filtering: Catching the Cool Packets! You can purchase this book from http://www.podbooks.com/. This article assumes that you have a basic understanding of protocol analysis. (For more information about protocol analysis, see "Basic Packet Filtering Using Your Network Analyzer," Novell Connection, Jan. 2001, pp. 40-41.
When you first powered up your network analyzer, you probably spent hours looking at wonderful charts, graphs, and decoded packets. You experienced protocol analysis in a relatively passive mode--looking at the interpretations of the traffic trends and activity on your network.
Next, you probably got a bit curious about the type of traffic you were seeing. You may have seen some strange packets or maybe an unusually high amount of traffic from a single source.
Now, you are ready to build a library of filters that will save you time and money--and could very possibly ensure the security of your network. You can build various types of filters to examine traffic on your network. For example, you can filter on traffic coming and going from a specific hardward device, on packets from a specific port, or on specific types of packets.
This article examines the various protocol filters that you should build. Of course, the actual filter set you need depends on your company's network, but this article will give you an idea of how to build a set of filters and what filters you should build.
USING THE PROTOCOL ID FIELD
Each packet header has some sort of a Protocol ID (PID) field that indicates which header or protocol is coming up next in the packet. For example, in the Ethernet II header, the value in the Ethertype field indicates which protocol follows the Ethernet header. A value of 0x0800 in the Ethertype field indicates that an IP header is coming next. A value of 0x0806 in the Ethertype field indicates that an Address Resolution Protocol (ARP) packet is coming up next. (For more information about ARP, see Request for Comments [RFC] 826 at www.ietf.org/rfc/rfc826.org.) If you build filters that look for either 0x0800 or 0x0806 in the Ethertype field, you have built IP and ARP filters.
As you move further into the packet, you can build more protocol filters by looking for additional PID fields. For example, in the IP header, the PID field indicates what type of protocol is using IP for networking. The value 1d in the Protocol field indicates an Internet Control Messaging Protocol (ICMP) packet follows the IP header. The value 6d indicates a TCP header follows the IP header. The value 17d indicates that a User Datagram Protocol (UDP) header follows the IP header.
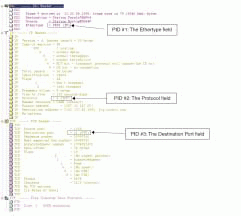
Packets always include a PID field to tell you what's coming next. Figure 1 highlights some of the PID fields. The first PID field is the Ethertype field in the Ethernet header. The second PID is the Protocol field in the IP header. The third PID field is the Destination Port field in the TCP header.
Figure 1
Note. Now that I said packets always include a PID field, I'll have to give you an example of an exception to this rule: the old, ugly Ethernet 802.3 frame type that Novell formally used as its default frame type. This frame type did not have an Ethertype field or any field that indicated what was coming next. As a result, you could not filter on the Ethertype field to build any protocol filter for the IPX header that followed these Ethernet headers. You actually had to look further into the packet--into the place where the IPX default checksum value of 0xFFFF was--to identify the packet as an IPX packet over the Ethernet 802.3 frame type.
To build basic protocol filters, you only need to know which PID you are interested in, the location of that PID, and the value for the protocol you are interested in. For example, if you want to capture all TCP traffic, you need to filter on the value 6d in the Protocol field in the IP header.
PROTOCOL FILTERS THE EASY WAY
When you start to write a master list of all the protocols for which you should build filters, you begin to wonder when you will have time for life. You have so many filters to build. Fortunately, today's network analyzers have some prebuilt protocol filters. You simply select the protocol, and you're done. This article explains how you can build filters using two of the most popular network analyzers, Network Associates' Sniffer and WildPackets' Etherpeek.
Figure 2
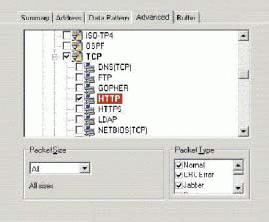
Figure 2 shows the prebuilt filters included with Sniffer. In fact, this figure doesn't show all of the prebuilt filters. Under the IP heading, there are myriad prebuilt filters, including the following:
IP
EGP
GGP
Hello
ICMP
IGMP
IGRP/EIGRP
IP-VINES
ISO-TP4
OSPF
TCP
DNS (TCP)
FTP
GOPHER
HTTP
HTTPS
LDAP
NETBIOS (TCP)
NNTP
POP
PRINTER
REXEC
RLOGIN
RSH
Figure 3 shows how WildPackets' EtherPeek network analyzer protocol filters are built using the predefined PID values.
Figure 3
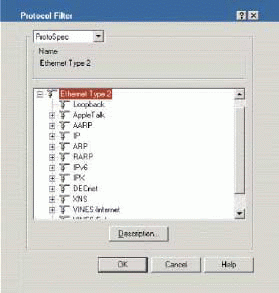
These prebuilt protocol filters are based on standards and specifications. For example, if a specification indicates that FTP commands use port 21, then the prebuilt FTP filter looks for the number 21 in the port number field.
Unfortunately, these filters are not always effective. For example, what if someone brings up an FTP server using port 80 for FTP commands? In this case, the prebuilt filter won't work. While the filter looks for all traffic to and from port 21, FTP traffic cruises by using port 80. As a result, you can't always rely on the prebuilt filters.
You should take a few minutes to create a solid set of protocol filters for your network. To create these filters, you first need to determine which protocols are traversing your network. To do this, you must first capture traffic using your network analyzer. You then view the protocol distribution window.
Figure 4
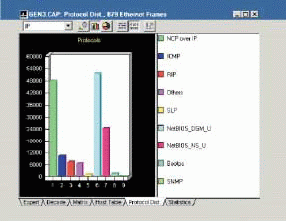
Figure 5
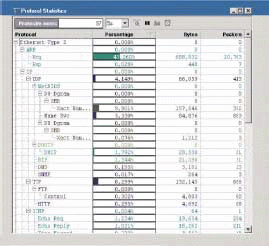
Figures 4 and 5 show the protocol distribution windows for Sniffer and EtherPeek, respectively. As you can see, the network from which these traces were taken are running several IP-based protocols. If I were setting up the analyzer for this network, I would build the following filter set:
All IP traffic (you've got to have that)
Broadcast traffic
NetWare Core Protocol (NCP) over IP (based on port 524)
ICMP (based on protocol 1 in the IP header)
Routing Information Protocol (RIP) (based on port 520)
Service Location Protocol (SLP) (based on port 527)
NetBIOS Name Service (based on port 137)
NetBIOS Datagram Services (based on port 138)
Dynamic Host Configuration Protocol (DHCP) (based on ports 67 and 68)
Simple Network Management Protocol (SNMP) (based on ports 161 and 162)
You may wonder why I would create a filter for all IP traffic. I like to know when non-IP traffic is sent across the network. By looking at the rate of packets seen versus the packets captured on an IP filter, I can determine how much non-IP traffic is crossing the wire.
Note. You can also capture non-IP traffic by building a filter using the NOT Boolean operand. For more information about creating filters using Boolean operands, see "Advanced Packet Filtering," Novell Connection, Apr. 2001, pp. 33-39.
MY FAVORITE PROTOCOL FILTERS
I have two filters that are my absolute favorites: the broadcast filter and the ICMP filter. You can create a filter that captures all broadcast traffic by building an address filter. To create this filter, you define a filter that captures all broadcast traffic that is going to and from the MAC address, 0xFF-FF-FF-FF-FF-FF. (See Figure 6) (For more information about creating address filters, see Packet Filtering: Catching the Cool Packets! at http://www.podbooks.com/.)
Because excessive broadcast traffic impacts the performance of individual devices (they all have to process broadcasts), I need to know how much traffic these devices are processing. In some cases, misconfigured devices may also continually broadcast queries on the network.
You can create a filter that captures ICMP traffic by making a simple protocol selection in most analyzer products. Why do I care so much about the ICMP filter? When I go onsite, I usually capture all of the packets (no filters applied) and then look specifically for the ICMP traffic crossing the wire. Here are some examples of what you can learn using an ICMP filter:
If you find a lot of ICMP echo requests/replies on the network, you can look at the source to determine whether an automated process is sending out all these packets (pinging). Or, perhaps an application is using ICMP as a "keepalive" process. You should also look at where the ICMP packets are coming from. If the packets are coming from an outside system (outside the firewall), you should be curious about the sender and his or her intentions.
If you capture a lot of ICMP redirects, you should check out what is being redirected to where. For example, maybe a set of hosts are using the least efficient default gateway setting, or maybe a redirection attack is underway.
If you capture a lot of ICMP destination unreachable packets, you should look into who is sending and receiving those packets to determine what each destination unreachable packet is saying. For example, perhaps the host was unreachable or the destination port number was unreachable. Either way, you should determine why these packets are crossing the wire.
ICMP is one of my favorite protocols in the TCP/IP protocol suite because you can find out a lot about your network by looking at the ICMP traffic. To learn more about ICMP traffic, I highly recommend you spend some time with RFC 792 and RFC 1256. (You can download these documents from www.ietf.org/rfc/rfc792 and www.ietf.org/rfc/rfc1256, respectively.) You can also read "TCP/IP Analysis and Troubleshooting" available at http://www.podbooks.com/ or "Routing Sequences for ICMP," Novell Connection, Mar. 2001, pp. 32-35. (You can download this article from www.ncmag.com/past.)
PROTOCOL FILTERS THE SUPER EASY WAY
Of course, you probably don't want to build all these protocol filters one by one. Most network analyzers have a braindead way to export and import filters. I say "brain-dead" because most analyzers are lousy at this. For example, if you are using Sniffer, you need to fool the system by renaming files and then importing the files you want. If you are using Etherpeek, the system can't import individual filters out of a set--you must import the entire set.
Exporting and Importing Sniffer Filters
To import filters into Sniffer, you must first understand that Sniffer maintains three filter files:
NXSAMPLE.CSF, the sample filter set (stored in the NAI\Sniffer\Program directory)
SNIFFER.CSF, the current filter set (stored in the NAI\SNIFFER\PRO-GRAM\LOCAL_x file)
SNIFFERDISPLAY.CSF, the display filter set (stored in the NAI\SNIFFER\PRO-GRAM\LOCAL_x file)
I rarely use or refer to the SNIFFERDISPLAY.CSF file because this file contains only the Sniffer Display filters. I think these filters are pretty lousy--they can only be used to apply filters to captured data. On the other hand, Capture filters can be used on live traffic or on captured data.
Note. Always make a copy of the SNIFFER.CSF file, which contains all of the active capture filters on your Sniffer system.
Exporting a filter set is simple: You copy the SNIFFER.CSF file and send it to someone else.
Importing a filter set is another story, however. You need to be careful not to overwrite your SNIFFER.CSF file when you import a filter. Remember the SNIFFER.CSF file contains all of the active capture filters on your Sniffer system.
When you import a filter, follow the steps listed below. Don't forget to make a copy of the SNIFFER.CSF file before importing filters--this is so critical I mention it again.
Note. The following instructions work with Sniffer 4.5. If you have a newer version of Sniffer, check the Sniffer help files to see if these steps have been changed.
Close Sniffer.
Rename the NXSAMPLE.CSF file to NXSAMPLE-BACKUP.CSF.
Download my sample filter set from under the heading "Laura's Sniffer Filter Set" in the References section at http://www.packet-level.com/. The file is called LAURA[date].CSF, where [date] indicates the date that I created the file. As I update this file, the [date] section may change.
Copy the LAURA[date].CSF file to your NAI\Sniffer\Program directory. Rename the file NXSAMPLE.CSF.
Launch Sniffer.
Select Capture > Define Filter.
Click Profiles.
Click New.
Name your profile Night Crew Filter.
Click the button for Copy Sample Profile. (You are now opening the sample filter set.)
Locate and select the Night Crew Filter profile. Click OK. Now you've imported the filter you wanted. It's time to restore your standard Sample Filter file (NXSAMPLE.CSF).
Close Sniffer.
Rename the current NXSAMPLE.CSF file on your system to LAURAS-NXSAMPLE.CSF.
Rename the NXSAMPLE-BACKUP.CSF file to NXSAMPLE.CSF.
Launch Sniffer and check to ensure that the original default profile list appears now.
Exporting and Importing EtherPeek Filters
EtherPeek handles importing and exporting filter differently than Sniffer handles these tasks. In fact, EtherPeek actually has an import button and export button. What would be even better is if you could import or export a single filter--but that option is not available at this time.
To export your filter set, click the Export Filter button from the Filter window. It's that simple.
To import my sample filter set, complete the following steps:
Download the EtherPeek filter set from under the heading "Laura's EtherPeek Filter Set" in the References section at http://www.packet-level.com/. The file is called LAURA[date].FLT where [date] indicates the date that I created the file. As I update this file, the [date] section may change.
From the Filter window, click the Import Filter button.
Select the LAURA[date].FLT file.
As mentioned earlier, EtherPeek requires that you import an entire filter set--the imported filters are added to the existing filter list. The newer versions of EtherPeek check for duplicates before importing filters.
CONCLUSION
By building a set of protocol filters, you can analyze the traffic traversing your network. You can then troubleshoot problems on the network, ensure that the network is secure, and determine how you can make the network run more efficiently.
Laura Chappell performs onsite network analysis sessions for troubleshooting, optimization, and security checks. She also teaches hands-on courses on protocol analysis. For more information about how Laura Chappell can help your company's network run more efficiently and more securely, visit http://www.packet-level.com/.
* Originally published in Novell Connection Magazine
Disclaimer
The origin of this information may be internal or external to Novell. While Novell makes all reasonable efforts to verify this information, Novell does not make explicit or implied claims to its validity.