Upgrading Clients to GroupWise 6 in a NetWare Environment
Articles and Tips: article
Danita Zanrè
01 Dec 2001
Editor's Note. This article is based on a section of the authors' GroupWise 6 Upgrade Guide, which is published by Caledonia Network Consulting. This book is available at http://www.caledonia.net/.
So, you're planning to upgrade your company's GroupWise 6 clients. You can configure the upgrade process so that users upgrade their own GroupWise client, whether or not they have a drive letter mapped to the GroupWise server. If you are upgrading to NetWare 6 and plan to use native file access, this solution should be music to your ears.
The GroupWise client uses the Auto-update Algorithm to determine if it should upgrade itself to a newer version. By using the Auto-update Algorithm to your benefit, you can automate the process of upgrading the GroupWise client, with little or no interaction required by users. You should understand how this algorithm works before you proceed with the upgrade process.
This article explains the Auto-update Algorithm and three methods of upgrading GroupWise clients to GroupWise 6:
Upgrade all users belonging to a GroupWise post office. The users must have a drive mapped to and rights to the GroupWise <Software Distribution Directory (SDD)>\CLIENT folder. This method is the default for upgrading GroupWise clients.
Use the SETUPIP utility to upgrade all users belonging to a particular GroupWise post office. This method does not require users to have a drive mapped to the SDD.
Upgrade the GroupWise client by distributing the SETUPIP utility through an e-mail message. This method is particularly helpful if your company has remote GroupWise users.
UNDERSTANDING THE AUTO-UPDATE ALGORITHM
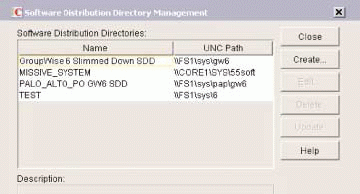
The SDD holds the GroupWise software after it has been installed from the GroupWise CD. In GroupWise 6, SDDs are defined in ConsoleOne under Tools|GroupWise System Operations|Software Directory Management. (See Figure 1.)
Each SDD has an associated value called a bump number. The bump number starts at 0 and can be incremented to 1, then 2, then 3, and so on. Controlling the bump number is essential to controlling the GroupWise client upgrade process. (Incrementing this number is discussed in more depth later in this article.)
Every GroupWise post office should have an associated SDD. In fact, when you create a GroupWise post office, you are required to associate an SDD with that post office.
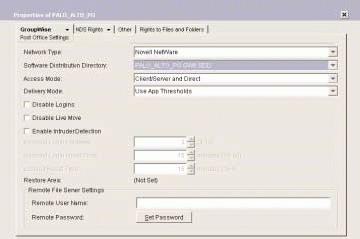
Although you can associate one SDD with several post offices, creating one SDD for each post office is the best practice for upgrade purposes. The GroupWise client primarily uses the SDD to determine if it should upgrade itself to a newer version of GroupWise. To see or change the SDD associated with a GroupWise post office, you view the post office's properties in ConsoleOne and then select the Post Office Settings property page from the GroupWise tab. (See Figure 2.)
The GroupWise 32-bit client should be located in the <SDD>\CLIENT folder. If you are using the SDD to distribute GroupWise client software, you must grant users Read and File Scan rights to the <SDD>\CLIENT folder and its subfolders. Users should not have rights to any other part of the SDD. If you are using ZENworks for Desktops or another desktop management solution or if you are using the SETUPIP utility to upgrade GroupWise clients, users do not need rights to the SDD.
The <SDD>\CLIENT folder contains two files that are essential to the GroupWise upgrade and Auto-update Algorithm: SETUP.CFG and SOFTWARE.INF. In addition, the WPDOMAIN.DB and the WPHOST.DB files contain the bump number.
The SETUP.CFG File
The SETUP.CFG file is a template that allows you to customize the way that the GroupWise client is installed on a user's workstation. For example, "The Contents of the SETUP.CFG File" shows the SETUP.CFG file for Missive Corp., a fictitious company. This SETUP.CFG file has been modified from the default SETUP.CFG file.
The [AutoUpdate] section of the SETUP.CFG file contains important settings for the Auto-update Algorithm. For example, the Enabled value must be set to Yes for the automatic update to occur.
The SOFTWARE.INF File
The SOFTWARE.INF file is a small ASCII file. In fact, the entire contents of the SOFTWARE.INF file from the GroupWise 6 SDD are listed below.
[General]
BuildNumber=2024
The BuildNumber is the version number in development terms. Novell releases GroupWise software in versions such as 5.5, 5.5.2, or 6.0.0. However, the BuildNumber 2017 is the development team's original shipping version of the GroupWise 6 client. The BuildNumber of the GroupWise 6 Support Pack 1 client is 2024.
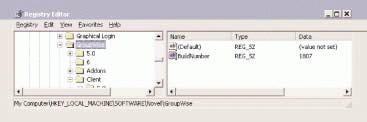
When the GroupWise client is installed, the BuildNumber of the GroupWise client is stored in the Windows registry. The BuildNumber string value is kept in the following location:
HKEY_LOCAL_MACHINE\SOFTWARE\Novell\GroupWise
Figure 3 shows a screen shot of the Windows registry. (I'm sorry to expose you to the Windows registry. I know it gives some people the creeps!)
The Significance of the Bump Number
Each time the GroupWise client loads, it asks for the bump number associated with the SDD for the user's post office. This bump number is obtained from the WPHOST.DB file. When the GroupWise client loads and contacts the Post Office Agent (POA), the conversation goes something like this:
CLIENT: Hi, POA, at IP address 192.168.100.237, port 1677. I need a client-server session with you. Here are my authentication credentials.
POA: Here's a client-server session, and here's the port we will speak at.
CLIENT: Hey, POA, before I completely load this client's user interface, what is the bump number for the SDD associated with my post office?
POA: It's 5.
CLIENT: Okay, the last time I installed the GroupWise client, the bump number was 4. (This number is stored in the Windows registry at the following location: HKEY_LOCAL_MACHINE\SOFTWARE\Novell\GroupWise\Client\5.0.) The value is called "NewSoftwareBump."
In this example, the bump number for the SDD is different from the bump number stored in the Windows registry. Thus, the GroupWise client must look further to see if the client must be upgraded.
CLIENT: Hey, POA, what's the location of my SDD.
POA: It's in the DENVER\MAIL:DENPO\GW6 folder.
CLIENT: Ok, let me look at the SOFTWARE.INF file in the DENVER\MAIL:DENPO\GW6\CLIENT folder. The BuildNumber in the <SDD>\CLIENT\SOFTWARE.INF file is 2024, and the BuildNumber in the Windows registry on my computer is 1807. It might be time to upgrade. Let me check the SETUP.CFG file in the <SDD>\CLIENT\WIN32 folder to see if the [AutoUpdate] section includes the Enabled=Yes line. Yes, the line is there. It's upgrade time!
To summarize, if the bump number for the SDD associated with a post office is different (not higher per se, just different) from the bump number in the Windows registry, the GroupWise client compares the BuildNumber in the SOFTWARE.INF file with the BuildNumber in the Windows registry: If the BuildNumber in the SOFTWARE.INF file is greater than the BuildNumber in the Windows registry, the GroupWise client checks the SETUP.CFG file. If the [AutoUpdate] section in the SETUP.CFG file contains Enabled=Yes, the GroupWise client attempts to upgrade itself by using one of the methods described in the remainder of this article.
UPGRADING USERS WHO HAVE A DRIVE MAPPED TO THE SDD
As the GroupWise administrator, you can configure what users see during the GroupWise client upgrade and exactly what will be installed. Before you begin the upgrade process, you should list the requirements of this process. For example, Missive Corp. might have listed the following requirements for its upgrade process:
Users will be forced to update their GroupWise client.
Users will not be prompted to answer questions regarding which components should be installed.
GroupWise Document Management integration will not be enabled by default.
GroupWise Notify will not be put in the Windows startup folder.
GroupWise Tips will be enabled.
The Mail To functionality from the user's browser will be implemented.
The client version of GWCHECK will be installed.
The default language will be English. Users will not be prompted to specify a language.
Using these requirements, we have outlined the process for upgrading a post office at Missive Corp. After reading this section, you can modify the process to meet the needs of your company.
Create a GroupWise 6 SDD. This SDD has to contain only the following: a complete copy of the CLIENT folder and its subfolders from a GroupWise 6 SDD. For example, you could create a GW6 folder under the post office directory and then copy the <GroupWise 6 SDD>\CLIENT folder to the <post office>\GW6 directory. You can copy the SDD to another location on the GroupWise server. However, there is no harm in creating the SDD in the post office folder, as long as users have rights to this location but no rights to other folders or files in the post office directory structure.
Copy the SETUP.CFG file from the <post office>\GW6\CLIENT folder to the <post office>\GW6\CLIENT\WIN32 folder. When installed, this file defaults to a read-only file. You must change this attribute. Using Windows Explorer, you can remove the read-only attribute by changing the properties of the file and unchecking the read-only attribute.
You can then satisfy Missive Corp.'s first seven requirements by editing the SETUP.CFG file as follows:
Section in FileChange[AutoUpdate]
ForceUpdate=Yes
[ShowDialogs]
HideAllDialogs=Yes
[IntegrationApps]
All apps have a value of No
[Startup]
Notify=No
[GWTIP]
Default=Yes Workstation=Yes
[GWMAILTO]
Default=Yes Workstation=Yes
[GWCHECK]
InstallGWCheck=Yes GWCheckEnabled=Yes
[Languages]
Default=English English=Yes
After you modify the SETUP.CFG file, you must edit the SETUP.INI file. This file is located in the <post office>\GW6\CLIENT\WIN32 folder. This file lets you control whether or not users will be prompted to specify a language. At Missive Corp., all users will use English, so they should not be prompted to specify a language. In this file, you change EnableLangDlg=Y to EnableLangDlg=N.
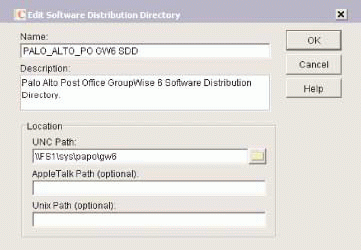
Launch ConsoleOne, and define the newly created SDD. Select Tools|GroupWise System Operations|Software Directory Management. Click the Create button, and type a name for the SDD, such as PALO_ALTO_PO GW6 SDD. (See Figure 4.) Warning. Completing the next steps will cause GroupWise clients to upgrade the next time users log in to GroupWise.
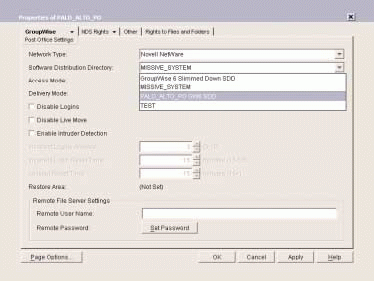
Assign the new GroupWise 6 SDD to the post office. To do this, edit the properties of the post office, and select the Post Office Settings property page from the GroupWise tab. In the Software Distribution Directory field, select the appropriate SDD for this post office. (See Figure 5.)
Step 5 may be enough to initiate the auto-update process, but there is a chance it won't be. If the original GroupWise 5.x SDD for the post office you are upgrading had the same bump number as the GroupWise 6 SDD you just created, then the GroupWise client will not detect a change in the bump number.
A change in the bump number is the first part of the Auto-update Algorithm, so the bump number must be changed before the GroupWise client can discover the new version it should upgrade to. You should identify the bump number of the GroupWise 5.x and GroupWise 6 SDD to determine if you need to increment the GroupWise 6 SDD to initiate the upgrade process. To do so, you complete the following steps:
a. On the computer that is running ConsoleOne, exit ConsoleOne.
b. Create a GWSUPP.FIL file at the root of the C: drive. This file does not have to contain anything special; it can be an ASCII file that contains any characters. Just make sure the file is named GWSUPP.FIL.
c. Launch ConsoleOne, and select GroupWise Diagnostics from the Tools menu.
d. Select Tools|GroupWise System Operations|Software Directory Management, and complete the description field of the GroupWise 5.x SDD that is currently assigned to the post office. Repeat this step for the GroupWise 6 SDD that you are preparing for the post office. You can then determine which SDD is for GroupWise 5.x and which SDD is for GroupWise 6. (You need to know this in Step 6e.)
e. Select Tools|GroupWise Diagnostics|General Edit. In the drop-down list, select Areas by ID. Find the GroupWise 5.x SDD that was originally defined for the post office you are upgrading.
f. Compare the software version number (which is really the bump number) of the GroupWise 5.x and GroupWise 6 SDDs. Are the two numbers different? If the two numbers are the same, the GroupWise client will not know that it needs to upgrade. If the two numbers are different and even if the GroupWise 6 SDD's software version is lower, the GroupWise client will detect the change in the bump number. This change is factored into the Auto-update Algorithm.
g. If you need to increment the software version of the GroupWise 6 SDD (that is, if the GroupWise 5.x SDD and the GroupWise 6 SDD have the same software version number), select Tools|GroupWise System Operations|Software Directory Management, and highlight the GroupWise 6 SDD. Select the Update button, and then check the Force Auto-update Check by GroupWise Components option. Click the OK button. This action will increment the software version/bump number by 1.
The next time users try to log in to GroupWise, their client will detect a change in the GroupWise client, which will begin the client upgrade process.
USING THE SETUPIP UTILITY TO UPGRADE THE GROUPWISE CLIENT
The SETUPIP utility that ships with GroupWise 6 has a problem with the WRITEIP.DAT file. Support Pack 1 for GroupWise 6 corrects this problem. You should apply this support pack before you use the SETUPIP utility. (You can download this support pack from http://support.novell.com/.)
Using the SETUPIP utility, users can upgrade the GroupWise client without having a drive letter mapped to the file server. This solution is particularly useful in the following circumstances:
You have post offices with users spread throughout your company's Novell eDirectory tree.
Users do not have easy file access to an SDD.
Some GroupWise users do not have eDirectory accounts.
You are implementing NetWare 6 with native file access (which means users will not use a Novell client).
You can use this upgrade method in conjunction with the mapped drive method. For example, if a user has rights to the post office's SDD, the GroupWise client performs the upgrade using the SETUP.EXE file from the <SDD>\CLIENT\WIN32 directory. If a user does not have rights to the SDD, the GroupWise client performs the upgrade using the SETUPIP.EXE file via an IP connection to the POA and a web server. The architectural concepts behind the SETUPIP upgrade method are outlined below.
When a GroupWise client detects that the bump number for the user's post office is different from the bump number in the Windows registry, this client tries to find the SOFTWARE.INF file and a SETUP routine such as the SETUP.EXE file in the <SDD>\CLIENT\WIN32 folder. If the GroupWise client finds that it does not have a drive mapped to the SDD for the post office, this client asks the POA for help locating the SOFTWARE.INF file.
The POA sends the GWIPUPDT.DLL file from the <SDD>\CLIENT directory. After receiving the GWIPUPDT.DLL file, the GroupWise client requests that the POA retrieve the SOFTWARE.INF file from the <SDD>\CLIENT directory.
The GroupWise client then compares the BuildNumber in the SOFTWARE.INF file to the BuildNumber in the Windows registry. If the BuildNumber in the SOFTWARE.INF file is greater than the BuildNumber in the Windows registry, the GroupWise client requests that the POA retrieve the SETUP.CFG file from the <SDD>\CLIENT\WIN32 directory. The GroupWise client then looks for the following lines in the SETUP.CFG file:
[AutoUpdate] Enabled=Yes SetupIPEnabled=Yes
Both of these lines must be set to Yes before the GroupWise client can use the SETUPIP upgrade method. If SetupIPEnabled is set to Yes, the GroupWise client requests that the POA retrieve the SETUPIP.EXE file from the <SDD>\CLIENT\WIN32 directory. The GroupWise client then runs the SETUPIP utility which you have preconfigured to pull the GroupWise client from a web server.
Configuring the Web Server
This section explains how to configure a web server to enable GroupWise clients to use the SETUPIP utility upgrade method. These instructions assume you are using a Netscape Enterprise web server on a NetWare 5.1 server. If you are using a different web server, you may need to complete additional steps. For example, the Microsoft Windows IIS server may not allow users to download files by default. You may need to grant users this right.
Configure the Netscape Enterprise web server to support downloads from a directory with approximately 2,500 files. To do this, add the following line to the MAGNUS.CONF file, which is located in the SYS:\NOVONYX\SUITESPOT\HTTP- <web server name>\CONFIG directory: MaximumFilesReturnedInIndex 2500 Note. If you have already specified a higher value for this setting, that's fine.
Restart the web server for this setting to take effect.
On the Netscape Enterprise web server, create the GWCLIENT folder under the SYS:NOVONYX\SUITESPOT\DOCS directory.
Locate the GroupWise 6 SDD, and complete the following steps:
a. Copy the SOFTWARE.INF file from the GroupWise 6 SDD to the SYS:NOVONYX\SUITESPOT\DOCS\GWCLIENT directory.
b. Copy the OFVIEWS folder and its contents from the <SDD>/CLIENT folder to the SYS:NOVONYX\SUITESPOT\DOCS\GWCLIENT directory.
c. Copy the <SDD>\CLIENT\WIN32 folder and its contents to the SYS:NOVONYX\SUITESPOT\DOCS\GWCLIENT directory.
From the master GroupWise 6 SDD, copy the SETUP.CFG file from the CLIENT folder to the SYS:NOVONYX\SUITESPOT\DOCS\GWCLIENT\WIN32 directory.
Modify the SETUP.CFG file so that it matches the installation criteria for your GroupWise system. Make sure that the [AutoUpdate] section includes the following lines: Enabled=Yes SetupIPEnabled=Yes
Note. Make sure the SETUP.INI file in the SYS:NOVONYX\SUITESPOT\DOCS\GWCLIENT\WIN32 directory has the EnableLangDlg equal to N.
Configuring the Post Office SDD to Support the SETUPIP Utility
The POA that services a post office should be able to access the SDD associated with that post office. (This is not the SDD on the web server.) The POA retrieves certain files from the SDD on behalf of the client. You will either want to put the GroupWise SDD for this post office on the same server on which the POA is located, or you must enable the following switches for the POA:
/user-<eDirectory login name>
/password-<password>
The server that holds the SDD must have a read-write or master replica of the partition that contains the Organizational Unit (OU) object in which the user in the /user-<eDirectory login name> resides.
You can then configure the post office SDD to support the SETUPIP utility by completing the following steps:
Completely configure the GroupWise 6 SDD for this post office as explained in the "Upgrading Users Who Have a Drive Mapped to the SDD" section. Complete all of the steps, except that you should not increment the bump number at this time.
Modify the SETUP.CFG file in the SDD\CLIENT\WIN32 folder for the SDD associated with the post office to be upgraded. Make sure that the [AutoUpdate] section includes the following lines: Enabled=Yes SetupIPEnabled=Yes
Access the ADMIN\UTILITY\SETUPIP folder in the Master GroupWise 6 SDD. Run the WRITEIP.EXE utility. Fill in the Domain Naming System (DNS) name or the IP address of the web server with the appropriate location of the GroupWise 6 SDD on the web server, such as www.missive.com/gwclient.
When you click the OK button, the WRITEIP.EXE utility compiles a new SETUPIP.EXE file. This file contains the information that you just entered.
Copy the SETUPIP.EXE file to the GroupWise 6 <SDD>\CLIENT\WIN32 directory associated with this post office. (This is not the SDD on the Netscape Enterprise web server.)
Everything is in place for an upgrade of the GroupWise client via the SETUPIP utility. You can now increment the bump number for the post office you want to upgrade. Read the "Upgrading Users Who Have a Drive Mapped to the SDD" section, and increment the bump number as needed.
The next time users who have file system rights to the SDD log in to GroupWise, the GroupWise client will launch the SETUP.EXE process to upgrade itself. If users do not have file system rights to the SDD, the GroupWise client will launch the SETUPIP utility to perform the upgrade from the web server.
UPGRADING REMOTE GROUPWISE USERS WITH THE SETUPIP UTILITY
What if GroupWise remote users access the post office through GroupWise remote 100 percent of the time? How do you upgrade these users' GroupWise clients? The GroupWise remote client is not designed to query the POA for the bump number of the post office. As a result, the Auto-update Algorithm is never initiated, and the GroupWise remote client is oblivious to upgrades to the GroupWise client.
With the SETUPIP utility, upgrading GroupWise remote users can be much easier than shipping every user a CD. You send users the SETUPIP utility that you configure by completing the following steps:
Follow the instructions in the "Using the SETUPIP Utility to Upgrade the GroupWise Client" section.
E-mail the SETUPIP.EXE utility you generated to remote GroupWise users. In the e-mail message, instruct users to connect to the Internet, right-click SETUPIP.EXE, and select Open.
The SETUPIP utility will download the GroupWise client. The bad news is the download is approximately 50 MB. The good news is that if the user exits the SETUPIP utility prematurely and relaunches it, the download continues where it left off before the user exited.
CONCLUSION
Upgrading the GroupWise client is generally a painless process, thanks to Novell's Auto-update Algorithm. You can customize the upgrade process to meet the needs of your company, and the upgrade requires little or no intervention from users.
A Master CNE, Tay Kratzer has supported GroupWise for eight years. Tay writes for Novell's Cool Solutions and authored Novell's GroupWise 6 Administrator's Guide, which will be published and available at http://www.caledonia.net/ in December 2001. Tay is also the winner of the Software Support Professionals Association's year 2000 "Outstanding SuperStar" award.
Danita Zanrè has been using GroupWise since 1989, when its predecessor was known as WordPerfect Office 2.0. She is experienced in all aspects of GroupWise, from design and installation to training administrators and users. Danita is one of the primary consultants responsible for the day-to-day operations of Caledonia Network Consulting and is the coauthor of the GroupWise 5.2 Administrator's Guide and GroupWise 5.5 Administrator's Guide. (For more information about these books, visit http://www.caledonia.net/.) Danita is also a sysop on the Novell Support Connection (http://support.novell.com/).
The Contents of the SETUP.CFG File
[GroupWiseSetup]
Version=6
StandardInstall=Yes
Path=C:\Novell\GroupWise
Folder=GroupWise
[ShowDialogs]
HideAllDialogs=Yes
Welcome=No
SetupOptions=No
DestinationDirectory=No
SelectOptionalComponents=No
SelectProgramFolder=No
SelectStartUpFolderSoftware=No
LanguageSelection=No
SoftwareIntegrations=No
StartCopyingFiles=Yes
SetupComplete=Yes
[AutoUpdate]
Enabled=Yes
SetupIPEnabled=No
ForceUpdate=Yes
PromptUntilUpdated=Yes
[Startup]
Notify=No
[GWTIP]
Default=Yes
Hide=No
Workstation=Yes
[GWMAILTO]
Default=Yes
Hide=No
Workstation=Yes
[GWCHECK]
InstallGWCheck=Yes
GWCheckEnabled=Yes
[IntegrationApps]
Lotus WordPro=No
Microsoft Binder 97=No
Microsoft Excel 7.0=No
Microsoft Excel 97=No
Microsoft Excel 2000=No
Microsoft PowerPoint 97=No
Microsoft PowerPoint 2000=No
Microsoft Word 7.0=No
Microsoft Word 97=No
Microsoft Word 2000=No
Corel Presentations 7.0/8.0/9.0=No
Corel Quattro Pro 7.0/8.0=No
Corel Quattro Pro 9.0=No
Corel WordPerfect 7.0=No
Corel WordPerfect 8.0=No
Corel WordPerfect 9.0=No
[Languages]
Default=English
Arabic=No
ChineseSimplified=No
Chinese=No
Czech=No
BrazilianPortugese=No
Danish=No
Dutch=No
English=Yes
Finnish=No
French=No
German=No
Hebrew=No
Hungarian=No
Italian=No
Japanese=No
Korean=No
Norwegian=No
Polish=No
Russian=No
Spanish=No
Swedish=No
Thai=No
Turkish=No
* Originally published in Novell Connection Magazine
Disclaimer
The origin of this information may be internal or external to Novell. While Novell makes all reasonable efforts to verify this information, Novell does not make explicit or implied claims to its validity.