Installing and Configuring ZENworks for Servers
Articles and Tips: article
01 Apr 2000
If you spend too many nights and weekends upgrading servers, installing server-based software, and otherwise managing servers, Novell's ZENworks for Servers (ZFS) 1.0 can automate these tasks for you. Using ZFS' server policies, you can manage the configuration and behaviors of servers across your company's network. Using ZFS' Tiered Electronic Distribution (TED) and server software packages, you can distribute software, files, directory structures, and more to your company's servers. Best of all, with ZFS, you do not have to leave your desk to manage your company's NetWare 5 and 4 servers: You can schedule management tasks to take place automatically.
The last issue of NetWare Connection explained each of the ZFS features. (See "ZENworks for Servers: Managing Servers Through Policies," Mar. 2000, pp. 38-43. You can download this article from http://www.nwconnection.com/past.) This article explains how to install and configure ZFS.
PREPARING TO INSTALL ZFS
You can install ZFS on any NetWare 5 or 4 server. The server must have a minimum of a 200 MHz Pentium processor, 135 MB of free disk space, and 128 MB of RAM. For large TED deployments, Novell recommends that the server have a minimum of 256 MB of RAM.
Before you can install the ZFS components on a NetWare 5.0 or 4.11 server, you must first install the latest support packs for these operating systems. (NetWare 5.1 and 4.2 servers do not require support packs.) For your convenience, Novell has included these support packs in the TOOLS subdirectory on the ZFS CD: The NW5SP4_BLDC23.ZIP file contains NetWare 5.0 Support Pack 4, and the NW4SP8_BLD127.ZIP file contains NetWare 4.11 Support Pack 8.
ZFS also requires NetWare 5 and 4 servers to run the Novell Java Virtual Machine (JVM) and the Novell Java class libraries that are included with ZFS. The ZFS Express installation option automatically installs both the JVM and the libraries. If you use the Custom installation option, the box to install these components is checked automatically.
If you are installing ZFS on a NetWare 4.11 server, you must also complete the following steps:
You must install the Winsock that is included with NetWare 4 Support Pack 8a for NetWare IP and the HTTP stack.
You must load the IP stack.
You must enable long name space support to install the JVM.
INSTALLING ZFS
Before you begin the installation process, you must unload the JVM on the servers on which you will install ZFS. To unload the JVM, you type JVM -EXIT at the server console.
From a workstation, you log in as the ADMIN user (or a user with equivalent rights) to the Novell Directory Services (NDS) tree in which you will install ZFS. After you are authenticated to the NDS tree, insert the ZFS CD into the workstation's CD-ROM drive. The autorun program should automatically launch the installation program. (If not, you can manually start the installation program by running WINSETUP.EXE from the root of the CD. You then select Install ZENworks for Servers.)
The installation process is very straightforward. After the installation begins, the installation wizard walks you through the process. After you read and accept the license agreement, choose the type of installation you want to perform: Express or Custom.
Express Installation
The Express installation option enables you to quickly install ZFS on a small number of servers. This option automatically installs all of the ZFS components--server policies, TED, and server software packages--to the servers that you specify. If you later want to install additional components on specific servers, you can rerun the installation and select the Custom installation option.
To install ZFS using the Express installation option, you complete the following steps:
Select the NDS tree on which you want to install ZFS. Because you chose the Express installation option, the installation program automatically extends the schema of the NDS tree to include new objects and properties for server policies, TED, and server software packages.
Select the servers on which you want to install policy packages. (To make it easier to manage servers, ZFS groups server policies into policy packages.) The installation program will install the policy packages and server manager software to the servers you select. Each server on which you will administer server policies must have this server manager software. The installation program will also copy .NCF files used by ZFS to the SYS:\SMANAGER directory on the servers you select.
Select the servers on which you want to distribute software packages. The installation program will copy the TED distributor components to the servers you select. The installation program will also copy the subscriber components to these servers and the servers chosen in step 2. In addition, the installation program will copy the .NCF files required to support TED to the SYS:\TED directory of these servers.
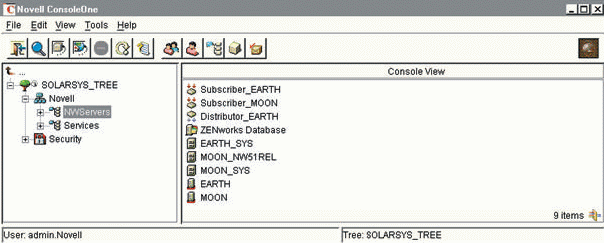
The installation program will automatically create NDS objects in the NDS tree for the TED components installed on each server. When the installation program creates these objects, it uses the following naming convention: component_SERVERNAME. For example, the installation program named the Distributor object for the EARTH server Distributor_EARTH. (See Figure 1.)
Figure 1: The installation program creates NDS objects for TED components.
The installation program will also install ConsoleOne 1.2c and the related ZFS snap-in modules on the servers that you select in this step and step 2. To access ConsoleOne 1.2c on one of these servers, create a shortcut on your workstation to SYS:\PUBLIC\MGMT\CONSOLEONE\1.2\BIN\CONSOLEONE.EXE.
Note: Note. If you want to install ConsoleOne 1.2c on a workstation, the Custom installation option allows you to do so.
Select the server on which you want to install the ZENworks database. ZFS uses this SYBASE database for logging and reporting ZFS' activity. The installation program will install the database on the server or servers you select and will edit each server's AUTOEXEC.NCF file to automatically run the database at startup. You run the database through the MGMTDBS.NCF file, which the installation program copies to the SYS:\ZENWORKS\DATABASE directory.
ZFS uses the same database that ZENworks for Workstations uses. Each server can contain only one ZENworks database. If a server already holds a ZENworks for Workstations database, ZFS extends that database's schema to include ZFS' tables.
Now select the volume on which you want to install the ZENworks database. Since the ZENworks database continually logs information about the success and failure of policy enforcement and software distribution, the database can grow rapidly and use large amounts of disk space. As a result, Novell recommends that you install the database on a volume other than the SYS: volume.
If you select the SYS: volume, the installation process will continue normally. However, an error screen will appear, recommending that you select another volume. If you do not have another volume, you can ignore this message.
Review current settings. The final installation screen summarizes the selections you have made. If the selections are correct, click Next, and the file copy begins. When the file copy is completed, view the installation error log to ensure that the installation program installed each component successfully.
Custom Installation
You should use the Custom installation option if you want to install only some of the ZFS components (such as only the server policies) or if you want to install ZFS on a large number of servers. You can also use this option to update your ZFS configuration, such as adding server policies or TED components to additional servers in the NDS tree.
To install ZFS using the Custom installation option, you complete the following steps:
Select the NDS tree that contains the servers on which you want to install ZFS. The installation program will extend the schema of this NDS tree to support the ZFS components you select.
You can choose only one NDS tree. If you want to install ZFS on servers in multiple NDS trees, you must rerun the installation program for each tree.
Select the ZFS components you want to install. (See Figure 2.) These components are described below.
Figure 2: Using the Custom installation option, you can choose which components to install.
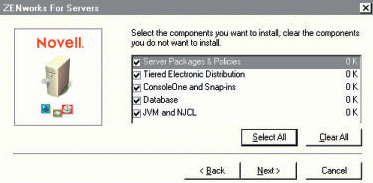
Server Packages and Policies. Select this component if you want to create server software packages to distribute through TED and if you want to use server policies to remotely manage server configuration and behavior.
Tiered Electronic Distribution. Select this component to perform server-to-server distribution of software, files, and directories and to distribute server software packages.
ConsoleOne and Snap-ins. Select this component to install ConsoleOne 1.2c and the snap-in modules required to manage ZFS. This version of ConsoleOne is customized for ZFS, so you must install it on at least one server.
Database. Select this component if you want ZFS to log and report activity in a SYBASE database. ZFS uses the same database that ZENworks for Workstations uses. If a ZENworks for Workstations database already exists, ZFS extends that database to include ZFS' tables.
JVM and NJCL. Select this component to update the JVM and Novell Java class libraries to the versions required by ZFS.
Note: Note. The following steps assume that you are installing all ZFS components. If you do not select a component, the screens related to that component will not appear.
Select schema extensions and program files. You should install schema extensions if this is the first time you have run the installation program on the NDS tree. The installation program extends the schema of the NDS tree to include new objects and properties for server policies, TED, and server software packages. The installation program will also create the Database object if one does not exist.
You should install program files if you want to add ZFS components (such as server policies or distributor, proxy, and subscriber agents) to servers in the NDS tree.
Select the servers on which you want to install the policy packages. The installation program will install policy packages and server manager software on the servers you select. Each server on which you will administer server policies must have this server manager software.
The installation program will also create the ZFS.NCF file in the SYS:\SMANAGER directory on each server. This file loads the server manager software on each server. To ensure that the server manager software loads automatically when you reboot the server, the installation program will modify the server's AUTOEXEC.NCF file to load the ZFS.NCF file.
Select the servers that you want to distribute software to other servers. The installation program will copy the distributor components to the servers you select. The installation program will also create the DIST.NCF file in the SYS:\TED directory of each server. This file loads the distributor agent on each server. To ensure that the distributor agent is loaded automatically when the server reboots, the installation program will modify the server's AUTOEXEC.NCF file to load the DIST.NCF file. (A distributor agent can handle up to 40 subscriber and/or proxy servers.)
In addition, the installation program will create objects in the NDS tree to represent the distributor agents installed on each server. When the installation program creates these objects, it uses the following naming convention: component_SERVERNAME. For example, the installation program named the Distributor object for the EARTH server Distributor_EARTH. (See Figure 1.)
Select the servers you want to function as proxies. Proxies ensure that distributions cross WAN links only once, rather than one time for each subscriber server. The installation program will copy the TED proxy components to the servers you select and create the PROXY.NCF file in the SYS:\TED directory of each server. This file loads the TED proxy agent on a server. To ensure that the proxy agent is loaded automatically when you reboot a server, the installation program will modify the server's AUTOEXEC.NCF file to load the PROXY.NCF file. The installation program will also create NDS objects in the NDS tree to represent the proxy agents installed on each server.
Select the servers you want to function as subscriber servers. Subscriber servers receive content distributed across the network by distributor servers. The installation program will copy the TED subscriber components to the servers you select and will create the SUB.NCF file in the SYS:\TED directory on each server. This file loads the subscriber agent on the server. To ensure that the subscriber agent is loaded automatically when you reboot a server, the installation program will modify the server's AUTOEXEC.NCF file to load the SUB.NCF file. In addition, the installation program will create objects in the NDS tree to represent the subscriber agents installed on each server.
Select where ConsoleOne 1.2c should be installed. This option will install ConsoleOne 1.2c, which is customized for ZFS. You can install ConsoleOne 1.2c on servers in the NDS tree or on your workstation. Novell recommends that you choose the workstation because ConsoleOne 1.2c will run faster from there than from a server. (ConsoleOne 1.2c requires 46 MB of available disk space on the workstation.)
Select the servers on which you want to install the JVM and the Novell Java class libraries. The installation program will update the JVM and Novell Java class libraries on these servers to the versions required by ZFS.
Select the server on which you want to install the database. The installation program will install the database to the server you select and will edit the server's AUTOEXEC.NCF file to automatically run the database at startup. You run the database through the MGMTDBS.NCF file, which the installation program will copy to the SYS:\ZENWORKS\DATABASE directory.
Select the volume on which you want to install the ZENworks database. Because the ZENworks database continually logs information about the success and failure of policy enforcement and software distribution, this database can grow rapidly and use large amounts of disk space. Novell recommends that you install the database on a volume other than the SYS: volume.
If you select the SYS: volume, the installation process will continue normally. However, an error screen will appear, recommending that you select another volume. If you do not have another volume to select, you can ignore this message.
Review the current settings. The final installation screen summarizes the selections you have made. If the selections are correct, click Next, and the file copy begins. When the file copy is completed, view the installation error log to ensure that the installation program installed each component successfully.
CONFIGURING ZFS
After you install ZFS, you use ConsoleOne 1.2c to configure the components. Before you run ConsoleOne 1.2c, however, you must ensure that your workstation meets the following requirements:
A Pentium 200 MHz computer with at least 128 MB of RAM and virtual memory enabled.
Novell Client 4.6 or later for Windows NT or Novell Client 3.1 or later for Windows 95/98 with the appropriate support packs installed. Novell has included the necessary client support packs in the TOOLS subdirectory on the ZFS CD. The NT46SP2.EXE file contains the support pack for Windows NT, and the 9531SP2.EXE file contains the support pack for Windows 95/98.
If you chose the Express installation option, the installation program copied ConsoleOne 1.2c to the SYS:\PUBLIC\MGMT\CONSOLEONE\1.2\BIN\CONSOLEONE.EXE directory of the servers on which you installed ZFS. If you chose the Custom installation option, the installation program copied ConsoleOne 1.2c to this directory on the servers you selected. To run ConsoleOne 1.2c from a server, use My Computer or Windows Explorer to browse the SYS:\PUBLIC\MGMT\CONSOLEONE\1.2\BIN directory and run CONSOLEONE.EXE.
If you installed ConsoleOne 1.2c on a workstation, the installation program created a ConsoleOne shortcut on the desktop. You can use this shortcut to run ConsoleOne 1.2c.
CONFIGURING SERVER POLICIES
As mentioned earlier, ZFS groups server policies into policy packages. Using ConsoleOne 1.2c, you can create three types of policy packages:
Container Package. This package holds the container search policy.
Server Package. This package contains generic policies that apply to all servers.
Service Location Package. This package contains policies that relate to Simple Network Management Protocol (SNMP) and database services.
Each policy package contains different policies. As a minimum, Novell recommends that you configure the following:
Search Policy. This policy enables you to limit unnecessary search traffic. A search policy directs servers that are running ZFS to search specific areas in the NDS tree for the policies that apply to them.
STMP Host Policy. This policy enables you to use the e-mail notification option in the Distributor, Subscriber, Proxy, or Policy Package objects. You can then specify who should be notified about ZFS events.
ZENworks Database Policy. ZFS requires this policy to enable logging in the ZFS database.
ZFS Policy. This policy lets you specify how information is purged from the ZENworks database. Because the database logs every ZFS success or failure, the database can grow rapidly. Enabling this policy prevents the database file from becoming too large.
Novell recommends that you create an Organizational Unit (OU) for storing server policies. If you access partitions across a WAN link, you should ensure that the Policy Package objects are in the same partition as the Server object. This ensures that the ZFS agents load.
Because server policies have a 64-character limit for the full name and path in the NDS tree, Novell recommends that you place the OU as high in the NDS tree as possible and that you give it a short name. You then have the maximum characters available for naming policies.
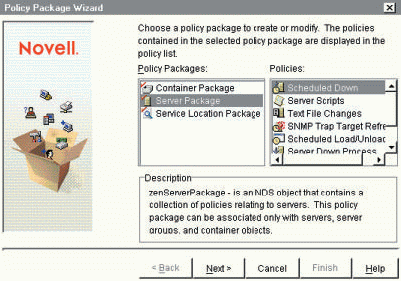
Creating a Policy Package Object
To create a Policy Package object, right-click the container object in which you want to create the object, select New, and then select Policy Package. The policy package wizard appears. (See Figure 3.) Select the type of Policy Package object you want to create, and give it a descriptive name.
Figure 3: The policy package wizard helps you configure policy packages for your servers.
To configure the Policy Package object, double-click the object to access its Properties page. You can then enable the desired policies by clicking the boxes next to the policies.
After you enable a policy, you can define it further by selecting the policy and clicking the Properties button. Properties vary from policy to policy, but you can define things such as the procedures for the policy, the schedule for the policy, and the NDS rights required.
After you create a Policy Package object and define its policies, you must associate that object with Server objects or Server Group objects. When you click OK to create the Policy Package object, a message appears, indicating that the object is not associated with any other objects in the NDS tree. You then have the option to create the associations at this time.
If you click Yes to create the associations, ConsoleOne 1.2c takes you directly to the Associations property of the Policy Package object. You then click the Add button to associate the Policy Package object with Server objects, Server Group objects, or container objects.
CONFIGURING TED
The first step in configuring TED is to create the main TED objects: Distributor, Proxy, and Subscriber objects. You can create these objects only through the ZFS installation program as described earlier in this article. The installation program also creates .NCF files that automatically load the distributor, subscriber, and proxy agents on the servers at startup.
After you create and load the TED objects, you must complete the following steps to configure these objects:
Step 1: Configure TED Objects
To configure Distributor, Proxy, and Subscriber objects, right-click the object in ConsoleOne 1.2c, and select Properties. Like most NDS objects, the TED objects contain both optional and mandatory properties. Typically, the mandatory properties contain default values that are sufficient for most systems and do not require changing. Rather than explain all of the properties of each object, the following sections identify the properties that you should configure or modify.
Configure a Distributor Object
You should configure the following properties for the Distributor object:
General Tab
The General tab contains two groups of properties: Information and Messages. You should configure the following Information properties:
Server. Define the server that will host the distributor agent.
Working Directory. Specify the working directory on the server that the distribution system will use. This directory contains archives, persistent status, and temporary working files. The default location is the SYS: volume. Because this directory can become extremely large, Novell recommends that you change the default working directory to a location that has adequate disk space.
You should configure the following Messages properties:
Server Console, Remote Console, SNMP Trap, and Log File. Define the types of messages you want the distributor server to display (such as errors, warnings, or successes).
Log File. Specify if you want a log file of messages created. Then specify the log file's name and full Universal Naming Convention (UNC) path.
E-mail Messages. If you want the distributor server to send messages via e-mail, you can specify the User or Group objects you want to receive these messages. You can also enter e-mail addresses of the people you want to receive the messages.
Schedules Tab and Proxies Tab
You should configure the following Schedules and Proxies properties:
Schedule Type. Define when the distributor server is available to perform distributions (such as always, daily, monthly, or yearly).
Proxy Name. If proxy servers will be assigned to this distributor server, add the proxy servers to the distributor server's proxy list.
Configure a Proxy Object
You should configure the following properties for a Proxy object:
General Tab
Like the Distributor object's General tab, this tab contains two groups of properties: Information and Messages. You should configure the following Information properties:
Server. Specify the server that will host the proxy agent.
Working Directory. Define the working directory on the server that the proxy agent will use.
You should configure the following Messages properties:
Server Console, Remote Console, SNMP Trap, and Log File. Define the types of messages that you want the proxy server to display (such as errors, warnings, or successes).
Log File. Specify if you want a log file of messages created. Then specify the log file's name and full UNC path.
E-mail Messages. If you want the proxy server to send messages via e-mail, specify the User or Group objects you want to receive these messages. You can also enter the e-mail addresses of the people you want to receive the messages.
Schedules Tab and Proxies Tab
You should configure the following Schedules and Proxies properties:
Schedule Type. Define when the proxy server is available to send and receive distributions (such as always, daily, monthly, or yearly).
Proxy Name. If you will be using multiple tiers of proxy servers, define the next tier of proxies to be used by this proxy server.
Configure a Subscriber Object
You should configure the following properties for a Subscriber object:
General Tab
The General tab of the Subscriber object also contains two groups of properties: Information and Messages. You should configure the following Information properties:
Server. Specify the server that will host the subscriber agent.
Working Directory. Define the working directory on the host server that the subscriber agent will use.
You should configure the following Messages properties:
Server Console, Remote Console, SNMP Trap, and Log File. Define the types of messages you want the subscriber server to display (such as errors, warnings, successes, and so on).
Log File. Specify if you want a log file of messages created. Then specify the log file's name and full UNC path.
E-mail Messages. If you want the subscriber server to send messages via e-mail, specify the User or Group objects you want to receive these messages. You can enter e-mail addresses for the people you want to receive the messages.
Schedules Tab
You should configure the following Schedules property:
Schedule Type. Define when a subscriber server is available to receive distributions (such as daily, monthly, or yearly).
Step 2: Create Distributions
Distributions are NDS objects that contain the data (such as files, applications, or server software packages) that you want to distribute. To create a distribution, highlight the Distributor object in ConsoleOne 1.2c, select New, and then select Object. In the Object Create window, select ZENworks Distribution. Next, give the distribution a descriptive name. Since you will need to access the Properties page of this object to complete the configuration of the distribution, click the Define Additional Properties box, and then click Create. You will then need to define the following properties to complete the configuration of the distribution.
General Tab
Under the General tab, configure the following properties:
Active. Check this box to make the distribution available to subscriber servers.
Archive Patching. Select the Archive Patching box if the source data you want to distribute is an archive file.
Maximum Number of Patches. Specify the number of archive versions that should be stored for updating subscriber servers.
Lock Files. Check this box to have ZFS lock all of the files in a distribution while it is extracting them. If a file is in use and ZFS cannot lock the file, it will retry every five minutes for one hour before it fails.
Platform Restriction. Specify the NetWare platform this distribution requires.
Required Disk Space. Specify the amount of free disk space required on the destination volume. If the volume does not meet this space requirement, the distribution will not take place. If you do not enter a value here, ZFS will only make sure that there is enough free space for the distribution. For example, if a distribution requires 100 MB and the volume has only 100 MB available, the distribution will occur.
Contents Tab
The Contents tab lets you define the files, subdirectories, or server software packages that make up a distribution. (See Figure 4.) To define the contents of a distribution, complete the following steps:
Click the Add Grouping button. A distribution can only have one grouping.
Assign the grouping a name.
Specify the type of grouping. Select File if you are distributing files or subdirectories. Select Software Package if you are distributing server files and applications to be installed on a server.
Click OK to add the grouping.
In the File Grouping Window, select New. Click the Browse button to browse the destination server for the files, directories, or software packages you want to distribute.
In the File Grouping Window, select the DestRoot folder in the Destination Panel.
Change the text "DestRoot" to the name of the destination root directory.
If desired, click the Add Folder button to add subdirectories under the destination root directory.
Figure 4: You can add as many files to a server software package as you want.

Schedules Tab
You should configure the following Schedules properties:
Schedule Type. Specify when ZFS will gather the components of the distribution to create a new version (such as immediately, daily, monthly, or yearly).
Repeat Action Every. Check this box if you want ZFS to repeat the action. In the box provided, define how often the action should be repeated.
Step 3: Create Channels for the Distributor Server
You must create one or more channels for a distributor server to use to send distributions to its subscriber servers. Multiple servers can subscribe to a single channel--each through its own subscription.
To create a channel, highlight the Distributor object in ConsoleOne 1.2c, select New, and then select Object. In the Object Create window, select ZENworks Channel. Next, give the channel a descriptive name. Since you must access the Properties page of this object to complete the configuration of the distribution, click the Define Additional Properties box, and then click Create.
Step 4: Assign Distributions to a Channel
After you create a channel, you must assign one or more distributions to the channel. (You can also assign one distribution to multiple channels.) To assign a distribution to a channel, right click the channel in ConsoleOne 1.2c, and select Properties. Next, select the Distributions tab, and click the Add button. Browse the NDS tree, select the distributions you want to assign to this channel, and click Add. After you have finished adding distributions, click OK to save the changes to the Channel object.
Step 5: Configure Subscriber Server to Receive Distributions
To configure a subscriber server to receive distributions, right-click the Subscriber object in ConsoleOne 1.2c, select New, and then select Object. In the New Object Window, select ZENworks Subscription, and click OK. Next, give the subscription a descriptive name. Since you will need to access the Properties page of this object to complete the configuration of the subscription, click the Define Additional Properties box, and then click OK.
You will need to define the following properties to complete the configuration of the subscription.
General Tab
Under the General tab, configure the following properties:
Active. Check this box to enable subscriber servers to receive distributions.
Distribution Channel. Use the Browse button to select the channel where the desired distribution exists.
Number of Bytes to Receive/Second. Use this option to limit the amount of bandwidth TED uses for the distribution. If you leave this field blank, TED will not use throttling and, instead, will use as much bandwidth as it needs for the distribution.
Schedules Tab
You should configure the following Schedules properties:
Schedule Type. Define when TED should extract and/or run a subscription that a subscriber server has received (such as immediately, daily, monthly, or yearly).
Repeat Action Every. Check this box if you want ZFS to repeat the action. Use the box provided to define how often you want the action repeated.
After you have configured the subscriber servers to receive distributions, the distributions will occur based on the schedules you defined.
SERVER SOFTWARE PACKAGES
You create server software packages to distribute files and applications that you want installed on servers. You can also create server software packages that contain user applications that you will distribute to workstations via the Novell Application Launcher.
Server software packages are made up of software components. You can create a software package that contains just one component or multiple components. Each software component can contain as many files and folders as you want. As a result, you can create a software package that installs multiple applications or performs pre-installation tasks, installation tasks, and post-installation tasks.
You can also configure each software component with its own set of minimum requirements. If a server meets the requirements of one component but not another, TED installs only part of a distribution.
When you create a server software package, you are essentially building an installation executable file. To create this file, you complete the following steps:
Step 1: Create the .SPK File
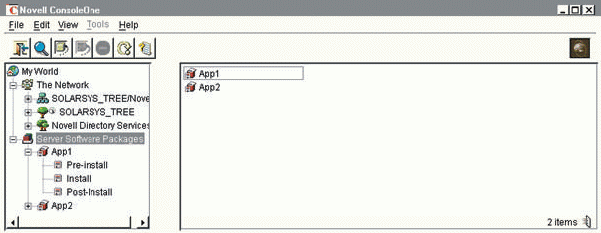
An .SPK file is an outline of what you will include in a server software package. To create an .SPK file, right-click the Server Software Packages name space that appears under My World in ConsoleOne 1.2c. (See Figure 5.) Next, select New Package, and the server software package wizard loads.
Figure 5: To create server software packages, you must create an .SPK file by clicking Server Software Packages under the My World menu.
In the Create New Server Package screen, name the server software package. This name will appear in ConsoleOne 1.2c. Next, specify the path and filename of the .SPK file you want to create (such as SYS:\APPS\APP1.SPK), and click Finish.
Step 2: Configure the .SPK File
To configure an .SPK file right-click the software package in ConsoleOne 1.2c, and select properties. Next, configure the following properties for the software package:
Identification Tab
Check the Disable Rollback box if you do not want the option of rolling back this application after it is installed. The rollback feature enables you to uninstall an application that was distributed using TED and a server software package.
Requirements Tab
Click the Add button to define requirements that a subscriber server must meet to receive this software package. You can configure the following requirements:
Operating System. Specify the NetWare platform and version required.
Memory. Specify the condition required (such as greater than, less than, or equal to) and the amount of RAM required.
Disk Space. Specify the volume location, the condition required (such as greater than, less than, or equal to), and the amount of disk space required.
SET Parameters. Launch a wizard that dynamically gathers the SET command from the ZENworks server you choose. Then select the specific SET parameters that the package requires.
Registry. Specify the required registry settings.
File. Specify files and condition required (such as exists, does not exist, or date).
Products.dat. Specify the Products.dat filename, version, and description.
Step 3: Create and Configure Software Components
When you distribute a software package, TED will install a component either completely or not at all. If a problem occurs during a distribution, TED will back out any portion of a component that was not installed successfully. As a result, you should include files and applications that are dependent on each other in the same component.
To create a software component, right-click the Software Package in ConsoleOne 1.2c, and select New Component. Assign the component a descriptive name, and click OK. Next, configure the component by right-clicking it and selecting Properties. You should then configure the following properties of the software component:
Identification Tab
After the installation is completed, define what you want the component to do--nothing, down the server, restart the server, or reset the server.
Requirements Tab
Click the Add button to define requirements that a subscriber server must meet to receive this component. You can configure the same requirements as described in step 2.
Pre-Installation Tab
If you want to Load or Unload a process at the subscriber server before TED installs a component, click the Add button, and select one of the following:
Load NLM. Specify the name and properties of the NetWare Loadable Module (NLM) you want to load.
Load Java Class. Specify the name and properties of the Java class you want to load.
Unload Process. Specify the process to unload.
Copy File Tab.
If you want the component to copy files, click the Add button, and specify the name and target directory of the first file group you want to copy. (You must create at least one file group.) Next, click the Add button again to specify the individual files and subdirectories that you want copied in this component.
Text File Tab.
If you want to make changes to existing text files on the subscriber server when TED installs the component, click the Add button, specify the name of the text file you want to change, and enter a description for the change. Next, enter the modifications you want to make to the file in the fields provided.
Set Commands Tab.
If you want to add, remove, or change SET commands on the subscriber server when TED installs this component, click the Add button. A wizard launches and will gather the SET command from the ZENworks server you select. Select the specific SET parameters that you want to add, remove, or change.
Registry Settings Tab.
If you want to modify the registry settings on the subscriber server, click the Add button. (This tab applies only to NetWare 5 servers.) You make the following registry entries during the installation of this component:
Key
Binary
Expand string
DWord
Multi-Value String
String
Products.dat Tab
If you want to update the Products.dat file so that future updates can know the most recently installed version of the file or application, specify one of the following actions:
Add. Specify the ID, version, and description.
Modify Existing Entry. Enter the existing ID, new version, and new description.
Replace Existing Entry. Enter the product ID and version to find and specify the new ID, version, and description.
Post-Installation Tab
If you want to load or unload a process at the subscriber server after a component is installed, click the Add button and select one of the following:
Load NLM. Specify the name and properties of the NLM you want to load.
Load Java Class. Specify the name and properties of the Java class you want to load.
Unload Process. Specify the process to unload.
Step 4: Compile the Server Software Package
After you define a server software package and configure its components, you must compile the package before you can distribute it using TED. To compile a server software package, right-click the Server Software Package in ConsoleOne 1.2c, and select Compile. The compile server software package wizard launches.
Click Next, and specify the path and filename of the compiled server software package. Be sure to give this file a .CPK extension, such as APP1.CPK. Click Next, and the compilation begins. When the compilation process is completed, you can distribute the server software package with TED.
CONCLUSION
Although some steps required to configure ZFS components are quite involved, they are by no means complicated or difficult. Explaining the steps is more difficult than performing them. And in the end, ZFS saves you time and money by automating the management and configuration of servers across the network.
Sandy Stevens is a freelance writer based in San Diego, California. Ms. Stevens is coauthor of Novell's Guide to Integrating NetWare 5 and NT, Novell's Guide to NetWare Printing, and Novell's Guide to BorderManager.
* Originally published in Novell Connection Magazine
Disclaimer
The origin of this information may be internal or external to Novell. While Novell makes all reasonable efforts to verify this information, Novell does not make explicit or implied claims to its validity.