ConsoleOne 1.2: Network Management From Anywhere, Anytime
Articles and Tips: article
01 Aug 1999
The recent release of Novell Directory Services (NDS) 8 includes ConsoleOne 1.2, a new client-side version of Novell's Java-based management console. Novell has significantly improved both performance and functionality in this new version of ConsoleOne. In addition, Novell has released ConsoleOne Web Edition, a web server extension that enables you to manage NDS through a web browser. (You can download NDS 8, ConsoleOne 1.2, and ConsoleOne Web Edition for free from http://www.novell.com/download.)
CONSOLEONE IS THE FUTURE
Novell has clearly stated that ConsoleOne is the future of network management at Novell. Novell's main objective for ConsoleOne is to provide network management from anywhere. To meet this objective, Novell based ConsoleOne's framework on Internet standards such as Java, Java Naming and Directory Interface (JNDI), IP, Lightweight Directory Access Protocol (LDAP), and Secure Sockets Layer (SSL).
The original NetWare 5 release of ConsoleOne did not provide all of the features or the performance customers expected and was available only on the server. With the improvements made to ConsoleOne 1.2, however, this management console is on par with Novell's NetWare Administrator (NWADMIN) utility for NDS client-side administration tasks.
THE CONSOLEONE ARCHITECTURE
ConsoleOne, which is written entirely in Java, provides an extensible foundation which allows developers to easily add functionality to the management console. To add functionality to ConsoleOne, developers simply create snap-in modules that integrate into a common shell. This shell provides a common hosting environment for both default and third-party snap-in modules.
The snap-in modules provide all of the features and functions available in ConsoleOne. As a result, ConsoleOne's total functionality depends on which snap-in modules are installed on a particular workstation. This flexible architecture is especially useful if you want to assign IT staff specific management tasks and create customized views based on the tasks assigned. To create these customized views, you can add or remove snap-in modules to include or exclude various ConsoleOne features or functions.
Two types of ConsoleOne snap-in modules are available: the console snap-in module and content snap-in modules. Novell provides the console snap-in module, which is installed by default. The console snap-in module extends ConsoleOne to provide the basic, Novell-defined management and administrative functionality for ConsoleOne. In addition, the console snap-in module provides the management console's look and feel and the basic content of the object browser, main menu, and toolbar.
Both Novell and third-party developers can write content snap-in modules, which provide application-level features and functionality. For example, the NDS Administration snap-in module is a content snap-in module that provides NWADMIN-like functionality in ConsoleOne 1.2.
Novell and third-party developers can also write content snap-in modules to add features and functionality to other content snap-in modules. For example, if a third-party developer creates an application that adds a new object or attribute to NDS, that developer can also create a content snap-in module for ConsoleOne. This snap-in module can extend the NDS Administration snap-in module, enabling network administrators to manage the new object or attribute.
If you are familiar with the NWADMIN utility, you may think that ConsoleOne snap-in modules sound similar to NWADMIN snap-in modules. However, there is one key difference between the two: NWADMIN snap-in modules are simply Windows .DLL files. Because ConsoleOne is Java-based, ConsoleOne snap-in modules are Java applications that developers can write once for all platforms. Writing snap-in modules in Java saves significant development time and costs. The Java platform makes ConsoleOne an ideal management console for heterogeneous networks.
WHAT ABOUT THE NWADMIN UTILITY?
Although you can still use the NWADMIN utility to manage your company's NDS 8 tree, Novell recommends that you begin using ConsoleOne 1.2. One reason that Novell makes this recommendation is that ConsoleOne 1.2 can efficiently gather and display the contents of large container objects. For example, when you browse a container object that contains thousands of objects, ConsoleOne 1.2 retrieves and displays the contents of the container object one page at a time. The NWADMIN utility, on the other hand, gathers all of the contents of the container object before displaying these contents. As a result, using the NWADMIN utility to browse large directory trees is more time consuming.
Unfortunately, there are no ConsoleOne snap-in modules currently available for Novell products such as GroupWise, ManageWise, and ZENworks. Although Novell has said that these snap-in modules will be available in the future, Novell has given no firm dates when these snap-in modules will be released. In the meantime, you will need to use the NWADMIN utility to manage these products.
USING CONSOLEONE 1.2
After you have installed NDS 8 on a NetWare 5 server and have run the setup program for ConsoleOne 1.2 on your workstation, you can begin using ConsoleOne 1.2 to manage your company's NDS 8 tree. (For more information about installing NDS 8, see "NDS 8: Rev Up Your Directory Tree," May 1999, NetWare Connection, pp. 34-38. You can download this article from http://www.nwconnection.com/past.)
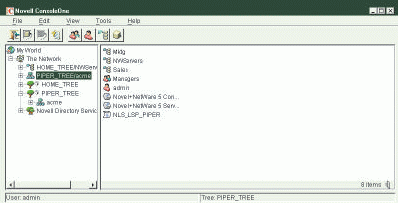
When you launch ConsoleOne 1.2, you are presented with a two-pane view, similar to the screen shown in Figure 1. You can use the left pane to browse the network and the right pane to perform a management task. For example, to view the properties of the Admin User object shown in Figure 1, you use the left pane to browse the PIPER_TREE NDS tree and to display the contents of the container object tree in the right pane. You then right-click on the Admin User object in the right pane and choose Properties.
Figure 1: You can use the left pane in ConsoleOne 1.2 to browse your company?s network, and you can use the right pane to complete a management task.

You can create customized views in both the left and right panes. In the left pane, you can use your mouse to resize the pane or to change the view of the pane. For example, if you want to view only the PIPER_TREE NDS tree and its contents, you select the PIPER_TREE NDS tree in the left pane and then click the Set as Root button in the toolbar (the second button on the left). You can also use the Menu bar to set the view by highlighting the appropriate object and then selecting View/Set as root.
In the right pane, you can create a customized view by defining which objects you want displayed. By default, ConsoleOne 1.2 displays all types of objects. However, if you want only User and Group objects displayed, you can select View/Filter from the Menu bar and then place a check mark in the User and Group boxes in the Object Type window. When you place a check mark next to any object in the list, ConsoleOne 1.2 automatically removes the check mark from the All object types box. ConsoleOne 1.2 will then display only the object types you have selected instead of displaying all object types.
The options available in the ConsoleOne 1.2 toolbar and menu bar vary, depending on which object is selected. For example, when you select a container object as shown in Figure 1, the toolbar displays the buttons that enable you to create new NDS objects. If you select a file system directory under a volume object, the toolbar changes to offer file and directory management functionality. For example, the buttons displayed enable you to create new directories and to cut, paste, and copy files.
Although the ability to customize views in ConsoleOne 1.2 is extremely useful on a session-by session basis, any changes that you make to the default ConsoleOne 1.2 view (except resizing the pane) are lost when you exit ConsoleOne 1.2.
Finding Objects With ConsoleOne 1.2
Novell has added advanced search capabilities to ConsoleOne 1.2. If you know the name and context of the object you want to view, you can simply select a container object (or the [Root] of the NDS 8 tree) in the left pane and begin typing the object name. ConsoleOne 1.2 then displays a GoTo box in which you can type the full distinguished name of the object you want to view.
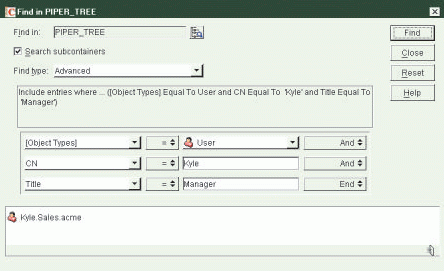
If you want to search for an object, first select the container object where you want the search to begin in the left pane. Then choose Edit/Find from the menu bar. A window similar to the one shown in Figure 2 appears.
Figure 2: To help you find objects in the NDS 8 tree, ConsoleOne 1.2 provides both basic and advanced search options.

To perform a basic search of the NDS 8 tree, set the Find type box to Standard, and specify the name and object type for which you want to search. If you want to perform an Advanced search, set the Find type box to Advanced, and enter the parameters for your search. As Figure 2 shows, you can build complex search strings by using comparison operators (such as =, not=, <, and <) and statement connector keywords (such as and, or, end).
Managing NDS Objects
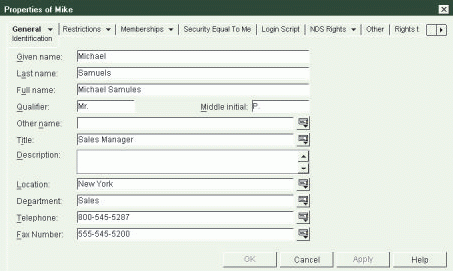
If you have used the NWADMIN utility to manage NDS objects, it won't take you long to learn how to manage your company's NDS 8 tree with ConsoleOne 1.2. Most of the differences you will encounter are differences in the interface. For example, when you use ConsoleOne 1.2 to view the properties of an object, you will see the same properties that are displayed in the NWADMIN utility. However, ConsoleOne 1.2 displays these properties as tab lists, rather than as buttons, which is how the NWADMIN utility displays these properties. (See Figure 3.)
Figure 3: To view or configure the properties of NDS objects, you select the appropriate tabs in ConsoleOne 1.2.

Another difference you will notice is that ConsoleOne 1.2 does not have any drag-and-drop capabilities. To move objects or to grant NDS rights with ConsoleOne 1.2, you must select the object and right-click your mouse or use the menu bar.
The process for creating NDS objects with ConsoleOne 1.2 is almost identical to the process for creating objects with the NWADMIN utility. To create a new object with ConsoleOne 1.2, use the right pane or left pane to select the container object in which you want to create the new object. To create a Group, User, or container object, you can then click on the appropriate button in the toolbar. (See Figure 1.) To create another type of object, you can click the Object button in the toolbar, and select an object from the list of available objects that appears. (You can also select a container object and press the Insert key to view a list of available objects--a feature also available in the NWADMIN utility.)
Managing the NetWare 5 File System
You can also use ConsoleOne 1.2 to manage the NetWare 5 file system. In the left pane, open the container object in which the volume objects are located. (This is generally the same container object in which you installed the server.) Next, select the appropriate volume, right-click your mouse, and choose properties.
You can view the volume's statistics, set trustee rights, establish user disk space restrictions, and so on. You can also work with individual files and directories stored on the volume: You simply double-click the Volume object to open it and then browse to the individual file or directory you want to manage. You can then create, move, copy, and delete individual files and folders. You can also modify file and folder attributes, rights, and owners.
Managing the NDS Schema
Another new feature available in ConsoleOne 1.2 is the ability to manage the NDS schema. To manage the NDS schema, choose Tools/Schema Manager from the ConsoleOne 1.2 menu bar. To view information about the existing object classes and attributes, you select the desired tab and then select the Info button.
To create a new attribute, you select the Attributes tab and click the Create button. This action launches a wizard that will guide you through the process of creating a new attribute.
To create the new attribute, you enter the attribute name and the Abstract Syntax Notation 1 (ASN1) ID. The ASN1 is an optional, unique ID, which Novell assigns. Developers can use the ASN1 to ensure uniqueness when their applications extend the NDS schema. If you want to ensure that your schema extension is unique, call Novell to obtain this number. If your schema extension is for internal purposes only, you do not need to register it with Novell. In this case, you can leave this field blank.
Next, select a syntax that best describes the data type used in this attribute, and set the attribute flags to control how objects use this attribute. After you are finished configuring the attribute, click the Finish button to create the attribute.
The ConsoleOne Schema Manager also provides a wizard to simplify the creation of new object classes. To create a new object class, choose the Classes tab, and then click the Create button. Enter the class name, the optional ASN1 ID, and the class type (effective, noneffective, or auxiliary).
Next, you can specify that this new object class inherits properties from an existing object class or classes. The next screens that appear enable you to add mandatory and optional properties to the object class.
The ConsoleOne Schema Manager then gives you the option to change the naming attributes and containment rules for the object. The naming attributes define how NDS names the object in the NDS tree (for example, CN= or OU=). The containment rules define where you can create the object in the NDS tree (such as within an Organization object or an Organizational Unit object). After you define the characteristics of the object class, click the Finish button to add the new object class to the NDS schema.
USING CONSOLEONE WEB EDITION
With ConsoleOne Web Edition, Novell delivers on its objective to provide network management from anywhere. Using a standard web browser, you can use ConsoleOne Web Edition to perform the following NDS management tasks from any workstation that has Internet access:
Create, modify, and delete NDS User objects
Disable user accounts
Clear locked accounts
Edit group memberships
Manage passwords
To use ConsoleOne Web Edition, you must install a web server, such as Netscape FastTrack Server for NetWare or Netscape Enterprise Server for NetWare, on your company's NetWare 5 server. (You can download Netscape Enterprise Server for NetWare free of charge from http://www.novell.com/download.) You must also install NetWare 5 Support Pack 2 and NDS 8 on the NetWare 5 server. (You can download NetWare 5 Support Pack 2 from http://support.novell.com/misc/patlst.hm.)
You must then download the ConsoleOne Web Edition and install it by completing the following steps:
Unload the web server at the server console.
Unload Novell's Java Virtual Machine (JVM) by typing the following command at the server console:
JAVA -EXIT
From a Windows workstation, map a drive to the SYS: volume of the server on which you will be installing the ConsoleOne Web Edition.
From the directory in which you downloaded ConsoleOne Web Edition, double-click the C1_WEB.EXE file to run the ConsoleOne Web Edition installation program.
Continue past the introduction screens. When prompted, select the drive that you mapped to the SYS: volume.
Return to the server console, and type the following command:
C1WCFG
This command automatically completes the server-side installation by configuring the servlet gateway and restarting the web server.
From the ConsoleOne Installer, enter the IP address and port number of your web server. (If the web server is using the default port, you can leave this field blank.) Then click the OK button to continue.
When the installation is completed, the ConsoleOne Web Edition URL appears as a shortcut on your desktop. If this shortcut doesn't appear or doesn't run properly, you can access ConsoleOne Web Edition by entering its exact URL. If SSL is not installed on the web server, enter http://webserverIPaddress:port/ConsoleOne. If SSL is installed, enter https://webserverIPaddress:port/ConsoleOne.
When the ConsoleOne Web Edition Welcome screen appears, you can click on the monitor to begin managing your NDS tree. ConsoleOne Web Edition then prompts you to enter a username, password, and the NDS 8 tree you want to manage. After you have entered this information, click Login to access the ConsoleOne home page.
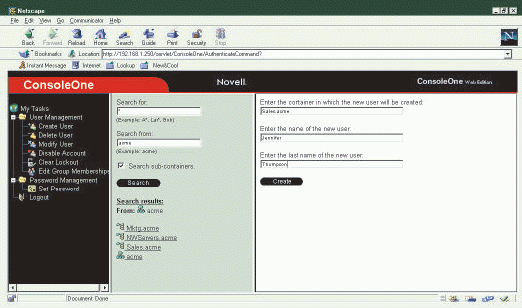
In the left pane of the ConsoleOne home page, you can expand the User Management and Password Management options and select the task you want to perform. (See Figure 4.) You cannot browse the NDS 8 tree with Console-One Web Edition, but you can search the NDS 8 tree to find the location of the User, Group or container object you want to manage.
Figure 4: With ConsoleOne Web Edition, you can manage your company?s NDS 8 tree from any web browser.

CONCLUSION
If you are a NetWare veteran, you may remember when Novell introduced the NWADMIN utility for managing NetWare 4. If you were like me, you moaned and groaned about having to switch from the text-based SYSCON utility to the new GUI utility. In no time at all, however, you were probably embracing the ability to centrally manage even NetWare 3 servers with the NWADMIN utility.
You're facing a similar situation now. This time, however, you're moving from one GUI utility to another. The first thing to remember when you begin using ConsoleOne 1.2 is that it is not the NWADMIN utility. Although you can perform the same management tasks with ConsoleOne 1.2 that you can perform with the NWADMIN utility, some of the steps you take may differ.
These differences may pose some minor irritation to you at first, but you will quickly learn how to use ConsoleOne 1.2 and manage your company's NDS 8 tree with ease. In addition, ConsoleOne 1.2 will give you benefits the NWADMIN utility cannot deliver. For example, ConsoleOne 1.2 provides cross-platform support, scalability, and NDS management from a web browser. In the end, you'll be happy Novell made the change.
Sandy Stevens is a freelance writer who is located in Salt Lake City. She is coauthor of Novell's Guide to BorderManager, Novell's Guide to Integrating NetWare and NT, and Novell's Guide to NetWare Printing. (These books are available from Novell Press.)
* Originally published in Novell Connection Magazine
Disclaimer
The origin of this information may be internal or external to Novell. While Novell makes all reasonable efforts to verify this information, Novell does not make explicit or implied claims to its validity.