The DNS Service in NetWare 5: Going Beyond the Configuration Basics
Articles and Tips:
01 Mar 1999
NetWare 5 includes Domain Naming System (DNS) and Dynamic Host Configuration Protocol (DHCP) services, which integrate with Novell Directory Services (NDS). Over the next several months, NetWare Connection will feature articles that explain how to use these services. The last issue of NetWare Connection explained how DNS works, how to install the NetWare 5 DNS service, how to configure Zone objects and Address resource records, and how to enable DNS support on NetWare clients. (See "NDS and DNS: Configuring DNS Services in NetWare 5," Feb. 1999, pp. 29-38. You can download this article from http://www.nwconnection.com/feb.99/dns29.)
This article also focuses on the NetWare 5 DNS service: This article explains how to commit changes to NDS, use different types of resource records, manage child zones, create a secondary DNS server, use caching-only DNS servers, and use DNS management tools.
COMMITTING CHANGES TO NDS
With NetWare 5, you modify the detail parameters for a DNS or DHCP object in the DNS/DHCP Management Console. However, the changes are not written to NDS until they are committed. You can commit changes by clicking the Save Data to NDS button in the toolbar. This button is illuminated only when changes are made that have not yet been saved. If you do not save the changes you have made to one object and then select another object, a prompt appears, asking whether or not you want to save the changes made to the current details page.
MORE ABOUT ADDRESS RESOURCE RECORDS
The basic characteristics of Address resource records were covered in the last issue of NetWare Connection, but there are a few more facts you should know: First, you may want to configure multiple Address resource records for the same IP address (that is, for the same server). Second, you may want to map one DNS name to more than one network interface (that is, to more than one server).
Multiple Address Resource Records for the Same Server
Suppose that a server provides a variety of services. For example, the server may be configured as a conventional NetWare server, a web server, and an FTP server. Also, suppose you want users to be able to access each service using a DNS name that identifies the service. Using Address resource records, you can accomplish your goal in one of two ways:
The first solution is to bind multiple IP addresses to the same network interface. This task is easy: You simply use the INETCFG utility to add TCP/IP bindings. Then you can create an Address resource record that maps each domain name that you want to use to a unique IP address. For the server in this example, you might create these Address resource records:
nw1.pseudo-corp.com for IP address 192.168.1.1
www.pseudo-corp.com for IP address 192.168.1.2
ftp.pseudo-corp.com for IP address 192.168.1.3
Although this solution works, it is neither necessary nor commonly used. An even simpler solution is to create multiple Address resource records that map to the same IP address. Using multiple resource records does not create a conflict because each service is distinguished by a unique TCP or UDP port number. For example, if you access a server to open a web connection, your browser opens a connection to TCP port 80. An FTP connection uses FTP port 21. Because each service has a unique port number, all services on a server can be associated with the same IP address. As a result, you can create the following Address resource records for the server in this example:
nw1.pseudo-corp.com for IP address 192.168.1.1
www.pseudo-corp.com for IP address 192.168.1.1
ftp.pseudo-corp.com for IP address 192.168.1.1
To see how these resource records work, suppose a web browser resolves www.pseudo-corp.com to 192.168.1.1. The web browser requests a connection on port 80 of server 192.168.1.1. This connection request does not conflict with other services on the server. Thus, you need to bind only one IP address to the server's network interface, regardless of the number of services the server supports. Mapping the Same DNS Name to Multiple Servers You may also want to map the same DNS host name to more than one server. For example, suppose that your company needs several web servers to support user demand. Each server has the same web content, and you want to distribute user access across all of the servers. To achieve this goal, you can create multiple Address resource records that match the same DNS host name to the IP addresses of each server. You might, for example, create the following three Address Resource Records: www.pseudo-corp.com for IP address 192.168.1.5 www.pseudo-corp.com for IP address 192.168.2.18 www.pseudo-corp.com for IP address 192.168.3.20 If these three Address resource records are in the DNS zone database, the DNS server responds to client queries using a "round-robin" approach. That is, the DNS server responds to the first request for www.pseudo-corp.com with the IP address 192.168.1.5. For the second request, the DNS server responds with the IP address 192.168.2.18, and for the third request the DNS server responds with the IP address 192.168.3.20. DNS automatically distributes demand across all of the web servers.
CNAME Resource Records
Although you can use multiple Address resource records to map different DNS host names to the same IP address, this solution has a liability: If the IP address of the server changes, you must update all of the Address resource records that point to that server. If a server offers many services, you have to change quite a few Address resource records.
A better solution is to use aliases. You then create only one Address resource record for the server and establish additional names for the server by creating aliases for the name you specified in the Address resource record. If you then need to change the server's IP address, you need to modify only one Address resource record. Although the IP address of the server has changed, the name has not. Consequently, the aliases still map to the server through the server's DNS name.
In DNS terminology an alias is a canonical name, which is defined in a CNAME resource record. You define a CNAME resource record as follows:
Using the DNS/DHCP Management Console, create an Address resource record for the server that will be identified by the CNAME alias.
Select the Zone object for the zone that contains the Address resource record you created in step 1.
Click the Create icon in the toolbar.
Select Resource Record in the Create New DNS Record dialog box.
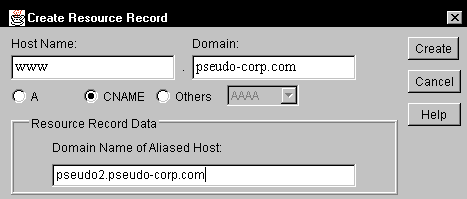
Select the CNAME radio button. The Create Resource Record will be modified as shown in Figure 6.
Figure 6: A CNAME record matches an alias name to the name of an existing host.
Complete the dialog box as follows.
Click Create. The CNAME resource record object is placed under its own Resource Record Set (RRSet) object, which is identified by the name you specified in the Host Name field.
Although CNAME Resource Records are immensely useful, you shouldn't confuse them with Address resource records. For example, you cannot create multiple CNAME resource records in which the same alias name points to several servers and expect these servers to be accessed in round-robin fashion. If you require round-robin access, you must create multiple Address resource records.
Mail Exchanger Resource Records
If your e-mail system communicates through Simple Mail Transfer Protocol (SMTP), Mail Exchanger (MX) resource records are necessary to enable outside mail systems to communicate with your mail exchangers (another name for a mail server). For example, suppose that you are sending an e-mail message to drew@pseudo-corp.com. Your mail exchanger must identify a mail exchanger in the pseudo-corp.com domain.
To identify this mail exchanger, your mail exchanger queries DNS servers in the pseudo-corp.com domain for MX resource records. An MX resource record may specify that mail1.pseudo-corp.com is a mail exchanger for pseudo-corp.com.
Multiple mail exchangers can service a domain. Each MX resource record contains a preference number ranging from 0 through 65,535. If two MX resource records have different preference numbers, the mail exchanger with the lower preference number handles mail for the domain. The mail exchanger with the higher preference number receives incoming mail only if the preferred mail exchanger is unavailable. If two or more mail exchangers have the same preference number, DNS responds in round-robin fashion to MX queries, balancing the load among the mail exchangers.
All that matters about the preference numbers is their order. If you have two MX records, using preference numbers 1 and 2 has the same effect as using preference numbers 5 and 500. (Mail routing in DNS is discussed in detail in Request For Comments [RFC] 974. To view RFCs, visit http://www.ietf.org.)
To create an MX resource record object, you complete the following steps:
Using the DNS/DHCP Management Console, create an Address Resource Record for the mail server.
Select the Zone object for the zone that contains the Address resource record you created in step 1.
Click the Create icon in the toolbar.
Select Resource Record in the Create New DNS Record dialog box.
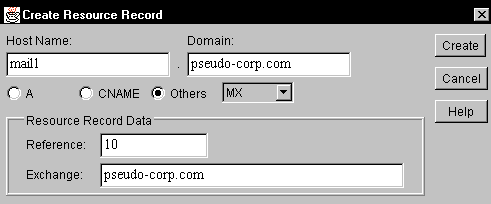
Select the Others radio button. Then select MX in the drop-down list on the right. The Create Resource Record will be modified as shown in Figure 7.
Figure 7: An MX resource record identifies a mail exchanger for a domain.
Complete the dialog box as follows:
Host Name. Enter the host name for the mail exchanger. This name should match the host name of the Address resource record you created in step 1.
Domain. This field holds the name of the domain that is associated with the Zone you selected in step 2.
Preference. Specify a preference number ranging from 0 to 65,535 inclusive. (In the initial release of the DNS/DHCP Management Console, which I used to prepare screen shots for this article, this field is mistakenly labeled "Reference.")
Exchange. Specify the name of the domain that will be serviced by this mail exchanger.
Click Create. The MX resource record object is placed under its own RRSet object, which is identified by the name you specified in the Host Name field.
Other Types of Resource Records
There are many other types of resource records, most of which you will never need to use. When you open the Create New DNS Record dialog box in the DNS/DHCP Management Console, you can select the Other radio button and scan the choices. Unfortunately, space constraints prohibit describing all of the available resource record types in this article, and they are described only briefly in the NetWare 5 electronic manuals. However, various RFCs describe resource records. A good place to look for more information is RFC 1035, "Domain Names--Implementation and Specification," which contains specifications for most types of resource records. (To view this RFC, visit http://www.ietf.org.)
THE ROOTSERVERINFO ZONE OBJECT
When the DNS and DHCP schema extensions are added to NDS, the RootServerInfo Zone object is created. (This process was described in "NDS and DNS: Configuring the DNS Service in NetWare 5.") If you expand the tree under this object in the DNS/DHCP Management Console, you will see a series of RRSet objects with names such as a.root-servers.net. Under each of these RRSet objects is an Address Resource Record.
Each RRSet object describes one of the Internet root DNS servers. If a DNS server cannot resolve a name query locally and does not know a DNS server that can help in the name resolution process, the query is referred to a root DNS server, which initiates the name resolution process from the root domain.
The RootServerInfo Zone object contains records that were current when NetWare 5 was sent to manufacturing. From time-to-time, however, root DNS servers are added to the Internet. Although it isn't likely, changes may be made to the existing root DNS servers. Consequently, you should occasionally check the Internet to determine if changes have been made.
One way to check for changes is to run a WHOIS query at http://www.internic.net. Enter root-dom in the input field, and click Search. The resulting query will list the names and IP addresses of the current root DNS servers. You can use this information to update the contents of the Root ServerInfo Zone.
MANAGING CHILD ZONES
When managing your organization's domain, you may need to create child domains. For example, suppose that you manage the pseudo-corp.com domain. Your organization's Engineering department has requested that you set up a child domain named eng.pseudo-corp.com so that they can collect all their host names in one place. How do you proceed?
You can create the eng child domain in one of two ways: You can place the eng domain records in the zone you created for pseudo-corp.com, or you can create a new child zone for the eng child domain. Each solution has advantages and disadvantages. To choose a solution, you must determine how the eng child domain will be managed and how many resource records will be placed in the eng child domain.
If the Engineering department wants to manage its own DNS servers and the resource records in the eng child domain, creating a separate zone makes a lot of sense. You can then place the NDS objects associated with the eng child domain in a separate container object, making it easy to delegate management responsibilities to the users who will manage the zone. You can also replicate the partition containing the eng.pseudo-corp.com zone objects on the NetWare servers in the Engineering department.
You should also consider setting up a separate zone if the eng child domain will contain many resource records or if the resource records will change frequently. Finally, you must create a separate zone if the Engineering department wants to use Dynamic DNS to post updates from Engineering DHCP client leases in the eng child domain. (Dynamic DNS will be discussed in an upcoming article about the NetWare 5 DHCP service.)
On the other hand, if the eng child domain will contain few resource records, the zone data change infrequently, and the same administrators will manage both the eng.pseudo-corp.com domain and the pseudo-corp.com domain, posting the eng child domain resource records in the pseudo-corp.com zone may be more convenient. The following sections examine both of these solutions.
Posting Child Domain Resource Records in the Parent Domain's Zone
To add a resource record for a child domain to the parent domain's zone, you specify the child's host name relative to the name of the parent domain. For example, suppose you want to create an Address resource record object for the NetWare server nw1.eng.pseudo-corp.com. You create the Address resource record under the pseudo-corp.com zone object as you normally would, but in the Host Name field, you specify the name as nw1.eng. Because the nw1.eng Address resource record is created in the pseudo-corp.com domain, the DNS server treats the host name as nw1.eng.pseudo-corp.com. You can use this relative-name approach to create resource records for any child domain.
Posting Child Domain Resource Records in a Separate Zone
When creating a zone for a child domain, you must add resource records to the parent zone to delegate authority for the child zone to the appropriate DNS servers. Before you add the required resource records to the parent zone, you should create the child Zone object. You should also assign authoritative DNS servers for the child zone so these servers will be available to process DNS queries for the zone.
Ideally, you should not delegate authority to a child zone unless DNS servers for the child zone are active. If no DNS servers are available for a zone, client DNS queries for names in the zone must timeout--a process that can take considerable time and frustrate users. If DNS servers are active for a zone, these servers will promptly return errors if they are unable to resolve a name query. After the child zone is active, you can configure the parent zone so it will delegate authority for the child zone to the appropriate DNS servers.
Each DNS server that is authoritative for the child zone must be described in an Address resource record in the parent zone. For example, suppose that name1.eng.pseudo-corp.com (192.168.2.5) is a DNS server for the eng.pseudo-corp.com zone. In this case, you should add an Address resource record to the pseudo-corp.com zone. This resource record should have the following characteristics:
Host Name: name1.eng
Domain: pseudo-corp.com
IP Address: 192.168.2.5
In addition, each DNS server that is authoritative for the child zone must be described in a Name Server (NS) resource record in the parent zone. The last issue of NetWare Connection explained how to create Name Server resource records: Using the DNS/DHCP Management Console, you must specify the DNS servers that are authoritative for a zone. You specify these servers in the Authoritative DNS Servers list, which is located on the Attributes tab of the detail properties for a Zone object. However, you cannot use this procedure to define a Name Server resource record for another zone. Consequently, you must manually create the Name Server resource record that is required.
To create the Name Server resource record, you complete the following steps:
Using the DNS/DHCP Management Console, select the Zone object for the parent zone that contains the Address resource record that identifies the DNS server for the child zone.
Click the Create icon in the toolbar.
Select Resource Record in the Create New DNS Record dialog box.
Select the Others radio button. Then select NS in the scroll box to the right. The Create Resource Record will be modified as shown in Figure 8.
Figure 8: This dialog box enables you to define a DNS server for a child domain.

Complete the dialog box as follows:
Host Name. Enter the host name for the DNS server relative to the zone selected in step 1. In the example, you would enter name1.eng.
Domain. Enter the full domain name of the parent domain. In the example, you would enter pseudo-corp.com, which is the default value. Together the Host Name and the Domain fields define the fully qualified domain name of the DNS server.
DNS Server Domain Name. Enter the full domain name of the child domain. In the example, you would enter eng.pseudo-corp.com.
Click Create.
This procedure actually creates two resource records for the same host name. When you try this procedure, you may want to take a moment to expand the RRSet object in the object tree. You will notice that the Address resource record and the Name Server resource record are both stored under the name1 RRSet object. That is the purpose of RRSet objects--to collect all of the resource records for a given host so that these resource records can be stored in NDS.
The DNS/DHCP Management Console automatically groups resource record objects under the appropriate RRSet objects. If you add a resource record to an existing RRSet object, you can simplify the process by selecting the RRSet object before you click the Create icon in the toolbar. The Host Name field in the Create Resource Record dialog box is then completed for you.
CONFIGURING A SECONDARY ZONE
In many cases, your organization's NetWare 5 DNS server must co-exist with other types of DNS servers, such as BIND (which is by far the most popular DNS server on the Internet). If your organization is running TCP/IP in an environment with multiple operating systems, the DNS services are probably provided by BIND running over UNIX.
If you want to import zone records from a non-NetWare 5 DNS server into the NetWare 5 environment, you need to configure the NetWare 5 DNS service with a secondary zone that will use zone transfers to obtain the resource records. To create a secondary zone, you open the DNS/DHCP Management Console, and click the Create icon in the toolbar. You then select Zone in the Create New DNS Record dialog box. The Create Zone dialog box appears.
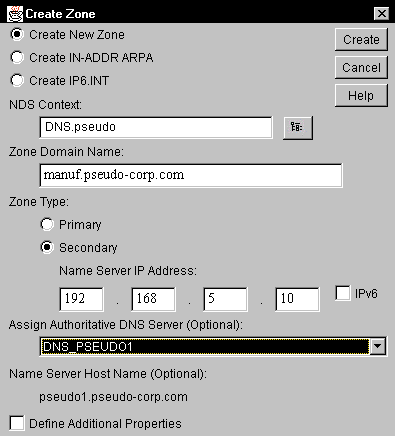
The chief difference when you create a secondary zone is that you select the Secondary radio button, which activates the Name Server IP Address fields in which you specify the IP address of the DNS master from which zone transfers will be made. Figure 9 shows a Create Zone dialog box that defines a secondary zone.
Figure 9: To define a secondary Zone object, you must designate the IP address of a DNS master in the Name Server IP Address fields.
If you are assigning more than one NetWare 5 DNS server authority for a secondary zone, you must designate one of the servers as the "zone-in DNS server." This server is responsible for performing the zone transfer to obtain the zone database.
The zone-in DNS server populates NDS with the required objects that describe the zone database. Other NetWare 5 DNS servers function as normal NetWare 5 DNS servers and obtain the zone data from NDS.
To designate the zone-in DNS server, select the secondary Zone object in the DNS/DHCP Management Console. In the Zone object's detail parameters, select the appropriate DNS Server object in the Zone-In DNS Server field.
You don't need to manually update the Serial Number fields in the Start of Authority (SOA) Information for a secondary zone. The zone-in DNS server automatically updates the Serial Number fields. Other DNS servers that are authoritative for the zone are then prompted to retrieve changes made to the zone database.
CONFIGURING CACHING-ONLY DNS SERVERS
Because WAN bandwidth is precious, you will want to reduce the number of DNS queries that cross your organization's WAN link to the Internet. All DNS servers maintain a cache in which they store recently resolved name queries. When a DNS server can use its name cache to resolve a name query, the server does not need to transmit a name-resolution request across the WAN link to the Internet.
However, large organizations must often configure multiple DNS servers to keep up with clients' requests for name resolution. When all DNS servers directly query the Internet, they do not share these cached names. A client's primary DNS server must often query the Internet for a name that could be resolved from another local DNS server's cache. Is there any way to consolidate caching activity so that a central cache database is maintained?
Figure 10 shows how you can configure DNS servers in a DNS server hierarchy to improve the efficiency of DNS servers. In this case, one DNS server is primarily responsible for transmitting DNS queries to the Internet. As a result, this DNS server stores the results of all DNS queries in its cache. This primary DNS server is known as a forwarder because all name queries that cannot be resolved by local DNS servers are forwarded to the primary server.
Figure 10: You can use caching-only DNS servers to reduce name-resolution traffic across a WAN link.
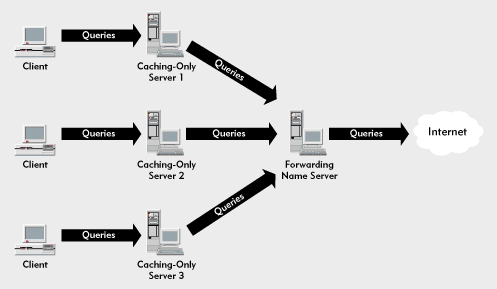
Of course, one DNS server can be overwhelmed by the name queries of a large organization. You can improve efficiency by adding cache-only DNS servers between the clients and the forwarder. Cache-only DNS servers resolve name queries only from resource records found in their local databases or the local name cache. (A cache-only DNS server can be authoritative for a primary or secondary zone.) If a name query cannot be resolved locally, the cache-only name server passes the query to a forwarder.
Each cache-only DNS server gradually builds up a cache of names that its clients request. The name requests then do not need to be forwarded for resolution. As a result, the cache-only DNS servers reduce the workload of the forwarder.
Does using one forwarder establish a single point of failure? No, caching-only DNS servers revert to normal operation if the forwarder is unavailable. These servers will forward queries to the Internet root DNS server when they do not receive a reply from the forwarder. Clients can continue to resolve Internet names using their preferred DNS servers, although WAN efficiency will be reduced.
DNS MANAGEMENT TOOLS
You can use several tools to test and troubleshoot the operation of your organization's DNS service. As the following sections explain, you can use the PING utility to run a quick test of DNS servers, you can use the log capabilities included with the NetWare 5 DNS service, and you can use the NSLOOKUP utility that is included with Windows NT Server 4.0.
Using the PING Utility
Perhaps the most convenient testing tool is the PING utility, which accepts a DNS name as an input parameter. (This utility is included with most TCP/IP protocol stacks.) For example, you can test your computer's ability to resolve the name drew.pseudo-corp.com by entering the following command:
ping drew.pseudo-corp.com
Suppose that your workstation is configured to resolve names using a local DNS server. The first step is to see if you can ping a local host by name. If the client can resolve the name, the host's IP address will be displayed while the PING utility executes.
If local names are being resolved, you can try to ping a host on the Internet. In many cases, Internet servers do not respond to pings, but for now at least, the root DNS servers will respond. You can, for example, ping a.root-servers.net.
If your computer can resolve local names but cannot resolve names on the Internet, one of two things is wrong: something has happened to the RootServerInfo zone, or there is a general problem in communicating with the Internet. You can test communication by using an address to ping a root DNS server. For example, you can enter the following command:
ping 198.4.0.4
If you can ping by address but not by name, you should examine the RootServerInfo zone to ensure that it is configured properly. You should also check your organization's Internet connection, which may be misconfigured. You should ensure that a router filter is not filtering packets for port 53, which is assigned to DNS. In addition, you should check any proxy servers or firewalls for configuration errors.
Using the DNS Service Logs
Each NetWare 5 DNS server can maintain two logs: one log for events and alerts and one log that compiles an audit trail. By default, neither log is active.
To activate the logging feature, select a DNS Server object in the DNS/DHCP Management Console, and select the Options tab for the DNS Server object's detail parameters. Then select one of the following options to configure event log activity: None, Major Events, or All.
These options are self-explanatory, but you should use the All option only when checking a new DNS server or troubleshooting a problem. Verbose logging can negatively impact server performance. Under normal operation, you should select the None or Major Events option.
If you want to record an audit trail, you must select the checkbox Enable Audit Trail Log, which is also found on the DNS Server Options tab.
To view the logs, you must load the CSATPXY NetWare Loadable Module (NLM) on the NetWare 5 DNS server. If you frequently need to view the logs, you should add the LOAD CSATPXY command to the AUTOEXEC.NCF file. To display the logs, you click the View Events/Alerts button or the View Audit Trail Log button in the toolbar of the DNS/DHCP Management Console. You can also specify a range of dates for which you want to examine log records.
Using the NSLOOKUP Utility
You can use the NSLOOKUP utility to troubleshoot DNS servers. Because the NSLOOKUP utility is a fairly complex tool, this section will cover only the basics. If you want more information about this utility, you can consult the Windows NT Help utility.
The NSLOOKUP utility operates in a command prompt window and can be used in interactive or noninteractive mode. Noninteractive mode is useful when you are making single queries. Interactive mode is more convenient when you need to make multiple queries.
Noninteractive Queries
The following dialog is a sample NSLOOKUP query that attempts to resolve a name to an IP address. The > character is the NSLOOKUP prompt. As you can see, the noninteractive use of the NSLOOKUP utility provides basic information.
C:\<nslookup drew.pseudo-corp.com>
 Server: pseudo1.pseudo-corp.com
 Address: 192.168.1.1
 Name: drew.pseudo-corp.com
 Address: 192.168.2.51
Before making a query, the NSLOOKUP utility must locate a DNS server by consulting the addresses in the DNS Service Search Order list, which is in the client's TCP/IP Properties dialog box. (For more information about client configuration, see "NDS and DNS: Configuring DNS Services in NetWare 5.") If the NSLOOKUP utility cannot contact a DNS server in the list, the utility makes several attempts before moving to the next DNS server.
Interactive Queries
The following dialog shows the beginning of an interactive session.
C:\<nslookup>
 Default Server: pseudo1.pseudo-corp.com
 Address: 192.168.1.1
You can enter many commands and queries at the NSLOOKUP prompt. For example, you can enter a host name or an IP address at the NSLOOKUP prompt. This type of query produces the same results as a noninteractive query.
By default, the NSLOOKUP utility searches for entries in Address resource records. You can alter the query by specifying different types of resource records, or you can search all resource records.
The target of a search is defined by the value of the querytype variable (abbreviated q), which is set by default to A for Address resource record lookups. To examine the SOA record for a domain, you use the command set q=soa to set the querytype variable to soa. You then enter a query with the appropriate domain name.
> set q=soa
 > pseudo-corp.com
 Server: pseudo1.pseudo-corp.com
 Address: 192.168.1.1
 pseudo-corp.com
 primary name server = pseudo1.pseudo-corp.com
 responsible mail addr = drew.pseudo-corp.com
 serial = 1999011701
 refresh = 10800 (3 hours)
 retry = 3600 (1 hour)
 expire = 604800 (7 days)
 default TTL = 86400 (1 day)
 pseudo-corp.com nameserver = pseudo1.pseudo-corp.com
 pseudo1.pseudo-corp.com internet address = 192.168.1.1
Suppose that you want to examine all of the resource records pertaining to a given host. To do this, you set the querytype variable to any and enter the query with the appropriate host name, as the following example shows:
> set q=any
 > mail1.pseudo-corp.com
 Server: pseudo1.pseudo-corp.com
 Address: 192.168.1.1
 mail1.pseudo-corp.com internet address = 200.190.50.254
 mail1.pseudo-corp.com MX preference = 10, mail exchanger = pseudo-corp.com
To examine all of the resource records in a domain, you use the ls command. This command supports a variety of parameters that focus or expand the query. In the next example, the -d parameter returns all of the resource records in the specified domain, which is determined by querying the default DNS server. If the records do not fit on one screen, they are presented one page at a time.
> ls -d pseudo-corp.com
The NSLOOKUP utility can access only one DNS server at a time. If you want to query a different DNS server, enter the server or lserver command at the NSLOOKUP prompt, as shown below:
> server dns1.eng.pseudo-corp.com
Subsequent queries are directed to the DNS server you specified. The server and lserver commands accomplish much the same thing but differ in a significant way. The lserver command queries the local server--the server on which you started the NSLOOKUP session--to obtain the address of the next server to be queried. The server command queries the current default DNS server. If you query a server that does not respond, the NSLOOKUP utility is cut off from a working DNS server. If the current default server does not respond, you can use the lserver command to access the DNS server on which you started the NSLOOKUP session.
LEARNING MORE ABOUT DNS
This article and the article in the last issue of NetWare Connection focused on the procedures used to manage the NetWare 5 DNS service. You can find more detailed information about the DNS service itself in a variety of DNS references. I suggest you read DNS and Bind, written by Albitz and Liu and published by O'Reilly ' Associates Inc. You may also want to read several RFCs from http://www.ietf.org. The primary documentation for DNS is found in RFCs 1034 and 1035.
Drew Heywood is a network administrator who spends most of his time writing books and articles about networking. His new book Novell's Guide to NetWare 5 and TCP/IP will soon be published by Novell Press.
* Originally published in Novell Connection Magazine
Disclaimer
The origin of this information may be internal or external to Novell. While Novell makes all reasonable efforts to verify this information, Novell does not make explicit or implied claims to its validity.