Novell Upgrade Wizard: Upgrading Couldn't Get Easier
Articles and Tips:
01 Aug 1998
Upgrade. This word can make even the most experienced network administrator break out in a cold sweat--especially if that administrator is contemplating a major network operating system upgrade. For example, although the features and benefits of intraNetWare are compelling, many network administrators have considered upgrading their company's NetWare 3 servers to intraNetWare a complex and risky process.
Recognizing these concerns, Novell has released an easy-to-use utility called the Novell Upgrade Wizard, which is designed to make upgrading NetWare 3 servers worry free. This utility will also allow you to upgrade NetWare 3 servers to NetWare 5 when it is released later this year. (You can download the Novell Upgrade Wizard free from http://www.novell.com/intranetware/upgrade/wizard.html.)
HOW THE NOVELL UPGRADE WIZARD WORKS
The Novell Upgrade Wizard is a graphical modeling and upgrade tool that simplifies the process of migrating a NetWare 3 server across the wire to a new or existing intraNetWare or NetWare 5 server. The Novell Upgrade Wizard enables you to migrate the NetWare 3 bindery and volumes with simple drag-and-drop functionality. (For information about other migration methods, see "Which Upgrade Method Should You Use?" at http://www.nwconnection.com/nwc/aug.88/wizard88/upgrade.html.)
The Novell Upgrade Wizard performs three processes: modeling, verification, and migration. During the modeling process, you create an upgrade project, which allows you to determine where the NetWare 3 bindery and volumes will be placed in the Novell Directory Services (NDS) tree. Because all of the modeling is done offline at the workstation, the upgrade project has no effect on the NDS tree until you select the Migrate option. As a result, you can model multiple scenarios until you find the best scenario for your company.
After you decide where the NetWare 3 bindery and volumes should be placed in the NDS tree, you should use the verification process to resolve any naming conflicts between the Bindery objects being migrated and the existing NDS objects. During this process, the Novell Upgrade Wizard may also identify potential problems with NetWare Loadable Module (NLM) versions or name space support. Although the verification phase is optional, resolving naming conflicts before you begin the migration process is helpful.
During the migration process, the Novell Upgrade Wizard copies the Bindery and Volume objects from the NetWare 3 server, converts these objects to NDS objects, and places the NDS objects in an existing NDS tree as defined in the upgrade project. Because the Bindery and Volume objects are migrated across the wire, the NetWare 3 server is unaffected. If you experience problems with the migration process, the NetWare 3 server is still available.
LET'S UPGRADE!
Using the Novell Upgrade Wizard to migrate a NetWare 3 server to intraNetWare or NetWare 5 is easy. You simply complete the following steps:
Complete premigration tasks.
Download and install the Novell Upgrade Wizard.
Create an upgrade project.
Verify the upgrade project.
Migrate the upgrade project.
Complete postmigration tasks.
COMPLETE PREMIGRATION TASKS
Before you begin the migration process, you should complete several important tasks, as explained below.
Verify Hardware and Software Requirements
Using the Novell Upgrade Wizard to perform an across-the-wire migration requires a minimum of three computers: the NetWare 3 server being migrated, an intraNetWare or NetWare 5 server, and a Windows NT or Windows 95 workstation that will run the Novell Upgrade Wizard.
If you are using a Windows NT workstation, you must install intraNetWare Client for Windows NT 4.11 or above on this workstation. If you are using a Windows 95 workstation, you must install intraNetWare Client for Windows 95 2.2 or above on this workstation. (You can download the Novell client software from Novell's World-Wide Web site at http://www.novell.com/novellsw/brands.html.)
Log Out All Users
After you have verified that your company's network meets the hardware and software requirements, you should ensure that all users are logged out of the network. Although major upgrades are typically performed during off-peak hours, such as in the evenings or on weekends, you should still verify that there are no active connections before you begin the migration process. You can use the MONITOR NLM to view active connections and then clear these connections if necessary.
Back Up Servers
I strongly recommend that you back up the server (both the bindery and the volumes) being migrated. Although an across-the-wire migration leaves the NetWare 3 server intact, it is better to be safe than sorry. You may also want to back up the NDS tree and the intraNetWare or NetWare 5 server to which you are migrating data. You will then be able to restore the NDS tree and the server to their original states if necessary. (For information about backing up NDS, see the related article.)
Depending on how confident you are in backup software, you might want to make two backups as a fail-safe. Although taking this precaution may sound like extra work, the only thing worse than not having a backup is having a backup that you cannot restore properly.
Disable SAP Filtering
If you are migrating a NetWare 3 server to an intraNetWare or NetWare 5 server on a different network segment, you must disable Service Advertising Protocol (SAP) filtering. The Novell Upgrade Wizard cannot function properly if SAP filtering is enabled. If you cannot disable SAP filtering, you should put the NetWare 3 server and the intraNetWare or NetWare 5 server on the same network segment during the migration process.
Gather Information
When you run the Novell Upgrade Wizard, you must provide information about the source NetWare 3 server and the destination NDS tree. Gathering the following information before you begin the migration will help you complete this migration more quickly:
The name of the NDS tree
The password for the ADMIN or ADMIN-equivalent user
The password for the NetWare 3 SUPERVISOR or SUPERVISOR-equivalent user
DOWNLOAD AND INSTALL THE NOVELL UPGRADE WIZARD
After you complete these premigration tasks, you must download the Novell Upgrade Wizard from http://www.novell.com/intranetware/upgrade/wizard.html. You then run the NUWSETUP.EXE file on a Windows NT or Windows 95 workstation to install the Novell Upgrade Wizard.
During the installation process, the NUWSETUP utility copies several NLMs to the PRODUCTS\NW3X subdirectory, which is located in the directory in which you chose to install the Novell Upgrade Wizard. If you chose the default installation path, this subdirectory is located in C:\PROGRAM\FILES\NOVELL\UPGRADE\PRODUCTS\NW3X.
The NLMs are updates to existing NetWare 3 NLMs that are required by the Novell Upgrade Wizard. To update the NLMs on the NetWare 3 server you are upgrading, you simply copy these NLMs to the SYS:SYSTEM directory of the server. To ensure that the updated versions of the NLMs are loaded on the NetWare 3 server, you should shut down and restart the server.
After you reboot the server, you must load the appropriate TSA3X.NLM for the particular version of NetWare 3 you are upgrading. For example, if you are upgrading a NetWare 3.11 server, you should load the TSA311.NLM. If you are upgrading a NetWare 3.12 server, you should load the TSA312.NLM.
CREATE AN UPGRADE PROJECT
As mentioned earlier, an upgrade project enables you to model the NetWare 3 bindery and file system offline before you actually begin the migration. When you launch the Novell Upgrade Wizard, you are given the option to create a new upgrade project, to work on an existing upgrade project, or to open the last upgrade project accessed.
When you create a new upgrade project, you are prompted to enter a name for the project and to select the source NetWare 3 server and the destination NDS tree. You are then prompted to authenticate to the NetWare 3 server and to the NDS tree if you have not already done so.
After you have been authenticated to both the NetWare 3 server and the NDS tree, the Novell Upgrade Wizard gathers the NetWare 3 bindery and volume information and the NDS information and stores that information on the workstation's hard drive. A modeling screen then appears. (See Figure 1.)
Figure 1: The Novell Upgrade Wizard allows you to model the migration of NetWare 3 bindery and volume information before the migration process is actually performed.
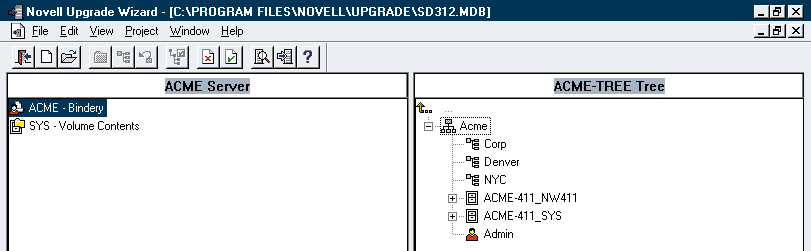
The left side of the modeling screen displays the source NetWare 3 bindery and volume information. The right side of the modeling screen displays the NDS tree. You can browse the NDS tree by double-clicking the container objects that appear on the right side of the modeling screen.
To begin modeling, you choose an existing Organization object or Organizational Unit (OU) object in which you want the NetWare 3 bindery information to reside. You can also create a new OU object: You simply use the button bar at the top of the modeling screen, or you right-click your mouse and select the New Organizational Unit option.
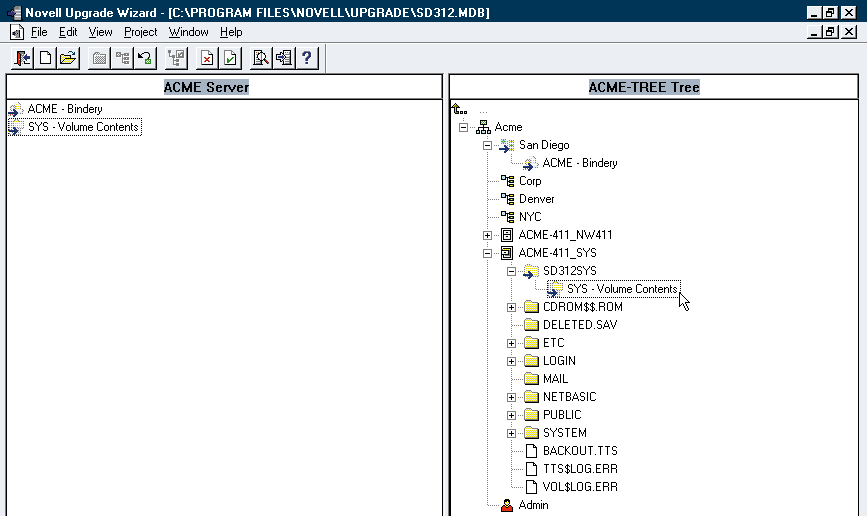
Because the modeling process is performed in an offline database, objects created during this phase are not actually created in the NDS tree until you select the Migrate option. The OU objects you create during the modeling process are identified by a faded icon with a blue arrow. In Figure 2, for example, the San Diego OU object was created during the modeling process and does not yet exist in the NDS tree.
Figure 2: If you create an OU object during the modeling process, the icon for this object is faded, and the object is not created until the migration process is actually performed
Model the NetWare 3 Bindery
To model the NetWare 3 bindery, you select the Bindery object displayed on the left side of the modeling screen, and you drag-and-drop this object to the desired location in the NDS tree. You must drag-and-drop the entire bindery; you cannot drag-and-drop individual objects within the bindery. If you want to move Bindery objects to different locations in the NDS tree, you can use Novell's NetWare Administrator (NWADMIN) utility after the migration process is completed.
Figure 2 shows the Bindery object for the ACME NetWare 3 server, which will be migrated to the San Diego OU object in the NDS tree. The icon indicates that the Bindery object was moved during the modeling process and does not yet exist in the NDS tree.
With the Novell Upgrade Wizard, you can make changes at any time during the modeling process. For example, suppose that you moved the Bindery object to a container object and then decided you wanted to move the Bindery object to a different container object instead. You would simply select the Bindery object in the NDS view of the modeling screen, right-click your mouse, and select the Back Out option.
Model the NetWare 3 Volumes
You use the same process to model the NetWare 3 volumes. However, rather than choosing a destination container object in the NDS tree, you choose a destination volume or directory on the intraNetWare or NetWare 5 server. You can also create a new directory during the modeling process.
Just as you must migrate the entire bindery, you must drag-and-drop the entire volume: You cannot drag-and-drop individual directories or files. After you actually migrate the NetWare 3 volumes, you can use the NWADMIN utility or Windows Explorer to delete unnecessary directories (such as the NetWare 3 LOGIN, SYSTEM, and MAIL directories) and to move directories to another location on the server.
In Figure 2, the SD312SYS directory was created during the modeling process (as indicated by the icon). During the migration process, the entire ACME SYS volume will be migrated to the SD312SYS directory you created.
Once again, no changes are made until you select the Migrate option. If you move a volume and are not satisfied with the location you chose, you select the Volume object in the NDS view of the modeling screen, right-click your mouse, and select the Back Out option.
Where Did It Go?
The modeling process becomes even more useful if you are migrating multiple NetWare 3 binderies and volumes to one NDS tree. When you are working on a large upgrade project, it is easy to forget exactly where you placed a particular Bindery or Volume object in the NDS tree. To help you find these objects, the Novell Upgrade Wizard provides a Where Did It Go? option: You select a Bindery or Volume object on the right side of the modeling screen, right-click your mouse, and select the Where Did it Go? option. The Novell Upgrade Wizard then shows you the location of that object in the NDS tree.
VERIFY THE UPGRADE PROJECT
After the modeling process is completed, you should verify the upgrade project you created to resolve naming conflicts and other errors that may affect the migration. To verify an upgrade project, you select the Verify option from the Novell Upgrade Wizard toolbar.
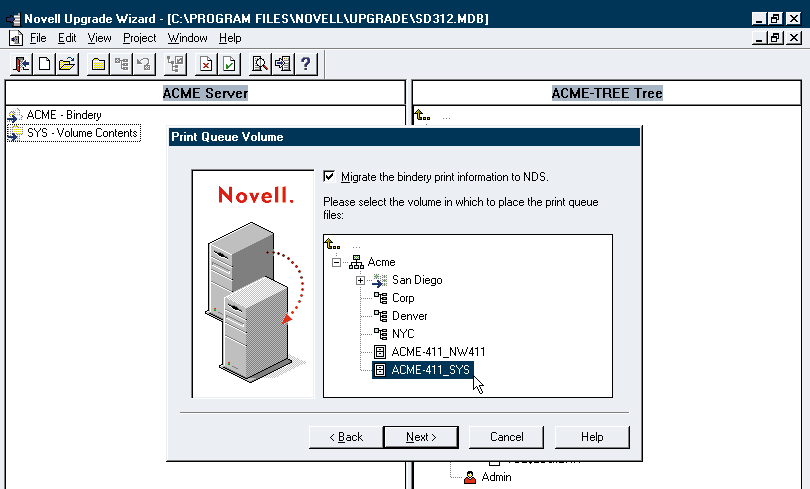
After the verification process begins, the Print Queue Volume screen appears. (See Figure 3.) You can use this screen to upgrade the NetWare 3 print queue information to the intraNetWare or NetWare 5 server. You must then select the Volume object in which you want the NetWare 3 print queues to reside.
Figure 3: The Novell Upgrade Wizard allows you to migrate printing information from the NetWare 3 server to the intraNetWare or NetWare 5 server.
After you enter the NetWare 3 print queue information, another screen appears, allowing you to apply an existing user template to the NetWare 3 User objects as they are being migrated. This option eliminates the need to manually define properties for the User objects after the migration process is completed. You can browse the NDS tree to select the desired user template.
The next step in the verification process is to authenticate to both the source NetWare 3 server and the destination NDS tree. You must have complete administrative rights to the NetWare 3 server and to the NDS context to which you will migrate the NetWare 3 bindery and volumes.
After you have been authenticated to the NetWare 3 server and to the NDS tree, you can define additional events for the Novell Upgrade Wizard to notify you of. By default, the Novell Upgrade Wizard automatically verifies events (such as sufficient rights, name spaces, and NLM versions) and notifies you if a problem occurs. The two options provided at this point--Check for Duplicate Objects and Check for Sufficient Disk Space--prompt the Novell Upgrade Wizard to notify you of these events, in addition to notifying you of the default events.
The verification process then begins. If the Novell Upgrade Wizard discovers a conflict during this process, you are given the option to resolve the conflict. For example, if the Novell Upgrade Wizard discovered a naming conflict, you could choose one of the following options:
Rename the object automatically.
Don't migrate the object.
Merge the two objects with the destination object as the priority, or merge these objects with the source object as the priority.
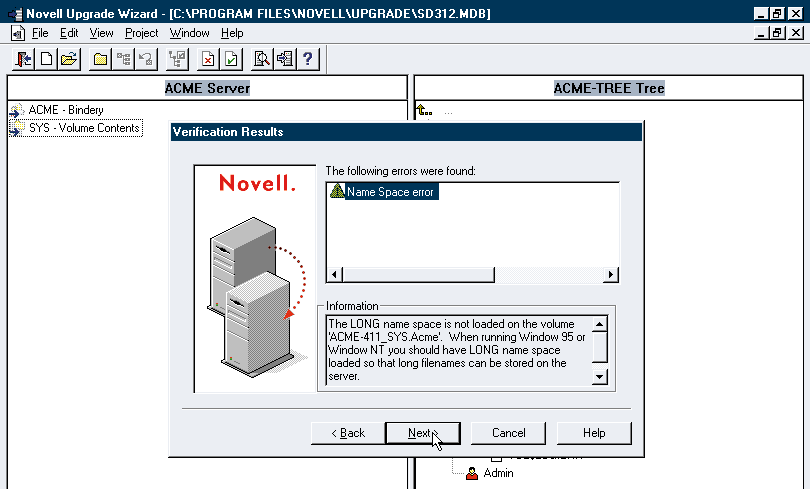
During the verification process, the Novell Upgrade Wizard notifies you of other potential problems, such as name space errors. In Figure 4, for example, the Novell Upgrade Wizard has detected that the LONG name space was not loaded on the ACME SYS volume.
Figure 4: The Novell Upgrade Wizard notifies you if it encounters an error during the verification process.
MIGRATE THE UPGRADE PROJECT
After you have created an upgrade project and verified this upgrade project, you can begin the actual migration. You select the Migrate option from the Novell Upgrade Wizard toolbar.
Before the migration process begins, the Novell Upgrade Wizard performs the verification process again: Because you ran the verification process to resolve all of the conflicts before you began the migration process, no error or conflicts should be encountered. The migration process then begins, and the Novell Upgrade Wizard displays the status of this process. (See Figure 5.)
Figure 5: After the migration process begins, the Novell Upgrade Wizard displays the status of this process.
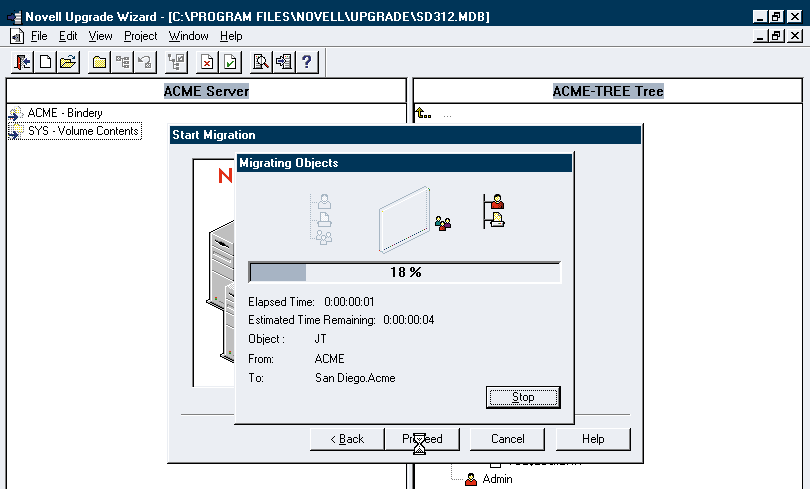
After the migration process is completed, you can view the error log and the success log. You should examine both of these logs carefully to ensure that the migration process was completed properly.
COMPLETE POSTMIGRATION TASKS
Finally, you should complete the following tasks to ensure that when users log in to the network the next day, everything works as it should:
Check Migrated Information
You should verify that all of the NetWare 3 bindery and volume information was migrated correctly. Although viewing the error log and the success log gives you a good idea of what happened during the migration process, you should also use the NWADMIN utility to examine the User, Group, Printer, Server, and Volume objects that were migrated.
Move Objects to New Locations
Because you must migrate the entire bindery or entire volumes to a specific container object in the NDS tree, you may need to move individual objects or directories after the migration process is completed. You can use the NWADMIN utility to move these objects or directories to the appropriate container objects in the NDS tree.
Modify Login Scripts
During the migration process, NetWare 3 user login scripts are migrated to the corresponding User objects that are created in the NDS tree. The NetWare 3 system login script is migrated to the container login script for the Organization or OU object to which the NetWare 3 bindery was migrated.
You must update these login scripts to reflect the migration. For example, you should change the references to the old NetWare 3 server to the new intraNetWare or NetWare 5 server. You should also update drive and print mappings to reflect the location of the new objects in the NDS tree.
Update the Novell Client Software
Fortunately, you do not need to update the Novell client software on all of the workstations overnight. However, you should know that some older versions of the Novell client software, such as the NETX shell, were not designed to support NDS. As a result, workstations running older versions of the Novell client software may not be able to take full advantage of NDS.
Also, intraNetWare and NetWare 5 provide features that simplify the process of upgrading the Novell client software on multiple workstations. For example, Novell Application Launcher (NAL) and Automatic Client Upgrade (ACU) allow you to upgrade software on workstations from a central location. (In NetWare 5, NAL is part of the Z.E.N.works Starter Pack.)
Verify Third-Party Applications
Finally, you should verify that all third-party applications work properly--especially if the applications use information stored in the NetWare 3 bindery. For these applications, NDS supports bindery services emulation, which enables a container object in the NDS tree to emulate the NetWare 3 bindery. You may also want to see if an NDS version of each application is available. (For information about NDS-enabled applications, see the related article.)
AN UPGRADE IS AN UPGRADE
Although the Novell Upgrade Wizard simplifies the process of migrating a NetWare 3 server across the wire to a intraNetWare or NetWare 5 server, an upgrade is an upgrade. The modeling process eliminates much of the guesswork, but you must still complete premigration and postmigration tasks.
Hopefully, future versions of the Novell Upgrade Wizard will provide more flexible modeling capabilities, such as the ability to drag-and-drop individual Bindery objects to the NDS tree. The Novell Upgrade Wizard may not be perfect, but it is certainly a step in the right direction for Novell.
Sandy Stevens is a freelance writer based in Salt Lake City, Utah. She is the coauthor ofNovell's Guide to NetWare Printing, Novell's Guide to BorderManager,andNovell's Guide to Integrating IntranetWare and NT--all of which are available from Novell Press.
NetWare Connection,August 1998, pp. 30-35
* Originally published in Novell Connection Magazine
Disclaimer
The origin of this information may be internal or external to Novell. While Novell makes all reasonable efforts to verify this information, Novell does not make explicit or implied claims to its validity.