Z.E.N.works: Zeroes in on Workstations
Articles and Tips:
01 Apr 1998
If you are like most network administrators, your telephone is already ringing when you walk through your office door in the morning. The call could be a user who needs a new print driver, a user who wants to know how to download the latest version of WordPerfect, or a user who is experiencing a computer problem. Whatever the problem is, you will probably need to walk to the user's desk to provide a solution.
Although receiving a constant barrage of telephone calls can be annoying--preventing you from completing other network management tasks--you can't really blame users. After all, most users must overcome several networking obstacles just to do their jobs. For example, users must find, download, and install new applications before using them, and users often need to find print drivers and juggle print queues just to print a document. And if users experience a computer problem, they must know their Novell Directory Services (NDS) context when reporting the problem.
Novell has announced a new network management tool called Zero Effort Networks (Z.E.N.works), which is currently in open beta. With Z.E.N.works, you can make the network easier for users to use. And because users' jobs are easier, your job should be a lot easier, too.
This article explains how Z.E.N.works delivers zero-effort networking by providing the following capabilities:
Adding NDS capabilities to Windows policies
Allowing you to manage Windows NT, Windows 95, and Windows 3.1 workstations
Allowing you to distribute and manage applications across the network
Allowing you to conduct a hardware inventory of multiple workstations on the network
HOW DOES Z.E.N.WORKS DELIVER ZERO-EFFORT NETWORKING?
Z.E.N.works addresses three areas of network management:
Application Management. Z.E.N.works includes Novell Application Launcher (NAL) 2.5, which allows you to centrally distribute, upgrade, and manage applications across your company's network. (For more information about NAL, see "Novell Application Launcher 2.0: Winning the Application Battle,"NetWare Connection, Oct. 1997, pp. 24-32.)
Desktop Management. Z.E.N.works includes Novell Workstation Manager 1.1, which allows you to store user and desktop configuration information for Windows NT workstations in NDS. You can then manage these workstations with Novell's NetWare Administrator (NWADMIN) utility. (For more information about Novell Workstation Manager, see "Novell Workstation Manager: Take Control of Your Windows NT Workstations,"NetWare Connection, July 1997, pp. 30-37.)
Desktop Maintenance. Z.E.N.works allows you to securely manage workstations from a remote location.
In addition, Z.E.N.works uses NDS to extend Windows features, such as policies, print wizards, and the registry editor. Because Z.E.N.works incorporates these features into NDS, they are manageable.
Z.E.N.works combines all of these capabilities, which you access through the 32-bit version of the NWADMIN utility. (The Z.E.N.works installation program places this version of the NWADMIN utility in the PUBLIC directory of the server on which you install Z.E.N.works.) With Z.E.N.works, you can perform the following management tasks:
Manage workstations from a central location, including creating Windows policies, scheduling workstation changes, configuring Novell client software, creating Windows NT user accounts, and delivering applications when users need them.
Choose printing and other network options for users or workstations throughout the network, providing users with the same desktop no matter which workstation they use to log in to the network.
Deliver more information about users and workstations to your company's help desk.
Take secure, remote control of workstations to solve software-related problems. (Of course, hardware malfunctions still require you to visit these workstations.)
Conduct an inventory of the hardware on each workstation.
Z.E.N.works includes two components: a server component and a workstation component. Once you install both components, you should spend considerably less time visiting workstations to solve problems or to distribute applications.
POLICING WORKSTATIONS WITH POLICY PACKAGES
Although Windows policies are powerful desktop management tools, you may not be implementing policies on your company's network because this process can be time consuming. First, you must use the POLEDIT utility to create a policy for each Windows 95 and Windows NT workstation. (Windows 3.1 does not use policies.) The POLEDIT utility creates the NTCONFIG.POL file on Windows NT workstations or the CONFIG.POL file on Windows 95 workstations.
You must then copy the policy file to the PUBLIC directory on the user's preferred server. If you have a large network, you may have to copy this file to multiple servers for each workstation. And each time you update the policy file, you must repeat this process for each workstation.
Z.E.N.works makes Windows policies both easier to manage and more powerful. When you install Z.E.N.works, it adds a Policy Package object to NDS. This object allows you to control the way users access their workstations and the network.
You can associate a Policy Package object with User objects or Workstation objects. User policy packages affect a user's access to the workstation regardless of where the user logs in to the network. Workstation policy packages affect a workstation regardless of who logs in to the network from that workstation. You can also make policy packages mandatory, so users cannot modify them.
You can use a user policy package to restrict user options. (See Figure 1. All of the figures in this article are from a beta version of Z.E.N.works.) For example, you could hide the Run command in the Windows Start menu to prevent users from loading unapproved software. You could also hide the Network Neighborhood icon to restrict users' access to the network.
Figure 1: You can use a user policy package to restrict user options.
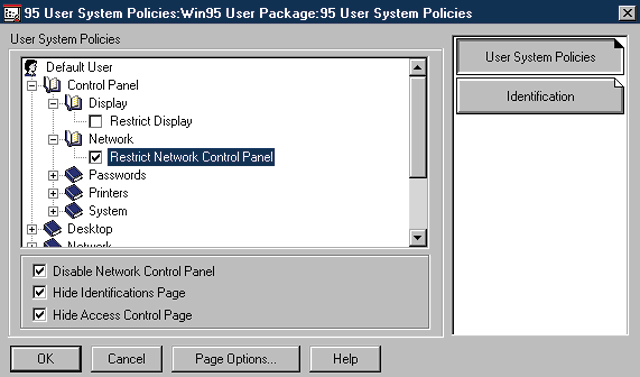
You can use a workstation policy package to run certain applications on a workstation regardless of which user is using the workstation. For example, you could use a workstation policy package to ensure that the company logo appears as a password-protected screen saver on all of your company's workstations. The workstation policy package also enables you to configure the NAL component of Z.E.N.works to run automatically on all workstations. (For more information about the NAL component of Z.E.N.works, see the "Managing Applications" section.)
Creating a Policy Package Object
You can use the 32-bit version of the NWADMIN utility to create a Policy Package object in NDS. (See Figure 2.) To create a Policy Package object for a Windows NT workstation, for example, you complete the following steps:
Figure 2:Launch the 32-bit version of the NWADMIN utility. Select the container object in which you want to create a Policy Package object, and then select the Create option from the Object menu. The New Object menu appears. (See Figure 2.)
Figure 2: You use the NWADMIN utility to create a Policy Package object and to associate this object with User objects and Workstation objects.
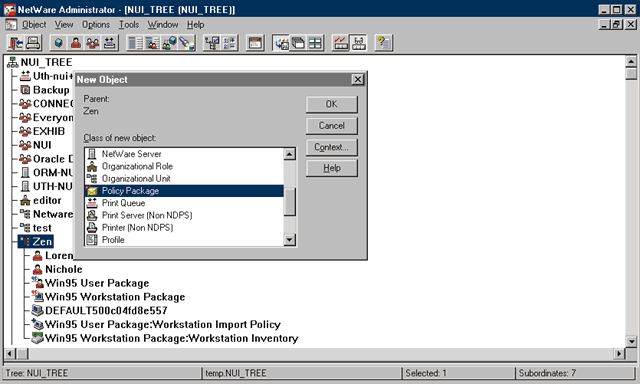
Select the Policy Package option from the New Object menu, and then select the workstation policy package for Windows 3.1, Windows 95, or Windows NT from the Create Policy Package window. (Because Windows 3.1 does not use policies, the Windows 3.1 configuration options are limited.) For example, to create a workstation policy package for a Windows 95 workstation, you would select the WIN95 Workstation Package option.
Next, name the Policy Package object.
Select the Define Additional Properties option, and then click the Create button. The WIN95 Workstation Package page appears.
Double-click the 95 Computer System Policies option. The 95 Computer System Policies page appears. Click the Computer Systems Policy button. (See Figure 3.)
Figure 3: You can use the workstation policy package to manage workstations.
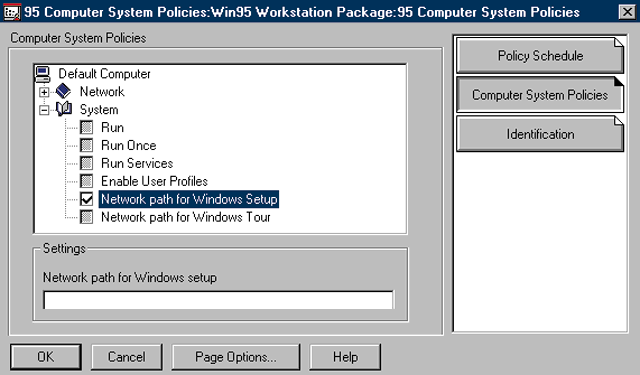
Select the options you want to use to configure the workstations that you will associate with this Policy Package object. For example, you could enable or disable the user-level access control. You could also enable the logon banner option and enter the text you want displayed on the workstations you will associate with this object.
Click the Associate button, and then select the appropriate container object or individual Workstation objects. (The process of creating Workstation objects will be explained later in this article.) Click the OK button.
SCHEDULING WORKSTATION CHANGES
With Z.E.N.works, you can schedule workstation changes for times that cause minimal interruption to users' work. You can schedule these changes through a workstation policy package as events that occur at a specific time of the day, day of the week, date, and so on. (See Figure 4.) For example, if Microsoft released a service pack for Windows NT workstations, you could schedule the update process during the evening after users have gone home.
Figure 4: Z.E.N.works allows you to automate workstation changes. You can specify when these changes occur and how frequently they occur.
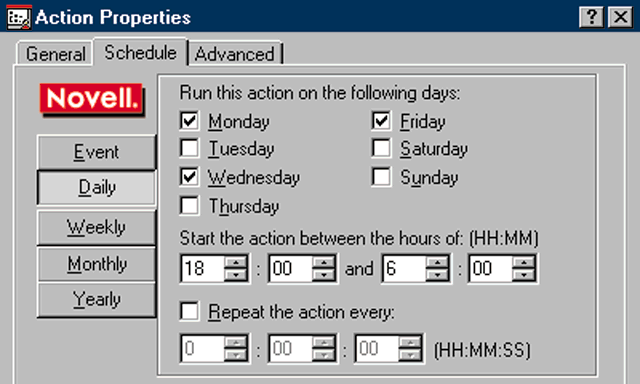
If a workstation is running, Z.E.N.works performs the event at the scheduled time, regardless of whether a user is logged in to the network from this workstation. You can also configure Z.E.N.works to attempt changes until it succeeds in case a workstation is shut down at the scheduled time.
CONFIGURING NOVELL CLIENT SOFTWARE
Suppose that Novell released a patch for its client software requiring you to update the NET.CFG file on 100 workstations. How long would the update process take? With Z.E.N.works, you can manage Novell client software on all Windows NT and Windows 95 workstations from a central location. You can update Novell client software and configure parameters such as Preferred Server, Name Context, Opportunistic Locking, and Packet Burst.
You configure these parameters through a workstation policy package. Z.E.N.works then updates the workstation the next time it authenticates to the network, regardless of which user logs in to the network from this workstation.
CATERING TO WINDOWS NT USERS ON THE MOVE
In many organizations, such as schools and hospitals, users are not assigned a particular workstation. They may log in to the network from a different workstation every day. If users log in to the network from a Windows NT workstation, they need access rights to that workstation.
Rather than create a user account for each user on each workstation, you can use Z.E.N.works to manage Windows NT workstations through NDS. (The Novell Workstation Manager component of Z.E.N.works provides this functionality.) In this way, you manage only one database of user information.
When a user logs in to the network, Z.E.N.works collects the username and password the user enters and authenticates this user both to NDS and to the Windows NT workstation. If the user does not have an existing account on this workstation, Z.E.N.works can create a user account dynamically using information defined in NDS. To enable the Dynamic Local User option, you check it in the Windows NT user policy package.
You can also specify that the user account is volatile or nonvolatile. Avolatileuser account is deleted from the workstation's Security Access Manager (SAM) when the user logs out of the network. (The SAM is a database of user accounts.) In this way, you can prevent unnecessary user accounts from accumulating in the workstation's SAM. You also establish tighter security since a user must be authenticated to NDS before he or she can access workstation resources.
Anonvolatileuser account, on the other hand, remains in the workstation's SAM after the user logs out of the network. With a nonvolatile user account, a user can access workstation resources even if the network is unavailable.
PUTTING PRINTERS IN THE RIGHT PLACE AT THE RIGHT TIME
Printing can be a management headache. Every time someone installs a new printer or a user moves to a new department, you must walk to the workstations to install print drivers and configure the printing environment.
Z.E.N.works makes printer management easier by letting you manage printers through NDS, eliminating the need for you to physically visit workstations. With Z.E.N.works, you can assign printers and print drivers through a user policy package or a workstation policy package. If you assign printers and print drivers through a user policy package, users can access the same printers and print drivers no matter where they log in to the network. For example, you could use a user policy package if certain users always need to print to a particular color printer. You can also configure Z.E.N.works to install and uninstall print drivers dynamically.
However, you will probably want to assign printers through a workstation policy package. In this way, you can configure workstations to print to the nearest printer, thereby eliminating the need for users to find the nearest printer and load the appropriate print drivers.
MANAGING APPLICATIONS
Distributing and managing applications can be time consuming. Even server-based applications require you to maintain application files and Windows registry entries. The NAL component of Z.E.N.works allows you to distribute and manage applications across the network. When you need to install an application on multiple workstations, Z.E.N.works determines which application files need to be installed on each workstation and then installs these files either permanently or dynamically. You could easily use Z.E.N.works to make your company year 2000 compliant.
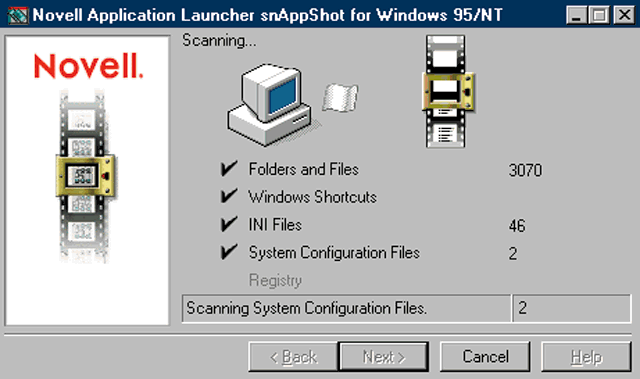
First, you run the snAppShot utility, which is part of the NAL component of Z.E.N.works, on a workstation. The snAppShot utility scans the workstation configuration and takes a "picture" of all of the files on this workstation. (See Figure 5.) You then install the application on this workstation. After the installation process is completed, the snAppShot utility scans the workstation configuration again, determines what has been changed, and creates a template that Z.E.N.works uses to install the application on other workstations. You can specify whether Z.E.N.works permanently installs the application on these workstations or uninstalls the application when the user logs out of the network.
Figure 5: The Z.E.N.works snAppShot utility scans the workstation configuration before and after you install an application.
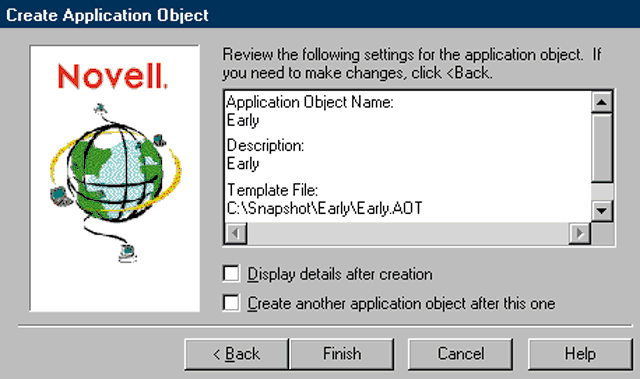
Next, you use the NWADMIN utility to create an Application object for the application you want to install. You select the workstation directory in which you want the application installed, and you review the configuration settings. (See Figure 6.) After you approve these settings, the NWADMIN utility uses the snAppShot template to create the Application object. You can then associate the appropriate User, Group, or container objects with the Application object.
Figure 6: You can use a Z.E.N.works snAppShot template to create an NDS Application object.
The next time a user who is associated with the Application object logs in to the network, the application's icon appears on the user's desktop. When the application attempts to launch, Z.E.N.works compares the workstation configuration to the snAppShot template. If a part of the application is missing from the workstation, Z.E.N.works identifies the missing application files and reinstalls them. For example, if a user inadvertently deleted a .DLL file, Z.E.N.works would reinstall this file when the user launched the application.
If you associate a user with the Application object, the application is available to that user no matter which workstation the user accesses to log in to the network. In addition, Z.E.N.works loads this application from the server that is physically closest to the workstation. For example, if a user logged in to the network from a workstation in Los Angeles, Z.E.N.works would load the application from a server in Los Angeles. If the user traveled to London and logged in to the network, Z.E.N.works would load the application from a server in London.
HELPING YOU HELP USERS
When users call your company's help desk about a computer problem, they may be irritated when they are asked for their NDS context. Most users don't even know what their NDS context is. Once the users get past this obstacle, they must try to follow instructions someone is giving them over the telephone, or they must wait until someone gets the time to help them.
Z.E.N.works can help you manage your company's help desk. With Z.E.N.works, you can create a help request policy in a user policy package. The help desk policy is intended to hook into existing help desk applications to provide a more efficient first step in the help desk process.
The help request policy lists the name, e-mail address, and telephone number of the appropriate help desk technician for a particular problem. Z.E.N.works delivers this information to users through a help request utility, which is part of the remote control component of Z.E.N.works.
The help request utility appears as an icon on the user's desktop. When a problem occurs, the user can double-click the icon to get information about who to contact for help. The user can call or send an e-mail message to the correct help desk technician. If the user sends an e-mail message, he or she can copy and paste any error messages into the e-mail message.
Because the help request utility includes the user's context, the help desk technician can easily find the user in NDS, and the user is no longer required to know their NDS context. In addition, the help desk technician can use Z.E.N.works to take control of the user's workstation and solve the problem on the spot.
Current remote control solutions are not secure, they can in some cases increase network traffic, and they are difficult to navigate. Z.E.N.works addresses these concerns:
Z.E.N.works uses NDS security. Only administrators with the necessary rights can remotely control a workstation.
Z.E.N.works accesses the IPX or IP address stored in the Workstation object to locate the workstation. Other remote control solutions require the workstation to advertise itself on the network, generating network traffic.
To use the remote control capabilities of Z.E.N.works, you install a .DLL file on all Windows 3.1 and Windows 95 workstations using a login script or the NAL component of Z.E.N.works. For Windows NT workstations, you install a service using the NTSTACFG installation program. (When you install Z.E.N.works, it copies the NTSTACFG installation program to the PUBLIC directory on the server.)
You can find the workstation you want to control by using the NWADMIN utility to browse the NDS tree. You then click the Remote Control button on the workstation's Remote Control page to take control of the workstation.
TAKING INVENTORY
Do you know how many workstations your company has, what type of computers these workstations are, and how these workstations are configured? If you are like most network administrators, tracking this information is an ongoing nightmare. Fortunately, Z.E.N.works provides a relatively easy way to keep track of multiple workstations, along with their processors, their RAM, and other hardware components. To conduct a hardware inventory for all of the workstations on your company's network, you complete the following steps:
Launch the 32-bit version of the NWADMIN utility. Select the container object in which you want to create a Policy Package object, and then select the Create option from the Object menu. The New Object menu appears. (See Figure 2.)
Select the Policy Package option from the New Object menu, and then select the user policy package for Windows 3.1, Windows 95, or Windows NT from the Create Policy Package window. For example, to create a user policy package for a user on a Windows NT workstation, you would select the WINNT Workstation Package option.
Next, name the Policy Package object.
Select the Define Additional Properties option, and then click the Create button. The WINNT Workstation Package page appears.
Double-click the NT Workstation Import Policy option. The NT Workstation Import Policy page appears.
Specify the container object in which you want Workstation objects to reside. You can also define how Workstation objects are named when they are created in NDS. Click the OK button after you define these options. The Workstation Import Policy page appears.
Click the Associate button, and then select the appropriate User or Group objects. Click the OK button.
When a user who has been associated with a Windows NT user policy package logs in to the network from a particular workstation, NDS creates a Workstation object for the workstation. This Workstation object appears in the container object you specified.
Now you can create a workstation policy package, enable the Workstation Inventory option, and associate the workstation policy package with a container object or with individual Workstation objects. The next time a user logs in to the network from a workstation that is associated with this workstation policy package, Z.E.N.works automatically populates NDS with an inventory list for that workstation. On subsequent logins, Z.E.N.works checks the inventory list and records any changes.
The inventory list includes the following information:
The amount of RAM
Types of drives, such as hard drives and CD-ROM drives
Types of buses, such as ISA and PSA
Types of services, such as a NetBIOS interface, a TCP/IP NetBIOS helper, remote procedure call (RPC), and plug-and-play
Memory addresses that are in use
Interrupts that are in use
I/O ports that are in use
Display settings
Because Z.E.N.works uses NDS to store workstation information, you can view the inventory list for any workstation on the network. (See Figure 7.) You can also use reporting software that is Open Database Connectivity compliant, such as Crystal Reports, to query NDS for workstation information.
CONCLUSION
With Z.E.N.works, you can make users more productive by making the network easier for them to use. And because Z.E.N.works is based on NDS, your job becomes easier as well. For example, Z.E.N.works extends Windows features, integrating them into NDS and allowing you to manage these features from a central location. As a result, you can manage workstations more easily and decrease the time you spend responding to users' requests for help. In addition, you can use Z.E.N.works to distribute and manage your company's applications.
For more information about Z.E.N.works, visit Novell's World-Wide Web site (http://www.novell.com/products/nds/zenworks), or call 1-800-NETWARE or 1-801-861-5588.
Michael Astle is a freelance writer based in Salt Lake City, Utah.
NetWare Connection,April 1998, pp.28-34
* Originally published in Novell Connection Magazine
Disclaimer
The origin of this information may be internal or external to Novell. While Novell makes all reasonable efforts to verify this information, Novell does not make explicit or implied claims to its validity.