LabExpert 2.21: Configuring Multiple Workstations
Articles and Tips:
01 Mar 1998
If you have configured multiple workstations to run Windows 3.x, you know how easy this process is: You simply install Windows 3.x and the necessary applications on one workstation and then use Novell's NCOPY utility to copy the files to a server. To configure a subsequent workstation, you partition and format the workstation's hard drive and use the NCOPY utility to copy the files from the server to this workstation. Configuring multiple workstations in this way can save hours of tedious labor.
Unfortunately, configuring multiple workstations to run Windows 95 is much more difficult: You must run the Windows 95 Setup utility on each new workstation. This problem has plagued computer resellers, labs, training centers, and other companies that need to frequently configure multiple workstations.
KeyLabs Inc., an independent testing lab based in Provo, Utah, has solved the problem by releasing LabExpert 2.21, a software suite that allows you to quickly configure multiple workstations. With LabExpert 2.21, you can configure one or more workstations in minutes rather than in hours or days.
As you might imagine, KeyLabs uses LabExpert 2.21 as the backbone of its lab operations. Without LabExpert 2.21, KeyLabs would spend more time configuring multiple workstations than testing products.
WHAT'S IN LABEXPERT 2.21?
LabExpert 2.21 allows you to create an image file of a workstation's hard drive. This image file contains everything stored on the hard drive, including the data and the partition information. You can save the image file to a server running any version of NetWare or Windows NT, or you can send this file across the network to one or more workstations. When a workstation receives the image file, the workstation writes this file to the hard drive, sector by sector. This hard drive is then an exact duplicate of the hard drive from which the image file was created.
LabExpert 2.21 consists of the following components:
ImageBlaster Pro
A collection of tools
ImageBlaster Pro
The core component of LabExpert 2.21 is ImageBlaster Pro, a DOS-based program that allows you to create an image file of a hard drive that is running any operating system. ImageBlaster Pro supports many partition types, including NetWare, UNIX, File Allocation Table (FAT), FAT 32, High-Performance File System (HPFS), and NT File System (NTFS).
ImageBlaster Pro keeps the image file size as small as possible by storing only the areas on the partition that contain data. In addition, ImageBlaster Pro uses file compression to minimize the size of the image file. For example, ImageBlaster Pro could store a 1-GB partition with 200 MB of Windows 95 system, application, and data files in a 150-MB image file.
With ImageBlaster Pro, you can also broadcast the image file to multiple workstations simultaneously. Because you broadcast the image file only once, the same amount of bandwidth is consumed whether you send this file to one workstation or to hundreds of workstations.
To receive an image file that you broadcast, each workstation must load a small, DOS-based terminate-and-stay resident (TSR) program that is included with ImageBlaster Pro. All of the workstations that receive the image file are then configured with an identical partition containing identical data, even if the hard drives on these workstations are not the same model, make, or size. The only stipulation is that these hard drives must be large enough to accept the image file.
You can run ImageBlaster Pro on any workstation that has an IPX connection to a NetWare or Windows NT server. This workstation must also be running any version of DOS, such as MS-DOS 6.22. In addition, the workstation must be running DOS-based LAN drivers and DOS-based client software, such as Novell's Virtual Loadable Module (VLM) client software.
A Collection of Tools
LabExpert 2.21 includes several tools that add flexibility, functionality, and ease-of-use to ImageBlaster Pro. The most useful tool is LabExpert Control Console, a Windows-based management utility that simplifies the process of configuring multiple workstations.
With LabExpert Control Console, you can manage a large number of workstations from a central location, installing new image files and rebooting the workstations with a click of the mouse. Although other imaging products are available, the ability to centrally manage many workstations sets LabExpert 2.21 apart from the competition.
LabExpert 2.21 also includes the following tools, which are discussed later in the article:
LabExpert Process Builder
BootWorks and BootWorks Makedisk
A set of software agents
In addition, LabExpert 2.21 includes two utilities that help you avoid problems related to the Windows 95 and Windows NT registry: Windows Registry Manager and SIDgen. (See "Windows on Your Mind")
SETTING UP THE NETWORK
I was somewhat daunted by the initial task of setting up the network for LabExpert 2.21. Because the copy of LabExpert 2.21 that I received contained no printed documentation, I made my first mistake during the installation process.
LabExpert 2.21 includes three diskettes, with no general instructions printed on them. A quick look at these diskettes revealed a Windows-based installation program, which I ran. (This installation program requires Windows 95 or Windows NT Workstation 3.51 or higher.) I accepted all of the default settings, installing LabExpert 2.21 on drive C, the default drive.
The installation program created a program folder with five documentation files. Because these files are written in HyperText Markup Language (HTML), I was able to view the documentation with my World-Wide Web browser.
One of the documentation files contains aQuick Start Guide, which explains that you should install LabExpert 2.21 on the server, rather than on drive C. As a result, I had to reinstall LabExpert 2.21--this time to the server. (The server was a Hewlett-Packard NetServer with a Pentium processor, 32 MB of RAM, and a 2-GB hard drive running intraNetWare.)
Because I was unfamiliar with disk imaging software, I found theQuick Start Guideinvaluable. Although setting up the network for LabExpert 2.21 may take some time, the process is not difficult if you follow this guide.
Server Requirements
To set up the network for LabExpert 2.21, you must have either a dedicated or a peer-to-peer server running any version of NetWare or Windows NT. You should ensure that the server has plenty of free hard drive space. The server must have enough hard drive space to store the LabExpert 2.21 program files and the control database, which maintains information about the configuration tasks you want each workstation to perform.
The server must also have enough hard drive space to store large image files. You might even want to store multiple image files at one time on the server.
Control Console Requirements
In addition, you must install LabExpert Control Console on a workstation running Windows 95 or Windows NT Workstation 3.51 or higher. This workstation must also have at least 16 MB of RAM and an IPX connection to the server on which LabExpert 2.21 is stored.
If you need to configure many workstations on a regular basis, you might want to dedicate a workstation to act as the control console. You can also use your own workstation or any other workstation on the network that meets the hardware and software requirements.
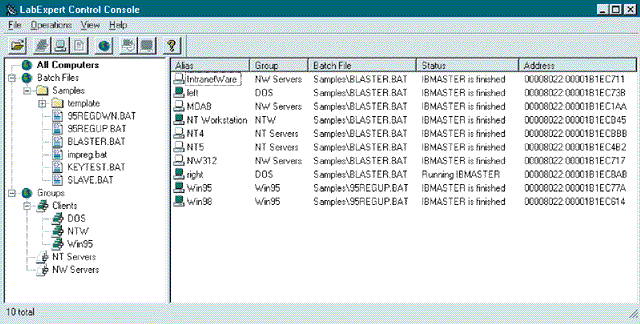
From the control console, you can manage the creation and distribution of image files for the entire network. (See Figure 1.) For example, you can assign batch files to each workstation. Then when the workstation is rebooted, it automatically performs the configuration task specified in the batch file. LabExpert Control Console includes several batch files that you can use to automate common configuration tasks, such as creating image files.
Figure 1: LabExpert Control Console displays all of the available workstations and the assigned batch files, which specify configuration tasks for each workstation.
You can use LabExpert Process Builder to write batch files for specialized configuration tasks, such as setting environment variables. Because these batch files are standard DOS-based batch files, you can use them to execute any DOS command or to launch any DOS application.
From the control console, you can reboot workstations in one of two ways :
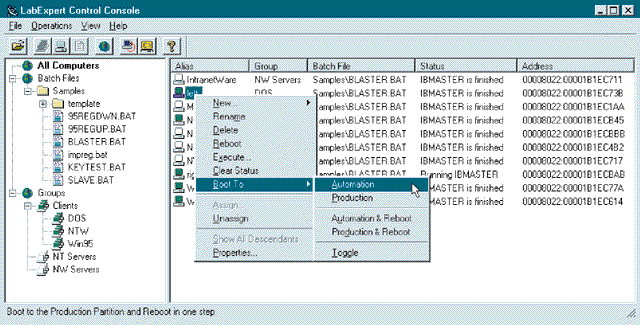
You can configure a workstation to boot to the production partition, which enables the workstation to launch its native operating system, such as Windows 95 or Windows NT.
You can configure a workstation to boot to the automation partition, which enables the workstation to perform any configuration tasks you have assigned the workstation. The automation partition is created when you install BootWorks on this workstation.
If you want the workstation to launch its native operating system, you select the production partition. If you want the workstation to perform a configuration task, on the other hand, you select the automation partition. (See Figure 2.)
Figure 2: LabExpert Control Console allows you to configure workstations to boot to the production partition or to the automation partition.
All configuration tasks that are executed from the control console are performed in real time. Simple configuration tasks, such as downloading an image file, may require LabExpert 2.21 to perform a single action. Complex configuration tasks, such as restoring a Windows 95 workstation from an image file, may require LabExpert 2.21 to perform multiple actions. LabExpert 2.21 links these actions together, allowing a sequence of actions to occur with only one click of the mouse.
Workstation Requirements
The workstation requirements for LabExpert 2.21 are simple: Each workstation needs a hard drive and a network connection to the server containing LabExpert 2.21. You can use any network interface board that has a DOS-based LAN driver.
You can also use any protocol to communicate with the server containing LabExpert 2.21. However, because LabExpert 2.21 requires IPX to provide some capabilities, such as broadcasting an image file, you cannot access these capabilities if you use another protocol.
If you need to configure a large number of workstations, you should try to ensure that these workstations have an identical hardware configuration or that all workstations with an identical hardware configuration are physically and logically grouped together. You can then distribute image files more easily.
This guideline is especially important if you are running benchmarks or if you are distributing image files for operating systems such as Windows 95 and Windows NT, which require identical base configurations. Distributing the same image file to workstations with different hardware components can cause hardware conflicts.
BootWorks
Each workstation must also run BootWorks, a software agent that enables you to automate configuration tasks. BootWorks checks the control database that is stored on the server containing LabExpert 2.21. This database contains information about the configuration tasks you have assigned to each workstation.
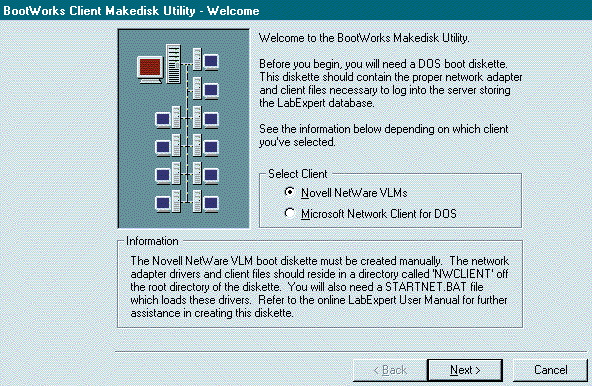
You can install BootWorks on each workstation's hard drive, or you can copy BootWorks to a floppy diskette, which you can then use to boot these workstations. You must also copy the necessary DOS-based LAN drivers and client software onto the BootWorks floppy diskette. (See Figure 3.)
Figure 3: BootWorks Makedisk allows you to install BootWorks on a workstation's hard drive or to create a floppy diskette from which you can run BootWorks.
If you install BootWorks on each workstation's hard drive, the installation program creates an automation partition in which to store BootWorks. This partition is 4 MB to 6 MB in size.
The automation partition speeds up configuration tasks because you can specify from the control console whether you want each workstation to boot to the production partition or to the automation partition. If you run BootWorks from a floppy diskette, however, you must insert the diskette into each workstation's floppy diskette drive to boot to the automation partition. You must then remove this floppy diskette to boot to the production partition.
BootWorks consumes memory only if a workstation boots to the automation partition. If you have assigned a configuration task to the workstation, BootWorks prompts this workstation to boot to the automation partition so the specified task can be performed.
If you have not assigned a configuration task to the workstation, on the other hand, BootWorks prompts this workstation to boot from the production partition, which launches the workstation's native operating system. In this case, BootWorks is not loaded into memory. Because BootWorks is stored in a separate partition, BootWorks does not even appear on the workstation's hard drive.
BootWorks Makedisk
BootWorks includes BootWorks Makedisk, a utility that generates the data necessary for creating the automation partition or the BootWorks floppy diskette. (See Figure 3.) To use BootWorks Makedisk, you must copy the necessary DOS-based client software and LAN drivers onto a bootable floppy diskette.
BootWorks Makedisk then generates a boot diskette or an installation diskette. If you want to manually boot each workstation to automation mode, you should prompt BootWorks Makedisk to generate a boot diskette. If you want to install BootWorks and create an automation partition on each workstation's hard drive, you should prompt BootWorks Makedisk to generate an installation diskette.
To install BootWorks on a workstation's hard drive, you simply boot the workstation from the installation diskette, which runs the BootWorks installation program. If a partition already exists on the workstation's hard drive, the installation program prompts you to move or to delete this partition because the automation partition must reside at the beginning of the hard drive.
You may not be able to move the existing partition on most workstations because this partition is probably configured to contain no free hard drive space. As a result, you must prompt the BootWorks installation program to delete the existing partition, reboot the workstation, and create an automation partition. You can then create a new partition out of the remaining hard drive space.
The definition for the automation partition must reside in the first slot of the partition table. If you have installed an operating system on the workstation, however, the first slot is probably occupied by the definition for this operating system's partition. In this case, the BootWorks installation program prompts you to move the existing partition definition to a different slot in the partition table so the definition for the automation partition can reside in the first slot.
If you are using Windows NT, moving the existing partition definition can cause problems because Windows NT maintains partition information on its boot partition. As a result, you should boot any existing Windows NT workstations to automation mode from a BootWorks floppy diskette.
Since both the automation partition and the BootWorks floppy diskette require a bootable version of DOS, LabExpert 2.21 includes a site license for Caldera OpenDOS 7.01. As mentioned earlier, LabExpert 2.21 also supports any other version of DOS you prefer to use, including MS-DOS 6.22.
Software Agents
Although you can use BootWorks to reboot workstations that are running in automation mode, you cannot use BootWorks to reboot workstations that are running in production mode. If you need this capability, you must install a software agent on these workstations. From the control console, you can then prompt any workstation running in production mode to reboot or to perform a particular configuration task. The software agent on the workstation receives and executes the command to perform this task.
LabExpert 2.21 includes a software agent for DOS, Windows 95, and Windows NT. The DOS software agent is implemented as a TSR program that can only reboot a workstation. The Windows 95 and Windows NT software agents, on the other hand, are implemented as services that can execute any command you send from the control console.
CREATING AN IMAGE FILE
After you have set up the network for LabExpert 2.21, you can start configuring multiple workstations. The first step is to configure the initial workstation, installing an operating system and all of the applications you want. You are then ready to create an image file using ImageBlaster Pro, which consists of two DOS-based utilities: IBMASTER and IBSLAVE.
The IBMASTER utility allows you to create and restore image files. With this utility, you can create an image file of an entire hard drive or just selected partitions.
The IBMASTER utility also allows you to broadcast the data stored in one partition to multiple workstations simultaneously, without having to store an image file on the server. Instead of saving data to an image file, the IBMASTER utility broadcasts data onto the network. The workstations you specify then use the IBSLAVE utility to receive the data and to write this data to their own hard drive.
Broadcasting data saves hard drive space on the server because you do not have to store image files on this server. Broadcasting data also minimizes network traffic because multiple workstations receive data simultaneously. As a result, configuring a few workstations consumes the same amount of bandwidth as configuring hundreds of workstations.
If hard drive space is not an issue but bandwidth is, you can create and store an image file on the server. You can then broadcast this image file to multiple workstations during an off-peak period.
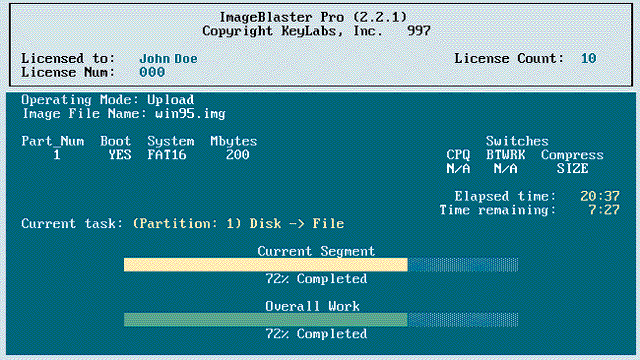
To create an image file of a particular workstation from the control console, you assign the BLASTER.BAT batch file to the workstation, and you reboot this workstation to the automation partition. When the workstation boots, the main menu for ImageBlaster Pro automatically appears. (See Figure 4.) You then choose whether ImageBlaster Pro should compress the image file to maximize speed or to minimize size. As the image file is created, ImageBlaster Pro displays a status screen that allows you to monitor this process. A similar status screen appears on any workstation that is downloading an image file. (See Figure 5.)
Figure 4: From the main menu of ImageBlaster Pro, you can create an image file, download an image file from the server, or broadcast an image file to multiple workstations.
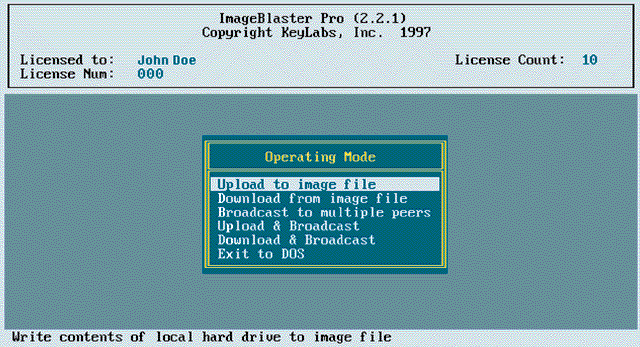
Figure 5: ImageBlaster Pro displays a status screen that allows you to monitor the progress of creating and downloading image files.
TESTING LABEXPERT 2.21
Although partitioning and formatting a hard drive doesn't take long, installing an operating system and applications can be time consuming. Installing Windows 95 alone takes at least 30 minutes, not to mention installing all of the applications you need. With LabExpert 2.21, however, you no longer have to manually install an operating system and applications on every workstation on the network.
To give you an idea of how LabExpert 2.21 speeds up this process, I tested LabExpert 2.21 in several scenarios. First, I created an image file from a workstation with a 486 processor and a 100-MB hard drive, which contained some DOS-based remote access software. Only about 10 MB of space was used on this hard drive; the remaining 90 MB were free. Creating the image file, which was 3 MB in size, took 44 seconds. Downloading this image file to another workstation on a 10 Mbit/s Ethernet network took 25 seconds.
Next, I created an image file from a workstation with a Pentium processor and a 1-GB hard drive running Windows 95. Creating the image file and storing it on the server took less than 15 minutes. However, I then tried bypassing the server and broadcasting this image file to several workstations with an identical hardware configuration over a 100 Mbit/s Ethernet connection. In this case, creating the image file and replicating it across the network took only 5 minutes.
Consider how long it takes to configure 25 new Windows 95 workstations without LabExpert 2.21 and how often you might have to reconfigure these workstations in the future. The capability of configuring multiple workstations simultaneously provides more value than any stopwatch can measure, as does the capability of restoring a workstation that has crashed to its original state in minutes.
CONCLUSION
If your company has a large lab, a classroom, or another environment that requires the rapid configuration of multiple workstations, LabExpert 2.21 can change the way your company does business. LabExpert 2.21 is the future for these environments, allowing you to get more mileage out of your company's existing hardware and software and to spend less time performing configuration tasks.
You can purchase LabExpert 2.21 through retail channels at the suggested retail price of U.S. $750 for a 10-node license. Licenses for additional nodes cost anywhere from U.S. $40 to U.S. $75 per node, depending on the number of licenses your company needs.
You can download a free, 30-day evaluation copy of LabExpert 2.21 from http://www.keylabs.com/software/labex_down.htm. For more information about LabExpert 2.21, visit KeyLabs's web site (http://www.keylabs.com). You can also call 1-801-377-5484.
Dennis Williams is freelance writer who specializes in writing about network systems and remote access. Dennis is based in Alpine, Utah. You can reach him via e-mail at Dennis@ProductReviews.com.
NetWare Connection, March 1998, pp.33-38
Windows on Your Mind
Configuring multiple workstations exactly the same presents some problems with a Windows 95 or Windows NT workstation, which maintains configuration information for all of the workstation's hardware and software in the registry. Many registry settings are unique for each workstation because these workstations have different configurations, static IP addresses, and workstation names. As a result, you must ensure that you maintain unique registry settings when you replicate an image file from a Windows 95 or Windows NT workstation to multiple workstations.
LabExpert 2.21 includes two utilities that help you overcome registry problems: Windows Registry Manager and SIDgen.
WINDOWS REGISTRY MANAGER
You can avoid registry problems by replicating an image file from a Windows 95 or Windows NT workstation, with the original registry files, to every workstation on the network. Windows 95 or Windows NT discovers any configuration differences and updates the registry accordingly. You then need to manually enter any unique registry settings for each workstation.
Manually configuring the registry for multiple workstations can be time consuming. After completing this task, however, you can use Windows Registry Manager to archive each workstation's registry, and you can store these archives on the server. You need to archive each workstation's registry only once: From then on, you can recreate any workstation's configuration by replicating an image file to multiple workstations and restoring the archived registry to these workstations.
Windows Registry Manager even simplifies the process of manually configuring the registry on multiple workstations. With Windows Registry Manager, you can create a .REG file for each workstation that contains only the unique registry settings. You can then import the .REG file into each workstation's registry.
SIDGEN
If you are using Windows NT, you can take advantage of a utility called SIDgen, which ensures that each Windows NT server and workstation has a unique security identifier (SID). (SIDgen works only with Windows NT because Windows 95 does not use SIDs.) Because Windows NT distinguishes these servers and workstations by their SID, duplicate SIDs could cause serious conflicts.
SIDgen makes a backup copy of a workstation's registry and generates a unique SID for this workstation. SIDgen then searches all registry hives, replacing them with the newly generated SID. Next, SIDgen scans the Windows NT file system, changing this file system's entries to reflect the newly generated SID. (All security entries should still list the same users and groups, and all user preferences should remain intact.) The workstation is then rebooted.
You can also use SIDgen to change a Windows NT workstation's name. As a result, SIDgen is a great complement to ImageBlaster Pro for configuring multiple Windows NT workstations.
* Originally published in Novell Connection Magazine
Disclaimer
The origin of this information may be internal or external to Novell. While Novell makes all reasonable efforts to verify this information, Novell does not make explicit or implied claims to its validity.