Novell Application Launcher 2.0: Winning the Application Battle
Articles and Tips:
01 Oct 1997
If managing your company's applications is consuming all of your timeand energy, you need Novell Application Launcher (NAL) 2.0. By taking advantageof Novell Directory Services (NDS), NAL 2.0 allows you to centrally distribute,upgrade, and manage applications across your company's network. When newapplications become available, NAL 2.0 allows you to update these applicationson Windows NT, Windows 95, and Windows 3.x workstations. You can also modifyWindows registry or .INI settings and provide fault tolerance and load balancingfor applications--all without leaving your own workstation.
Sound too good to be true? It gets better: NAL 2.0 is available freeon Novell's World-Wide Web site (http://www.novell.com/novellsw/brands.html).
This article takes an in-depth look at NAL 2.0, explaining the following:
How NAL 2.0 works
How you install NAL 2.0
How NAL 2.0 can reduce the amount of time and energy required to manage applications
HOW NAL 2.0 WORKS
With NAL 2.0, you can define applications as objects in the NDS treeand associate particular users with each application. If a user is associatedwith an application, NAL 2.0 automatically displays that application's iconon the user's desktop. Then when a user launches the application, NAL 2.0performs all of the tasks necessary for the application to run: NAL 2.0dynamically connects to the required network resources (such as networkdrives and printers),"pushes"any necessary components to theworkstation, and updates Windows registry and .INI settings. Because applicationsare delivered through NDS, each user sees the same application icons regardlessof which workstation he or she uses to log in to the network.
To define applications in the NDS tree, you use Application objects,which contain information such as the directory path to the application'sexecutable file and the appropriate Windows registry settings for the workstation.You can associate User objects, Group objects, or container objects witheach Application object.
Applications defined in NDS are dynamically delivered to users' desktops.If you change the way an application is defined in NDS or if you installa new application, these changes will appear on the appropriate users' desktopsal-most immediately.
Because you create Application objects in NDS, you no longer need towalk to each user's workstation simply to install and configure an application.You can create Application objects to do the following:
Provide users with access to network applications
Install or upgrade workstation applications
Install or upgrade Novell client software
Upgrade workstation operating systems (for example, upgrade Windows 3.1 to Windows 95)
This list shows only a few ways you can use NAL 2.0 to distribute softwarefrom a server to a workstation and to manage applications. Future releasesof NAL will allow you to distribute software from one server to another,using NDS to automate the entire process. Novell has also announced plansto enable NAL to run on other platforms that natively support NDS, includingUNIX and Windows NT Server. This cross-platform support, coupled with LightweightDirectory Access Protocol (LDAP) support, could provide directory-enableddistribution of software and data across the Internet.
NAL 2.0 COMPONENTS
NAL 2.0 consists of two management components, which allow you to createand manage Application objects, and two user components, which enable usersto access applications. These components are described below.
NAL Snap-in Module. Implemented as a Windows .DLL file, the NAL snap-in module for the NetWare Administrator (NWADMIN) utility extends the NDS schema, adding the Application object and its related properties to the NDS tree. The NAL snap-in module also makes the Application object and its related properties visible in the NWADMIN utility, allowing you to create and manage Application objects.
NAL snAppShot. This utility helps you manage application installations that are complicated. When an application's setup program changes a workstation's configuration, the NAL snAppShot records information about these changes in an Application ob-ject template (.AOT) file. The NAL snAppShot also keeps track of the files that the application's setup program installs on the workstation: The NAL snAppShot copies these files and stores them as .FIL files. You can then use this information to create and configure Application objects.
NAL Window. The NAL Window (NAL.EXE) is the standard NAL 2.0 client software for Windows NT Workstation 3.51 and 4.0 and for Windows 95. The NAL Window is also the only NAL 2.0 client software available for Windows 3.1. As the name suggests, the NAL Window opens a window on a user's desktop. This window contains the icons for all of the applications with which the user is associated and the folders that organize these icons. As shown in Figure 1, folders are displayed on the left-hand side of the window, and application icons are displayed on the right-hand side of the window.NAL 2.0 allows you to centrally control this window on all users' desktops. For example, you can specify the size and position of the window. You can also specify whether users can create personal folders inside the window or whether users can move or delete application icons. These controls limit a user's ability to damage the desktop, thereby minimizing support costs.
Figure 1: When you use NAL 2.0 to manage applications, the NAL Window appears on a user's desktop, displaying the user's application icons and folders.

NAL Explorer. The NAL Explorer (NALEXPLD.EXE) extends the basic features of the NAL Window, adding functionality to support the Windows NT and Windows 95 Explorer. With the NAL Explorer, you can display applications managed with NAL 2.0 in the Windows system tray, in the Windows Start menu, or on the desktop.
INSTALLING NAL 2.0
Before you install NAL 2.0, you should ensure that your network meetsthe following minimum requirements: The server must be running NetWare 4.1or higher, and workstations must be running one of the following versionsof Novell client software:
IntranetWare Client 4.1 for Windows NT
IntranetWare Client 2.2 for Windows 95
IntranetWare Client 2.2 for DOS and Windows
You can download these versions of Novell client software from Novell'sweb site (http://www.novell.com/novellsw/brands.html).
To manage NAL 2.0, you need a Windows NT or Windows 95 workstation runningversion 4.11 of the NWADMIN utility for Windows NT or Windows 95. You candownload the NWADMIN utility from Novell's web site (ttp://www.novell.com/text/intranetware/ntint/download.html).
The next sections explain how to install the server components and theworkstation components of NAL 2.0.
Installing the Server Components
To install the server components of NAL 2.0, you must be logged in tothe NDS tree as the ADMIN user or as a user with equivalent rights to theNDS tree. Before you begin the installation process, you should close allof the applications on your workstation. You must then complete the followingsteps to install the NAL snap-in module for the NWADMIN utility and theNAL snAppShot:
Run the SETUPNAL.EXE file to begin the installation process.
After you respond to the prompts on the Setup screen and the Software License Agreement screen, the Choose Destination Location screen appears.
You must specify the directory in which you want to install the server components of NAL 2.0. The default destination directory is SYS:\PUBLIC.
Note: Note: Novell strongly recommends that you accept the default destination directory because NAL 2.0 requires files that are stored in the SYS:\PUBLIC directory and its language subdirectories. If you install the server components of NAL 2.0 in a different directory, you must copy the necessary files to this directory before NAL 2.0 will work.
After you specify the appropriate directory and click the Next button, the setup program copies the NAL 2.0 program files to this directory.
After the setup program copies the NAL 2.0 program files to the server, a screen appears, asking if you want to extend the NDS schema. You can extend the NDS schema now, or you can extend the NDS schema the first time you run the NWADMIN utility after you install NAL 2.0. If you extend the NDS schema now, the setup program can create sample Application objects in the NDS tree. Click the Yes button to extend the NDS schema.
Another screen appears, asking if you want the setup program to create sample Application objects in the NDS tree. Click the Yes button.
The setup program creates Application objects for the following:
The NAL snAppShot
The NWADMIN utility for Windows 95
The NWADMIN utility for Windows NT
The Setup Complete screen appears. If you want to view the README file now, select the appropriate option on this screen. Then click the Finish button to exit the setup program.
Installing the Workstation Components
Installing the workstation components of NAL 2.0 is simple: To installthe NAL Window, you must locate the NAL.EXE file in the SYS:\PUBLIC directoryof the server on which you installed the server components of NAL 2.0. Youthen run the NAL.EXE file from your workstation.
The NAL.EXE file automatically loads the correct executable file forthe version of Windows running on the workstation. The NAL.EXE file alsocopies itself onto the workstation and updates the appropriate files.
The easiest way to install the NAL Window is to run the NAL.EXE filefrom a user, profile, or container login script. For example, you couldinclude a command similar to the following in the login script:
 IF OS = "WINDOWS" OR OS = "WIN95" OR OS = "WINNT" THEN"
  \\FILESERVER\SYS\PUBLIC\NAL END
After you install the NAL Window, you must install the NAL Explorer byrunning the NALEXPLD.EXE file, which is also located in the server's SYS:\PUBLICdirectory. The first time you run this file from your workstation, the filecopies itself onto the workstation. In addition, the NALEXPLD.EXE file automaticallyupdates the Windows registry.
Again, the easiest way to install the NALEXPLD.EXE file is from a user,profile, or container login script. For example, you could include a commandsimilar to the following in the login script:
IF OS = "WINNT" OR OS = "WIN95" THEN\\FILESERVER\SYS\PUBLIC\ NALEXPLD/S
CREATING APPLICATION OBJECTS
After you install NAL 2.0, you use the NWADMIN utility for Windows 95or for Windows NT to create Application objects and define which users willhave access to each Application object. As mentioned earlier, when you associatea user with an Application object, the application's icon appears on theuser's desktop almost immediately if the user is logged in to the network.The application's icon also appears on the user's desktop each time theuser logs in to the network. In addition, you can create Application objectsfor a workstation application and install or upgrade this application onmany workstations across the network.
You can create an Application object in one of two ways: manually orusing an Application object template.
Typically, you would create an Application object manually if you wantedto make an existing network application available to users. NAL 2.0 wouldthen display this application's icon on the appropriate users' desktops.You would also create an Application object manually if you needed to performsimple workstation installations or upgrades.
To create an Application object manually, you must complete the followingsteps:
Launch the NWADMIN utility, and select the Create option from the Object menu. The New Object screen appears.
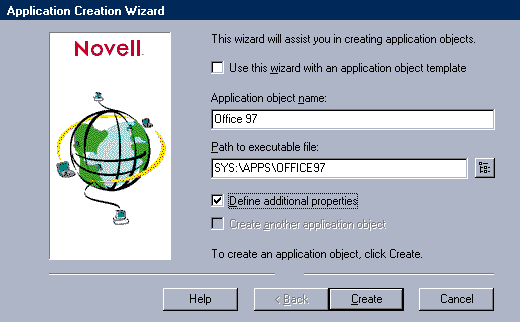
Select the Application option, and click the OK button. The Application Creation Wizard screen appears. (See Figure 2.)
Figure 2: The Application Creation Wizard screen allows you to define the name of the Application object and to specify the directory path to the application's executable file.

Define the Application object by specifying its name and the directory path to the appropriate executable file. You can also define additional properties. (See Figure 2.)
If you are using NAL 2.0 to perform application installations or upgradesthat are complicated, you may want to use an Application object templateto create the Application object. In this case, you complete the steps outlinedabove until the Application Creation Wizard screen appears. You then selectthe Use This Wizard With an Application Object Template option. (See Figure 2.)
If you select this option, the Application Creation Wizard uses the Applicationobject template to create the Application object. This file contains allof the information needed to install and run the application you ran whenyou created the Application object template. To create the Application objecttemplate, you use the NAL snAppShot, as described below.
Creating an Application Object Template
When you run the NAL snAppShot, it takes a snapshot of your workstationbefore you install an application. The NAL snAppShot then prompts you toinstall the application. After the installation process is completed, theNAL snAppShot takes another snapshot of your workstation.
The NAL snAppShot records the changes made during the installation processin an Application object template, which you can then use to create an Applicationobject. The NAL snAppShot also keeps track of the files that the setup programinstalls on the workstation. The NAL snAppShot then copies these files andstores them as .FIL files.
When you use the Application ob-ject template, you must ensure that theworkstation on which you run the NAL snAppShot is running the same operatingsystem as the other workstations on which you want to install the same application.For example, suppose that you wanted to install Microsoft Office 97 on severalworkstations. If you ran the NAL snAppShot on a Windows NT workstation,you could use the Application object template to install Microsoft Office97 on other Windows NT workstations. If you wanted to install MicrosoftOffice 97 on Windows 95 workstations, you must run the NAL snAppShot ona Windows 95 workstation to create the Application object template.
To use the NAL snAppShot to create an Application object template, youmust complete the following steps:
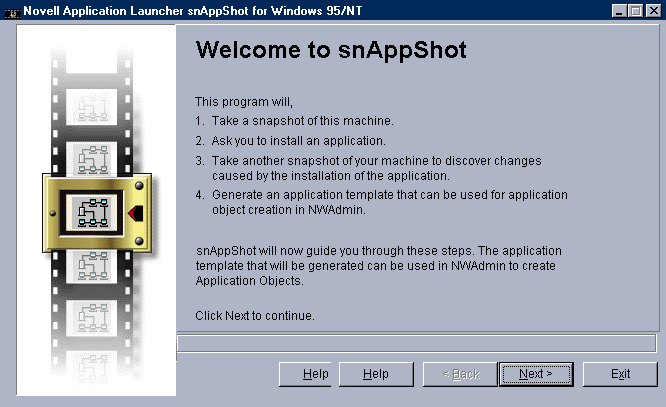
Run the SNAPSHOT.EXE file from the SYS:\PUBLIC\SNAPSHOT directory. (If you installed the NAL snAppShot on a workstation's hard drive, you can run the SNAPSHOT.EXE file from the workstation.) The Welcome to snAppShot screen appears. (See Figure 3.)
Figure 3: The Welcome to snAppShot screen

Click the Next button. The Application Information screen appears, prompting you to name the application you want to install and briefly describe the application.
After you provide this information, the Template and Configuration Information screen appears. You must specify the directory in which you want to store the Application object template, and you must enter the name of this template. You must also specify the directory in which you want to store all of the application files that the NAL snAppShot saves as .FIL files.
I recommend that you create an APPS subdirectory in the PUBLIC directory. You may place the APPS subdirectory anywhere on the server, but remember that all of the users who run the application need access rights to this directory to install the application correctly. Also, if you are installing a large application, you must ensure that the volume in which the APPS subdirectory resides is large enough to accommodate the entire application.
After you complete the Template and Configuration Information screen, click the Next button. The Include/Exclude screen appears, allowing you to specify which drives and files to include in the workstation snapshot and which drives and files to exclude from this snapshot. For most applications, the default settings are fine. Click the Next button to accept the default settings.
The Ready to Take Snapshot screen appears. Click the Next button.
The Run Setup Program screen appears, prompting you to run the application's setup program. When you run this setup program, you should install this application exactly as you want to install this application on the workstations. For example, you should select all optional components now.
If you make a mistake during the installation process, you should completely uninstall the application, cancel the snapshot, and try again. It is imperative that the NAL snAppShot record everything correctly.
After the application is installed, the Waiting for Setup to Finish screen appears. Click the Next button.
The Install Directory screen appears, prompting you to specify the directory in which the application was installed. After you specify the appropriate directory, click the Next button.
The Discovering Change screen appears as the NAL snAppShot analyzes and records any changes the application's setup program made to the workstation. This process may take a few minutes since the NAL snAppShot is creating the Application object template.
After the NAL snAppShot creates this template, the Completed screen appears. Click the Close button to exit the NAL snAppShot.
You can now use the Application object template to create an Applicationobject in the NWADMIN utility.
ASSOCIATING USERS WITH APPLICATION OBJECTS
After creating an Application object, you must grant users permissionto use the Application object. To grant this permission, you must associateUser, Group, or container objects with the Application object. Only thenwill the Application object appear on the appropriate users' desktops.
To associate a User, Group, or container object with an Application object,you must launch the NWADMIN utility and double-click the Application object.You then select the Associations option, click the Add button on the Associationspage, and browse the NDS tree to locate the appropriate objects.
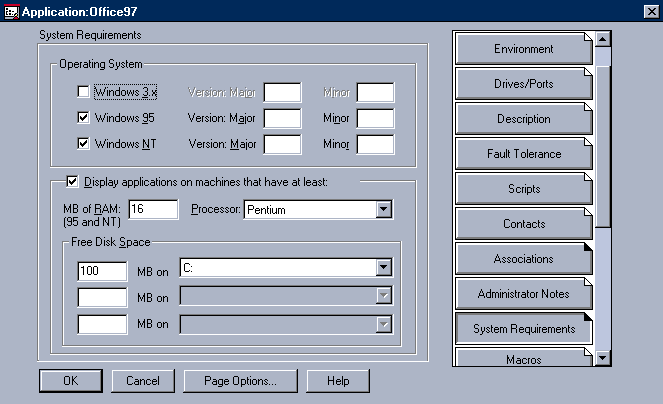
Because most applications have minimum workstation requirements, NAL2.0 also allows you to specify what resources the workstation must haveto run a particular application. If a workstation does not have these resources,the application icon will not be displayed on the user's desktop. For example,an application may require Windows 95, 40 MB of free hard drive space, and10 MB of RAM. To specify what resources a workstation must have to run anapplication, you use the Application object's System Requirements page.(See Figure 4.)
Figure 4: The System Requirements page allows you to specify what resources a workstation must have to run a particular application.

If you want to do more than place an icon on a user's desktop, NAL 2.0allows you to completely control users' applications: For example, you cancontrol where the NAL Window appears on the users' desktops, whether theicon can be moved or deleted, whether applications run in normal, minimized,or maximized mode, and more, depending on which version of Novell clientsoftware you use.
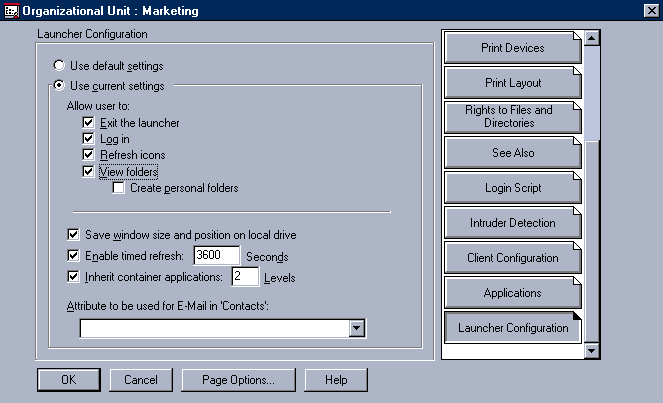
To set these kinds of options, you use the Launcher Configuration pagefor the User, Group, or container objects that you associated with the Applicationobject. (See Figure 5.)
Figure 5: The Launcher Configuration page allows you to specify how much users can customize the NAL Window.

Balancing the Load
Some companies have so many users accessing the same application thatthese companies need multiple application servers to handle the workload.To provide load balancing for applications, you would probably need to dividethe users into separate groups and create separate login scripts for eachgroup, or you would need to place an icon pointing to the correct applicationserver on each user's desktop.
Although both of these load-balancing methods work, they are time consumingand labor intensive. Wouldn't it be easier to create an icon that pointedto all of the application servers and let NAL 2.0 automatically select whichserver to launch the application from?
To enable NAL 2.0 to load balance applications automatically, you double-clickthe Application object in the NWADMIN utility. The Application Details pageappears, and you click the Fault Tolerance button to display the Fault Tolerancepage. Then you click the Load Balancing check box and add the directorypath to all of the application servers that should participate in load balancing.
Providing Fault Tolerance for Applications
NAL 2.0 also provides fault tolerance for applications. If your companyhas multiple application servers, you can select which applications youwant to protect and install these applications in the same way on any orall servers. Next, you access the Fault Tolerance page in the NWADMIN utility,click the Fault Tolerance check box, and add the directory path to all ofthe servers that should provide fault tolerance.
NAL 2.0 then automatically ensures fault tolerance. When users selectthe application, NAL 2.0 attempts to contact the primary application server.If this server is not available, NAL 2.0 tries to contact the next serverin the list, continuing this process until a server responds. By enablingfault tolerance, you can perform maintenance tasks on an application serverwithout worrying about getting the server up and running again so that userscan work.
Handling the Windows Registry
NAL 2.0 fully supports the Windows registry, a critical component ofboth Windows 95 and Windows NT. If you manually create an Application object,you can define any registry changes you want to include with the application.If you use an Application object template, NAL snAppShot automatically detectsall of the changes the application's setup program makes to the Windowsregistry. Because NAL 2.0 uses standard registry function calls, NAL 2.0automatically supports features such as user profiles and programs suchas Novell Workstation Manager.
However, certain parts of the registry are not included in the user profileand, therefore, do not move from one workstation to another. For example,HKEY_LOCAL_MACHINE, which is part of the Windows registry, is specific toa particular workstation.
Suppose that NAL 2.0 displayed an application icon that you used to accessa network application. Also suppose that the network application requiredworkstation components.
The first time you selected the application icon, NAL 2.0 would installall of the necessary components on the workstation and then launch the application.The next time you selected the application icon, the application would simplylaunch because NAL 2.0 would not need to reinstall the workstation components.
Now suppose that you logged in to the network from a different workstation.You would view your desktop and all of the other information stored in youruser profile. If you launched the application from NAL 2.0, it would downloadthe necessary workstation components be-fore launching this application.
When NAL 2.0 downloads applications to workstations, it saves applicationinformation in special keys that are stored in the HKEY_LOCAL_MACHINE portionof the Windows registry. Because this part of the registry does not movewith the user profile from workstation to workstation, NAL 2.0 always knowswhen it must download a component to the workstation.
NO TRAFFIC JAMS, PLEASE
With all of the time-saving features NAL 2.0 provides, it's easy to forgetthat installing a new application on hundreds of workstations at the sametime may cause congestion on the network. Fortunately, you can distributethe load over a period of time. For example, you could specify that an applicationbe installed during one week, and each day NAL 2.0 would distribute theapplication icon to a percentage of users' desktops. If you also set theRun Once flag and made the application's icon appear in users' startup folders,the application would be installed on workstations without user intervention.
GOTTA HAVE IT!
Whether your company has a small network that supports 10 users or anenterprise network that spans the globe, NAL 2.0 will save you significanttime and energy managing this network. You can distribute application iconsto users' desktops in a matter of minutes, and you can automatically installor upgrade workstation software. In fact, NAL 2.0 might single-handedlyfree up enough time to let you use some of those 300-plus vacation hoursyou have accumulated. Hawaii, here you come!
Sandy Stevens is a freelance writer based in Salt Lake City, Utah.She is the coauthor ofNovell's Guide to NetWare Printing,whichis available from Novell Press, andNovell's Guide to Integrating IntranetWareand Windows NT,which will soon be available from Novell Press.
NetWare Connection, October 1997, pp.24-32
* Originally published in Novell Connection Magazine
Disclaimer
The origin of this information may be internal or external to Novell. While Novell makes all reasonable efforts to verify this information, Novell does not make explicit or implied claims to its validity.