NDPS: Good-bye, Queue World!
Articles and Tips:
01 Oct 1997
Managing today's queue-based print services requires some technical acrobaticsin part because you must use more than one utility to set up and maintainthese services: You use Novell's NetWare Administrator (NWADMIN) utilityto create Print Queue, Print Server, and Printer objects in your NovellDirectory Services (NDS) tree; you use Novell's PSERVER utility to startthe print server; and you may use a third-party utility to manage the printeronce it is up and running. Even if you don't use a third-party utility,managing queue-based print services has inherent inconveniences, such asrequiring you to create three NDS objects for only one printer.
If setting up and maintaining queue-based print services does not giveyou a management headache, dealing with printer users will. Queue-basedprint services are often the source of these users' problems--and theirproblems quickly become your problems.
Users call you complaining that they need to print an important documentimmediately, but the printer is bogged down with a dozen other print jobs.Or they call you to ask where the color printer is and whether they canuse it. Sometimes they call you to report that they found the color printerand captured a port to that printer--but they still can't print their document.As a result, you spend valuable time running from printer to workstationto server console, finding the cause of each problem, shuffling print jobsaround in print queues, and loading printer drivers.
Fortunately, you can now bid adieu to the queue world of printing andsay hello to Novell Distributed Print Services (NDPS). NDPS, which is theresult of a joint development effort between Novell, Hewlett-Packard (HP),and Xerox, is the first fully distributed network printing solution. NDPSis both a product and an architecture that makes network printers easierfor you to manage--and easier for users to use. (For more information aboutthe NDPS architecture, see "The Agents Behind the Action" section.)
CLEARLY MORE CONVENIENT
NDPS is a collection of NetWare Loadable Modules (NLMs), administrativeand user tools, and NDPS-enhanced Novell client software. In the initialrelease of NDPS, the tools and client software are available only for Windows95 and Windows 3.x workstations. However, in subsequent releases of NDPS,the tools and client software will also be available for other platforms.
NDPS saves you time and money by significantly reducing the inconveniencesassociated with managing print services. For example, with NDPS runningon your company's network, you use only the NWADMIN utility to set up andmaintain network printers. You also create only a single NDPS Printer objectfor each printer, and you perform all print management tasks, such as changingthe order of print jobs, from the NDPS Printer object. In addition, youdo not have to install printer drivers because NDPS installs these driversfor you.
Users benefit from NDPS as well. For example, NDPS allows users to viewa printer's status, such as how many print jobs are waiting to be printed,before users send a print job to the printer. NDPS also allows users tosearch your company's network for printers with specific capabilities, suchas printers that can print a color document. In addition, NDPS allows usersto send a print job to any printer to which they have been granted the necessaryrights, without having to capture a port to the printer.
WHY DIDN'T SOMEONE THINK OF IT BEFORE?
Unlike queue-based print services, NDPS enables you to create a singleNDS object--the NDPS Printer object--to represent one printer. This one-to-onerelationship between NDS objects and printers is significant if only becausethe relationship is so logical: You install a printer, and you create oneNDS object for this printer--now that's intuitive.
Alternatively, you can decide not to create an NDS object at all, dependingon how you configure the printer. In an NDPS environment, you can configurea printer as one of the following types of printers:
A public access printer
A controlled access printer
Public Access Printers--Convenience Without Security
A public access printer, as the name implies, is available to all usersas soon as a Printer Agent for that printer appears on the network.PrinterAgents, which form the core of the NDPS architecture, are software representationsof physical printers. (For more information about Printer Agents, see "The Agents Behind the Action" section.)
Public access printers are not represented by NDS objects; these printerssimply exist on the network for all users to see and use. Users must beattached to the network to use public access printers but do not need tolog in to the network to use these printers. (That is, users do not haveto be authenticated to the NDS tree to use public access printers.)
Although public access printers are not represented by NDS objects, youcan manage these printers with the same utility you use to manage NDS objects--theNWADMIN utility. From the Tools pull-down menu, you select the Public AccessPrinters option to manage a particular public access printer. The PublicAccess Printers option is one of several options included in the NDPS snap-inmodules for the NWADMIN utility. These snap-in modules are installed automaticallywhen you install NDPS.
The sole, but significant, benefit of public access printers is convenience:You attach a printer to the network, you ensure that a Printer Agent existsfor the printer, and the printer is ready to be used. (See "Configuring Printers".) You don't create an NDS object to represent the printer,you don't grant users rights to use the printer, and you don't set any ofthe configuration options that are available for controlled access printers.
Controlled Access Printers--Convenience, Security, and More
A controlled access printer, as the name implies, enables you to assignNDS rights to control which users can see, use, and manage this printer.To configure a printer (including an existing public access printer) asa controlled access printer, you simply create an NDPS Printer object torepresent this printer. (See "Configuring Printers".)The NDPS Printer object you create then appears in the NWADMIN utility'sNDS browser, along with all of the NDS objects in your company's NDS tree.
As an NDS object, a controlled access printer offers a full range ofsecurity options. You can also configure default properties for a controlledaccess printer, including event and status notification options, which areunavailable to public access printers. (See the "Configuration Page" section.)
CONVENIENT CONTROL
The most obvious advantage of NDPS is that you can use the NWADMIN utilityto complete any management task for a public access printer or a controlledaccess printer: As mentioned earlier, you access a public access printerby selecting the Public Access Printers option from the Tools pull-downmenu, and you access a controlled access printer by double-clicking theappropriate NDPS Printer object in the NDS browser.
For example, if you wanted to view the current status of a controlledaccess printer, you would open the NDPS Printer object. If you wanted tochange the order of print jobs for this printer, you would open the NDPSPrinter object. If you wanted to change the printer's spooling configuration,you would open the NDPS Printer object.
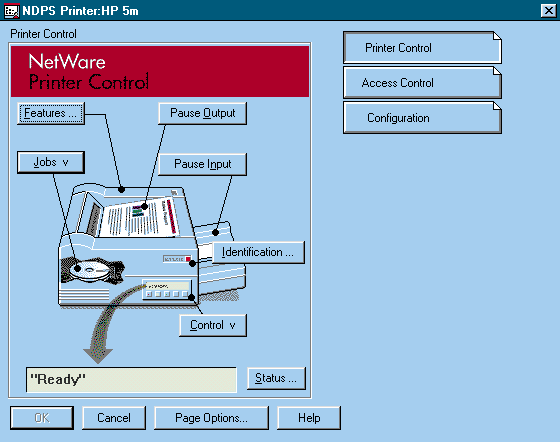
Printer Control Page
Whether you access a public access printer or a controlled access printer,the Printer Control page for the printer appears. (See Figure 1.) From this page, you can view a printer's features, access a printer'scontrol panel, view a printer's current status, pause or resume the inputor output of a print job, and view a printer's identification.
Figure 1: You can perform all printer management tasks from the Printer Control page in the NWADMIN utility.
You can also configure spooling options on the Printer Control page byselecting the Spooling Configuration option from the Job pull-down menu.When the Spooling Configuration dialog box appears, you can specify optionssuch as where the printer's print jobs should spool and which schedulingalgorithm (First In, First Out, for example) the printer should use. (See Figure 2.)
Figure 2: Using the Spooling Configuration dialog box, you can specify settings such as where jobs should be spooled, which scheduling algorithm the printer should use, and how much space should be reserved for spooling.
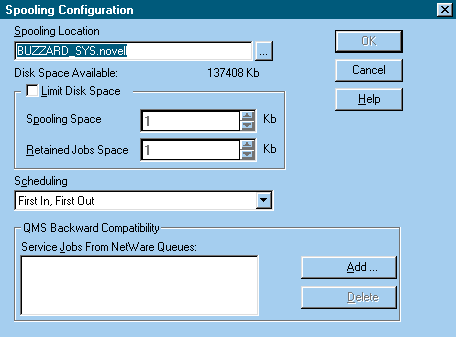
In addition, the Spooling Configuration dialog box allows you to specifya Printer Agent to service existing print queues. Because you might haveto maintain one or more print queues for non-NDPS clients, NDPS is backwardcompatible with queue-based printers.
To enable the Printer Agent associated with the printer to service anexisting print queue, you specify the location of this print queue in theQMS Backward Compatibility field. (See Figure 2.) As a result, non-NDPS clients retain their current printing capabilities,and you do not have to modify these clients' configurations.
Configuration Page
You can access two other pages from the Printer Control page for a controlledaccess printer: the Access Control page and the Configuration page. Thesetwo pages are not available from the Printer Control Page for a public accessprinter.
You can use the Access Control page to grant users access to a controlledaccess printer. The Access Control page for an NDPS Printer object is thesame as the Access Control Page for other NDS objects, and you grant usersrights to a controlled access printer just as you grant users rights toother NDS objects.
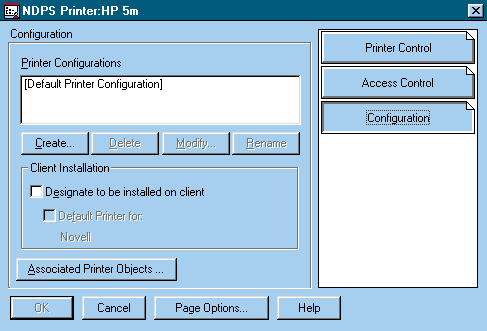
You can use the Configuration page to create severalprinter configurations(which are sets of job-handling instructions) for one controlled accessprinter. The Configuration page lists all of the printer configurationsyou have created for a particular controlled access printer. If you havenot created any printer configurations, only the Default Printer Configurationappears in the Printer Configurations list. (See Figure 3.) Every printer has a default printer configuration, which you canmodify but not delete.
Figure 3: To create several configurations for one printer, you use the Configuration page for an NDPS Printer object. Printer configurations specify job-handling criteria such as the number of copies and the level of priority.
By selecting one of the printer configurations you have created and clickingthe Modify button, you can access a dialog box that enables you to set differentconfiguration options. For example, you can specify the number of copiesyou want to print, or you can choose to print a banner--options you cancurrently set by creating a print job configuration in the NWADMIN utility.(Abanner, which is a page that prints before each document, includesinformation such as your name and the filename of the document you are printing.)
You can also set a few configuration options that are available onlywith NDPS. For example, you can specify a date and time to print a document,and you can indicate that users should be notified about the status of theprint jobs they have submitted to the printer. In addition, you can specifythat users should be notified with a pop-up screen, a log file, or an e-mailmessage sent through GroupWise or an MHS-compliant e-mail program.
Printer Drivers
You can also use the Configuration page to specify that you want a controlledaccess printer to be flagged for installation on NDPS clients. If you clickthe Designate to Be Installed on Client option, NDPS automatically installsthe printer and the appropriate printer drivers on the NDPS clients youspecified.
The controlled access printer then appears on the clients' list of installedprinters, along with the printer's default printer configuration. Userscan accept the default printer configuration or change this configurationto meet their needs. (See the "Modifying Printer Configurations" section.)
THE UPSIDE FOR USERS
Users are not limited to using only the printers you selected to be automaticallyinstalled on their NDPS client. Users can install additional printers byusing the Novell Printer Manager utility, which is included with the NDPSclient. When users select the New option from the Printer pull-down menu (See Figure 4), the Novell Printers dialog boxappears, displaying a list of installed printers. This list includes allof the printers that have been installed on the NDPS client and for whichNDPS has loaded a printer driver and created a logical port. (See Figure 5.)
Figure 4: Users can use the Novell Printer Manager utility to view all of the printers currently installed on their NDPS client and to install additional printers on this client.
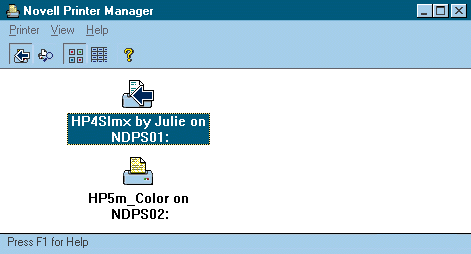
Figure 5: The Novell Printers dialog box in the Novell Printer Manager utility displays a list of every installed and available printer. The list of available printers includes all of the public access printers on the network and all of the controlled access printers to which you have rights that are in your current context.
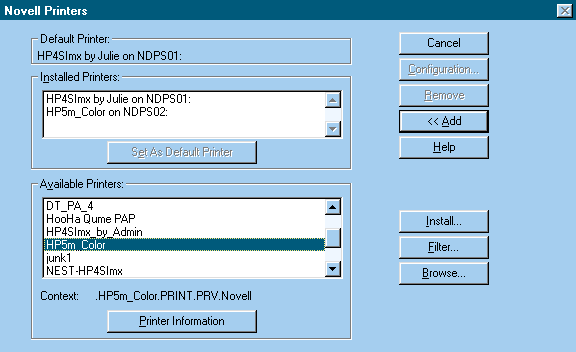
When users click the Add button, a list of available printers appears.This list includes all of the public access printers on the network andall of the controlled access printers in the user's current context. Userscan then browse the NDS tree to view and select controlled access printersin another context.
To install a printer, users highlight the printer they want to installand click the Install button. That's it; the printer is ready to use. Usersno longer need to capture ports to print queues or worry about manuallyloading printer drivers.
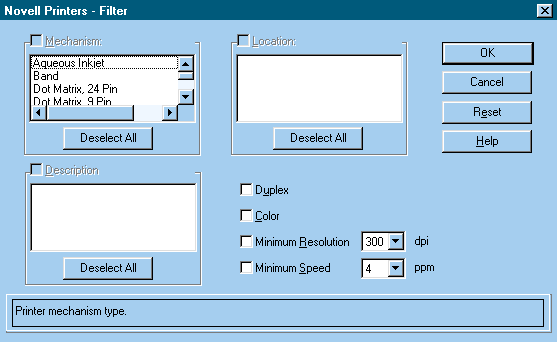
Users can also use the Novell Printer Manager utility to search for availableprinters with specific characteristics. This capability eliminates the needfor users to wander around the building or call you when they need to finda color printer. Instead, users can simply click the Filter button on theNovell Printers dialog box. Another dialog box opens, enabling users tospecify the printer characteristics they are searching for. For example,users can search for characteristics such as a printer's description, location,type, color, resolution, speed, and duplexing capabilities. (See Figure 6.)
Figure 6: The Filter dialog box enables users to search for an available printer with specific capabilities.
Modifying Printer Configurations
When users install additional printers on their NDPS client, they canaccept or change installed printer configurations. For example, supposethat Jane wanted to create a custom printer configuration that automaticallyprinted three copies of a weekly progress report. Jane also wanted thisreport to be printed on letter-size paper with a cover page on each copy.
In this case, Jane would install a printer configuration, which she mightcall Progress Report. Next, Jane would highlight the Progress Report printerconfiguration in the Novell Printer Manager utility's main window. Janewould then choose Configuration from the Printer pull-down menu. The printerconfiguration's Property page would appear. (This page is similar to theProperty page you can access from the NWADMIN utility's Configuration page.)Jane would then configure properties that define how, where, and when theprint job should be printed.
Users can change any properties of an installed printer configurationthat you have not locked. Users can also modify printer configurations ona job-by-job basis by selecting the Jobs option from the Printer pull-downmenu. (See Figure 4.) When the list of scheduledprint jobs appears, users can highlight the print job they want to changeand select the Configuration option from the Job pull-down menu.
When users set Job Configuration options (which are the same as PrinterConfiguration options), these options last only for the duration of theprint job. Because the Novell Printer Manager utility does not store JobConfiguration options, users cannot reuse these options. Users must resetthe options for each print job.
Viewing the Status of Printers and Jobs
NDPS provides another convenient option for users: Users can view thecurrent status of any available printer by double-clicking the icon forthe printer. (This icon appears in the Novell Printer Manager utility'smain window. See Figure 4.) When a user double-clicksa printer's icon, the Printer Information dialog box appears. From thisdialog box, users can check out a printer before they send a print job tothe printer. For example, users can see how many print jobs are waitingto be printed by a particular printer and what characteristics the printerhas. Viewing a printer's status and characteristics helps users find theright printer for the job--before they send it.
Users can access the Printer Information dialog box to view informationabout a specific print job. The Printer Information dialog box displaysa list of print jobs waiting to be processed by the printer the user selected.The user clicks the print job he or she is interested in to view this printjob's current status and details about the condition of the print job (suchas whether a page of the print job is jammed in the printer).
As mentioned earlier, users can also choose to be notified of such conditions.If users configure notification options, they do not need to access theNovell Printer Manager utility to view the status of a print job becauseNDPS automatically notifies users of this status.
THE AGENTS BEHIND THE ACTION
At this point, you should have a fairly good idea of what NDPS is andwhat it can do for you and the users on your company's network. However,you are probably still wondering exactly how NDPS works. To better understandhow NDPS works, you need to understand the NDPS architecture.
The NDPS architecture is based on the International Standards Organization(ISO) 10175 Document Printing Application (DPA) standard. Because most printermanufacturers support this standard, their existing and future printersare fully compatible with NDPS.
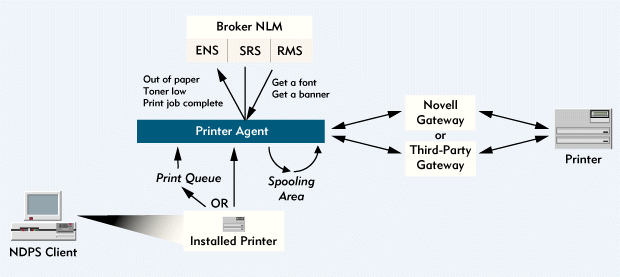
To truly understand the architecture of NDPS, you need to understandthe entities at its core: Printer Agents. As mentioned earlier, a PrinterAgent is software that represents a physical printer. Every printer on thenetwork is represented by a Printer Agent, which renders print queues andprint servers obsolete, making printers themselves the focal point of NDPS.
A Printer Agent can be an NLM on an IntranetWare or NetWare 4.11 server,as is the case today; or a Printer Agent can be embedded software in a printer,as will be the case in the near future. Today, every printer on your company'snetwork must have a Printer Agent running on a server. You can create aPrinter Agent to represent each printer on the network, or you can use aPrinter Agent that is created for you by third-party software. (For example,the HP gateway creates Printer Agents for its own printers. See "The HP Gateway" section.)
Eventually, server-based Printer Agents will be unnecessary because printerswill include embedded Printer Agents. In 1998, Novell will release an updatedversion of the Novell Embedded Systems Technology (NEST) Office softwaredeveloper's kit (SDK) that will include NDPS. Original equipment manufacturers(OEMs) will then be able to use the NEST Office SDK to embed NDPS and, therefore,Printer Agents in their printers.
Printer Agents store or have access to information about the printersthey represent, such as the printer's name, network address, status, andcharacteristics. Printer Agents also store or have access to a printer'sjob-handling information--its scheduling algorithm, where its jobs shouldbe spooled, and any printer or job configurations.
Printer Agents act as liaisons between NDPS clients and printers. Whena user submits a print job, the job goes first to a Printer Agent, althoughthis job appears to both the user and the NDPS client to go directly toa printer. (See "The Print Job's Journey".)A Printer Agent alone accomplishes what a print queue and print server combinedaccomplish in a queue-based printing environment.
However, a Printer Agent does more than spool print jobs and extractthem from print queues: A Printer Agent has access to other network servicesthat enhance basic print services. For example, a Printer Agent has accessto a new service called Event Notification Service (ENS), which notifiesusers about the status of print jobs by way of a pop-up screen, a log file,or an e-mail message. (See the "ENS" section.)When a user asks to be notified about the status of a print job (such aswhen the print job is completed), the Printer Agent submits the user's requestto ENS and later updates ENS on the print job's status. ENS, in turn, notifiesthe user.
The Printer Agents' Manager
On every server running one or more Printer Agents, you must load theNDPS Manager (NDPSM) NLM, which enables you to create and manage PrinterAgents. The NDPSM NLM also enables Printer Agents on the same server toshare resources, such as scheduling algorithms.
Next, you must create an NDS object to represent the NDPSM NLM. Thisobject allows you to access the NDPSM NLM through the server console orthrough the NWADMIN utility. After you create the NDS object for the NDPSMNLM, you can create Printer Agents for controlled access printers. (See "Creating an NDPS Manager Object".)
The NDPSM NLM is only a temporary necessity in an NDPS environment. Whenprinters with embedded Printer Agents are available, you will not have toload the NDPSM NLM because you won't need to create Printer Agents, andPrinter Agents won't need to share resources that will be included withthe embedded Printer Agents.
For now, however, you must load the NDPSM NLM on all servers that provideconnectivity to printers, and you must associate the Printer Agents representingthese printers with the NDPSM NLM. As with other NLMs, you can ensure thatthe NDPSM NLM is loaded automatically each time you boot a server by addingthe following line to the AUTOEXEC.NCF file:
LOAD NDPSM [NDPSM object name and context]
Gateways to Printer Agents
Gateways connect Printer Agents to printers. When you create a PrinterAgent, you configure the gateway associated with the Printer Agent to understandthe printer's make and model and how this printer is attached to the network(by way of a parallel or serial port or via the RPRINTER utility, for example).
Like server-based Printer Agents and the NDPSM NLM, gateways are temporarycomponents of the NDPS architecture: When Printer Agents are embedded inprinters, you won't need to create these Printer Agents on servers. As aresult, you won't need to install gateways to service the Printer Agents.In the meantime, however, gateways ensure that Printer Agents can communicatewith printers regardless of the port or protocol you are using to connectthese printers to the network.
NDPS is currently shipping with one gateway developed by Novell and anothergateway developed by HP. In addition, Xerox offers its own gateway for NDPS.
Early in 1998, Novell will release the NDPS OEM SDK that will enableother OEMs to develop gateways for their printers and snap-in modules forthe NWADMIN utility. An OEM's gateway will allow you to attach the OEM'sprinters to the network as NDPS printers. An OEM's snap-in modules, on theother hand, will allow you to manage these printers using printer-specificmanagement utilities, which you will be able to access by opening the NDPSPrinter object in the NWADMIN utility.
The Novell Gateway
The Novell gateway consists of two major components:
Print Device Subsystem (PDS)
Port Handler (PH)
PDS is designed to translate some of the information in a print job'sconfiguration channel. Every print job in an NDPS environment has two channelsof information: Adata stream channel, which the printer driver formats,and aconfiguration channel. The print job's configuration channelcontains the printer configuration that the user selected for this printjob.
PDS is designed to translate certain commands (such as the LANDSCAPEand DUPLEX commands) in the printer configuration into printer-specificlanguage, although NDPS printer configurations do not include commands thatrequire translating. As a result, the primary function of the Novell gatewayis to channel information to and from the printer through PH, which supportsthe following printing components:
Local Ports. PH enables Printer Agents to communicate with printers that are attached to a server's parallel (LPT) or serial (COM) port.
The RPRINTER Utility. PH enables Printer Agents to communicate with printers that are attached to servers or workstations running the RPRINTER utility. PH also enables Printer Agents to communicate with network printers that rely on products supporting RPRINTER mode, such as Intel's NetPort or versions of HP's JetDirect print server that the HP gateway might not support.
Queue Management Services (QMS). PH enables Printer Agents to send print jobs to print queues that rely on products supporting only QueueServer or PrintServer mode, such as versions of Intel's NetPort or HP's JetDirect print server.
The HP Gateway
The HP Printer Gateway NLM connects Printer Agents to printers that attachto the network via an HP JetDirect print server or an HP JetDirect card.The print server is configured to support HP JetAdmin's direct mode andto use the IPX/SPX protocol.
You can configure the HP Printer Gateway NLM first to locate all of theprinters on the network with HP JetDirect cards that are using Service AdvertisingProtocol (SAP) to advertise their location. You can further configure theHP Printer Gateway NLM to create Printer Agents for these printers. ThePrinter Agents will then register with the Service Registry Service (SRS)and stop using SAP. (For more information about SRS, see the "SRS" section.)
The Xerox Gateway
Xerox has also developed a gateway to enable Printer Agents to communicatewith Xerox printers. The Xerox gateway, which should be available by themiddle of this month, will be included with every printer Xerox ships. Youwill also be able to download the Xerox gateway from Xerox's World-WideWeb site (http://www.xerox.com). Otherprinter manufacturers are likely to develop gateways for their printerswhen Novell releases the NDPS OEM SDK for writing gateways.
BROKERING NEW SERVICES
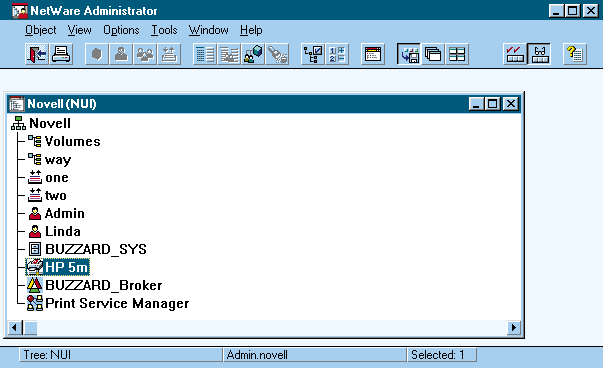
When you install NDPS, you will notice another new NDS object: the Brokerobject. (See Figure 7.) The Broker NLM, whichis loaded automatically when you install NDPS on a server, appears as anobject in your company's NDS tree.
Figure 7: Three new NDS objects exist in an NDPS environment: NDPS Printer, NDPS Manager, and NDPS Broker.
Although the Broker NLM was developed with and is being released withNDPS, its services are not exclusive to printing. In fact, the Broker NLMbrokers three services that any network resource can use:
Resource Management Service (RMS)
ENS
SRS
RMS
RMS stores network resources (such as drivers, fonts, and forms) in acentral location and locates these network resources for clients, printers,or any other network node that requests them. For example, using RMS, NDPScan automatically download printer drivers to NDPS clients.
NDPS also uses RMS to enable you to add, list, and replace banners andprinter drivers for Windows 95 and Windows 3.x. For example, suppose thatyou created a printer configuration requesting a banner for a print job.Upon receiving the print job, the Printer Agent would access RMS, whichwould find the banner you specified and return the necessary informationto the Printer Agent.
ENS
ENS enables network nodes, such as clients, to be notified of particularevents related to other network resources, such as printers. For example,using ENS, NDPS enables you to create a printer configuration that requestsnotification of print jobs or printer status by way of a pop-up screen,a log file, or an e-mail message.
ENS also supports another notification method calledprogrammaticnotification. Through programmatic notification, applications can requestnotification of various events. These applications, in turn, can notifyusers by whatever method (by pager, for example) and interface the applications'developers choose.
For example, if Corel modified WordPerfect to support programmatic notification,WordPerfect could request to be notified when a print job is completed.WordPerfect, in turn, could notify users about the completed print job--withoutthese users having to configure the printer to send such notification.
The NDPS independent software vendors (ISV) SDK enables ISVs to developNDPS-aware applications such as applications that support programmatic notification.An alpha version of the NDPS ISV SDK is currently available on the NovellSDK CD-ROM. A final version of the NDPS ISV SDK will be available beforethe end of this year.
SRS
SRS enables network devices to register themselves in a registry ratherthan in the NDS tree. Using SAP, SRS alerts all network nodes of its location.
In an NDPS environment, ENS, RMS, and public access printers registerwith SRS. As a result, ENS, RMS, and public access printers do not use SAPto announce their presence to other network nodes. Only SRS uses SAP toadvertise its availability. NDPS clients and printers access SRS to locatenetwork services and devices such as printers.
SRS conserves bandwidth by reducing the number of network services anddevices using SAP. For example, when you add a new printer to the networkin a queue-based printing environment, the printer immediately begins advertisingits availability using SAP, thereby consuming bandwidth. This printer continuesto advertise its availability as long as the printer is active. (Althoughthe default routing protocol for IntranetWare and NetWare 4.11 is NetWareLink Services Protocol [NLSP], printers still use SAP to advertise theiravailability. For more information about NLSP, see the related article.)
In contrast, when you add a public access printer to the network in anNDPS environment, the printer registers itself with SRS. SRS, in turn, informsNDPS clients of this printer's location and availability, reducing networktraffic.
YOU'LL HAVE TO WEAR SHADES
Although the initial release of NDPS makes managing print services moreconvenient, NDPS has the potential to make these print services even easierto manage. For example, when OEMs embed Printer Agents in printers, youwill not have to create Printer Agents, install a gateway, or install theNDPSM NLM and create an object for it. Because printers will include thePrinter Agents, you will not need the NDPSM NLM to create these PrinterAgents. And because Printer Agents will enable printers to communicate withNDPS clients, you will not need gateways.
With Printer Agents embedded in printers, NDPS will realize the plug-and-printmyth: If you bought a printer with an embedded Printer Agent, you couldplug the printer into the network, and this printer would be available immediatelyas a public access printer.
When OEMs develop snap-in modules for the NWADMIN utility, you will nothave to exit this utility to use a printer-specific utility. Instead, youwill simply install an OEM's snap-in module and click the appropriate NDPSPrinter object in the NWADMIN utility's NDS browser window to access theprinter-specific utility.
HP and Xerox have already developed snap-in modules for the NWADMIN utility.The HP snap-in module is shipping with NDPS, and the Xerox snap-in moduleis available with the Xerox gateway.
Finally, when NDPS supports Internet Printing Protocol (IPP), NDPS willextend its services over intranet and Internet connections. (For more informationabout IPP, see "Internet Printing Protocol".)Today, Novell is taking strides in that direction by leading an effort todrive the adoption of IPP as an Internet Engineering Task Force (IETF) standard.
As you might expect, NDPS is poised to support IPP, and as soon as thenew protocol gets the IETF's stamp of approval, Novell will adapt NDPS tosupport IPP. You will then be able to use NDPS to install, find, print to,and manage printers throughout the world--without leaving your desk.
Linda Boyer works for Niche Associates, an agency that specializesin technical writing and editing.
NetWare Connection, October 1997, pp.6-22
Configuring Printers
In a Novell Distributed Print Services (NDPS) environment, you can configure a printer as a controlled access printer or as a public access printer.
CONTROLLED ACCESS PRINTERS
Because controlled access printers are represented by ob-jects in your company's Novell Directory Services (NDS) tree, you can control users' access to these printers. To configure a printer as a controlled access printer, you must complete the following steps:
Launch the NetWare Administrator (NWADMIN) utility.
Click the container object in which you want the NDPS Printer object to reside.
Select the Create option from the Object pull-down menu. The New Object dialog box appears.
Click the NDPS Printer Object option. The Create NDPS Printer dialog box appears.
In the NDPS Printer Name field, enter the name you want to assign the NDPS Printer object.
In the Printer Agent Source field, click the Create a New Printer Agent option. (If you have already created an NDPS Printer object for the type of printer you are configuring, select the Printer Agent on Existing NDS Object option. If you have already configured this type of printer as a public access printer, select the Public Access Printer Agent option.)
Click the Create option. The Create Printer Agent dialog box appears.
In the Printer Agent Name field, enter the name you want to assign the Printer Agent.
Click the Browse (...) button in the NDPS Manager Name field, and click the NDPS Manager (NDPSM) object with which you want to associate the Printer Agent.
In the Gateway Types field, click the type of gateway the Printer Agent should use to communicate with the printer. (Two types of gateways are listed in this field: Novell Printer Gateway or HP IPX Printer Gateway.)
Click the OK button. The Configure Gateway dialog box appears.
Select the type of printer you are installing and the type of network interface board in this printer. The Select Printer Drivers dialog box appears. (Note: This step varies, depending on the type of gateway you select.)
Click the Windows 95 and/or Windows 3.1 tab, and select the appropriate printer driver from the list.
Click the Continue button. The new NDPS Printer object appears in your company's NDS tree.
PUBLIC ACCESS PRINTERS
Unlike controlled access printers, public access printers are not represented by objects in the NDS tree. As a result, you cannot control users' access to public access printers, so all users can see and print to these printers.
To configure a printer as a public access printer, you must complete the following steps:
Launch the NWADMIN utility.
Click the NDPSM object with which you want to associate the Printer Agent. (If you need to create an NDPSM object, see "Creating an NDPS Manager Object".)
Click the New button, and complete steps 8 through 13 as listed above.
The new NDPS public access printer appears as an available network printer.
Creating an NDPS Manager Object
Until original equipment manufacturers (OEMs) embed Printer Agents for Novell Distributed Print Services (NDPS) in their printers, you must create these Printer Agents on IntranetWare and NetWare 4.11 servers. Before you can create a Printer Agent, however, you must create an NDPS Manager (NDPSM) object in the Novell Directory Services (NDS) tree on your company's network. To create an NDPSM object, you must complete the following steps:
In the NetWare Administrator (NWADMIN) utility, select the container object in which you want the NDPSM object to reside.
Select the Create option from the Object menu. The New Object dialog box appears.
Select the NDPSM Object option. The Create NDPSM Object dialog box appears.
In the NDPSM Name field, enter the name you want to assign the NDPSM object you are creating.
Browse for the server to which you want to assign the NDPSM object. You can select any server in the NDS tree on which you have installed NDPS and loaded the NDPSM NetWare Loadable Module (NLM).
Browse for the volume to which you want to assign the NDPSM database. (This database stores configuration information for all of the Printer Agents you assign to this NDPSM object.) You must select a volume on the server you specified in step 5.
Select the Create option. The NDPSM object you have configured appears in the NWADMIN utility's NDS browser. You can now assign Printer Agents for public access and controlled access printers to this NDPSM object.
The Print Job's Journey
How does a print job travel from a Novell Distributed Print Services (NDPS) client to a printer, and what architectural components of NDPS are at work during the print job's journey from the NDPS client to the printer? (See Figure 8.) The following example explains each step of the printing process in an NDPS environment:
Figure 8: In an NDPS environment, print jobs are queued and spooled by the Printer Agent.
Suppose that your Windows 95 workstation were running an NDPS-enhanced version of IntranetWare Client for Windows 95 and that you installed a Hewlett-Packard (HP) 4si printer on this client. You then installed a printer configuration specifying that you wanted to be notified of a print job's status via a pop-up screen. When you installed the HP4si printer and the printer configuration, NDPS would create a logical port for routing printing information from the NDPS client to the HP4si printer.
Now suppose that you had already installed two other printers on the NDPS client and that NDPS created logical ports NDPS01 and NDPS02 for these printers. NDPS would then assign logical port NDPS03 to the HP4si printer you just installed. Unlike physical ports, logical ports are infinite, which means that you can use any printer on your company's network without having to change your desktop configuration.
After creating a logical port for the HP4si printer, NDPS would update the NDPS client's short list, which would be located in the Windows 95 registry. (In Windows 3.x, the short list is a file.) A short list includes printer information such as the printer's name, the Printer Agent's network address, the name of the NDPS Printer object (if one exists) with which the Printer Agent is associated, and the printer configuration. NDPS would update the short list by supplying this information for the HP4si printer and the printer configuration you installed and by specifying that all print jobs for this printer should go through logical port NDPS03.
NDPS would then use logical port NDPS03 to download the appropriate printer driver to the NDPS client. This printer driver would load the first time you printed a document to the HP4si printer.
The HP4si printer would now be ready to use. Suppose that you sent a WordPerfect document to the HP4si printer, requesting two copies of the document from within WordPerfect. The print job's journey would begin when WordPerfect sent the print job to logical port NDPS03. When the print job reached this port, the NDPS client redirector would call the NDPS client library, saying "I have a WordPerfect document printing to the HP4si printer." The NDPS client library would look at the NDPS client's short list to retrieve the Printer Agent's network address and the printer configuration.
Next, the NDPS client library would separate the print job information into two channels: one channel for the WordPerfect document (including the request for two copies) and another channel for configuration information (including the request to be notified via a pop-up screen). The NDPS client library would then send the print job to the Printer Agent.
The Printer Agent, in turn, would spool the print job and check the configuration channel. If you had installed the HP4si printer with its default printer configuration, the configuration channel would be empty when it reached the Printer Agent. The Printer Agent would then find the default printer configuration for the HP4si printer and fill the configuration channel with that information.
In this case, the Printer Agent would find in the configuration channel the request to be notified via a pop-up screen. Accordingly, the Printer Agent would submit a profile to Event Notification Service (ENS) to ensure that ENS is prepared to notify you of the print job's status by way of a pop-up screen. Finally, the Printer Agent would retrieve the print job from the spooling area and submit it to the HP Printer Gateway NetWare Loadable Module (NLM), which would pass this print job to the HP4si printer.
After the HP4si printer had completed the print job, this printer would notify the Printer Agent, which would then notify ENS. ENS would check to see if any user on the network is interested in the print job, find the profile the Printer Agent submitted earlier, and notify you via a pop-up screen that the WordPerfect document had been printed.
Internet Printing Protocol
Novell is leading the effort to define Internet Printing Protocol (IPP), which is a new standard for submitting and managing print jobs over intranets and the Internet. IPP was initially developed through the collaborative efforts of Novell, IBM, Sun Microsystems, and Xerox. Other printer and software vendors that participated in these efforts include Adobe, Canon, Dataproducts, Dazel, Digital, Hewlett-Packard, Intel, Kyocera, Lexmark, Microsoft, Netscape, QMS, Ricoh, Sharp, and Tektronix.
This group of vendors, called the IPP working group, met earlier this year during the Internet Engineering Task Force (IETF) meetings held in Munich, Germany. The IPP working group is now finalizing their documentation, which defines the IPP printing model, protocol specification, security mapping, and directory schema for printers. The IPP working group is concurrently finalizing documents that describe things such as the rationale for IPP and its gateway implications.
The IPP working group will ask the IETF to issue a last call for comments prior to the next IETF meeting, which will be held this December in Washington, D.C. At this meeting, the IPP working group will submit the finalized documentation for IPP. The IETF can then issue this documentation as a proposed standard.
As you might expect, NDPS is well-suited for supporting IPP. Novell will add this support as soon as IPP is adopted as a standard. When NDPS supports IPP, users won't have to waste time first printing and then faxing documents to remote locations. Instead, these users will use a World-Wide Web browser to find and install an NDPS intranet or Internet printer, each of which will be identified with a uniform resource locator (URL).
With NDPS as the print services behind IPP, users will select the printers they want to use, and NDPS will automatically download the necessary printer drivers to the users' workstation. An NDPS implementation of IPP will further enhance this standard by notifying users (by way of a pop-up screen, a log file, an e-mail message, or a third-party notification method) when a print job is completed.
Disclaimer
The origin of this information may be internal or external to Novell. While Novell makes all reasonable efforts to verify this information, Novell does not make explicit or implied claims to its validity.