Novell Workstation Manager: Take Control of Your Windows NT Workstations
Articles and Tips:
01 Jul 1997
If your company is among the many companies that are choosing WindowsNT Workstation 3.51 or 4.0 for their high-end workstations, you may havediscovered that Windows NT's desktop security has a price: Unless you wantto implement Windows NT Server domains, you must set up and maintain securityon each Windows NT workstation.
As a result, you must create two user accounts for each Windows NT user:one for his or her workstation and one for the network. If several usersshare a Windows NT workstation, your management responsibilities increaseeven more. Users are also inconvenienced since they must first log in toa Windows NT workstation and then log in to the network.
To ease the burden of managing Windows NT workstations, you can use NovellWorkstation Manager, a component of IntranetWare Client 4.1 for WindowsNT, to integrate these workstations with your IntranetWare or NetWare 4.1network. With Novell Workstation Manager, you can store user and desktopconfiguration information for Windows NT workstations in the Novell DirectoryServices (NDS) database and use the NetWare Administrator (NWADMIN) utilityto manage Windows NT workstations. You than maintain only one database ofuser information, saving you time and reducing management costs.
Users, on the other hand, enter only one username and password to accessboth their Windows NT workstation and your IntranetWare or NetWare 4.1 network.After a user logs in to the network, Novell Workstation Manager downloadsthe Windows NT user profile and policies to the workstation. As a result,each user sees the same desktop, regardless of which Windows NT workstationthe user uses to log in.
INTRODUCING THE MYSTERIOUS NWGINA
The magic behind Novell Workstation Manager is the Novell Graphical Identificationand Authentication (NWGINA) module, which runs on the Windows NT workstation.When a user logs in, NWGINA collects the username and password the userenters and authenticates this user to both NDS and the Windows NT workstation.
If the user does not have an existing account on the Windows NT workstation,NWGINA can create an account dynamically, using information defined in NDS.(This feature will be explained later in the article.) When NWGINA createsa user account on a Windows NT workstation, that account can be volatileor nonvolatile. Avolatileuser account is deleted from the workstation'sSecurity Access Manager (SAM) when the user logs out of the workstation.(The workstation's SAM is a database of user accounts.) In this way, unnecessaryuser accounts do not accumulate in the workstation's SAM, and security istighter: Users must be authenticated to NDS before they can use workstationresources.
Anonvolatileuser account remains in the Windows NT workstation'sSAM after the user logs out. With a nonvolatile user account, a user canaccess the workstation even if the network is unavailable. (The criteriaNWGINA uses to determine whether to create a volatile or nonvolatile useraccount will be explained later in the article.)
To create and delete user accounts, NWGINA must have administrative rightsto the Windows NT workstation. NWGINA runs as a secure process, preventingunauthorized users from accessing the Windows NT workstation with administrativerights.
THE SNAP-IN MODULE FOR THE NWADMIN UTILITY
Novell Workstation Manager also includes a snap-in module for the NWADMINutility. (This module supports the version of the NWADMIN utility that runson Windows NT Workstation. Novell sources say that a snap-in module forWindows 95 will be available soon.) The snap-in module enables the NWADMINutility to recognize the NT Configuration object, which is added to NDSwhen you install Novell Workstation Manager.
The NT Configuration object stores all of the information NWGINA needsto dynamically create user accounts on a Windows NT workstation. NovellWorkstation Manager allows you to create multiple NT Configuration objectsand store them in the NDS tree. Each object can provide a different levelof access to Windows NT workstation resources. For example, you can createa Main NT Configuration object for most Windows NT users, and you can createan Administrator NT Configuration object for Windows NT users who need administrativerights. (Creating and configuring an NT Configuration object will be discussedlater in this article.)
INSTALLING INTRANETWARE CLIENT 4.1 FOR WINDOWS NT
Before installing Novell Workstation Manager, you must install IntranetWareClient 4.1 for Windows NT on your NT workstations. (Novell Workstation Managerdoes not run with earlier versions of Novell's client software.) This sectionoutlines the options you can use to install IntranetWare Client 4.1 forWindows NT.
Using the SETUPNW Utility
If you are installing IntranetWare Client 4.1 for Windows NT for thefirst time or if you are upgrading an earlier version of Novell's clientsoftware, Novell recommends that you use the SETUPNW utility to performthe installation process. This utility provides a graphical interface thatrequires little interaction.
You can automate the installation process by setting configuration parametersin the UNATTEND.TXT file on the IntranetWare Client 4.1 for Windows NT CD-ROM.By using this file and running the SETUPNW utility with the /U option, youcan install and configure IntranetWare Client 4.1 for Windows NT withoutbeing present during the installation process. This solution is especiallyhelpful if you must install the client software on multiple workstations.
Using the Automatic Client Upgrade
IntranetWare Client 4.1 for Windows NT 4.1 includes an automatic clientupgrade (ACU) option, which allows you to automatically upgrade multipleworkstations that are running an older version of Novell's client software.When you run the SETUPNW utility with the /ACU option, NWGINA checks theversion number of the client software installed on the Windows NT workstation.If this client software is outdated, the SETUPNW utility automatically installsthe latest version of the client software.
Because Windows NT Workstation has desktop security, only a user withadministrative rights to the Windows NT workstation can update workstationfiles. When NWGINA detects that a workstation requires updating, NWGINAautomatically creates a temporary administrative user account on the WindowsNT workstation. After creating this temporary administrative user account,NWGINA logs in to the Windows NT workstation as this user and performs theupgrade process. When the upgrade is complete, NWGINA immediately logs out,deletes the account, and reboots the workstation.
During the entire upgrade process, the Windows NT workstation remainscompletely secure. Because the upgrade runs automatically without any userinteraction, no one has an opportunity to access this workstation with administrativerights while the upgrade is being performed.
You can use the ACU option to upgrade workstations across the networkfrom a central location. This option saves you time because you do not haveto physically visit each workstation to perform the upgrade. In order forNWGINA to automatically create the temporary administrative user, you mustenable the ACU option in the NT Configuration object as described below.
First, you select the Client Upgrade page of the appropriate NT Configurationobject, and then you select the Enable Automatic Client Upgrade box. Whenyou select this box, you must specify the directory path to an alternatelogin script. You can use this alternate login script to specify the commandsnecessary to run the ACU unattended. For example, you could add the followingcommand to the alternate login script:
#\\HOME\SYS\PUBLIC\CLIENT\ACU\ SETUPNW.EXE /ACU /U
Using the Network Control Panel
You can also use the Windows NT Network control panel option to installIntranetWare Client 4.1 for Windows NT. First, you select the Settings optionfrom the Windows NT 4.0 Start menu, and then you select the Control Paneland Network options. From the Services tab, you select Add/Have Disk andspecify the directory path from which to install IntranetWare Client 4.1for Windows NT.
If you are installing IntranetWare Client 4.1 for Windows NT on onlyone workstation or if you are installing this client software on one workstationat a time, this option is viable. However, using the Windows NT Networkcontrol panel requires a few more steps than using the SETUPNW utility doesand is, therefore, more time consuming.
Installing the Client Software When You Install Windows NT Workstation
If you are installing Windows NT Workstation and IntranetWare Client4.1 for Windows NT on multiple workstations, you can save time by installingboth products simultaneously. Because this option requires a network connection,it is typically used for upgrading.
First, you copy the Windows NT Workstation CD-ROM and the IntranetWareClient 4.1 for Windows NT CD-ROM on to your IntranetWare or NetWare 4.1server. Then you automate the installation process by setting configurationparameters in the following files:
The UNATTEND.TXT file for Windows NT Workstation
The UNATTEND.TXT file for IntranetWare Client 4.1 for Windows NT
The UNATTEND.TXT file that is included with the IntranetWare client isa modified version of the Microsoft file. The IntranetWare file containsthe configuration parameters needed to automatically configure IntranetWareClient 4.1 for Windows NT during an unattended installation. To installthe IntranetWare client when you install Windows NT, you must copy the clientparameters from the IntranetWare UNATTEND.TXT file to the Windows NT UNATTEND.TXTfile.
After you set the appropriate configuration parameters and merge thetwo files, you can begin the unattended installation. You simply log into the network from each workstation and run WINNT with the following syntax:
WINNT /s:<emphasis>sourcepath</emphasis> /b /u:<emphasis>path to unattend file</emphasis>
INSTALLING NOVELL WORKSTATION MANAGER
After you have installed IntranetWare Client 4.1 for Windows NT on yourNT workstations, you can install Novell Workstation Manager. This installationprocess consists of three main steps:
Modifying the registry of the Windows NT workstation(s) from which you will run the NWADMIN utility
Installing the snap-in module for the NWADMIN utility on the appropriate IntranetWare or NetWare 4.1 servers
Enabling Novell Workstation Manager on your Windows NT workstations
Modifying the Windows NT Registry
Before you can use Novell Workstation Manager, you must first modifythe registry of a Windows NT workstation to use the snap-in .DLL files forthe NWADMIN utility. Registry changes are made to the HKEY_CURRENT_USERkey, which is the current user profile on the Windows NT workstation. Asa result, you must modify the registry for each administrative user on eachworkstation that the user will use to run Novell Workstation Manager.
To modify the Windows NT registry, you double-click the WORKMAN.REG iconin the I386 directory on the IntranetWare Client 4.1 for Windows NT CD-ROM.The WORKMAN.REG file makes the following changes in HKEY_ CURRENT_USER:
 Software

   NetWare

    Parameters

     NetWare Administrator

      Snap-in Object DLLs WINNT

       NWCSNAP: REG_SZ: NWSMGR32.DLL
Installing the Snap-in Module for the NWADMIN Utility
Next, you must install the snap-in module for the NWADMIN utility oneach server from which you want to manage Windows NT workstations. To installthis snap-in module, you simply run the ADMSETUP.EXE file from the I386directory of the IntranetWare Client 4.1 for Windows NT CD-ROM.
You are first prompted to accept the terms of the Novell software licensingagreement. When you choose Yes to accept these terms, the first installationscreen appears, indicating that the installation program will copy the appropriatefiles to your IntranetWare or NetWare 4.1 server and will create the correspondingApplication objects in NDS. After you select Continue, the Setup Selectionsscreen appears. (See Figure 1.)
Figure 1: When the Setup Selections screen appears, you select the products you want to install and the servers on which to install these products.
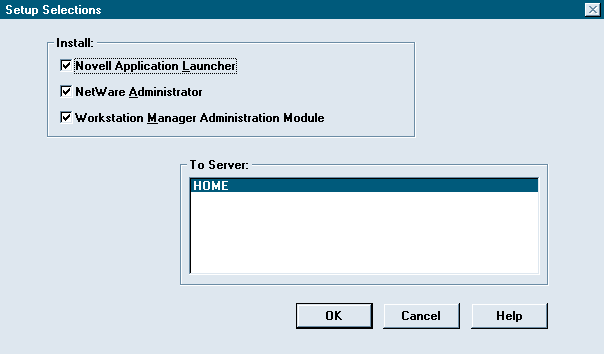
You can choose to install Novell Application Launcher, NetWare Administratorfor Windows NT, or the Novell Workstation Manager snap-in module on theservers you specify. After you select the products you want to install,click OK. The installation program copies the files for these products tothe servers you specified and creates the corresponding Application objects.A dialog box appears, indicating that the installation process is completed.
Enabling Novell Workstation Manager
Finally, you must enable Novell Workstation Manager on your Windows NTworkstations and create a list of trusted trees. When a user logs in toNDS from a Windows NT workstation, Novell Workstation Manager searches theNDS trees in the trusted trees list to locate the workstation's NT Configurationobject. If a user is from an unauthorized NDS tree, he or she cannot login to the NT workstation.
You can enable Novell Workstation Manager and specify a trusted treeslist in one of the following ways:
Access Novell Workstation Manager's Properties page
Manually modify the registry
Run the SETUPNW utility with the /W option
Use an unattended installation process
Accessing Novell Workstation Manager's Properties Page
If youare enabling Novell Workstation Manager and configuring a trusted treeslist for only a few Windows NT workstations, you can manually perform thesetasks on each workstation by accessing Novell Workstation Manager's Propertiespage. The way you access this page differs, depending on which version ofWindows NT you use.
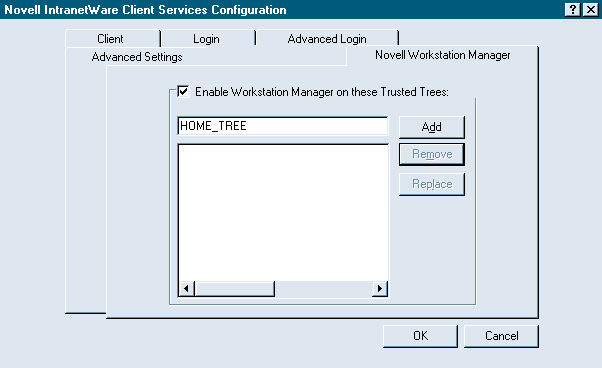
If you are using Windows NT Workstation 4.0, you can access Novell WorkstationManager's Properties page by selecting the Settings option from the Startmenu. Then select the Control Panel, Network, Services, and Novell IntranetWareClient for Windows NT options.
Next, click the Properties button, and select the Workstation Managertab. When you select this tab, the screen shown in Figure 2 appears. To enable Novell Workstation Manager, you click the EnableWorkstation Manager on These Trusted Trees box. You then specify a trustedtrees list for this workstation. (See Figure 2.)
Figure 2: When you configure Novell Workstation Manager, you create a trusted trees list.
If you are using Windows NT Workstation 3.51, you select the ControlPanel option from the Main program group and then select the Novell IntranetWareClient for Windows NT option. Next, you select the Configure and WorkstationManager options. You can then enable Novell Workstation Manager and specifya trusted trees list for this workstation.
Manually Modifying the Registry
You can also manually modifythe registry of a Windows NT workstation. However, you should use this methodonly if you are familiar with the registry and its settings. Otherwise,you could damage the registry. To modify the registry, add the followinglines to HKEY_ LOCAL_MACHINE:
 SOFTWARE

   Novell

    NWGINA

     Workstation Manager

      Enabled: DWORD: 0x1

       Trusted Trees: REG_SZ: treename1, treename2
Replacetreename1andtreename2with the NDS trees youwant in the trusted trees list. (You can add as many trees as you want tothe trusted trees list.)
Running the SETUPNW Utility
To use the SETUPNW utility to enableNovell Workstation Manager and to specify a trusted trees list, you runthis utility with the /W option. You can launch the utility from a workstationcommand line or from within a login script, using the following syntax:
SETUPNW /W:treename1, treename2 . . .
Replacetreename1andtreename2with the NDS trees youwant in the trusted trees list. (Again, you can add more trees to the trustedtrees list if necessary.)
Using an Unattended Installation Process
If you are enablingNovell Workstation Manager and specifying a trusted trees list for multipleWindows NT workstations, you can automate this process by modifying theUNATTEND.TXT file on the IntranetWare Client 4.1 for Windows NT CD-ROM.(You should check the Novell Workstation Manager documentation for the requiredparameters.) After you configure this file, you run the SETUPNW utilitywith the /U option.
The SETUPNW utility then automatically configures Novell WorkstationManager on your Windows NT workstations. You do not have to walk to eachworkstation to make the changes.
CONFIGURING NOVELL WORKSTATION MANAGER
After you have installed both IntranetWare Client 4.1 for Windows NTand Novell Workstation Manager, you must complete the following steps toconfigure Novell Workstation Manager:
Create and configure an NT Configuration object
Configure the NWGINA login interface
Creating and Configuring an NT Configuration Object
As mentioned earlier, NWGINA uses the NT Configuration object to determineif it should dynamically create a user account in a Windows NT workstation'sSAM. The NT Configuration object defines the username, Windows NT groupmemberships, profile and policy information, and so on. To create an NTConfiguration object, you use the NWADMIN utility. (The NWADMNNT.EXE fileis located in the SYS:\PUBLIC\WINNT directory on the IntranetWare or NetWare4.1 server you specified during the installation process.)
If you are running the NWADMIN utility for the first time since you installedNovell Workstation Manager, a message appears, indicating that the NDS schemawill be extended. The NT Configuration object and its associated propertiesare then added to the NDS tree. (If you installed Novell Application Launcher,the NDS schema may be extended for this product as well.)
In the NWADMIN utility, you select the container object in which youwant to create an NT Configuration object. Then you select the Object/Createand NT Configuration Object options and click OK. After you have createdthe NT Configuration object, you must associate the appropriate NDS userswith this object.
Associating Users
To associate users with an NT Configurationobject, you click the NT Configuration object in the NWADMIN utility andthen choose the Associations page. You can associate individual User objectswith the NT Configuration object, or you can associate Group, container,or Country objects.
When a user logs in from a Windows NT workstation, NWGINA uses theseassociations to find the appropriate NT Configuration object. Since a usercan be a member of a container and several groups, some users may be associatedwith more than one NT Configuration object. In this case, NWGINA uses thefirst NT Configuration object it finds. NWGINA searches for associationsin the following order: User, Group, container, and Country objects.
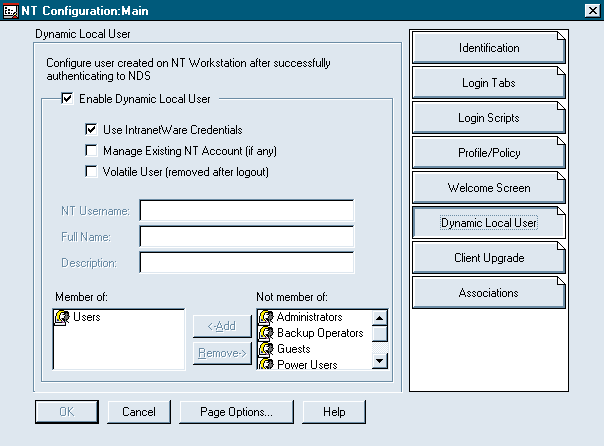
Defining Dynamic Local Users
After a user is authenticated toNDS, NWGINA checks the options that you defined in the NT Configurationobject's Dynamic Local User page. (See Figure 3.) If you selected the Enable Dynamic Local User option, NWGINA creates a useraccount in the Windows NT workstation SAM. To create this user account,NWGINA examines the username used to authenticate to NDS. If this usernamedoes not already exist in SAM, NWGINA creates the user account. If thisusername does exist, NWGINA authenticates the user to the Windows NT workstationusing the existing account.
Figure 3: You can specify how user accounts are created on the Windows NT workstation.
If you do not select the Enable Dynamic Local User option, NWGINA checksthe credentials that were selected on the Windows NT tab of the NWGINA logininterface. These credentials include a User object's login name, full name,description, and password. If the credentials match an existing user accounton the Windows NT workstation, NWGINA authenticates the user to this workstation.
Defining Credentials
If you want NWGINA to dynamically createuser accounts in a Windows NT workstation's SAM, you must define the credentialsthat NWGINA will use to create these user accounts. If you select the UseIntranetWare Credentials option, NWGINA creates the user account with thesame credentials used to authenticate the user to NDS. (See Figure 3.)
If you do not select the Use IntranetWare Credentials option, the VolatileUser option is automatically selected. As mentioned earlier, NWGINA deletesvolatile user accounts from the Windows NT workstation's SAM when the userlogs out.
Managing Existing User Accounts
To manage a user account thatalready exists in the Windows NT workstation's SAM, you select the ManageExisting NT Account option. If you select the Use IntranetWare Credentialsoption as well, NWGINA examines the credentials of the authenticated NDSuser. If a user account with these credentials already exists in the workstation'sSAM, NWGINA changes the account so that it is managed by Novell WorkstationManager. In addition, NWGINA adds any group memberships defined in the MemberOf list on the Dynamic Local User page to the original user account. (See Figure 3.)
If you select the Manage Existing NT Account option but do not selectthe Use IntranetWare Credentials option, you must enter the username, fullname, and description for the existing user account. Using this configurationhas some interesting results: Because you did not select the Use IntranetWareCredentials option, NWGINA automatically creates a volatile user account.When a user logs in, NWGINA changes the account in the Windows NT workstation'sSAM to a volatile user account. Then when the user logs out, NWGINA automaticallydeletes the account from the workstation's SAM.
Defining Group Memberships
To add a user account to an existingWindows NT group, you use the Member Of list on the Dynamic Local User page.(See Figure 3.) In addition, you can use thislist to add group memberships to existing user accounts as described above.
Managing Profiles and Policies
Novell Workstation Manager alsoallows you to centrally manage user profiles and policies on your WindowsNT workstations. User profiles store information that controls how eachuser's desktop looks. For example, a user profile defines the color of eachuser's desktop, user-defined shortcuts, and Program menu items. Policiesare a security component of Windows NT domains. Windows NT uses the followingpolicies: accounts (passwords), user rights, auditing, and trust relationships.
Although user profiles and policies are usually stored on each WindowsNT workstation or on a Windows NT server, Novell Workstation Manager allowsyou to store this information on an IntranetWare or NetWare 4.1 server.Novell Workstation Manager not only provides a central point of administrationbut also ensures that users have a consistent desktop, regardless of whichWindows NT workstation they are using.
If you want to manage user profiles and policies through Novell WorkstationManager, you select the NT Configuration object's Profile/Policy page. Tostore user profiles on an IntranetWare or NetWare 4.1 server, you selectthe Enable Roaming Profile option on the Profile/Policy page. (See Figure 4.) Then when a user logs in, Novell WorkstationManager downloads the user profile to the user's Windows NT workstation.
Figure 4: If you select the Enable Roaming Profile option, you can store user profiles on an IntranetWare or NetWare 4.1 server.

When you select the Enable Roaming Profile option, you must specify theexact directory in which the profile resides, or you must select the Relativeto Home Directory option. To establish a standard user profile, you enterthe directory in which the profile resides, and each user associated withthe NT Configuration object then uses this profile.
As Figure 4 shows, the Profile/Policy pageincludes a Location field for both Windows NT Workstation 3.51 and 4.0.Because the profile structure for the two operating systems differs, Novellprovided both of these fields so that you can use one NT Configuration objectto support workstations running either version of Windows NT Workstation.
If you select the Relative to Home Directory option, each user profileis stored in a user's home directory on the IntranetWare or NetWare 4.1server that stores the user profiles. The first time a user logs in afteryou select this option, the user profile is automatically copied to hisor her home directory on the IntranetWare or NetWare 4.1 server.
Novell Workstation Manager then downloads this user profile to the WindowsNT workstation each time the user logs in, regardless of which Windows NTworkstation the user is logging in from. In this way, you can associatemultiple users with a single NT Configuration object but still allow usersto have a unique user profile.
By default, Novell Workstation Manager supports policies as well as userprofiles. NWGINA automatically checks the SYS:\PUBLIC\WINNT directory forthe NTCONFIG.POL file. If this policy file exists, NWGINA applies the policiesin this file to the Windows NT workstation from which a user logs in.
If you want to customize the policies in the NTCONFIG.POL file, you usethe Windows NT Server policy editor (POLEDIT.EXE). You can also use a differentpolicy file by selecting the Enable System Policies option and specifyingthe directory that contains the policy file you want to use.
Configuring the NWGINA Login Interface
In addition, Novell Workstation Manager enables you to control what userssee as they log in and what happens during the login process. The NT Configurationobject includes three pages that relate to the login process: Login Tabs,Login Scripts, and Welcome Screen.
Login Tabs
Novell Workstation Manager allows users to changetheir login parameters. For example, users can spec-ify which IntranetWareuser or Windows NT user is logging in and which login script should be run.By default, the log-in dialog box includes the following tabs: IntranetWare,Windows NT, Script, and Variables.
You can use the NT Configuration object's Login Tabs page to controlwhich tabs are displayed when a user logs in. For example, to disable atab, you simply deselect the tab on the Login Tabs page.
Login Scripts
Novell Workstation Manager also allows you to controllogin script processing on your Windows NT workstations. If you want loginscripts to run for users associated with an NT Configuration object, youmust ensure that the Enable Login Scripts option on the Login Scripts pageis selected. This option is selected by default when you create an NT Configurationobject. If you do not want login scripts to run (even if they are definedat the user, container, or profile level), you must deselect the EnableLogin Scripts option.
With this option, you can even specify an alternate login script to runin place of the user or profile login script. You simply specify the directorypath and filename for the user or profile login script you want to run.You must write the alternate login script in the standard login script formatand save this script as a text file.
In addition, Novell Workstation Manager allows you to centrally managelogin script variables through NDS. Using login script variables, you cancustomize login scripts for specific User or Group objects. You can definevalues for the %2, %3, %4, and %5 variables on the Login Scripts page ofan NT Configuration object. You can define any value in these fields, andyou can then use this value as a standard login script variable.
For example, suppose that you defined the %2 variable as"StaffMeeting Today."Every time the %2 variable appeared in a WRITE statementin a user, container, profile, or alternate (as defined on the Login Scriptspage) login script, the users associated with this NT Configuration objectwould see the"Staff Meeting Today"message when they logged in.
Welcome Screen
When a user boots a Windows NT workstation, awelcome screen appears, prompting the user to press the<Ctrl><Alt><Delete>keys to log in to the workstation. After you install IntranetWareClient 4.1 for Windows NT, the bit-map image used for this screen is changedto one that displays the IntranetWare logo.
Using the NT Configuration object's Welcome Screen page, you can customizethe Windows NT welcome screen by specifying the directory path to an alternatebit-map image. In addition, you can create a custom message that is displayedat the top of the welcome screen.
CONCLUSION
If you have Windows NT workstations on your IntranetWare or NetWare 4.1network, Novell Workstation Manager is a must-have product. Not only doesNovell Workstation Manager save you time managing user accounts, but italso allows you to centrally manage all aspects of your Windows NT workstations.If you are still not convinced, download Novell Workstation Manager andIntranetWare Client 4.1 for Windows NT free from Novell's World-Wide Website (http://www.novell.com/intranetware/ntint/products.html).
Sandy Stevens is a freelance writer based in Salt Lake City, Utah.She is the coauthor ofNovell's Guide to NetWare Printing, whichis available from Novell Press, andNovell's Guide to Integrating IntranetWareand Windows NT, which will be available later this year from Novell Press.
NetWare Connection, July 1997, pp.30-37
* Originally published in Novell Connection Magazine
Disclaimer
The origin of this information may be internal or external to Novell. While Novell makes all reasonable efforts to verify this information, Novell does not make explicit or implied claims to its validity.