How to Deploy Novell exteNd Director 4.1 Enterprise on Tomcat 4
Articles and Tips: article
Senior Technical Manager
Novell, Inc.
Ulrich.Romahn@novell.com
01 Oct 2003
This Developer Note explains how to deploy Novell exteNd Director 4.1 Enterprise on the Tomcat 4 application server.
|
Topics |
exteNd Director, Tomcat, Web servers, Web services |
|
Products |
Novell exteNd Director 4.1 Enterprise, Tomcat 4.x |
|
Audience |
network consultants, integrators, developers |
|
Level |
intermediate |
|
Prerequisite Skills |
familiarity with basic Web services environment |
|
Tools |
none |
|
Sample Code |
no |
Introduction
Starting with version 4.1, Novell exteNd Director Enterprise can be packaged into a J2EE 1.3 WAR (Web Archive) file, instead of just an EAR (Enterprise Archive) file. This enables Director to be deployed on application servers that do not fully support all of the specified J2EE 1.3 services, such as Enterprise Java Beans (EJB), J2EE Connector Architecture (JCA), and Java Message Service (JMS).
Two popular versions of such application servers are Tomcat from the Jakarta project of the Apache Software Foundation (http://jakarta.apache.org/tomcat ) and Jetty from Mortbay (http://jetty.mortbay.org/jetty ). Both of these application servers support the Servlet 2.3 and Java Server Pages (JSP) 1.2 specifications. In addition, both servers can be augmented with a basic Java Naming and Directory Interface (JNDI) provider and resource management for data providers.
Tomcat in particular has become a very popular platform for lightweight Web applications, not only because it is open source and free, but even more because it has become the de facto reference implementation for the Servlet and JSP specifications.
This AppNote describes in detail the setup and deployment of a Director 4.1 Enterprise project on a Tomcat 4.1.23 application server. It is anticipated that the procedures described herein will also be valid for further versions of Tomcat 4.x, but not for Tomcat 5.x.
This AppNote explains how to acquire and install Tomcat 4.1.x, generate a Director project with Novell exteNd Workbench 4.1.1 and configure it for deployment, and configure Tomcat for a Director deployment.
Installing Tomcat 4
This section provides brief instructions on how to install and set up Tomcat 4 to work with Director 4.1 Enterprise. More details about installing Tomcat can be found at http://jakarta.apache.org/tomcat/tomcat-4.1-doc/index.html .
Prerequisites
The Tomcat installation procedure outlined in this AppNote is based on the following configuration:
Hardware: Dell C640 laptop, Pentium 4 2 GHz processor, 1 GB RAM, 40 GB hard drive
Operating System: Microsoft Windows XP Professional SP1
It is expected that the installation should also work on different hardware and operating system environments.
Before attempting to install Tomcat, it is recommended to have a Relational Database Management System (RDBMS) installed on your computer, along with a current JDK (preferably J2SDK1.4.1). Since Director 4.1 does not yet support MySQL, the only options on a Windows platform would be Adaptive Server Anywhere (ASA), MS SQL Server, Oracle 8 or 9i, or IBM DB2. For this AppNote, Tomcat was running on J2SDK1.4.1_02 and accessing SQL Server 2000.
One final prerequisite is the assumption that Novell exteNd Workbench 4.1.1 and Director 4.1 Enterprise have been successfully installed on this machine.
Downloading and Installing Tomcat 4
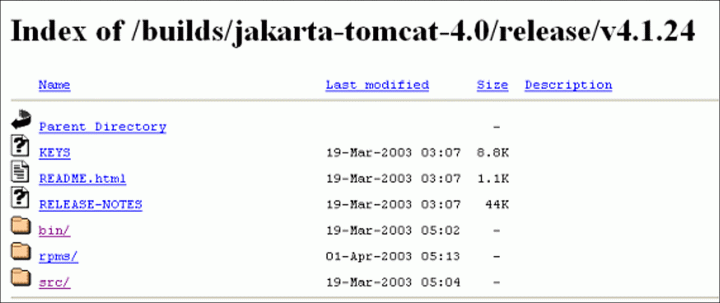
You can download Tomcat 4 from http://jakarta.apache.org/site/binindex.cgi under the section "Main distribution site." There are multiple versions of Tomcat available for download. It is recommended that you get the latest revision of Tomcat 4.1.x. After clicking the link, you will see the folder structure of the download site (see Figure 1).
Figure 1: The folder structure of the Jakarta Tomcat download site.
Click on the "bin/" folder. You will see a list of releases as shown in Figure 2.
Figure 2: List of Tomcat releases available for download.
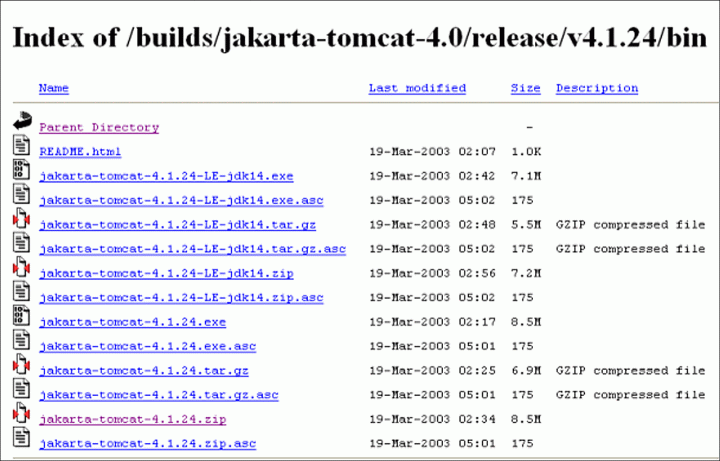
As you can see, the site offers multiple distributions. You might want to download one of the full distributions (not containing "LE" for "Light Edition"), even if you have already a JDK 1.4 installed. I was not able to make any LE version of Tomcat work, but others may not experience the same problems as I did.
For Windows, download either the .zip file or the installation (.exe) file. For UNIX/Linux distributions, download the .tar.gz version.
After downloading the appropriate file, extract the package to a location of your choice or run the Windows installer.
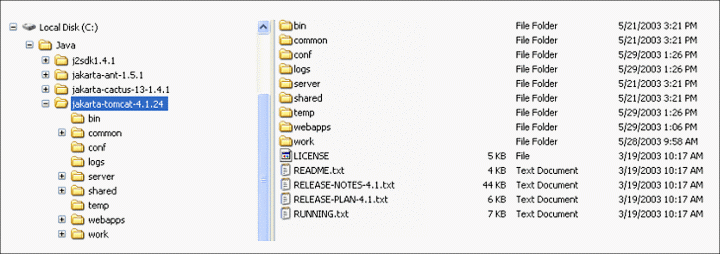
You will end up with a folder structure similar to the one shown in Figure 3 (in my case, I unpacked it into C:\Java).
Figure 3: Tomcat files extracted into the folder of your choice.
Configuring Tomcat 4
Configuring Tomcat properly is probably the most complicated and error-prone part of this entire process. The configuration instructions are split into two parts: basic configuration and Director-specific configuration.
For the purposes of this AppNote, I will use the term TOMCAT_HOME for the path where Tomcat has been installed (in this example, TOMCAT_HOME=C:\Java\jakarta-tomcat-4.1.24).
Basic Configuration
By default, Tomcat is configured to work on port 8080 for HTTP and 8443 for HTTPS. It also requires port 8009 for an AJP 1.3 port (servlet redirect from Apache HTTP server or MS IIS). If your computer has no other service already running on these ports, you can leave everything configured as is.
If you do have other services using one or more of these ports, it is better to change them. Before you start Tomcat the first time, start a browser and check to see if there is a response on one of these ports (for example, http://localhost:8080).
To adjust one of these settings, it is necessary to edit the server.xml file located in the TOMCAT_HOME\conf directory. Below is an excerpt of the XML code with the port specifications:
<!-- Define a non-SSL Coyote HTTP/1.1 Connector on port 8080 -->
    <Connector className="org.apache.coyote.tomcat4.CoyoteConnector"
               port="8080" minProcessors="5" maxProcessors="75"
               enableLookups="true" rediretPort="8443"
               acceptCount="100" debug="0" connectionTimeout="20000"
               useURIValidationHack="false" disableUploadTimeout="true" />
    <!-- Note : To disable connection timeouts, set connectionTimeout value to -1 -->

    <!-- Define a SSL Coyote HTTP/1.1 Connector on port 8443 -->
    <!--
    <Connector className="org.apache.coyote.tomcat4.CoyoteConnector"
               port="8443" minProcessors="5" maxProcessors="75"
               enableLookups="true"
	       acceptCount="100" debug="0" scheme="https" secure="true"
               useURIValidationHack="false" disableUploadTimeout="true">
      <Factory className="org.apache.coyote.tomcat4.CoyoteServerSocketFactory"
               clientAuth="false" protocol="TLS" />
    </Connector>
    -->

    <!-- Define a Coyote/JK2 AJP 1.3 Connector on port 8009 -->
    <Connector className="org.apache.coyote.tomcat4.CoyoteConnector"
               port="8009" minProcessors="5" maxProcessors="75"
               enableLookups="true" redirectPort="8443"
               acceptCount="10" debug="0" connectionTimeout="0"
               useURIValidationHack="false"
               protocolHandlerClassName="org.apache.jk.server.JkCoyoteHandler"/>
Change the ports in the file to a value that is not likely being used. On Windows, one way to see which ports are being used is to open a command prompt window and enter the command "netstat -a". You will get a list of all active ports on this system. (Linux has a similar command for this.)
If you have to change the ports, it is recommended to change all of them consistently. In my example, I changed them to HTTP=9080, HTTPS=9443, and AJP13=9009.
This should be enough for the basic configuration of Tomcat 4.
Director-Specific Configuration
Before this configuration should be done, a new Director project should be created and actually deployed to Tomcat. These steps will be described in the next section. To keep the Tomcat configuration in one section, we will describe these steps here.
The Director-specific configuration encompasses three steps:
Copy the RDBMS JDBC drivers to the Tomcat folders.
Configure the datasource in Tomcat's server.xml file.
Add the application context with the proper resource references.
Here are the details for completing these steps.
Copying the RDBMS JDBC Drivers into the Tomcat Folders
The first task is to locate the libraries for your RDBMS's JDBC drivers. In this example (MS SQL Server 2000), they can be downloaded from Microsoft's Web site at http://www.microsoft.com. After installation, copy the mssqlserver.jar, msbase.jar, and msutil.jar files to the TOMCAT_HOME\common\lib folder (this is the place where all libraries go that need to be accessed from all applications and the Tomcat server itself).
Configuring the Datasource in Tomcat's server.xml File
Open the serverl.xml file in your favorite text editor or in exteNd WorkBench. In the <GlobalNamingReources> section, add your Director datasource as shown here:
<!-- Global JNDI resources -->
  <GlobalNamingResources>

    <!-- Test entry for demonstration purposes -->
    <Environment name="simpleValue" type="java.lang.Integer" value="30"/>

    <!-- Editable user database that can also be used by
         UserDatabaseRealm to authenticate users -->
    <Resource name="UserDatabase" auth="Container"
              type="org.apache.catalina.UserDatabase"
       description="User database that can be updated and saved">
    </Resource>
    <ResourceParams name="UserDatabase">
      <parameter>
        <name>factory</name>
        <value>org.apache.catalina.users.MemoryUserDatabaseFactory</value>
      </parameter>
      <parameter>
        <name>pathname</name>
        <value>conf/tomcat-users.xml</value>
      </parameter>
    </ResourceParams>
		***INSERT CODE HERE***
  </GlobalNamingResources>
Before the end tag, insert the following code (assuming the use of MS SQL Server):
<Resource name="Director" scope="Shareable" type="javax.sql.DataSource"/>
    <ResourceParams name="Director">
      <parameter>
        <name>factory</name>
        <value>org.apache.commons.dbcp.BasicDataSourceFactory</value>
      </parameter>
      <parameter>
        <name>maxWait</name>
        <value>5000</value>
      </parameter>
      <parameter>
        <name>maxActive</name>
        <value>4</value>
      </parameter>
      <parameter>
        <name>password</name>
        <value>password</value>
      </parameter>
      <parameter>
        <name>url</name>
        <value>jdbc:microsoft:sqlserver://localhost:1433;DatabaseName=Director </value>
      </parameter>
      <parameter>
        <name>driverClassName</name>
        <value>com.microsoft.jdbc.sqlserver.SQLServerDriver</value>
      </parameter>
      <parameter>
        <name>maxIdle</name>
        <value>2</value>
      </parameter>
      <parameter>
        <name>username</name>
        <value>DirectorAdmin</value>
      </parameter>
    </ResourceParams>
The parameters in bold italics need to be adjusted according to each individual environment. For example, the JDBC driver name and URL will be different for a different RDBMS.
Of course, it is also assumed that a new database (or a new schema for Oracle) has been created that will be used for Director.
Adding the Application Context with the Proper Resource References
In general, applications are deployed to Tomcat by copying a WAR file or a folder that complies with the structure of a WAR file into the folder TOMCAT_HOME/webapps. Upon startup of Tomcat, the deployer of Tomcat will start the application, provided there is a context in the server.xml file.
So, after deploying the Director project to Tomcat but before starting the application server, the following code needs to be inserted right after the root context:
<!-- Tomcat Root Context -->
        <!--
          <Context path="" docBase="ROOT" debug="0"/>
        -->
			*** INSERT CODE HERE ***
        <!-- Tomcat Examples Context -->
        <Context path="/examples" docBase="examples" debug="0"
                 reloadable="true" crossContext="true">
The code to insert is:
<Context docBase="DirectorTomcat" path="/DirectorTomcat" useNaming="true" displayName="TomcatDirector" >
          <Logger className="org.apache.catalina.logger.FileLogger" debug="0" directory="logs" prefix="localhost_director_log." suffix=".txt" timestamp="true" verbosity="1"/>
		  <ResourceLink name="Director" type="javax.sql.DataSource" global="Director" />
        </Context>
The parameters in bold italics need to be adjusted accordingly for each individual environment.
After you have done all this, stop and restart Tomcat if it is already running.
Creating and Deploying Your Director Project
This section assumes that you have a working installation of exteNd Workbench 4.1.1 and Director 4.1 Enterprise on your computer, as outlined in the "Prerequisites" section.
Generating a Director Project
Follow these steps to generate a Director project.
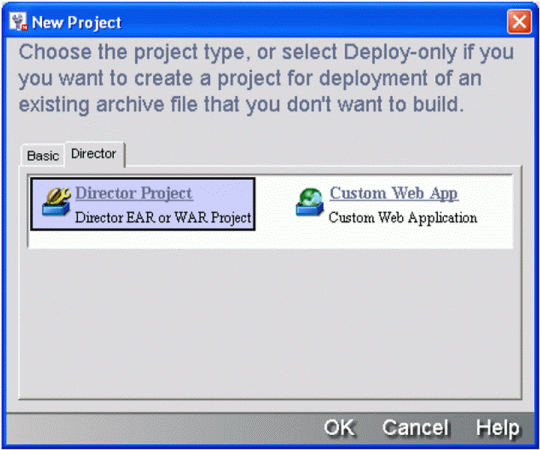
Start exteNd WorkBench and select "Director Project" to create a new Director project (see Figure 4).
Figure 4: Creating a new Director project.
In the next screen, select the default template and let WorkBench generate the project. Fill in the project information as shown in Figure 5. Then click Next .
Figure 5: Director Project Setup screen.
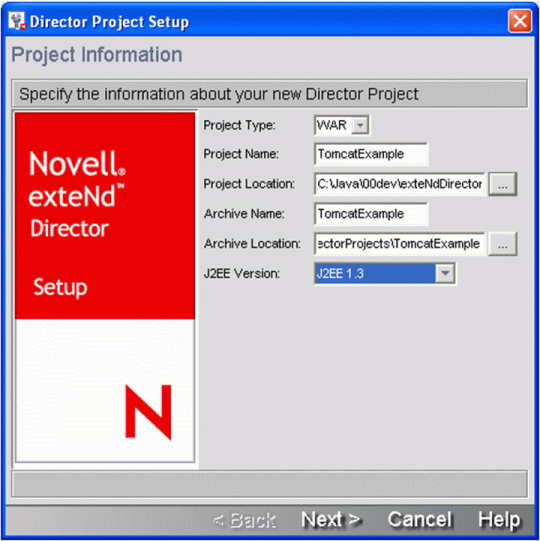
You might want to select a "Custom" type. If so, continue clicking Next until you reach the "Directory Information" form. Select "PersistManager" from the drop-down menu.
You can also select and configure the "LDAP" realm. However, for simplicity's sake, this option has not been selected here.
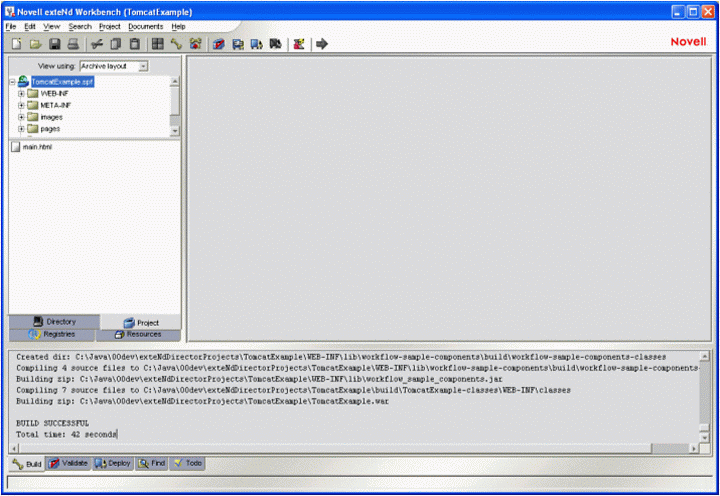
Click Next until you see the Summary screen, and then click Finish . Let WorkBench generate the Director project for you. By accepting all the default settings, you are generating a Director project with all available subsystems. When the project build is complete, you should see the message shown in Figure 6.
Figure 6: Message displayed when the project build is successful.
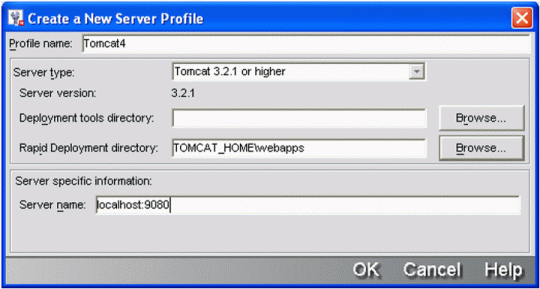
Next you must create a server profile for Tomcat 4. Select Edit > Profiles, create a new profile, and name it "Tomcat 4" (or whatever name you feel comfortable with). Enter the profile information as shown in Figure 7. Of course, you will replace TOMCAT_HOME with whatever path you have used (for example, C:\Java\jakarta-tomcat-4.1.24).
Figure 7: Creating a new server profile.
Configuring Director to Deploy on Tomcat
For this configuration, you need to adjust the default JNDI name of the datasource in the resource set. Here are the steps for doing this.
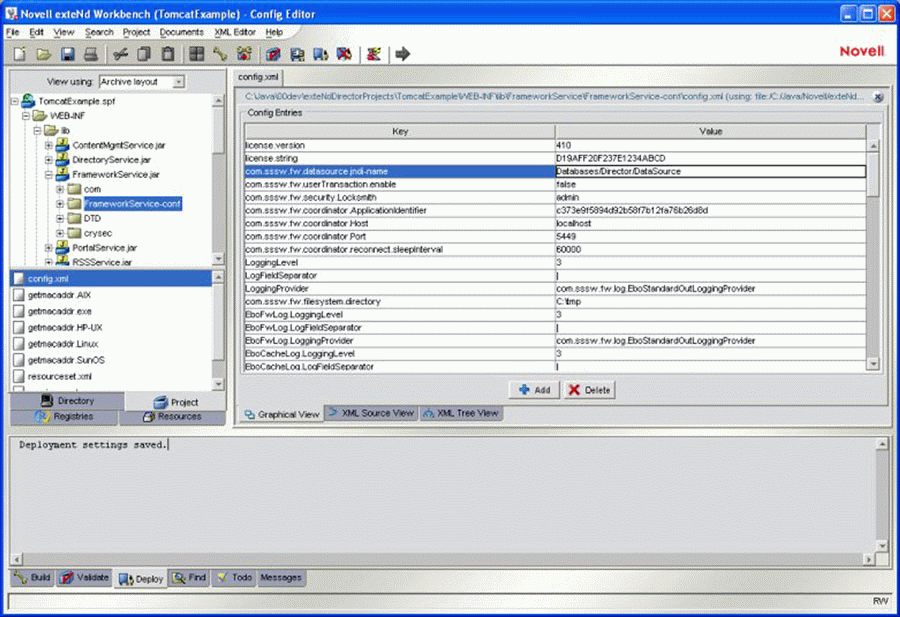
Open the config.xml file in the WEB-INF/lib/FrameworkService.jar/FrameworkService-conf directory.
Change the "com.sssw.fw.datasource.jndi-name" entry to "Director" instead of the default value as shown in Figure 8.
Figure 8: Editing the config.xml file in Workbench.
Close the config.xml file and save the changes.
For the final step, you must enter a reference to the datasource resource in the deployment descriptor web.xml file. Here are the steps to do this.
Open web.xml in Workbench and scroll down to the end of the file (see Figure 9).
Figure 9: Editing the web.xml file in Workbench.
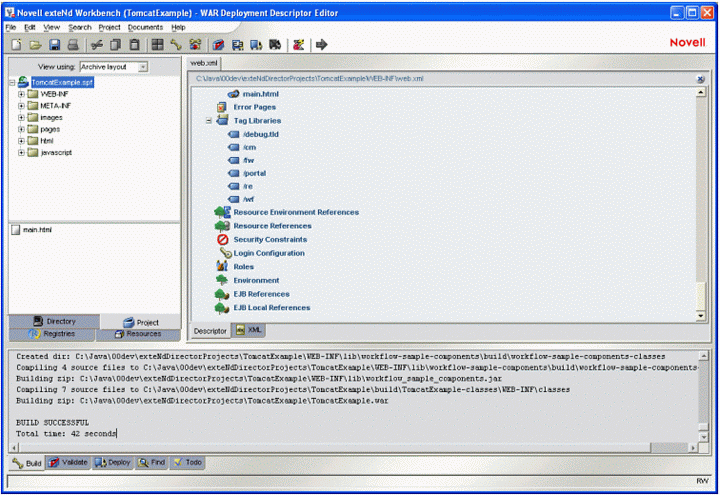
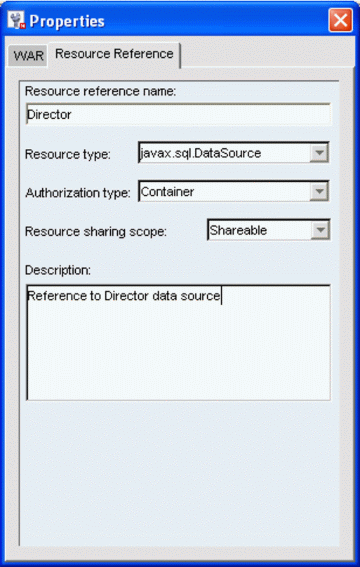
Right-click on the "ResourceReferences" entry and select "Add" from the pop-up menu. Right-click on the new entry called "UntitledResourceReference" and edit the properties as shown in Figure 10.
Figure 10: Editing the Resource Reference.
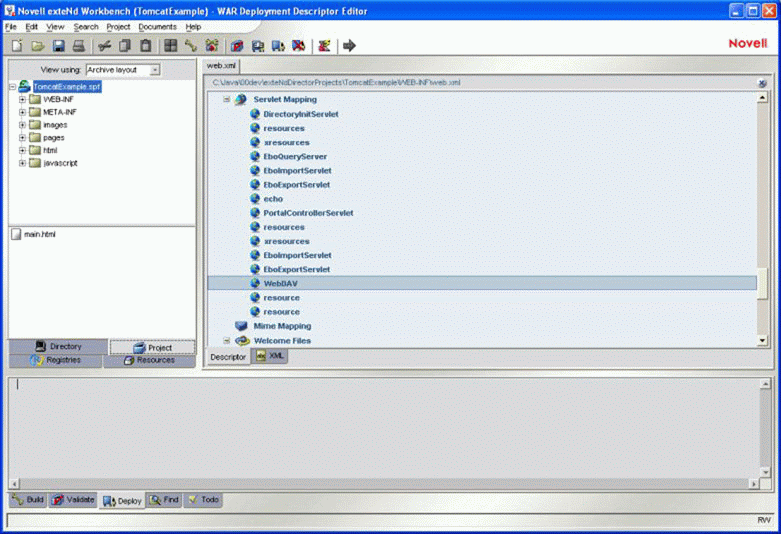
It seems that sometimes there is a conflict with the WebDAV servlet mapping while deploying to Tomcat. To avoid this, it is recommended that you change the default mapping. Look for the servlet mapping in your web.xml file (see Figure 11).
Figure 11: WebDAV servlet mapping.
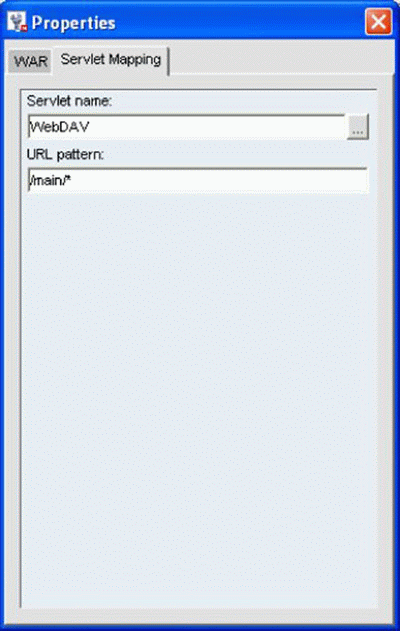
Right-click to open the properties dialog, and change the default URL pattern to "/webdav/*", as shown in Figure 12.
Figure 12: Servlet Mapping page in the Properties screen.
Close the properties window and save the web.xml file.
Select "Build and Archive (Ctrl+F7)" and "Deploy Archive (Ctrl+F5)" to generate and deploy your project.
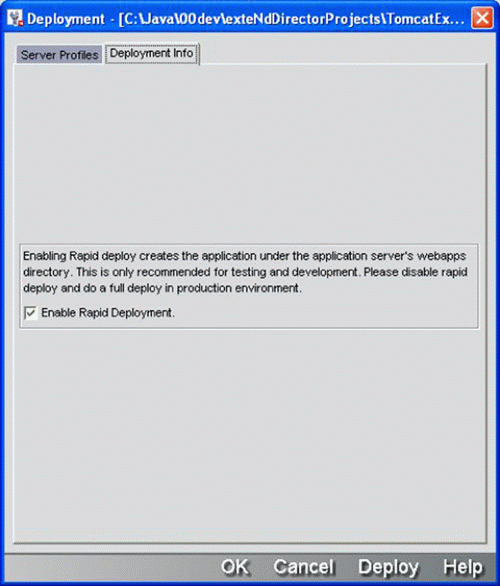
For deployment, it is recommended to have Tomcat not running and enable rapid deployment on the Deployment Info page, as shown in Figure 13.
Figure 13: Enabling Rapid Deployment.
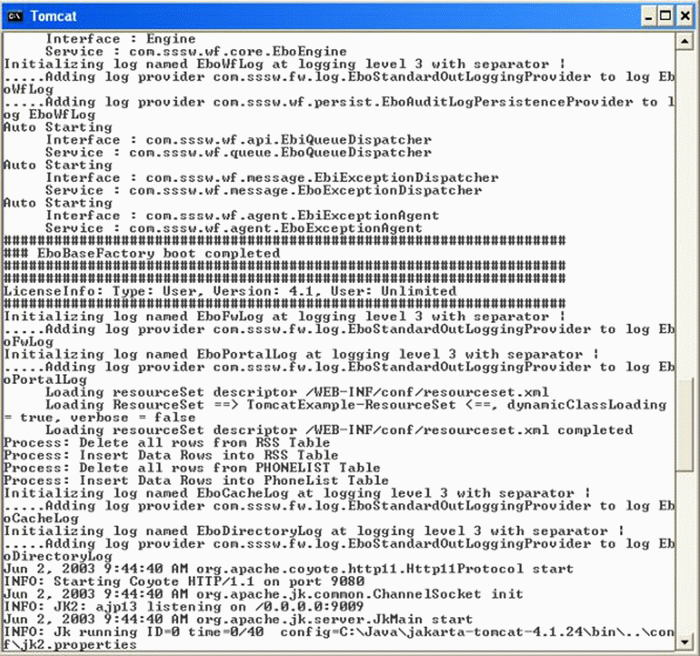
Finally, you should be able to start Tomcat and see the boot messages from Director. The output should look similar to what is shown in Figure 14.
Figure 14: Boot messages from Director when starting Tomcat.
Congratulations! You have successfully installed, configured, and deployed exteNd Director 4.1 Enterprise on Tomcat 4.
Here are the URLs to each subsystem ("TomcatExample" is the context name of this document):
Main Page: http://localhost:9080/TomcatExample/main
PMC: http://localhost:9080/TomcatExample/main/pages/PmcFolders.html
PAC: http://localhost:9080/ TomcatExample /main/pages/PacPortalDetails.html
myPortal: http://localhost:9080/ TomcatExample /main/myportal
Personalize: http://localhost:9080/ TomcatExample /main/component/PortalPersonalizer
WebDAV: http://localhost:9080/ TomcatExample /webdav
Conclusion
This Developer Note has shown how to deploy exteNd Director 4.1 Enterprise on the Tomcat 4 application server. For more information about exteNd Director and related products from Novell, visit http://www.novell.com/extend.
* Originally published in Novell AppNotes
Disclaimer
The origin of this information may be internal or external to Novell. While Novell makes all reasonable efforts to verify this information, Novell does not make explicit or implied claims to its validity.