Getting Started with Novell exteNd Director 4.1 EnterpriseEdition
Articles and Tips: article
Senior Software Engineer
Novell, Inc.
arun.singh@novell.com
01 Jul 2003
This AppNote will help you to understand features and basic usage of Novell exteNd Director 4.1 Enterprise Edition. This information is based on a DeveloperNet University course entitled "Introduction to Novell exteNd Director Enterprise Edition" available online at http://developer.novell.com/education.
|
Topics |
exteNd Director, exteNd Workbench, Web application development, Web services |
|
Products |
Novell exteNd Director 4.1, Novell exteNd Workbench 4.1 |
|
Audience |
Web application developers |
|
Level |
beginning |
|
Prerequisite Skills |
familiarity with Java programming, J2EE, and XML |
|
Operating System |
Windows 2000 Professional/Server |
|
Tools |
none |
|
Sample Code |
no |
Introduction
For years, organizations have been investing thousands-perhaps even millions- of dollars in applications that serve a single purpose. These legacy applications, such as databases, Electronic Data Interchange (EDI) transactions, and Enterprise Resource Planning (ERP) systems, are undeniably valuable. But to meet today's business needs, you need applications that serve many purposes.
Novell exteNd Director 4.1 Enterprise Edition is a portal server that makes it easy for IT organizations to build and maintain interactive, personalized Web applications and content. This powerful tool provides all of the technologies you need to build robust applications that consume Web services and provide a relevant view of business functions for any user on any device.
Novell exteNd Director includes Novell exteNd Workbench, which provides a simple, visual-design environment for even novice programmers, and Novell exteNd Application Server, a fully J2EE-compliant Web application server for deploying high-performance Web services. Together, these products form is a complete environment for building and rolling out state-of-the-art Web applications.
Novell exteNd Director and exteNd Workbench, along with the Novell exteNd Application Server, are indispensable components of Novell's exteNd solutions and are included in the Novell exteNd 4.1 product suite.
This AppNote introduces you to exteNd Director 4.1 Enterprise Edition and its related products. It provides an overview of features and benefits, outlines the installation and setup procedures, and then walks you through the creation of a sample application.
The sample project files referenced in this AppNote are available for download at http://www.novell.com/coolsolutions/tools/index.html.
Overview of Novell exteNd Director 4.1 Enterprise Edition
For those who are unfamiliar with Novell exteNd Director, this section provides an overview of its major features and benefits. This information is adapted from the "Quick Look" and "Features and Benefits" documents found on the product Web site at http://www.novell.com/products/extend/director.
Features and Benefits
Novell exteNd Director 4.1 Enterprise Edition (hereinafter referred to simply as "exteNd Director") provides a comprehensive development environment to help you create state-of-the-art interactive applications that users access through a portal. This single, comprehensive tool simplifies the process of developing standards-based applications and, therefore, increases developer productivity.
Note: Novell also offers exteNd Director 4.1 Standard Edition, which is the upgrade to Novell Portal Services, an easy-to-use tool for creating personalized portals.
Using exteNd Director, you can:
Create standards-based applications without sacrificing productivity
Organize information in a meaningful way
Manage interactions using services that provide personalization, user profiling, workflow, rules, security, and wireless support
Support for Web Standards.Applications created with exteNd Director fully support the Java 2 Enterprise Edition (J2EE) standard. Because these applications are standards-based, the Enterprise Archives (EARs), Web Archives (WARs), and Java Archives (JARs) that comprise them can work together effectively to unify your organization's diverse computing environment.
Extensible Framework with Subsystems.exteNd Director provides an extensible framework that incorporates several subsystems-including (but not limited to) Workflow, Rules, and Content Management. These subsystems can help you build time- and money-saving features into your applications. As you design each application, you select only those subsystems that will be needed. Thus the finished solution includes only the components necessary to complete the tasks for which the application is designed to handle.
Visual Development Environment.To create applications, you use Novell exteNd Workbench, the visual development environment included with exteNd Director. Novell exteNd Workbench provides a drag-and-drop design environment for creating personalized Web applications and content. Its easy-to-use interface simplifies the complexity of structuring J2EE-compliant applications and saves you time and money by accelerating development cycles.
Application Portability.Because exteNd Director applications fully support the J2EE standard for deploying Web services, these applications are portable. You can use exteNd Workbench to easily deploy exteNd Director applications-as either EAR or WAR files-on the following J2EE-based Web application servers:
Novell exteNd Application Server
Apache Tomcat
BEA WebLogic Server
IBM WebSphere Server
Personalized Portal Content.The highly-customizable Portal subsystem included with exteNd Director enables you to create personalized interfaces for applications. Implementing a one-size-fits-all approach to user access is generally a bad idea. For one thing, such an approach is inefficient for users, who must waste time negotiating an array of irrelevant selections to find the resources they need. For another thing, allowing users to know about resources they are not authorized to access creates a security risk.
To avoid these pitfalls, you can create exteNd Director applications that use implicit and explicit information to personalize users' access to the resources that these applications provide. Users see only the resources in which they are interested and to which they have access rights.
Integrated Workflow and Content Management.You can increase users' productivity by creating applications that include automated workflow processes. For example, an application could automatically present to new users a request form for office supplies. After users submit this form, the application could then forward it to a supervisor for approval and, finally, deliver the approved form to your organization's purchasing department. Such an application could dramatically reduce the amount of time users waste waiting for the supplies they need.
In this example, the workflow application would retrieve and store request forms using the Content Management subsystem, which works with any type of digital content. With this subsystem, users can use familiar programs to access, create, update, and store files. For example, users can launch a Hypertext Markup Language (HTML) editor to work with HTML files. To locate these files, users can access mapped drives or use exteNd Director's integrated Search feature.
Built-in Support for Wireless Devices.Because users are no longer tied to desktop workstations, Web applications must include display components that work with mobile devices, such as Internet-enabled cellular telephones and personal digital assistants (PDAs). To facilitate this capability, you can include in exteNd Director applications a built-in Transcoding engine. With this feature, users can receive accurately-rendered information on a host of different wireless devices.
Open API.The open Application Programming Interface (API) included with exteNd Director enables third-party developers to create additional subsystems and other plug-ins to extend the functionality of applications created with this tool.
For more information about exteNd Director, visit the product Web site at http://www.novell.com/products/extend/director.
About exteNd Director Applications
An application created with exteNd Director is a J2EE application packaged as an EAR (Enterprise Archive) and deployed to a J2EE-compliant application server. Director applications typically include a portal Web site, which provides the interface through which users access the Web content they want to see. However, you can also use exteNd Director to build applications that take advantage of Director services, without using a portal interface.
Director Subsystems
As mentioned earlier, exteNd Director includes a set of core technologies called subsystems. These subsystems provide several prebuilt user interfaces, as well as APIs for those who want to build J2EE applications from the ground up. By taking advantage of the features provided by these subsystems, you can create an application that is most relevant to the consumer.
Note: Subsystems are included in the project EAR as WARs (Web Archives) and JARs (Java Archives).
Figure 1 shows the exteNd Director framework and its subsystems.
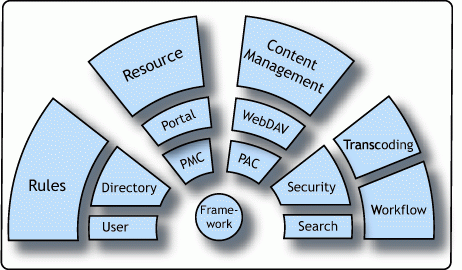
Figure 1: Novell exteNd Director framework and subsystems.
Here is a brief explanation of each subsystem's functionality:
The Framework provides core services for all Director applications, such as support for caching, system configuration, session management, and other services used by the other subsystems.
The Portal subsystem provides Web presentation services for Director applications. It includes the Presentation Manager, the Page Manager, and the Component Manager.
The PMC (Portal Management Console) provides an interface for setting up and maintaining the infrastructure for a content management system.
The PAC (Portal Administration Console) provides an interface for administering Director applications.
The WebDAV subsystem provides support for the Web Distributed Authoring and Versioning (WebDAV) communications protocol. Using this protocol, you can access server-side content in the Content Management subsystem from third-party WebDAV client applications.
The Rules subsystem allows you to trigger business rules, which are conditional formulas for making business-based choices in a Director application. You can have the application take different actions depending on whether the condition is true or false.
The User subsystem allows you to save and update information about users in user profiles. User profiles are stored in a database deployed with your application.
The Directory subsystem provides services for managing user logins and authentication. It works with your application server's security realms to check user IDs and passwords, and to add users to the realm.
The Security subsystem provides role-based security services to restrict user access to portal components and pages, and ACL-based security services to restrict access to subsystem functionality.
The Search subsystem provides the ability to search content using conceptual pattern matching, a more sophisticated approach than traditional full-text searching. It is based on the Autonomy Application Builder toolkit and Dynamic Reasoning Engine (DRE).
The Content Management subsystems allows you to create, label, categorize, and display content. Your application can retrieve, display, and update content and display it in various formats based on stylesheets. Content is stored in a database associated with your application.
The Workflow subsystem allows you to graphically model business processes that use simple or rules-based routing to move metadata and documents relating to an item of work among workflow activities. A runtime engine manages processes, work items, and participants.
Other subsystems and tools are included with exteNd Director to help you build and manage your Director project. For more information, refer to the online documentation at http://www.novell.com/documentation/lg/director41.
Director Project Structure
A Director application is packaged in a single Director EAR file or WAR file. The EAR architecture is suitable for deployment to an enterprise-level application server, such as the Novell exteNd Application Server. The WAR architecture is suitable for deployment to a lightweight application server, such as Apache Tomcat.
You create a Director project by running the Director Project Wizard in Novell exteNd Workbench. The wizard lets you select the subsystems you want to use and specify configuration properties for these subsystems. After you've finished making your selections, the wizard creates an EAR or WAR project that includes the J2EE modules you need for your application.
Once you've run the Director Project Wizard, you can add additional application-specific J2EE modules to the archive. You can also add or remove subsystems, or make any other necessary changes to the structure and content of the archive, just as you would with any J2EE application.
When you're ready to deploy the application, you can use the facilities provided with Workbench to upload the EAR or WAR to one or more servers.
Database for the Subsystem
An exteNd Director application requires a database for storing data used by the subsystems. When you deploy an application to the server, a boot service populates the database with the tables needed by your application. The database must be configured and available in your server's connection pool.
Templates
A template is a predefined exteNd Director application designed for a particular purpose. When you run the EAR Wizard provided with exteNd Workbench to create an application, you select the template that is closest to what you want to build. The EAR Wizard allows you to either use the entire template or select only the modules needed for your application.
Installation and Setup
You should install Novell exteNd Workbench to help you develop and deploy portal applications to a J2EE-compliant server. Its wizards and editors will improve your productivity as an exteNd Director developer. You also need to install Novell exteNd Application Server or have access to another J2EE-compliant application server to test your developed components.
This AppNote assumes you have installed Novell exteNd Workbench 4.1 and Director 4.1 Enterprise Edition and verified that they are working properly. It also assumes you have access to a properly-configured Novell exteNd Application Server 4.0. The development platform used for the sample project is a PC running Windows 2000 Professional (with SP3 applied), and having 512 MB of RAM and 2 GB of hard disk space.
If you need help installing the above software, consult the respective installation documentation for each product.
Application Development Example
Novell exteNd Director is integrated with exteNd Workbench to provide an extensible environment for creating, maintaining, and deploying J2EE applications. The Director EAR Wizard runs within Workbench and creates a properly constructed Director project.
This section walks you through the creation and deployment of a sample application called "Director Examples" using the Director EAR Wizard in exteNd Workbench. Before you start Workbench, however, you need to set up the database and make sure the Autonomy DRE is configured.
Setting Up the Database
A sample database named eBankDB is included in the download file for this AppNote. You need to add this database to the Novell exteNd Application Server.
Copy the eBankDB.db file to an appropriate location on your Application Server. For example:
D:\Novell\exteNdAppServer41\db
Define eBankDB as an ODBC data source using the Windows 2000 Administrative Tools in Control Panel.
Go to Control Panel > Administrative Tools > Data Sources (ODBC).
Select the System DSN tab.
Click the Add button. You should see the "Create New Data Source" window shown in Figure 2.
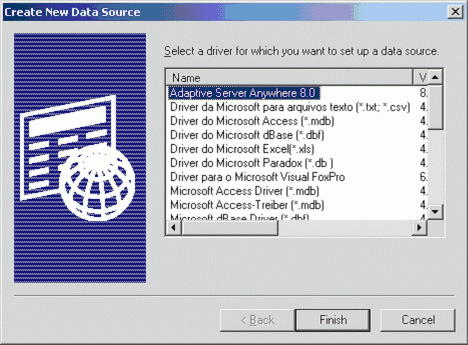
Figure 2: Create New Data Source window.
In the Create New Data Source list, select the proper driver for your database server and click Finish.
You should now see the ODBC Configuration window for your server. Click the Database tab and enter the information as shown in Figure 3. Click OK to continue.
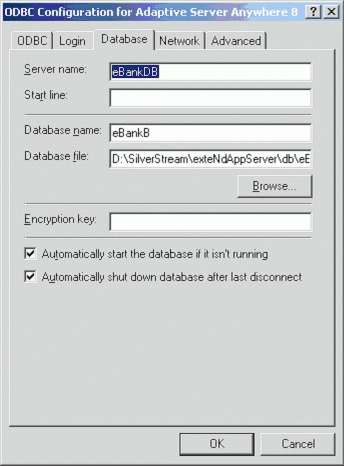
Figure 3: Configuration of the eBankDB database.
The eBankDB database should now appear in the list of System Data Sources, as shown in Figure 4. Click OK to exit.
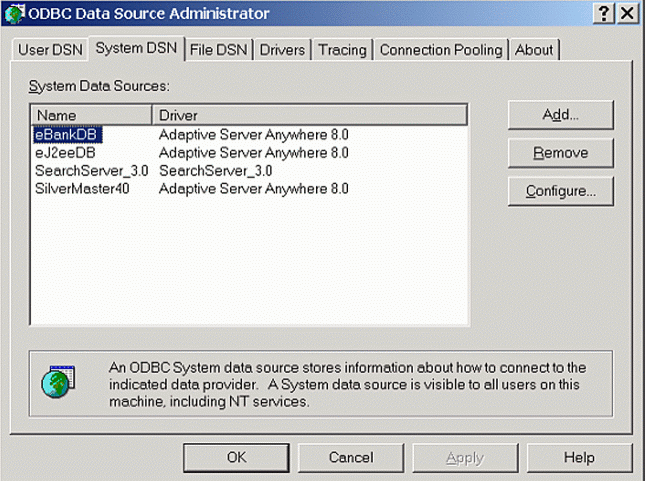
Figure 4: System Data Sources in the ODBC Data Source Administrator.
Add the eBankDB database to the exteNd Application Server using the exteNd Application Server Management Console utility located at D:\Novell\exteNdAppServer41\bin\smc.exe.
When the Management Console screen appears (see Figure 5), select "Databases" and then click the Add Database button.
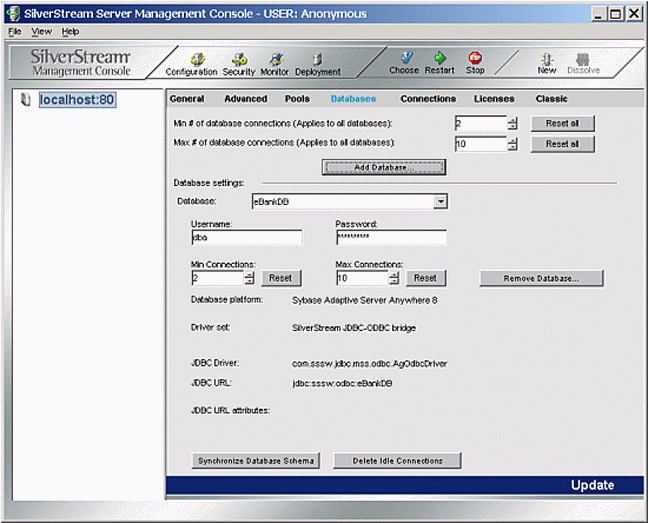
Figure 5: The Management Console Databases screen.
Enter the name of the database, a user name and password, and specify the Database platform and Driver set, as shown in Figure 6.
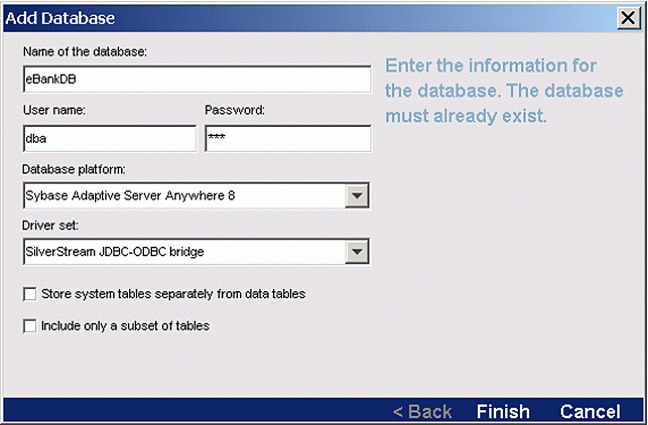
Figure 6: The Add Database screen.
A prompt will appear, as shown in Figure 7, indicated that the database was added successfully. Click OK.

Figure 7: The Success screen.
Verifying the DRE Configuration
One other thing you need to verify before starting exteNd Workbench is that the Autonomy Dynamic Reasoning Engine (DRE) is running. By default, it should be-but it never hurts to check.
To do this, locate DirectorDREadmin.exe in the exteNdDirector/autonomy/engine folder on the PC on which you installed exteNd Director. Start the utility and verify that the DRE Status is "Running," as shown in Figure 8.
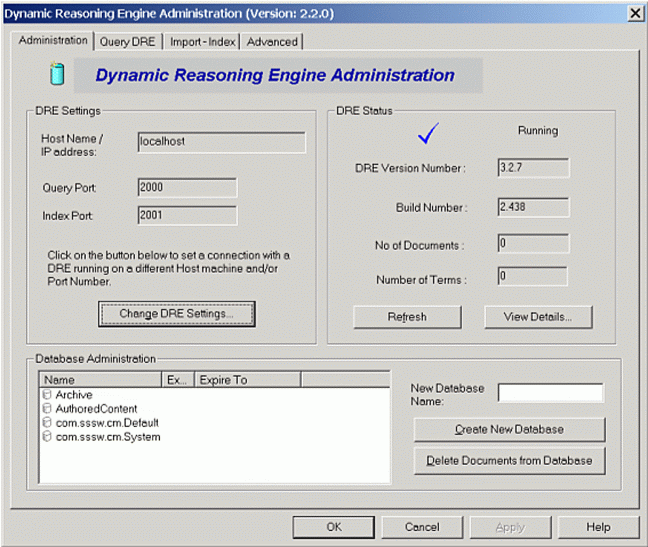
Figure 8: The DRE Administration utility screen.
Creating the Director EAR Project
You are now ready to use the Director EAR Wizard in Workbench to create a new project.
Start the Novell exteNd Workbench program.
When the main Workbench screen appears, select File > New Project.
In the New Project window, click the Director tab and select "Director Project", as shown in Figure 9. Click OK to continue.
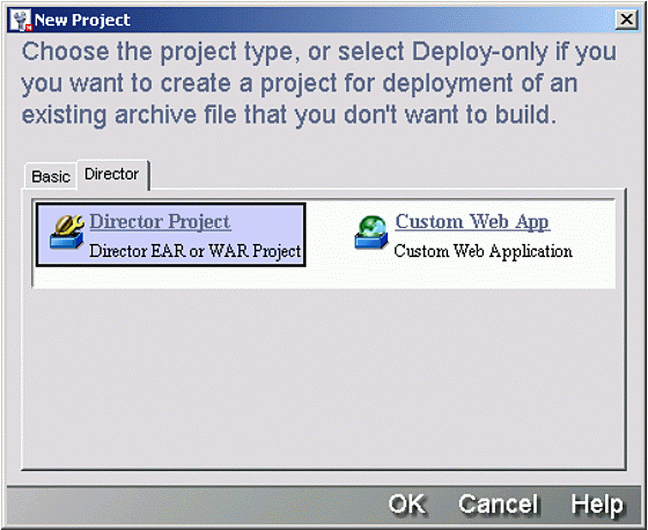
Figure 9: The New Project window.
Accept the default location of the Director template (see Figure 10) and click Next.
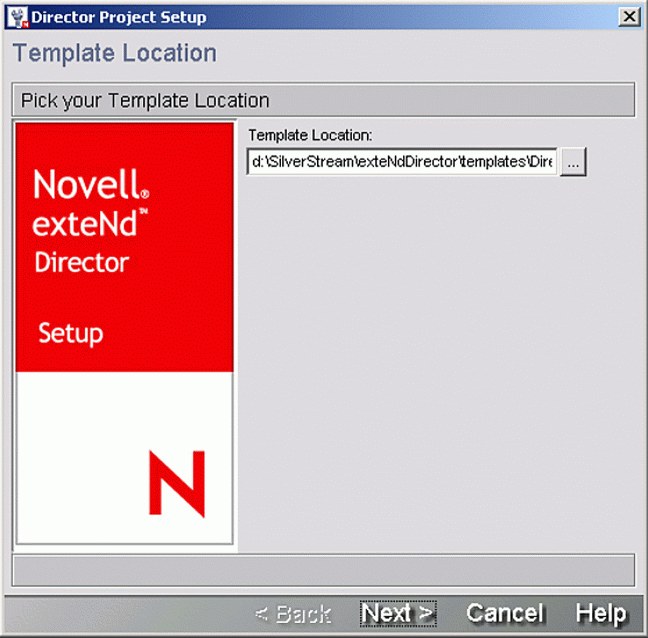
Figure 10: The Template Location window.
Confirm your selection of the Standard Director EAR Template by answering "Yes" to the prompt shown in Figure 11.
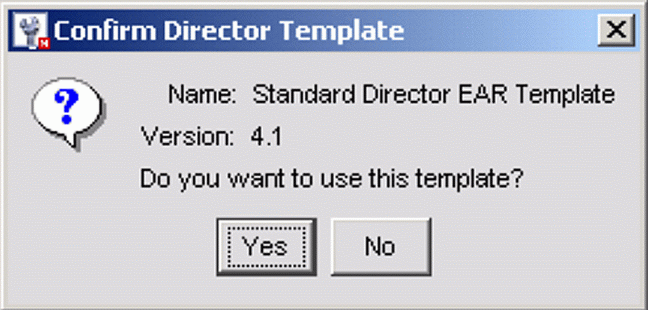
Figure 11: The Confirm Director Template prompt.
A progress bar will display while Workbench loads the template.
In the Project Information screen (see Figure 12), specify the setup information for your new project. The Project Name and Location can be anything you want. The program automatically sets the Archive Name and Location according to the Project, but you can override these if you want. Specify either J2EE version 1.2 or 1.3. Then click Next.
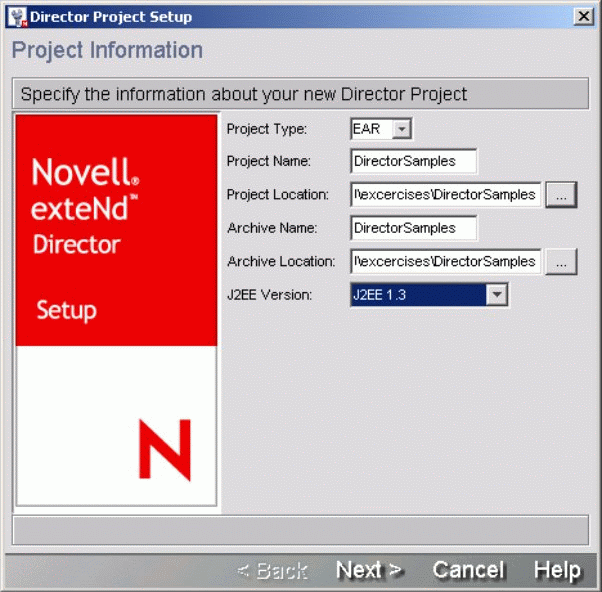
Figure 12: The Project Information screen.
In the Setup Type screen (see Figure 13), choose Typical and click Next.
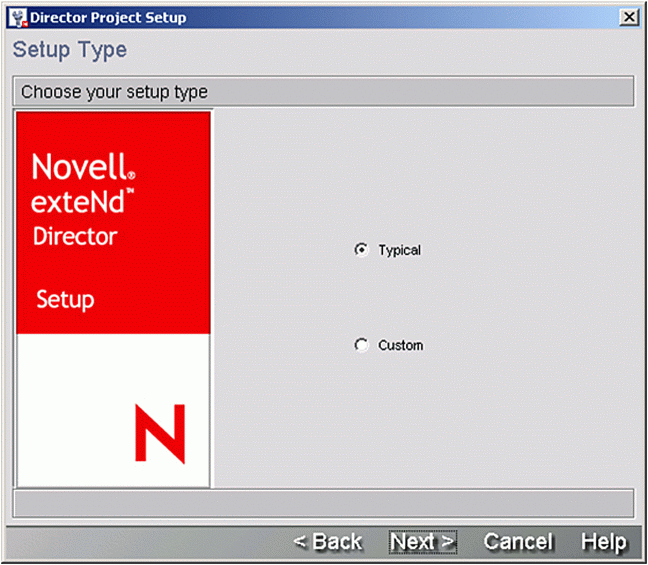
Figure 13: The Setup Type screen.
In the Custom Web App screen (see Figure 14), accept the default settings by clicking Next.
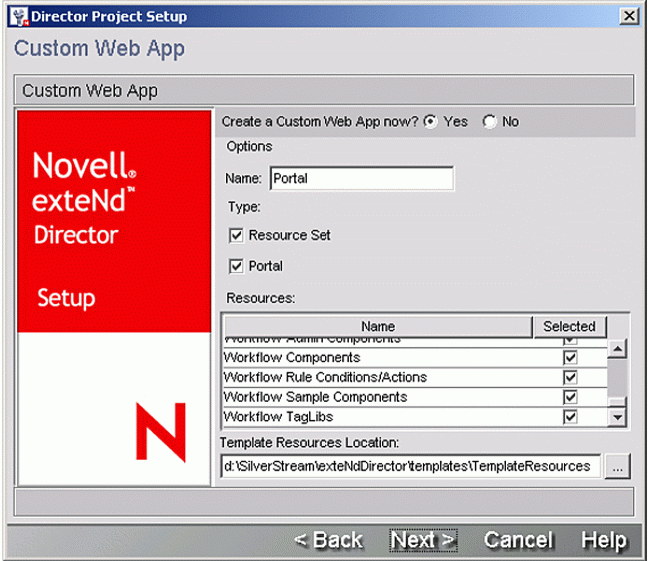
Figure 14: The Custom Web App screen.
In the Namespace Application screen (see Figure 15), accept the default settings by clicking Next.
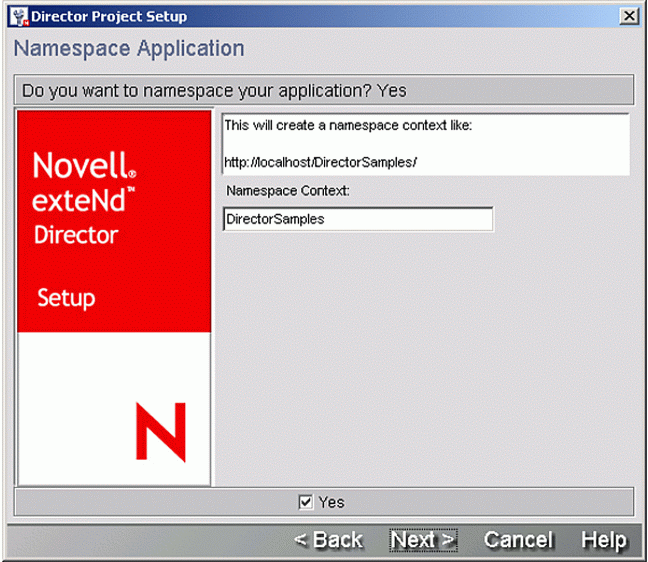
Figure 15: The Namespace Application screen.
In the Content Management Search Configuration screen (see Figure 16), accept the default settings by clicking Next.
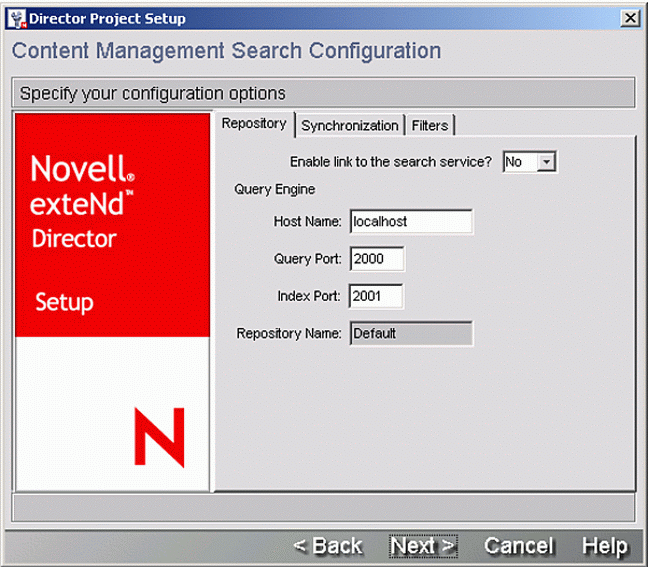
Figure 16: The Content Management Search Configuration screen.
In the Directory Configuration screen (see Figure 17), accept the default directory service realm by clicking Next.
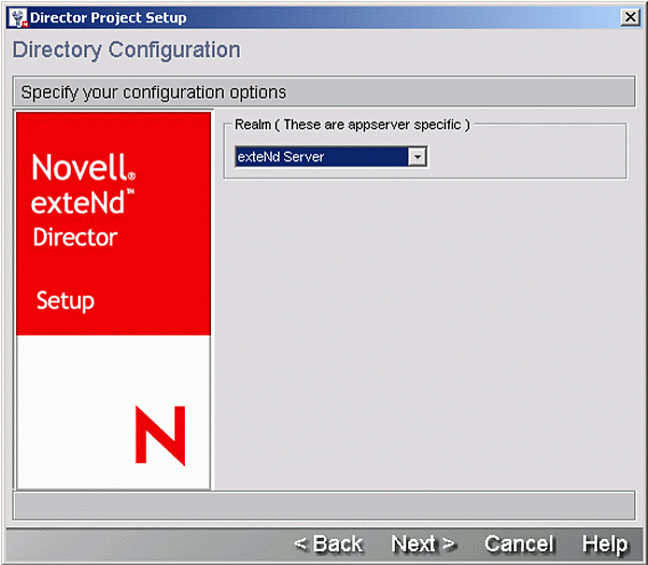
Figure 17: The Directory Configuration screen.
In the Framework Configuration screen (see Figure 18), specify eBankDB as the Director Framework Datasource (Databases/eBankDB/DataSource). The database must have been added to the exteNd Application Server as described previously. Leave the other settings as they are and click Next.
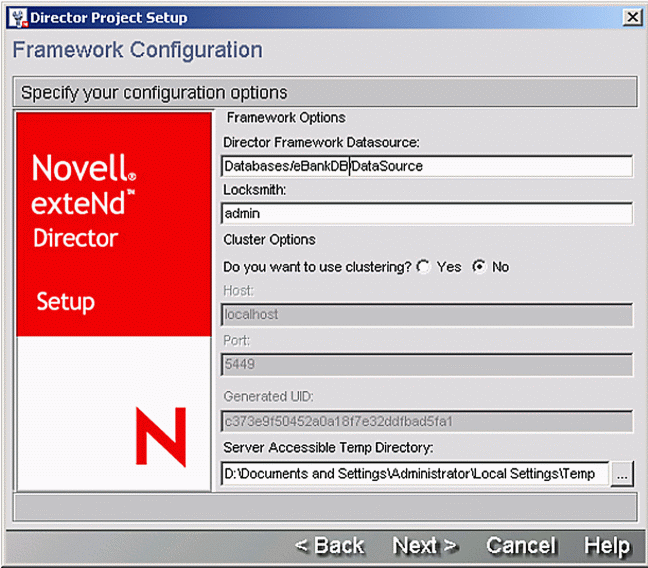
Figure 18: The Framework Configuration screen.
The Summary screen (see Figure 19) shows a summary of your Director EAR project. Review the information and then click Finish.
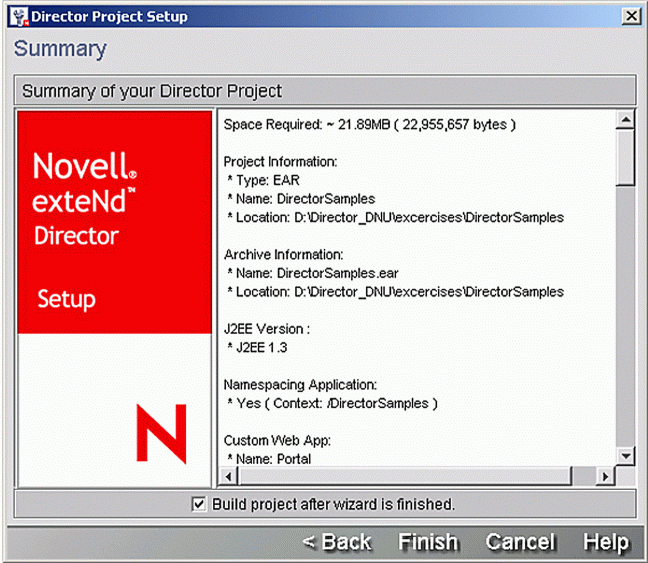
Figure 19: The Summary screen.
Since the "Build project after wizard is finished" setting is checked, Workbench will proceed to build and archive the project. When it is finished, you should see the message "BUILD SUCCESSFUL" in the bottom portion of the Workbench screen, as shown in Figure 20. You can explore the contents of the project in the navigation pane on the left side of the screen.
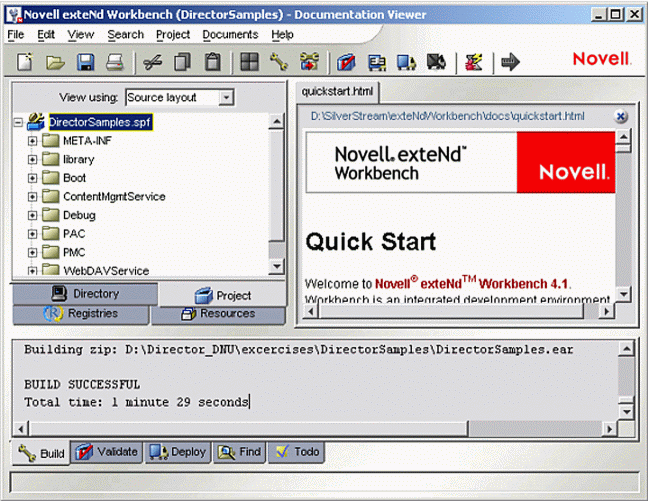
Figure 20: Message indicating that the build was successful.
Creating a Deployment Plan
Next you create an exteNd Server deployment plan.
From the Workbench main screen, select File > New.
In the next screen (see Figure 21), select "exteNd Server Deployment Plan" and click OK.
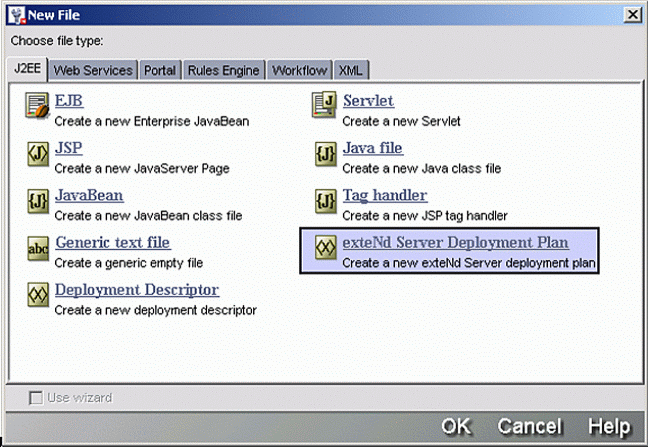
Figure 21: Selecting "exteNd Server Deployment Plan".
In the next screen (see Figure 22), make sure your project name is selected and click OK.
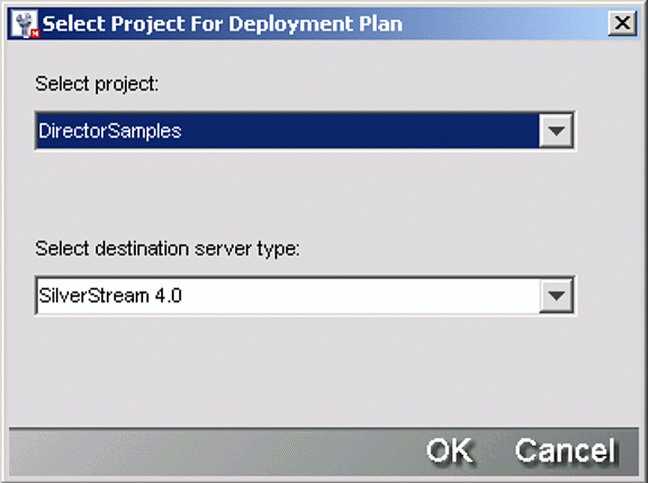
Figure 22: Selecting your project for the Deployment Plan.
Workbench proceeds to build the deployment plan for the project.
When you see the "BUILD SUCCESSFUL" message, click the X in the upper-right corner to close the new deployment plan. When prompted, answer "Yes" to save the changes to the file.
Deploying the Project
Now you are ready to deploy your Director project to the application server. Make sure the server is up and running.
In Workbench, select Project > Deployment Settings.
The first time you deploy your project, you'll see an error message stating that no server profile is associated with the deployment plan. Click OK.
In the next screen (see Figure 23), click the Server Profiles tab and select "eBankDB" as the Profile name. Then click New.
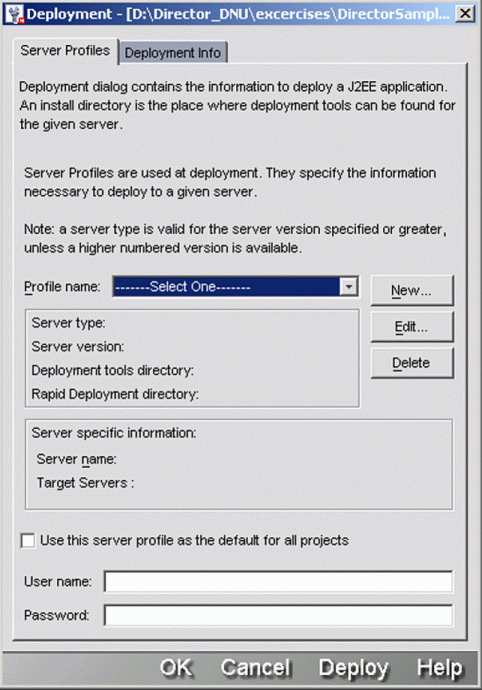
Figure 23: Selecting the Server Profile.
In the "Create a New Server Profile" window, enter "eBankDB" as the Profile name and make the other settings as shown in Figure 24. Then click OK.
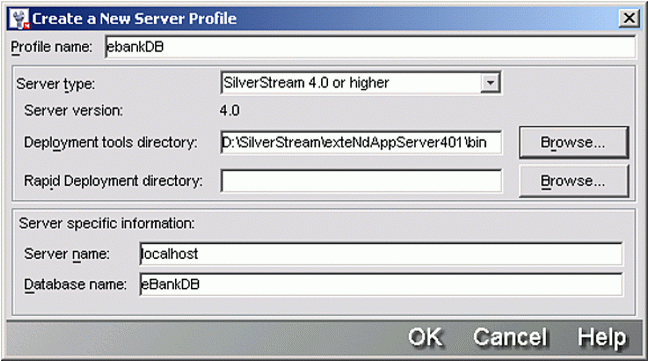
Figure 24: Creating the New Server Profile.
The Server Profiles window reappears, with the server type, version, and other information filled in (see Figure 25). Click the Deployment Info tab.
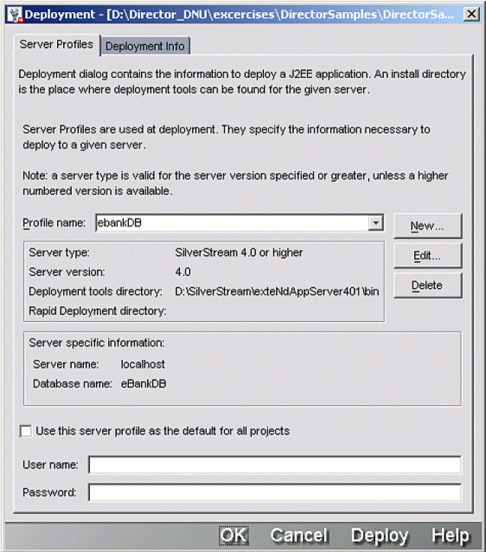
Figure 25: The Server Profiles screen with a new Deploy button.
In the Deployment Info screen (see Figure 26), browse to and select your saved Deployment Plan file. Click OK.
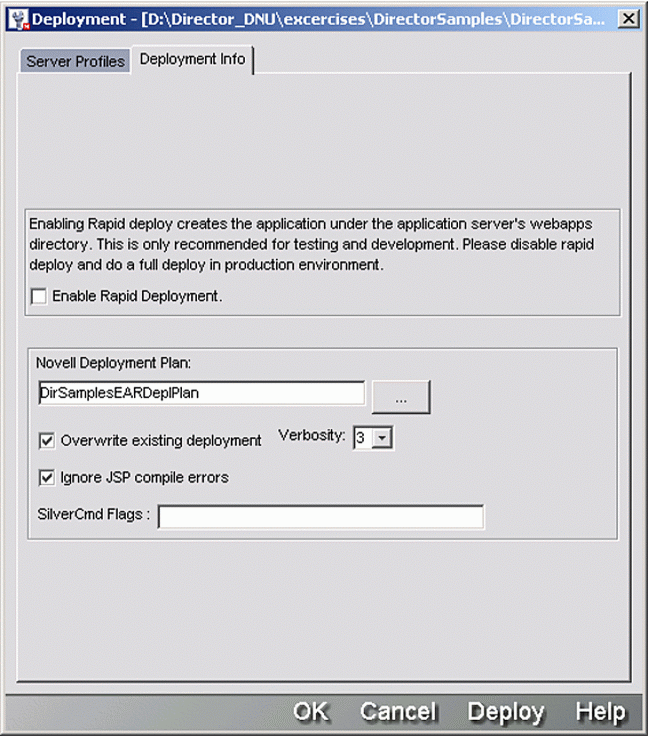
Figure 26: The Deployment Info screen.
You are now ready to build (or "compile") and deploy the DirectorSamples project.
Compiling and Deploying the Project
To compile and deploy the project through exteNd Workbench, complete these two steps:
In Workbench, select Project > Build and Archive.
When the build is finished, select Project > Deploy Archive. When the deployment is completed, you'll see a screen similar to the one in Figure 27.
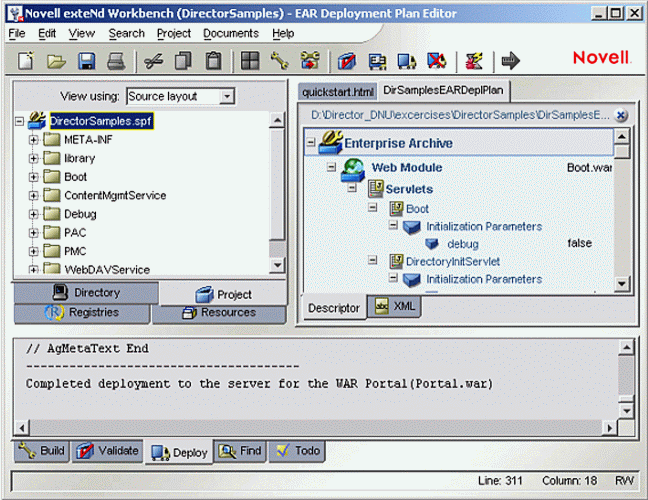
Figure 27: The completed deployment screen.
To access and test the deployed application, open a Web browser and type in the following URL: http://localhost/eBankDB/DirectorSamples/. The base servlet page shown in Figure 28 should open.
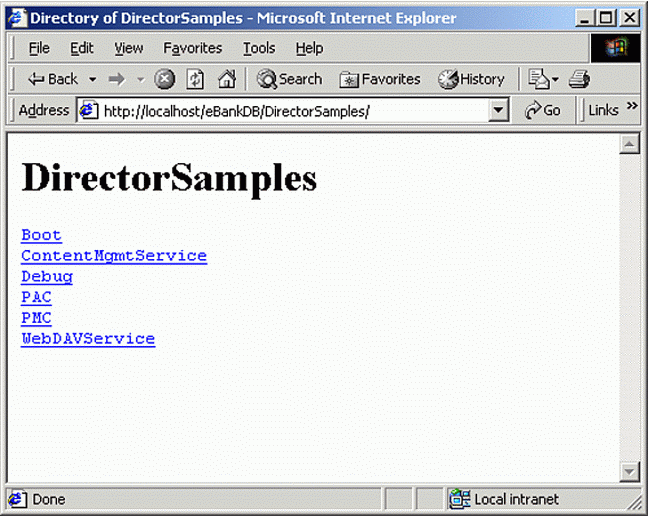
Figure 28: The DirectorSamples application's main Web page.
You should test the application by clicking on the links and verifying that they all work.
Conclusion
This AppNote has introduced Novell exteNd Director 4.1 Enterprise Edition, shown you how to install and set up the Director development environment, and walked you through the creation of a sample application. For information about an Advanced Novell Director Course, see http://extend.novell.com/Website/app/extend/EducationLanding.
For More Information
For more information about Novell exteNd Director, refer to the following URLs:
exteNd Director product page (http://www.novell.com/products/extend/director)
exteNd Director Developers page (http://developer.novell.com/extend/director)
exteNd Director NDK (http://developer.novell.com/ndk/exdirector.htm)
* Originally published in Novell AppNotes
Disclaimer
The origin of this information may be internal or external to Novell. While Novell makes all reasonable efforts to verify this information, Novell does not make explicit or implied claims to its validity.