Novell exteNd Director Pluggable Security Realm for eDirectory/ WebSphere
Articles and Tips: article
Consulting Architect
Novell, Inc.
ekuprel@novell.com
01 Apr 2003
This AppNote describes the process of creating a custom pluggable security realm with Novell exteNd Director for Novell eDirectory (LDAP) and Windows NT/2000 on IBM WebSphere.
- Introduction
- Configuring the Environment
- Creating and Deploying a Pluggable Realm
- Building the Interface and Implementation Classes for eDirectory
- Building the Interface and Implementation Classes for Windows NT/2000
- Deploying the Director EAR
- Conclusion
|
Topics |
Novell exteNd Director, web services, security |
|
Products |
Novell exteNd Workbench 4.0, Novell exteNd Director 4.0, Novell eDirectory 8.6.2, WebSphere Advanced Server Edition 4.0.2, Windows 2000 sp3, Oracle 8.1.7 |
|
Audience |
developers |
|
Level |
advanced |
|
Prerequisite Skills |
familiarity with Oracle 8, WebSphere Advanced Server, exteNd, and Windows 2000 |
|
Operating System |
NetWare 5 and above, Windows 2000 |
|
Tools |
none |
|
Sample Code |
yes |
Introduction
Novell exteNd Director is based on the J2EE and XML standards, with pluggable subsystems organized as Web tiers (WARs) and services (JARs). The Director Service provides a rich set of APIs that allow tight integration with server security. This implementation provides the ability to build and plug-in custom security realms by implementing well-defined Director interfaces.
The sample code provided with this AppNote was developed for demonstration purposes and can be easily extended for specific implementations. There are some known issues with the examples, which are explained at the end of this AppNote.
Advantages of a Pluggable Realm
When compared to the existing method of using the Director WebSphere custom security, implementing a pluggable realm provides two major benefits: first, configuration and installation of the environment is greatly simplified; and second, the development environment and lifecycle are quicker and more lightweight.
Specific benefits include the following:
Director maps into an existing WebSphere security setup. Most WebSphere shops have existing applications and a single shared security setup (for example, LDAP/NT) and don't want to be forced to use custom database security.
Initial configuration and deployment is quicker, simpler, and far less error-prone.
Developers aren't forced to use databases that support distributed transactions (XA). Far more database types and versions can be used. For example, many shops are standardized on Oracle 8.1.5, which cannot be used with a normal Director setup.
Multiple Director EARs can be deployed on the same server. Most customers have a cluster of servers serving several applications; hence, this is a requirement. Also, testing teams often have multiple versions of applications running on the same server.
Director does not infringe on the application server's default server-wide class path, so when a security/database setting changes, developers don't need to copy new versions of Director JARs to the server's class path, and the server doesn't need to be bounced.
Developers can now use WebSphere Single Server edition for development, and Enterprise Server for production. Single Server is more lightweight, easier to install, and easier to use for development purposes.
For developers who don't need the graphic tools provided by the Workbench, they can edit Director applications in WSAD and launch Single Server as an inline JVM application within WSAD to instantaneously debug their application changes.
Development environments are also lightweight because NT security can be used for development and LDAP can be used for production without requiring code changes (some XML configuration changes are required).
The reason that this simplifies the process so much is that custom registries are not used in WebSphere. WebSphere provides fully integrated security options for LDAP and NT.
By providing a Director-pluggable realm that integrates with WebSphere for the authenticate() method and directly with LDAP/NT (which WebSphere is mapped to through the Security Center console) for all other user/group methods, full security integration is achieved.
Single-sign across WebSphere, Director, and LDAP/NT works perfectly, whether a user logs into an application using WebSphere's J2EE container declarative security or using a Director Logon form. We have implemented both LDAP and NT pluggable realms (Read-Only so far).
Custom-Pluggable Realms in a Development/Production Environment
It is common for a developer to use WebSphere application server (Single Server edition) for running, testing, and debugging the application, and then to use Enterprise Edition for the production/QA environment. Single Server supports native OS security only-hence on Windows this is NT security. Enterprise Edition also supports LDAP and custom realms.
It is likely that a developer would use Single Server with NT Security, and Production/QA would use LDAP or a custom realm they already have (not the one dictated by Director).
A key point about providing a pluggable realm for an application server is that you can only provide a realm that is natively supported for that application server. That is, if an application server doesn't natively support LDAP you can't write a pluggable realm to support LDAP even if you have an LDAP server available.
As a result, Single Server can't be used with LDAP, only with NT security. This is because the pluggable realm relies on single sign-on between the underlying application server container and the Director application.
WebSphere pluggable realms use the authenticate() grey-api for WebSphere, allowing the user to log into an application using Browser BASIC HTTP authentication or a Director logon form. It doesn't matter which.
In this environment it is quite easy to develop in a sandbox using Single Server with the NT pluggable realm. Moving the application into production involves making a few small configuration changes to the Director XML configuration files. These changes are isolated to the following files:
\library\DirectoryService\DirectoryService-conf\config.xml
\library\DirectoryService\DirectoryService-conf\services.xml
\library\FramworkService\FrameworkService-conf\config.xml
These settings are further explained in the following section.
Configuring the Environment
The following environment was used to produce the examples included in this AppNote:
Oracle 8.1.7 (WebSphere 4.0.2 won't work with Oracle 8.1.6 and earlier if you use the default Director WebSphere custom realm. However, if you use the NT or LDAP pluggable realm, this restriction goes away because full XA driver support is no longer required.)
WebSphere Advanced Server Edition 4.0.1, with the 4.0.2 patch applied
eDirectory 8.6.2
exteNd Director 4.0
exteNd Workbench 4.0
Windows 2000, Service Pack 3
eDirectory Installation and Configuration Tips
Here are a few tips I found helpful during the installation and configuration of Novell eDirectory:
You can download eDirectory from Novell's web site. You will be e-mailed the license key file you need during installation.
During installation, select the Custom client installation, select IP only, and then select Remove IPX if found. If you use the Typical installation, even though it allows you to select IP as your preferred protocol, you must uninstall and then reinstall IP.
When the NICI installation finishes (during Directory Services installation), change ownership of C:\WINNT\system32\Novell\NICI\[ntuser]). The Novell installation does not provide permissions to these files, even if you are an administrator.
For more information about eDirectory installation and configuration, see the Installation Notes that come with the Novell Application Server.
Figure 1 shows a sample of LDAP objects in eDirectory, which can be used to prove this integration approach.
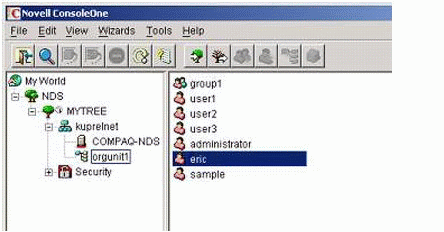
Figure 1: Sample LDAP objects in eDirectory.
Be sure to install the latest Windows 2000 service pack. In my case I upgraded to SP3 after a fresh Windows 2000 Professional installation. SP2 works too.
WebSphere Installation and Configuration Tips
Following are some helpful tips for installing and configuring IBM WebSphere:
If you will use the WebSphere custom security implementation that comes with Director, or if you will use the eDirectory (LDAP) pluggable realm, you need WebSphere Advanced Edition 4.02, not WebSphere Advanced Single Server Edition. You can use the Single Server edition if you are only implementing the NT pluggable realm.
Before installing make sure you have a Windows user (such as Admin) who has administrative rights and who has the privileges set for "Act as part of the operating system" and "Log on as a service".
To set these, select Control Panel > Administrative Tools > Local Security Policy > Local Policies > User Rights Assignments. (For more detail, see the following section.)
WebSphere creates a repository against a database for its metadata (a bit like Silvermaster); therefore, you need an appropriate database configured before running the WebSphere installer (unless you have a copy of DB2 available).
If you use Oracle, keep the following in mind:
Before you install WebSphere, make sure the Oracle client is installed locally (or that you are using a full Oracle database).
If you use versions of Oracle prior to 8.1.7, Director on WebSphere will not work if you use the default custom security implementation. However, if you use the NT or LDAP pluggable realm this restriction goes away because full XA driver support is no longer required for either Oracle client or server.
In the installation, when prompted for the database installation directory, use a path like C:\oracle\ora81. This must be the path that contains the jdbc\lib subdirectory.
If you use the Oracle thin driver for configuring WebSphere, before you run the WebSphere installation make sure that classes12.zip is in C:\oracle\ora81\jdbc\lib. Also make sure that two users have been created in Oracle: one to hold the WebSphere repos and the other to hold the Director application tables. Examples of users are EJSADMIN and WSTEST. Make sure these users have DBA rights (grant connect, resource, and dba to EJSADMIN).
Extra help for installing WebSphere on Windows with Oracle8i can be found at http://www.ibm.com/software/webservers/appserv/doc/v40/aee/ wasa_content/pdf/win_adv_ihs_oracle_v4.pdf.
After the WebSphere installation, keep the following points in mind:
You can change some settings in the WebSphere config file at c:\WebSphere\AppServer\bin\admin.config.
To avoid server startup issues, comment out the admin.config setting com.ibm.ejs.sm.adminServer.disableAutoServerStart=true. This means you must start the default server manually each time you start the WebSphere admin server, but that's not a bad thing.
To start the WebSphere admin server, enter the following command:
net start IBM WS AdminServer 4.0
To stop the WebSphere admin server, enter this command:
net stop IBM WS AdminServer 4.0
After the admin server is started, you can start the admin console and then start your default server.
Always check the WebSphere logs in C:\WebSphere\AppServer\logs to see if there are errors on startup, to look for stack traces, and so on.
If you want to use WebSphere when not networked, you must install a LoopBack Adapter on your Windows machine. More information about doing this on Windows 2000 is available at http://support.microsoft.com/ default.aspx?scid=kb;EN-US;q236869.
WebSphere Advanced Server Edition 4.0.2 is a patched edition of 4.0.1. Install 4.0.1 first and make sure it is working properly; then download and install the patch from ftp://ftp.software.ibm.com/software/websphere/ appserv/support/fixpacks/was40/fixpack2/Windows/was40_ae_ptf_2.zip.
Creating a Local Windows NT User for WebSphere
You should create a local user ID that the WebSphere server will use to authenticate itself to the local operating system. You could use your own ID, but this is not recommended because the password for this ID is stored in the WebSphere server-cfg.xml file.
The password in the file is obscured (not encrypted) using an XOR mask. This prevents casual observation of the password, but doesn't prevent a determined attacker who has access to the file.
If the portal application to be developed requires more than one user to help test aspects (such as user personalization), it is convenient at this point to add these users in the same manner.
Create the ID as a local user. For the Director application we recommend that you create a user with the ID of "websphere". This is because the source-controlled template Director application maps deployment descriptor roles to a user named "websphere" in the WebSphere-specific deployment descriptors.
On Windows 2000, you can add a user from the computer management console. Do the following:
Right-click on the My Computer icon and open the console by selecting "Manage".
Navigate to System Tools > Local Users and Groups > Users.
With the Users folder highlighted, from the Action or context menus select "New User".
Enter the user information as shown in Figure 2; then click Create:
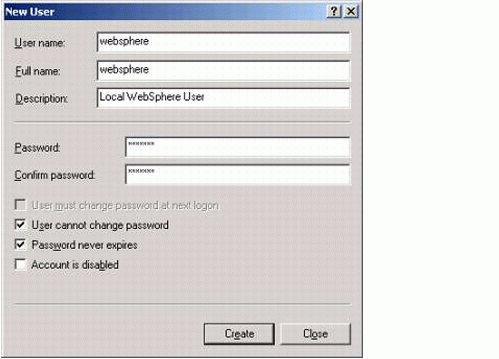
Figure 2: New User dialog for Windows 2000.
Add the user to the local Administrators group by double-clicking the new user in the list at the right of the console window, selecting the Member Of tab, clicking Add, and selecting the appropriate group.
Click OK to save the changes. A dialog similar to the one shown in Figure 3 appears.
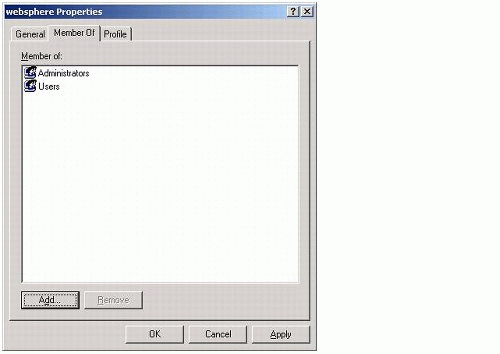
Figure 3: WebSphere Properties dialog.
Assigning Permissions to User IDs
You must assign the following permissions to both the new WebSphere IDs and your own user ID:
Act as part of the operating system
Log on as a service
To assign permissions, do the following:
Open the local security settings management console and navigate to Start > Settings > Control Panel > Administrative Tools > Local Security Policy.
Within the console, select Security Settings > Local Policies > User Rights Assignment.
Locate the two policies in the window and add the user IDs to the list by double-clicking each policy name (see Figure 4).
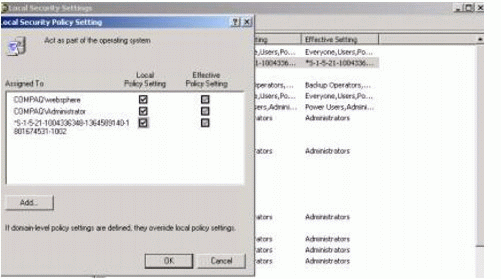
Figure 4: Local Security Policy Setting dialog.
To add each user ID, for each policy click the Add button.
After the permissions are added, reboot your machine so the policies can take effect.
Note: Before the reboot, the Effective Policy Setting boxes (as seen in Figure 4) aren't selected; after you reboot, check the dialog to make sure the policies are effective.
If you require additional users for the portal development environment, follow the same procedure for each new user ID.
Creating and Deploying a Pluggable Realm
When creating and deploying a pluggable realm, keep in mind that a security realm is an object that knows how to talk to back-end authentication systems and is used by the Directory Manager or its delegate. An application built with Director is configured to use a security realm.
This security system typically uses a Directory server, which provides persistence for user and group information (LDAP, Windows NT, NIS+, and so on). You can configure the Directory subsystem to use either a readable or a readable/writable security realm:
Readable security realm. In a readable security realm, Director applications such as the portal administration console (PAC) can't add users or groups or modify existing ones. This is useful for intranets where a central administration application manages all users and groups for all applications.
Readable/writable security realm. In a readable/writable security realm, administrators can use the Directory subsystem and the PAC to add, delete, and modify user and group entries. This is useful for Internet sites where users are allowed to register themselves.
For the WebSphere security realm, the EAR Setup wizard adds the following to config.xml for DirectoryService:
<property>
 <key>DirectoryService/realms/readable</key>
  <value>com.sssw.fw.server.websphere.realm.EboWebSphereRealm</value>
</property>
<property>
   <key>DirectoryService/realms/writeable</key>
 <value>com.sssw.fw.server.websphere.realm.EboWebSphereRealm</value>
</property>
<property>
   <key>DirectoryService/realms/websphere/anonymous</key>
   <value>anonymous</value>
</property>
Note: This default realm for WebSphere uses a custom registry. The following sections describe how to configure a Director application to use a security system that WebSphere natively supports, such as LDAP or NT. Only when such a pluggable realm is used can the deployment procedure described in this AppNote be used for deploying Director applications to WebSphere.
You can implement your own security realm to directly access a Directory server, or you can rely on an existing database structure.
You can easily create a custom security realm by implementing one or two Java interfaces that include a few dozen methods (EbiRealm or EbiWriteableRealm). You can switch a Director application to use a custom realm through the eXtend workbench service and configuration editors.
Building the Interface and Implementation Classes for eDirectory
As a prototype, two classes were written to create a pluggable security realm. These classes enable a Director EAR to be deployed and used on a WebSphere application server configured to use eDirectory. These classes are as follows (a code sample is included in the download file for this AppNote):
EbiNovellLDAPRealm is an interface that extends EbiRealm, which is an interface that custom realms implement to provide read-only Directory services. Director's Directory Manager loads instances of realms that implement this interface and the EbiWriteableRealm subinterface.
EboNovellLDAPRealm implements EbiNovellLDAPRealm and has methods for getting a user or a collection of users from the LDAP server. This class provides a method for users to log on to WebSphere using a Director- generated HTML form. This class also support users logging on using WebSphere's default container authentication mechanism. Single sign-on is achieved across Director, WebSphere, and LDAP regardless of whether WebSphere or Director is used for initial authentication. This class could implement additional methods to gain more group information from the LDAP server, but these haven't been included in the current prototype class. For the prototype, a single hard-coded group that contains all the users has been assumed.
Configuring the Pluggable Realm for eDirectory
To configure your own Security realm for use with Director, do the following:
In your XML editor, open ..\library\DirectoryService\DirectoryService- conf\services.xml.
Insert the following lines:
<service>
  <interface>com.sssw.fw.directory.api.EbiNovellLDAPRealm</interface>
  <impl-class>com.sssw.fw.server.websphere.realm.EboNovellLDAPRealm</impl-class>
   <description>Novell LDAP WebSphere Realm</description>
   <max-instances>1</max-instances>
 <startup>M</startup>
 <namespaced>false</namespaced>
</service>
In your XML editor, open ..\library\DirectoryService\DirectoryService- conf\config.xml.
Insert the following lines:
<property>
 <key>DirectoryService/realms/readable</key>
  <value>com.sssw.fw.directory.api.EbiNovellLDAPRealm</value>
</property>
If you want to implement a writable realm, insert the following lines:
<property>
    <key>DirectoryService/realms/writeable</key>
    <value>com.sssw.fw.directory.api.EbiNovellLDAPRealm</value>
</property>
Note: To set up a writable realm, EbiNovellLDAPRealm must extend EbiWriteable- Realm, and the current version of EbiNovellLDAPRealm only extends EbiRealm. If no writable realm is to be used, make sure the writable realm property entry in config.xml is removed; otherwise, Director's PAC assumes that users and groups can be added, and it shows these functions even though they are invalid.
Update the DirectoryService/realms/websphere/anonymous key so the value is UNAUTHENTICATED, which is WebSphere's default anonymous user:
<property>
 <key>DirectoryService/realms/websphere/anonymous</key>
   <value>UNAUTHENTICATED</value>
</property>
To the library\Directory jar of the Director EAR, add the pluggable realm interface com.sssw.fw.directory.api.EbiNovellLDAPRealm.
To the library\Framework jar of the Director EAR, add the pluggable realm class com.sssw.fw.server.WebSphere.realm.EboNovellLDAPRealm.
This class is contained in a different JAR to isolate application-server- specific classes to one single package in one single library jar.
Configuring WebSphere Security for eDirectory
The pluggable realm authenticates to WebSphere native security. You must define the LDAP security provider in the WebSphere administrator console as follows:
From the Console menu, select Security Center.
On the General tab, select "Enable Security".
On the Authentication tab, select "Lightweight Third Party Authentication (LTPA)".
Select LDAP and enter the appropriate settings to connect to the LDAP provider (eDirectory), as shown in Figure 5.
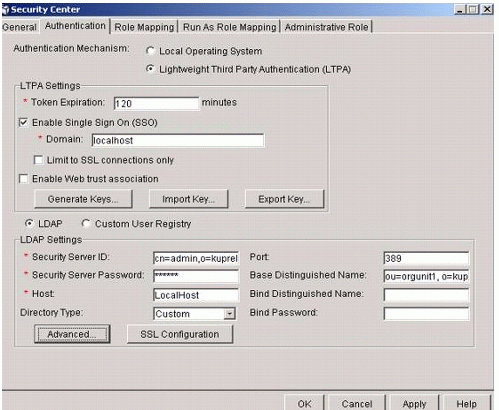
Figure 5: Security Center dialog with the Authentication tab selected.
Apply changes and restart the WebSphere administration server (IBM WS AdminServer 4.0) from the Windows 2000 Services panel.
Building the Interface and Implementation Classes for Windows NT/2000
As a prototype, two classes were written to create a pluggable security realm. These classes enable a Director EAR to be deployed and used on a WebSphere application server configured to use Windows NT. These classes are as follows (a code sample is included in the download file for this AppNote):
EbiWebSphereNTRealm is an interface that extends EbiRealm, which is an interface that custom realms implement to provide read-only Directory services. Director's Directory Manager loads instances of realms that implement this interface and the EbiWriteableRealm subinterface.
EboWebSphereNTRealm implements EbiWebSphereNTRealm and has methods for getting a user or a collection of users from the local NT server. This class provides a method for users to log on to WebSphere using a Director-generated HTML form. The class also support users logging on using WebSphere's default container authentication mechanism.
Configuring the Pluggable Realm for Window NT/2000
To configure your own security realm for use with Director, do the following:
In your XML editor, open ..\library\DirectoryService\DirectoryService- conf\services.xml.
Insert the following lines:
<service>
  <interface>com.sssw.fw.directory.api.EbiWebSphereNTRealm</interface>
 <impl-class>com.sssw.fw.server.websphere.realm.EboWebSphereNTRealm</impl-class>
  <description>WebSphere NT Realm</description>
    <max-instances>1</max-instances>
 <startup>M</startup>
 <namespaced>false</namespaced>
</service>
In your XML editor, open ..\library\DirectoryService\DirectoryService- conf\config.xml.
Insert the following lines:
<property>
 <key>DirectoryService/realms/readable</key>
  <value>com.sssw.fw.directory.api.EbiWebSphereNTRealm</value>
</property>
If you want to implement a writable realm, insert the following lines:
<property>
    <key>DirectoryService/realms/writeable</key>
    <value>com.sssw.fw.directory.api.EbiWebSphereNTRealm</value>
</property>
Note: To set up a writable realm, EbiWebSphereNTRealm must extend EbiWriteableRealm, and the current version of EbiWebSphereNTRealm only extends EbiRealm. If no writable realm is to be used, make sure the writable realm property entry in config.xml is removed; otherwise, Director's PAC assumes that users and groups can be added, and it shows these functions even though they are invalid.
Update the DirectoryService/realms/websphere/anonymous key with the following, so the value is UNAUTHENTICATED, which is WebSphere's default anonymous user:
<property>
 <key>DirectoryService/realms/websphere/anonymous</key>
   <value>UNAUTHENTICATED</value>
</property>
To the library\Directory jar of the Director EAR, add the pluggable realm interface com.sssw.fw.directory.api.EbiWebSphereNTRealm.
To the library\Framework jar of the Director EAR, add the pluggable realm class com.sssw.fw.server.WebSphere.realm.EboWebSphereNTRealm.
This class is contained in a different JAR to isolate application-server- specific classes to one package in one library jar.
Configuring WebSphere Security for Windows NT/2000
WebSphere enables security integration with the underlying operating system's native security infrastructure. (Advanced Edition also supports LDAP and custom security registries.) Therefore, to configure security users to be referenced by a Director portal application running on WebSphere, users must be added using Windows NT security tools.
To configure WebSphere to use local security (Windows NT/2000) do the following:
From the Console menu select Security Center.
On the General tab, select "Enable Security".
On the Authentication tab, select "Local Operating System".
Enter the information shown in Figure 6.
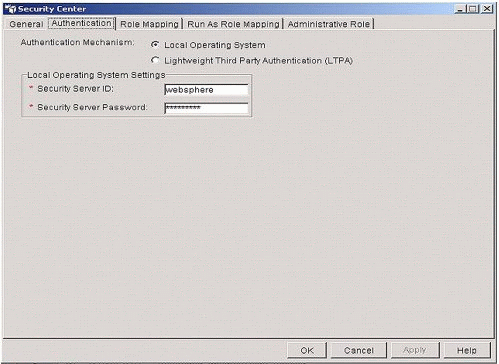
Figure 6: Security Center dialog with the Authentication tab selected.
For an explanation of this dialog, see the section titled "Creating a Local Windows NT User for WebSphere."
Deploying the Director EAR
Deployment to WebSphere Advanced Edition requires you to use the WebSphere advanced administrative console.
If your Director application includes custom WARs, EJB bindings, and resource references you've defined, you can use the IBM application assembly tool first to define bindings for EJBs and resource references.
The application assembly tool modifies the Director EAR and saves a second ready-to-deploy version of the EAR. Then you use the administrative console for the deployment.
Building and Deploying the EAR
To build an EAR in Workbench, select "Build and Archive" or "Rebuild All and Archive".
To deploy your application, do the following:
In the advanced administrative console, right-click the Enterprise Applications folder and from the menu, select "Install Enterprise Application".
In the install wizard, select "Install Application (*.ear)".
Use the Browse button to find the EAR for your Director application.
Enter the name you want to use for the application. The deployment gives the deployed EAR this name.
Navigate through the rest of the wizard, accepting defaults; then click Finish.
Stop and restart WebSphere Advanced Edition.
In the console, find your server in the Nodes folder and make sure it is started.
In the console, find your application in the Enterprise Applications folder and use the pop-up menu to start it.
Starting the application causes Director to generate the database schema for system data, including the security realm.
Use your DBMS tools to verify that the Director tables are in the database.
Changing Your Deployment Configuration
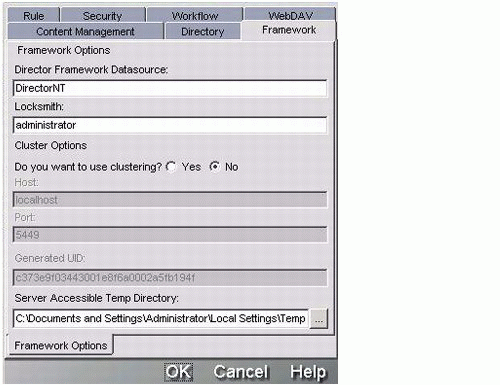
When you run the Director EAR wizard, you make choices based on the application server you plan to use. To deploy to a different server later, you can use the Director EAR configuration option in Workbench (Project menu) to make changes (see Figure 7).
Figure 7: Director Framework Options dialog.
You can also change settings in the Director XML configuration files. Here are some common settings:
|
What to Change
|
How to Change It
|
|
Realm for user authentication |
Edit library/DirectoryService-conf/config.xml. |
|
Locksmith ID |
Change the ID in library/FrameworkService-conf/config.xml. OR Add to your server's list of users an ID that matches the current Locksmith value. |
|
JNDI name for the application database |
Edit library/FrameworkService-conf/config.xml. |
Testing Your Deployment
To test your deployment, log in to PAC. If you have problems with the login, make sure your locksmith user is defined in the security realm you are using (eDirectory or NT).
Figure 8 shows the locksmith user definition in an eDirectory/LDAP environment.
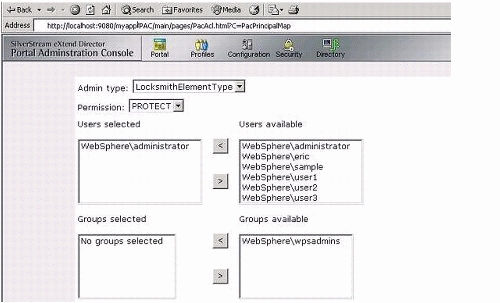
Figure 8: LDAP example.
Figure 9 shows the locksmith user definition in a Windows NT/2000 environment.
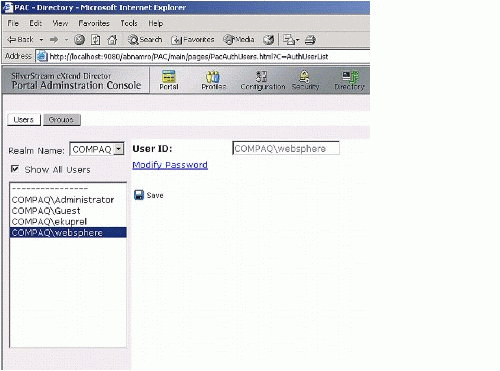
Figure 9: Windows NT/2000 example.
Debugging Hints
Here a few helpful tips for debugging and other purposes.
The WebSphere console system output can be found in \WebSphere\ AppServer\logs\Default_Server_stdout.
If your EAR is deployed and you can't access it, make sure it is started: check in the WebSphere administrator console in Enterprise Applications, then right-click the EAR and check the status.
If you are having problems removing your EAR from the WebSphere administrator console, make sure it is stopped first.
The default URL port for the deployed director EAR is 9080; for example, http://localhost:9080/myapp/PAC/main.
Restart the administrator service after making security changes. You can restart the IBM WS AdminServer 4.0 Windows service.
About the Download Files
Source code and other relevant files for the demo system described in this article are included in the download file for this AppNote, which is available at http://developer.novell.com/research/appnotes/download.htm. Here are some things to note about the files.
Classpath/Dependencies.To compile the source in FrameworkService, you need the following jar files included in the classpath:
DirectoryService.jar
jwsorb.jar (websphere)
ServerSideAuthenticator.zip
Security.jar
WebSphere.jar (websphere)
I built the ServerSideAuthenticator.zip file from these WebSphere classes:
LoginHelper.class
ServerSideAuthenticator.class
LDAP Code.Here is the Java source code for EbiNovellLDAPRealm:
package com.sssw.fw.directory.api;
import com.sssw.fw.factory.*;
public interface EbiNovellLDAPRealm extends EbiRealm { extends EbiRealm
  public static final String CUSTOM_LDAP_REALM =
(EboFactory.getConfig().getProperty(EbiNovellLDAPRealm extends EbiRealm
{.class.getName(), "WebSphere"));
 public static final String CUSTOM_LDAP_ANONYMOUS_KEY=
"DirectoryService/realms/websphere/anonymous";
}
There are two known issues with EboNovellLDAPRealm:
Server-specific settings (such as the LDAP URL) should be factored out into context parameters or env entries in the WAR web.xml deployment descriptor because they are hard-coded in the class.
The example group "wpsadmins" is hard-coded. This needs to be implemented because most customers will have more than one group and none of these will be called "wpsadmin".
Windows NT/2000 Code.Also included in the download is the source code for EbiWebSphereNTRealm and EboWebSphereNTRealm. There are two known issues with the latter:
Portal security only works if you log into NT as a user who is not a member of a domain.
There is an issue with assigning role-based security in the PAC to users other than the locksmith.
Config.xml.A sample config.xml file is included as \library\DirectoryService\ DirectoryService-conf\config.xml.
Services.xml.A sample services.xml files is included as \library\Directory- Service\DirectoryService-conf\services.xml.
Conclusion
This AppNote has demonstrated the process of creating a custom pluggable security realm using Novell exteNd Director for IBM WebSphere for both the Novell eDirectory (LDAP) and Windows NT/2000 environments.
For more information about Novell exteNd application development products, see http://www.novell.com/extend.
* Originally published in Novell AppNotes
Disclaimer
The origin of this information may be internal or external to Novell. While Novell makes all reasonable efforts to verify this information, Novell does not make explicit or implied claims to its validity.