How to Replicate User and Group Information Between exteNd Application Servers
Articles and Tips: article
Lead Consulting Engineer
Novell, Inc.
bburgess@novell.com
01 Jan 2003
This AppNote describes an easy way to move user and group information from one Novell exteNd Application Server to another using Novell exteNd Composer and the SilverCMD utility.
|
Topics |
Web application development, Novell exteNd products, XML, JDBC |
|
Products |
Novell exteNd Application Server, Novell exteNd Composer |
|
Audience |
developers |
|
Level |
intermediate |
|
Prerequisite Skills |
familiarity with exteNd application servers and XML |
|
Operating System |
n/a |
|
Tools |
none |
|
Sample Code |
yes |
Introduction
Have you ever built and tested a system with the Novell exteNd Application Server and then wondered how you were going to replicate those users and security groups over to the production server? Or perhaps you wanted to create a parallel test environment from an existing system? It is easy enough to move the data and source code, but the user and security group information usually had to be re-entered by hand.
This AppNote describes an easy way to move user and group information from one server to another using the exteNd Composer product and the SilverCMD utility with the exteNd Application Server. (If you don't have a copy of Novell exteNd Composer, give your Novell sales representative a call.)
Overview of the Process
Here is a quick overview of the process. In the SilverCMD utility, there is an option to create users and groups one at a time. Or, if you build a properly formatted XML file, you can populate a whole system (see the online help for details). This is great, but how do you create that file and how do you get the user and group information out of an existing system?
By using Novell exteNd Composer, you can extract the user and group information from a SilverMaster source database and write the results to a XML file. That file can then be used with the SilverCMD utility to create the users and groups for you.
If you're not familiar with Composer, it is a visual, standards-based integration server that supports the rapid creation, testing, and deployment of services-oriented applications. Composer uses XML as its native data language and, thus, easily delivers the sophisticated any-to-any mapping capabilities required by advanced portal, EAI, and B2B integration projects. A visual business process engine based on IBM's WSFL (Web Services Flow Language) standard enables modeling and automating complex processes. Processes can be modeled even before the components are built. With end-to-end animation capability, the user can quickly test and optimize a process. A Process Console provides monitoring and logging of the process.
In this AppNote, we are going to use Composer to extract the user and group information from a SilverMaster database by way of a JDBC connection. (For more information about Composer, see the product Web site at http://www.silverstream.com/Website/app/en_US/ProductsLanding.)
Step-by-Step Instructions
I've created a Composer project called SilverMasterExtract that extracts the user and group information and writes the XML file. Actually, this code is the culmination of ideas from a number of people; also, my colleague Pascal Barbier made some needed adjustments to the code. The resulting code now makes easy work of replicating user and group information between SilverMaster databases. (You can download the code from the AppNotes Download site at http://www.novell.com/coolsolutions/tools/15552.html.)
Figure 1 shows the general process of extracting the information from one SilverMaster database and then using the resulting XML file to populate the target SilverMaster database.
Figure 1: Process for replicating user and group security information between SilverMaster databases.

The steps are described in more detail below.
-
Install ExteNd Composer (Developer Edition is all that is needed).
-
Open the Composer project called "SilverMasterExtract_v2" which will perform the extract process.
-
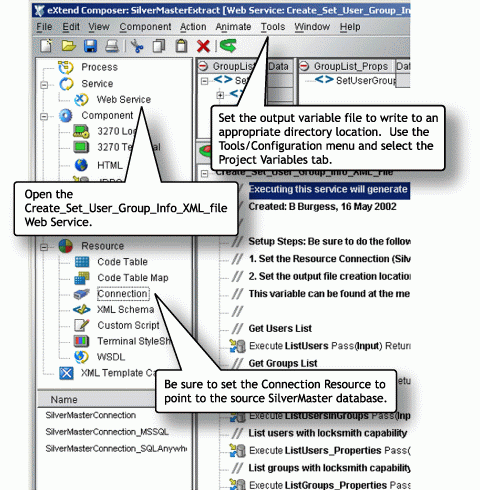
Set up your Resource Connection called "SilverMasterConnection" to connect to the source SilverMaster Database. Figure 2 is a partial screen shot of Composer's development environment, showing how to access the Resource Connection object. The other two connection resources are used only as examples of how to connect to a Sybase SQLAnywhere database and a Microsoft SQLServer database.
Figure 2: The Composer development environment.
-
Set the project variable to the following, as shown in Figure 3:
D:\S3_Projects\SilverMasterExtract_v2\SetUserGroupInfo\SetUserGroupInfo.xml
Figure 3: Configuring the OutputFile directory.
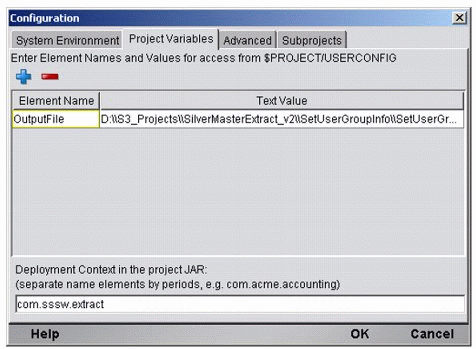
You may set it to any location, but for simplicity the XML file should be written to a location where the set_user_group_info.dtd file is located (more about that file later).
-
Open the WebService object called "Create_Set_User_Group_Info_XML_file".
-
Execute the process by clicking the green arrow just below the menus. You could also click the animate button, which is the button with a green arrow surrounding a red ball. Using this option you will need to step through the process, but it will allow you to see everything that is happening behind-the-scenes while the user and group information is extracted. You are now finished using Composer.

-
With the previous step complete, your XML file is now available. You might want to look at this XML file. It will contain the users and groups from the source server. One point to be aware of is that passwords are permanently encrypted on the application server, so this process can not extract passwords. I've written the Composer project to insert a default password for each of the user ids. Now open a command window or DOS box and navigate to the directory where the XML file is located.
-
Check to see that SilverCMD executes properly. To test that it is working, type the "SilverCMD -?" command at the prompt. If you see a list of keyword parameters, all is okay for the next step. If not, you need to get SilverCMD set up properly on your system. Most likely the problem will be a "pathing" issue. (See the SilverCMD online help for more information.)
-
With SilverCMD working properly, be sure that the "set_user_group_info.dtd" file is located in this same directory as the XML file. SilverCMD requires this DTD file to ensure the XML is in a valid format.
A copy of this file is included in the project's directory called ..\SetUserGroupInfo\. This location is the value of the project variable "OutputFile" that is set by default (see Step 4).
-
Now you are about to import the user and group information into the target SilverMaster database. Use the following command on the command line to execute the process:
silvercmd SetUserGroupInfo localhost -f SetUserGroupInfo.xml :i -U userid -P password
The localhost parameter is the location of the target SilverMaster server you want to replicate the information to. The userid and password parameters are required to access the server. This information will most likely need to be an administrator type of login.
After executing this command, you'll see the status of the import process in the command window. You've now replicated the user and group information to your target server.
That's all there is to it. You might want to verify that the users and groups were created as expected by using the Server Management Console (SMC).
Conclusion
Using Composer and SilverCMD makes the process of replicating user and group information between SilverMaster databases quick and easy. You'll want to remember this the next time you need to copy user and group information from one application server to another.
* Originally published in Novell AppNotes
Disclaimer
The origin of this information may be internal or external to Novell. While Novell makes all reasonable efforts to verify this information, Novell does not make explicit or implied claims to its validity.