The Novell Controls for ActiveX and Visual Basic: Adding Layouts to the NDS Directory
Articles and Tips: article
Software Engineer
Novell DeveloperNet University
madair@novell.com
01 Jun 2000
This article is the eighth installment in a series on Novell Directory Services (NDS) programming using the Novell Controls for ActiveX and Visual Basic. So far, we've talked about setting up your development environment, logging in to a directory, reading and searching NDS field values, writing data values to NDS fields, and creating directory entries. This article tells how to add new entry layouts to the NDS directory.
Layouts
For a quick review of the structures that comprise the NDS directory: fields, entries, and layouts, see "The Novell Controls for ActiveX and Visual Basic: Searching NDS Field Values," in Novell Developer Notes, October 1999, which is on the DeveloperNet web site, http://developer.novell.com/research/devnotes.htm.
The NDS Schema
If you've done database programming before, you're probably familiar with the term database schema. A database's schema is the set of rules that determine the database's structure. Things like:
The types of objects that must exist in the database
The types of objects that can exist in the database
Which types of objects can contain another object
The objects each object can contain
The data type of object attributes
The attributes each object must have
Additional attributes each object can have
Attributes an object can inherit
Once again, ActiveX uses terms that differ from corresponding terms in the NDS and general database contexts (and you'll find the terms used interchangeably in some documents). The following table gives some of the corresponding terms:
|
ActiveX term |
NDS term |
Database term |
|
Directory |
Tree |
Database |
|
Layout |
Object Class |
Class |
|
Entry |
Object |
Record |
|
Field |
Attribute |
Field Name |
|
Field Value |
Attribute Value |
Field Value |
|
Field Type |
Attribute Type or Syntax |
Field Type or Syntax |
Base Classes
When first installed, the NDS directory contains a default set field types and layouts that are sufficient for basic directory operations. The layouts (classes) in this default set are called base classes, and the relationship between the default attributes and these default classes is called the NDS base schema.
The base schema includes a number of general-purpose field types (the base attributes), including Integer, Boolean, Case Ignore String, Case Exact String, Time, and Telephone Number. These field types are used to build the layouts of the base schema. Figure 1 shows a simplified representation of the class inheritance of the NDS Base Schema.
Figure 1: The NDS Base Schema classes. 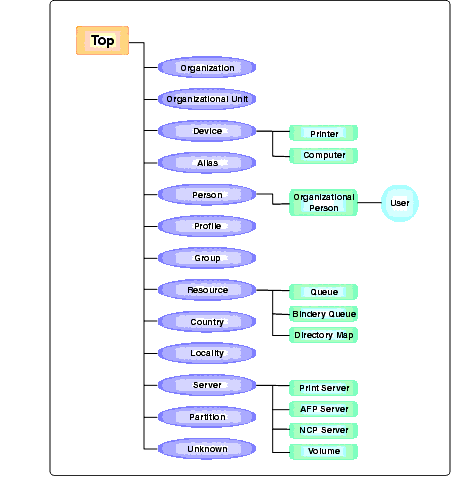
What this diagram doesn't show is how fields are inherited down the tree. Let's take a closer look at part of the base class inheritance. Figure 2 shows how the Device layout, which is based on the Top layout, inherits Top's mandatory and optional fields. The Computer and Printer layouts inherit Top's fields plus the Device layout's mandatory and optional fields. The Computer and Printer layouts also have their own fields.
Figure 2: Field inheritance for a few NDS base classes. 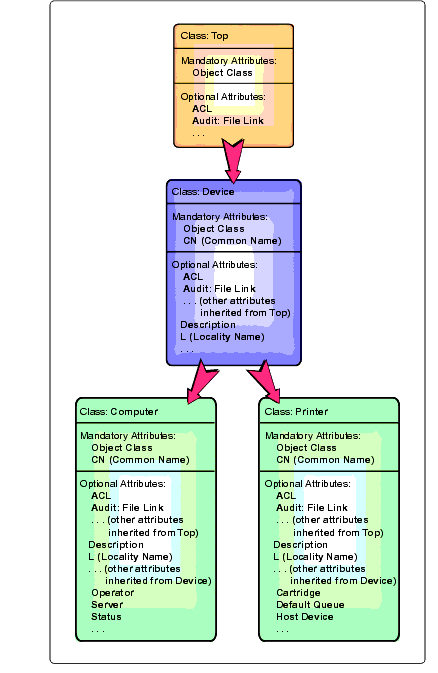
The NDS Schema Reference(available on the web at http://developer.novell.com/engsup/doc.htm) has a diagram and complete documentation for all the NDS base classes.
Extending the Schema
NDS is extensible. You can define new field types and layouts. The basic process for defining a new layout is:
Define the new field types required by the new layout. For each field type, you must assign a name, its syntax (integer or case ignore string, for example), and declare whether the field is single-valued or multivalued. (Multivalued fields can contain multiple data values. For example, the Group Membership field is multivalued, because users can belong to more than one group.)
Add the new layout to the NDS schema. You must specify the new layout's name and the name of the layout it is based on (inherits from).
Add your newly-defined field types to the new layout. You must specify whether the field is mandatory or optional.
Note: You can also add fields to layouts in the base schema (for example, to add a picture field to every user object) but you should be aware that it is difficult to undo changes to the base schema. If you add fields to a layout in the base schema, the only way to remove that field is to reinstall NDS.
While I'm giving advice and issuing warnings, I should also advise you not to use colons in the names of NDS fields and layouts. At one time, this was a popular way to name schema extensions, so they would be grouped together in an alphabetical list. Problems arise when someone uses LDAP to access an NDS directory, since colons are not legal characters in LDAP object names. Unfortunately, we didn't know that when we designed the example program for this lesson.
Removing Schema Extensions
Besides the important safety tip given above, all there really is to know about removing schema extensions is that you have to remove extensions in the reverse order of how you made them. You can't remove a field type from the schema until you've removed all the layouts that use it (or changed the layouts so they no longer use the field types you want to delete). And you can't remove a layout until you remove all the layouts that are based on it.
Example Program: ExtendSchema
ExtendSchema adds 3 fields and one layout to the NDS schema. The table below gives the name and type of each field. All three fields are single-valued.
|
Field Name |
Field Type (Syntax) |
Single or Multi-Valued |
|
DNU:OrgChart:Group Title |
Context Ignore String (SYN_CI_STRING) |
Single |
|
DNU:OrgChart:Group Manager |
Full Name/Distinguished Name(SYN_DIST_NAME) |
Single |
|
DNU:OrgChart |
Full Name/Distinguished Name (SYN_DIST_NAME) |
Single |
These 3 fields are optional fields of the OrgChart layout. The OrgChart layout extends the User layout (which extends Organizational Person, etc.) Figure 3 shows the OrgChart layout's class inheritance.
Figure 3: Fields and Layouts created by ExtendSchema. 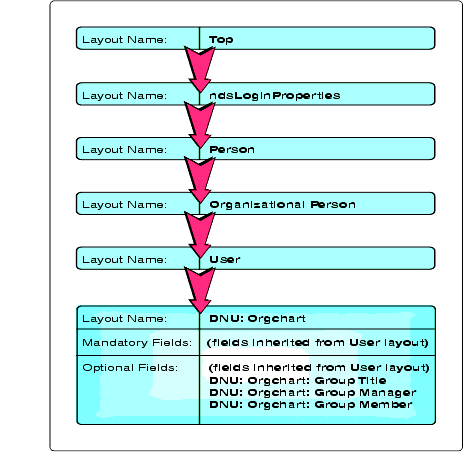
When ExtendSchema first executes, it displays a list of connected trees and allows the user to select one of them or log into another. After the user selects a tree to operate on, the user can choose to extend the schema, remove the OrgChart field and layout extensions, or exit the program. Figure 4 shows ExtendSchema's user interface.
Figure 4: Using ExtendSchema to add schema extensions.
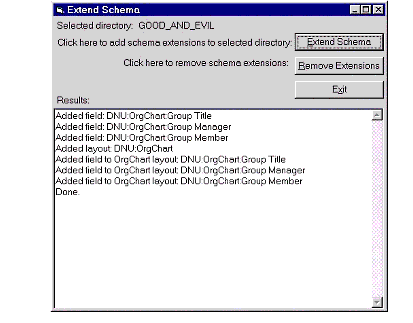
To build the ExtendSchema program:
Start Visual Basic and create a new "Standard EXE" project.
Add the Novell Directory and Session controls to your project:
Open the Components dialog by selecting "Components" from the Project menu, or by right-clicking the Toolbox and selecting "Components" from the pop-up menu.
Scroll down the list of components and check the boxes next to "Novell Directory Control" and "Novell Session Control."
Click "OK."
CreateEntry consists of 3 forms and one code module. As mentioned earlier, two of the forms can be copied from the ReadField program.
ConnectionsForm, LoginForm, and Module1
The example program from the previous article in this series, " The Novell Controls for ActiveX and Visual Basic: Reading and Writing NDS Stream Fields" (Novell Developer Notes, March 2000), had two forms, ConnectionsForm and LoginForm, and one code module, Module1. You will need to make one small change to each of the two forms and add a few lines to Module1, so you should create a new directory for the ExtendSchema program and copy ConnectionsForm.frm, LoginForm.frm, and Module1.bas to this new directory.
After copying the files, do the following:
Add Module1 to the project by selecting "Add Module" from the Project menu, clicking on the "Existing" tab, and selecting the Module1.bas file you just copied.
Add the forms to the project by selecting "Add Form" from the Project menu, clicking on the "Existing" tab, and selecting the ConnectionsForm.frm and LoginForm.frm files you just copied.
For each form, double-click anywhere on the form to open the associated code and change the line of code that says
CreateEntryForm.Show
to
ExtendSchemaForm.Show
Make ConnectionsForm the project's startup form by opening the project's property sheet from the Project menu, then selecting "ConnectionsForm" from the Startup Object drop-down menu.
Add the following declarations to Module1.bas (DefaultTree should already be declared):
Public De faultTree As StringPublic Const GroupTitleFieldName As String ="DNU:OrgChart:Group Title"Public Const GroupManagerFieldName As String ="DNU:OrgChart:Group Manager"Public Const GroupMemberFieldName As String ="DNU:OrgChart:Group Member"Public Const OrgChartLayoutName As String ="DNU:OrgChart"
ExtendSchemaForm
After the user has selected the directory that ExtendSchema is to operate on, ExtendSchemaForm loads and allows the user to extend the NDS schema with the OrgChart schema extensions or remove the extensions. Figure 5 shows ExtendSchemaForm's components and the attributes you must set when designing the form.
Figure 5: Designing ExtendSchemaForm. 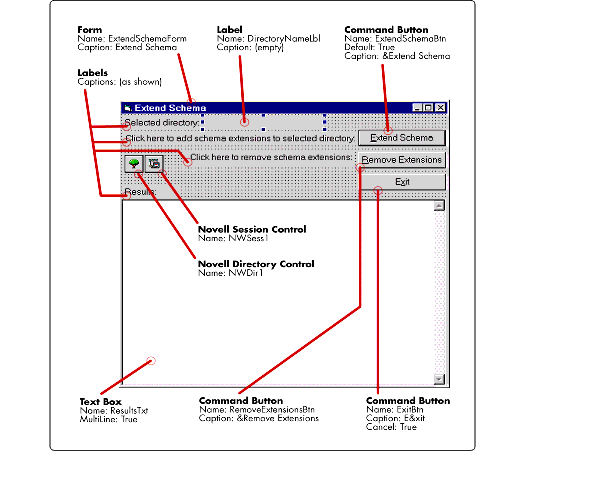
ExtendSchemaForm's Form_Load procedure uses the name of the tree the user selected to set the Session control's DefaultFullName and the Directory control's FullName properties. It also displays the name of the tree the user has selected. To enter the code that will be executed when ExtendSchemaForm loads, double-click on the form and enter the code shown below:
Private Sub Form_Load()


'Set context to root of the tree the user has selected


NWSess1.DefaultFullName = "NDS:\\" + DefaultTree + "\[Root]"


NWDir1.FullName = NWSess1.DefaultFullName
'Display the tree name


DirectoryNameLbl = DefaultTree
End Sub
Double-click on the Exit button and enter an End statement, so that the program will end when the user clicks the button:
Private Sub ExitBtn_Click() EndEnd Sub
ExtendSchemaForm's primary function is to extend the NDS schema with the OrgChart extensions. This occurs when the user clicks on the Extend Schema button. There are 3 steps involved in adding the Orgchart extensions:
Add 3 new field types to the schema: the Group Title, Group Manager, and Group Member fields.
Add the OrgChart layout as an extension of the User layout.
Add the 3 newly-defined field types as optional fields of the OrgChart layout.
Double-click on the Extend Schema button and add the code shown below.
Private Sub ExtendSchemaBtn_Click()

    Dim Layout As New NWDirLib.NWLayoutDescription

    Dim FType(2) As New NWDirLib.NWFieldType

    Dim FDesc(2) As New NWDirLib.NWFieldDescription

    On Error GoTo ErrorHandler

    'Define new field types

    FType(0).Name = GroupTitleFieldName

    FType(0).SingleValued = True

    FType(0).Syntax = NWDirLib.SYN_CI_STRING

    FType(1).Name = GroupManagerFieldName

    FType(1).SingleValued = True

    FType(1).Syntax = NWDirLib.SYN_DIST_NAME

    FType(2).Name = GroupMemberFieldName

    FType(2).SingleValued = False

    FType(2).Syntax = NWDirLib.SYN_DIST_NAME

    For i = 0 To 2

      added = (NWDir1.FieldTypes.Add(FType(i)))

      If added Then

        ResultsTxt.Text = ResultsTxt.Text + "Added field: " +

FType(i).Name + vbCrLf

    Else

      ResultsTxt.Text = ResultsTxt.Text + "Unable to add field: " +

FType(i).Name + vbCrLf

    End If
Next

    'define the OrgChart layout

    Layout.Name = OrgChartLayoutName

    Layout.BasedOn = "User"

    'add OrgChart layout to schema

    added = NWDir1.Layouts.Add(Layout)

    If added Then

      ResultsTxt.Text = ResultsTxt.Text + "Added layout: " +

Layout.Name + vbCrLf

    Else

      ResultsTxt.Text = ResultsTxt.Text + "Unable to add layout: " +

Layout.Name + vbCrLf

    End If

    'define attributes of OrgChart fields

    FDesc(0).Name = GroupTitleFieldName

    FDesc(0).Optional = True

    FDesc(1).Name = GroupManagerFieldName

    FDesc(1).Optional = True

    FDesc(2).Name = GroupMemberFieldName

    FDesc(2).Optional = True

    'add fields to OrgChart Layout

    For i = 0 To 2

      added = NWDir1.Layouts("DNU:OrgChart").Fields.Add(FDesc(i))

      If added Then

        ResultsTxt.Text = ResultsTxt.Text +

"Added field to OrgChart layout: " +

FDesc(i).Name + vbCrLf

      Else

        ResultsTxt.Text = ResultsTxt.Text +

"Unable to add field to OrgChart layout: " +

FDesc(i).Name + vbCrLf

      End If
Next

ResultsTxt.Text = ResultsTxt.Text + "Done." + vbCrLf

Exit Sub

ErrorHandler:

    If Err.Number = 615 Then

      ResultsTxt.Text = ResultsTxt.Text +

"OrgChart extensions already made to directory: " +

DefaultTree + vbCrLf

    ElseIf Err.Number = 672 Then

      ResultsTxt.Text = ResultsTxt.Text +

"Insufficient rights to directory: " +

DefaultTree + vbCrLf

    Else

      ResultsTxt.Text = ResultsTxt.Text + "Unhandled error " +

CStr(Err.Number) +

" encountered while extending directory: " +

DefaultTree + ": " + Err.Description + vbCrLf

    End If

End Sub
Finally, when the user clicks the Remove Extensions button, the ExtendSchema program removes the OrgChart extensions from the selected tree. There are two things you need to keep in mind when removing schema extensions:
You can't remove field types that have been associated with one or more layouts. You must first either remove any layouts that use the field types you want to delete, or modify the layouts so they no longer use the fields to be deleted.
You can't remove extensions to base layouts.
Double-click on the Remove Extensions button and enter the code associated with it, as shown below.
Private Sub RemoveExtenstionsBtn_Click()

    Dim removed As Boolean

    On Error GoTo ErrorHandler

    'Must remove OrgChart layout first, then field types

    If (NWDir1.Layouts.Remove(OrgChartLayoutName)) Then

      NWDir1.Layouts.Refresh

      ResultsTxt.Text = ResultsTxt.Text +

          "Removed OrgChart layout from schema" + vbCrLf

    Else

      ResultsTxt.Text = ResultsTxt.Text +

          "Unable to remove OrgChart layout" + vbCrLf

    End If

If (NWDir1.FieldTypes.Remove(GroupTitleFieldName)) And

    (NWDir1.FieldTypes.Remove(GroupManagerFieldName)) And

    (NWDir1.FieldTypes.Remove(GroupMemberFieldName)) Then

        NWDir1.FieldTypes.Refresh

    ResultsTxt.Text = ResultsTxt.Text +

    "Removed OrgChart field types from schema" + vbCrLf

  Else

    ResultsTxt.Text = ResultsTxt.Text +

      "Unable to remove OrgChart field types" + vbCrLf

  End If

Exit Sub

ErrorHandler:

    ResultsTxt.Text = ResultsTxt.Text +

      "Unable to remove schema extensions" + vbCrLf

    ResultsTxt.Text = ResultsTxt.Text + "Error = " +

      CStr(Err.Number) + ": " + Err.Description

End Sub
Save Your Work
At this point, you know all the tasks involved in developing a fairly sophisticated application using NDS. In the next two lessons in this series, we will integrate all these NDS programming tasks in one application. The first lesson is based on the ExtendSchema program developed in this lesson.
* Originally published in Novell AppNotes
Disclaimer
The origin of this information may be internal or external to Novell. While Novell makes all reasonable efforts to verify this information, Novell does not make explicit or implied claims to its validity.